

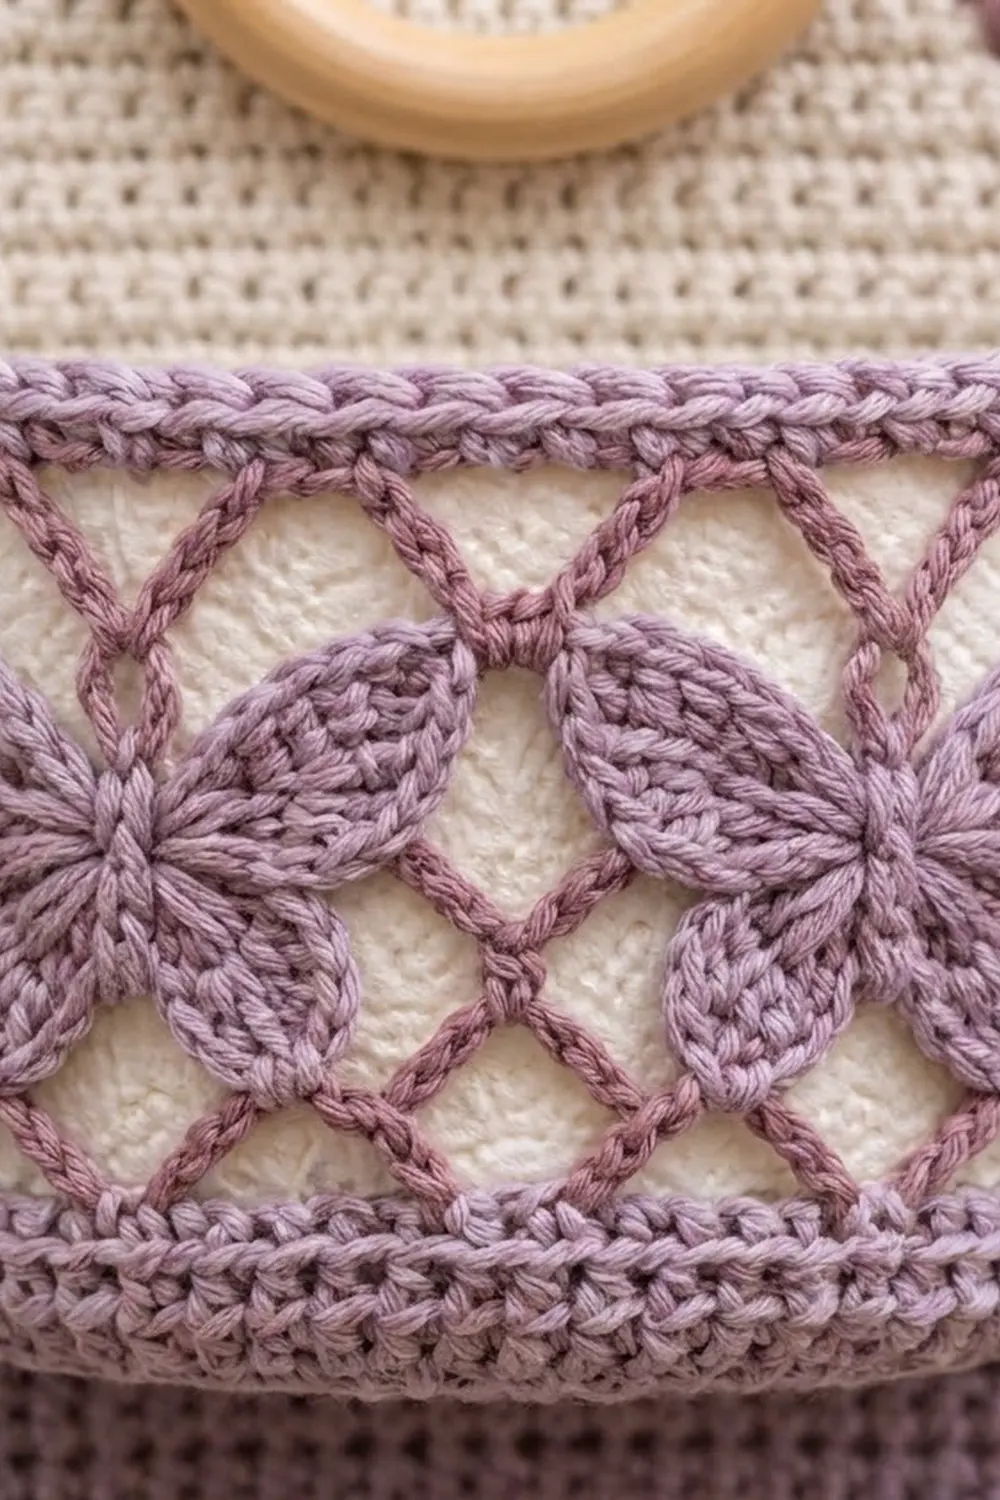
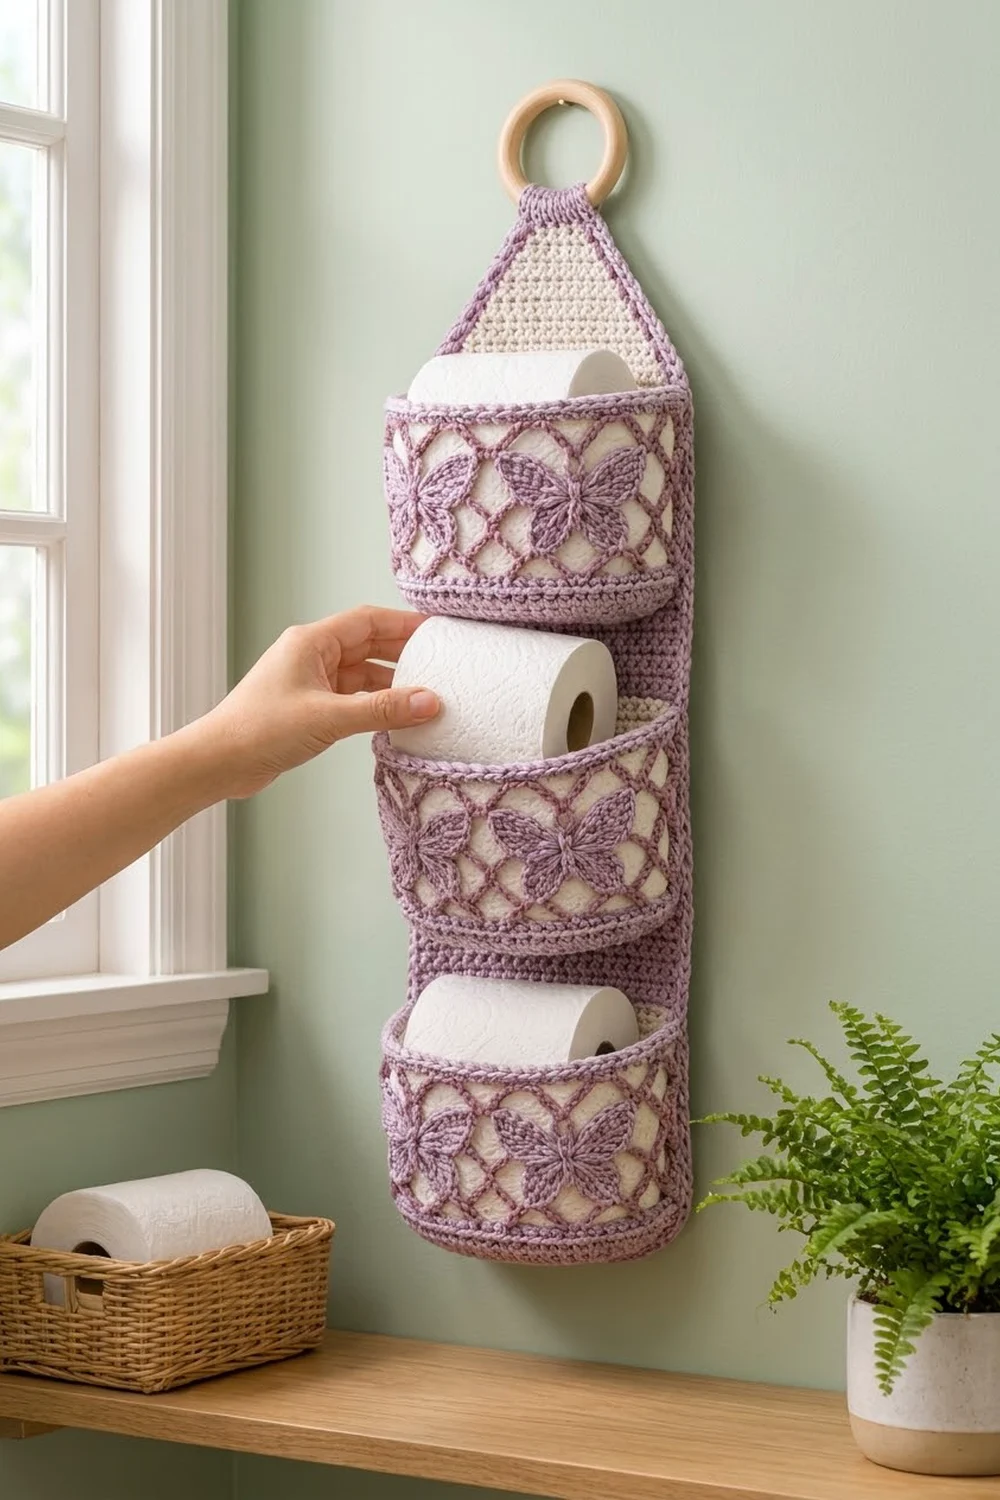
This hanging holder keeps three spare rolls close by and looks good doing it. A long cream backing panel hangs from a wooden ring. Three rounded pockets are stitched down its length, and each pocket has a dusty mauve diamond lattice with two lavender butterflies resting in it.
There are three colors. Cream is used for the backing, lavender for the pocket bands, butterflies and border, and dusty mauve for the open lattice. Cotton yarn gives clean stitches and holds the pocket shape well. The look is soft and slightly vintage, and it suits a bathroom.
This pattern uses US crochet terms. The finished holder is 6½ in (16.5 cm) wide and 27 in (68.6 cm) long before the tab is folded over the ring. Each pocket stands about 4¼ in (10.8 cm) tall.
To make it, you’ll crochet the panel flat in rows and taper the top into a tab. Each pocket is worked in the round from an oval base, the butterflies are made separately and sewn on, and the panel gets a two-round border. Then the pockets are sewn onto the panel and the tab is folded around the ring.
Finished Size and Construction
- Finished size: 6½ in × 27 in (16.5 × 68.6 cm), border included
- Skill level: Intermediate
- Terminology: US
- Yarn weight: Worsted (#4) cotton
- Hook: 4.5 mm (US 7)
- Number of pieces: 1 backing panel, 3 pockets, 6 butterflies, plus 1 wooden ring
- Layout: 3 pockets stacked vertically on the panel, 6½ in (16.5 cm) apart from the base of one pocket to the base of the next
- Pocket size: 16 in (40.6 cm) around × 4¼ in (10.8 cm) tall
- Panel size before border: 5½ in × 26 in (14.0 × 66.0 cm)
- Border depth: ½ in (1.3 cm) on every edge
Materials
Use a smooth worsted-weight cotton or cotton blend at about 170 m per 100 g. Cotton keeps the pockets firm and stands up to bathroom humidity.
- Cream (panel): 70 g / 119 m
- Lavender (pocket bands, butterflies, border, seams): 110 g / 187 m
- Dusty mauve (lattice): 35 g / 60 m
These quantities include a margin of about 15% for gauge swatches and seams.
Tools:
– 4.5 mm (US 7) crochet hook
– Wooden ring, 2½ in (6.4 cm) outer diameter
– Tapestry needle
– 8 locking stitch markers
– Rust-proof pins
– Measuring tape
Abbreviations (US Terms)
- ch: chain
- sl st: slip stitch
- sc: single crochet
- sc2tog: single crochet 2 together
- dc: double crochet
- tr: treble crochet
- BLO: back loop only
- sp: space
- st(s): stitch(es)
- RS: right side
Special stitch: reverse single crochet (rev sc). This is also called crab stitch. Work from left to right (left-handed crocheters work right to left). Insert the hook into the next stitch to the right, yarn over, pull up a loop, then yarn over and pull through both loops. It makes the twisted, cord-like edge.
Gauge and Checkpoints
Gauge: 16 sc × 16 rows = 4 in (10.2 cm) in sc, worked flat.
That works out to 4 stitches and 4 rows per inch. The square gauge is intentional, because it lets the border use exactly one stitch per row end.
Make one pocket before you start the panel. It uses every technique in the pattern, so it’s the best test piece.
Checkpoints:
– Pocket base after Rnd 8: about 6 in × 3½ in (15.2 × 8.9 cm)
– Pocket after Rnd 11: 16 in (40.6 cm) around
– Mesh band (Rnds 12–16): about 2½ in (6.4 cm) tall, slightly stretched
– Finished pocket: 4¼ in (10.8 cm) tall
– Panel after Row 16: 5½ in (14.0 cm) wide × 4 in (10.2 cm) tall
If your pieces come out too big, go down 0.5 mm in hook size. If they come out too small, go up 0.5 mm. Row gauge matters as much as stitch gauge here, so check both.
Backing Panel
Use cream throughout.
Row 1: Ch 23. Sc in 2nd ch from hook and in each ch across. Turn. (22 sts)
Rows 2–80: Ch 1, sc in each st across. Turn. (22 sts)
Checkpoint: 5½ in × 20 in (14.0 × 50.8 cm).
Taper
Row 81: Ch 1, sc2tog, sc in next 18 sts, sc2tog. Turn. (20 sts)
Row 82 and every even row through Row 96: Ch 1, sc in each st across. Turn.
Odd Rows 83–95: Ch 1, sc2tog, sc in each st to last 2 sts, sc2tog. Turn.
Stitch counts:
– Row 83: 18 sts
– Row 85: 16 sts
– Row 87: 14 sts
– Row 89: 12 sts
– Row 91: 10 sts
– Row 93: 8 sts
– Row 95: 6 sts
Row 96: Ch 1, sc in each st across. Turn. (6 sts)
The taper takes 16 rows and is 4 in (10.2 cm) tall.
Tab
Rows 97–104: Ch 1, sc in each st across. Turn. (6 sts)
Fasten off.
Checkpoint: The panel should measure 26 in (66.0 cm) long. That’s 80 + 16 + 8 = 104 rows at 4 rows per inch.
Pocket (Make 3)
Base (lavender)
Rnd 1: Ch 11. Sc in 2nd ch from hook, sc in next 8 ch, 3 sc in last ch. Working along the opposite side of the foundation chain, sc in next 8 ch, then 2 sc in the last ch (the same ch as the first sc). Join with a sl st to the first sc. (22 sts)
That count breaks down as 1 + 8 + 3 + 8 + 2 = 22.
Rnd 2: Ch 1. 2 sc in first st, sc in next 8 sts, 2 sc in each of next 3 sts, sc in next 8 sts, 2 sc in each of last 2 sts. Join. (28 sts)
Rnds 3–8: Each of these rounds uses the same repeat:
Ch 1. [Sc in next X sts, 2 sc in next st], sc in next 8 sts, [sc in next X sts, 2 sc in next st] 3 times, sc in next 8 sts, [sc in next X sts, 2 sc in next st] 2 times. Join.
| Rnd | X | Total sts |
|---|---|---|
| 3 | 1 | 34 |
| 4 | 2 | 40 |
| 5 | 3 | 46 |
| 6 | 4 | 52 |
| 7 | 5 | 58 |
| 8 | 6 | 64 |
Each of these rounds adds exactly 6 stitches, 3 at each curved end. The two 8-stitch straight sides never change.
Sides
Rnd 9: Ch 1, sc in BLO of each st around. Join. (64 sts)
The front loops left unworked form a crisp ridge where the base turns up into the sides.
Rnds 10–11: Ch 1, sc in each st around. Join. (64 sts)
Fasten off lavender.
Lattice (dusty mauve)
Rnd 12: Join mauve in any st. Ch 1, sc in same st, ch 5, skip 3 sts. Sc in next st, ch 5, skip 3 sts. Repeat from * 14 more times. Join to the first sc. (16 sc, 16 ch-5 loops)
The math works because each repeat uses 4 stitches, and 16 × 4 = 64.
Rnds 13–16: Sl st in next 3 ch to reach the center of the loop. Ch 1, sc in same loop. Ch 5, sc in next ch-5 loop. Repeat from * 14 more times. Ch 5 and join to the first sc. (16 loops)
Each new round sits in the centers of the loops below, which builds the diamond lattice. Fasten off mauve.
Top band (lavender)
Rnd 17 (conversion): Join lavender in any sc of Rnd 16. Ch 1. Sc in sc, 3 sc in next ch-5 loop. Repeat from * around. Join.
Stitch count: 16 sc worked into existing sc + 48 sc worked into loops = 64 sts.
Rnds 18–19: Ch 1, sc in each st around. Join. (64 sts)
Rnd 20: Ch 1, rev sc in each st around. Join. (64 sts)
Fasten off and weave in the ends.
Checkpoint: The pocket is 4¼ in (10.8 cm) tall and 16 in (40.6 cm) around.
Butterfly (Make 6)
Use lavender.
Rnd 1: Make a magic ring.
– Upper wing: ch 3, 4 tr into ring, ch 3, sl st into ring.
– Lower wing: ch 2, 3 dc into ring, ch 2, sl st into ring.
– Lower wing: repeat the lower wing.
– Upper wing: repeat the upper wing.
Pull the ring tight. You now have 4 wings, with the two upper wings on the outside of the sequence.
Rnd 2:
– Around each upper wing: 2 sc in ch-3 sp, 2 sc in each tr, 2 sc in ch-3 sp, then sl st in the sl st between wings. That’s 12 sc per upper wing.
– Around each lower wing: 2 sc in ch-2 sp, 2 sc in each dc, 2 sc in ch-2 sp, then sl st. That’s 10 sc per lower wing.
The round total is 12 + 10 + 10 + 12 = 44 sc. Fasten off and leave a 12 in (30.5 cm) tail.
Body: Use the tail to wrap the center vertically 3 times. Then embroider two straight stitches at the top, each ⅜ in (1.0 cm) long, for antennae.
Checkpoint: Each butterfly is 2 in × 1¾ in (5.1 × 4.4 cm).
Sew 2 butterflies onto the front of each pocket over Rnds 13–15. Center them side by side, about 1 in (2.5 cm) apart. Catch only the mauve chains so no stitches show inside the pocket.
Make All Pieces
- Cream: 1 backing panel
- Lavender + mauve: 3 pockets
- Lavender: 6 butterflies
Layout (top to bottom):
        [ ring ]
          /\
         /  \      tab + taper
        |    |
        | P3 |     panel rows 55–71
        |    |
        | P2 |     panel rows 29–45
        |    |
        | P1 |     panel rows 3–19
        |____|
Border
Add the border to the panel before you attach the pockets.
Border gauge: 1 sc per row end and 1 sc per stitch. At 4 rows and 4 stitches per inch, every edge lies flat without stretching.
Rnd 1 (lavender): With RS facing, join lavender at a bottom corner. Work sc evenly around, with 3 sc in each of the 4 outer corners. The 4 corners are the 2 bottom corners and the 2 top corners of the tab.
| Edge | Count |
|---|---|
| Bottom edge | 3 sc in first st, sc in next 20, 3 sc in last st = 26 |
| Each long side | 80 (Rows 1–80) + 18 (taper) + 8 (tab) = 106 |
| Top of tab | 3 sc in first st, sc in next 4, 3 sc in last st = 10 |
On the taper, work 1 sc in each of the 16 row ends. Work 2 sc instead of 1 in the row ends of Rows 81 and 89, which gives 18 sc per taper.
The round total is 26 + 106 + 106 + 10 = 248 sts. Join.
Rnd 2: Ch 1, rev sc in each st around. Join and fasten off. (248 sts)
Why the math works:
– The straight sides have 1 stitch per row at a square 4 × 4 per inch gauge, so they don’t ruffle or pull in.
– The diagonal taper is about 4½ in (11.4 cm) long. Its 18 stitches at 4 per inch match that length.
– 3 sc at each convex corner lets the border turn flat.
– The inner angle where the taper meets the tab is concave, so it gets no extra stitches.
After the border: 6½ in × 27 in (16.5 × 68.6 cm), adding ½ in (1.3 cm) on every edge.
Joining
Prepare each pocket: Flatten the pocket. Mark 22 consecutive stitches at the back of the Rnd 9 ridge, and mark the 22 stitches stacked directly above them on Rnd 19. Rnds 9–20 all have 64 sts, so the columns line up straight. The back is 22 sts and the front is 42 sts.
Placement: Measurements are from the bottom of the panel body, not including the border.
| Panel rows | Distance from bottom | |
|---|---|---|
| P1 | 3–19 | base on top of Row 2, ½ in (1.3 cm) |
| P2 | 29–45 | 7 in (17.8 cm) |
| P3 | 55–71 | 13½ in (34.3 cm) |
Sewing: Use lavender and whipstitch.
- Base: Sew the 22 back ridge stitches to the 22 sts of the panel row, one to one. This works because the pocket back and the panel width are both 22 sts.
- Sides: Sew each side column of the pocket to panel stitch 1 or stitch 22 over 17 rows, which is 4¼ in (10.8 cm). Use pins to space it evenly, because the lattice rounds are taller than sc rows.
- Rim: Sew the 22 back stitches of Rnd 19 to the top row of the pocket’s area on the panel, one to one. That’s Row 19, 45 or 71.
The remaining 42 front stitches, 10½ in (26.7 cm) of fabric, bow forward to form the rounded front.
Tension: Keep your stitches snug but not tight. If you see puckering on the panel, a seam is too tight.
Size check: P3’s rim sits 17¾ in (45.1 cm) from the panel bottom. That leaves 2¼ in (5.7 cm) before the taper.
Ring: Fold the top 1¼ in (3.2 cm) of the tab over the wooden ring to the back and whipstitch it down. The holder then hangs about 25¾ in (65.4 cm) below the ring.
Final Blocking
- Mist the panel lightly or steam it from above without touching the yarn.
- Pin the panel flat to 6½ in × 27 in (16.5 × 68.6 cm).
- Stuff each pocket with a toilet roll or a rolled towel to set its rounded shape.
- Gently pull the lattice so the diamonds open evenly.
- Let everything dry completely, about 24 hours.
- Remove the pins and hang the holder.
Final Quality-Control Checklist
- [ ] Panel is 22 sts wide and 104 rows long
- [ ] Taper ends at exactly 6 sts
- [ ] Border Rnd 1 has 248 sts and lies flat
- [ ] Each pocket has 64 sts on Rnds 8–11 and 17–20
- [ ] Each lattice round has 16 loops
- [ ] Butterflies are centered and match in size
- [ ] Pockets are evenly spaced, 6½ in (16.5 cm) apart from base to base
- [ ] Seams are secure, with no puckers
- [ ] All ends are woven in
- [ ] Ring tab is firmly stitched
Troubleshooting
- Pocket base cups up: Your tension is too tight on the curved ends. Loosen up, or go up one hook size for Rnds 1–8.
- Pocket base ruffles: Check that each round adds exactly 6 sts.
- Lattice loops sag: Use ch 4 instead of ch 5. The Rnd 17 count is unchanged.
- Border ripples on the sides: Your row gauge is shorter than 4 per inch. Skip 1 row end every 10 rows.
- Border pulls in: Add 1 sc every 10 row ends.
- Pocket tilts forward: Re-sew the rim more tightly to the panel.
Care
Hand wash in cool water and lay flat to dry, reshaping the pockets while they’re damp. Don’t tumble dry the holder, and remove the wooden ring before washing.
Final Notes
Here’s the measurement chain from start to finish:
- 4 stitches and 4 rows per inch
- 22-stitch panel: 5½ in (14.0 cm) wide, 26 in (66.0 cm) tall
- ½ in (1.3 cm) border: 6½ in × 27 in (16.5 × 68.6 cm)
- 64-stitch pockets: 16 in (40.6 cm) around, 4¼ in (10.8 cm) tall
- 22-stitch pocket back matches the 22-stitch panel width one to one
If each checkpoint matches, the finished holder will match too.
Happy crocheting!