

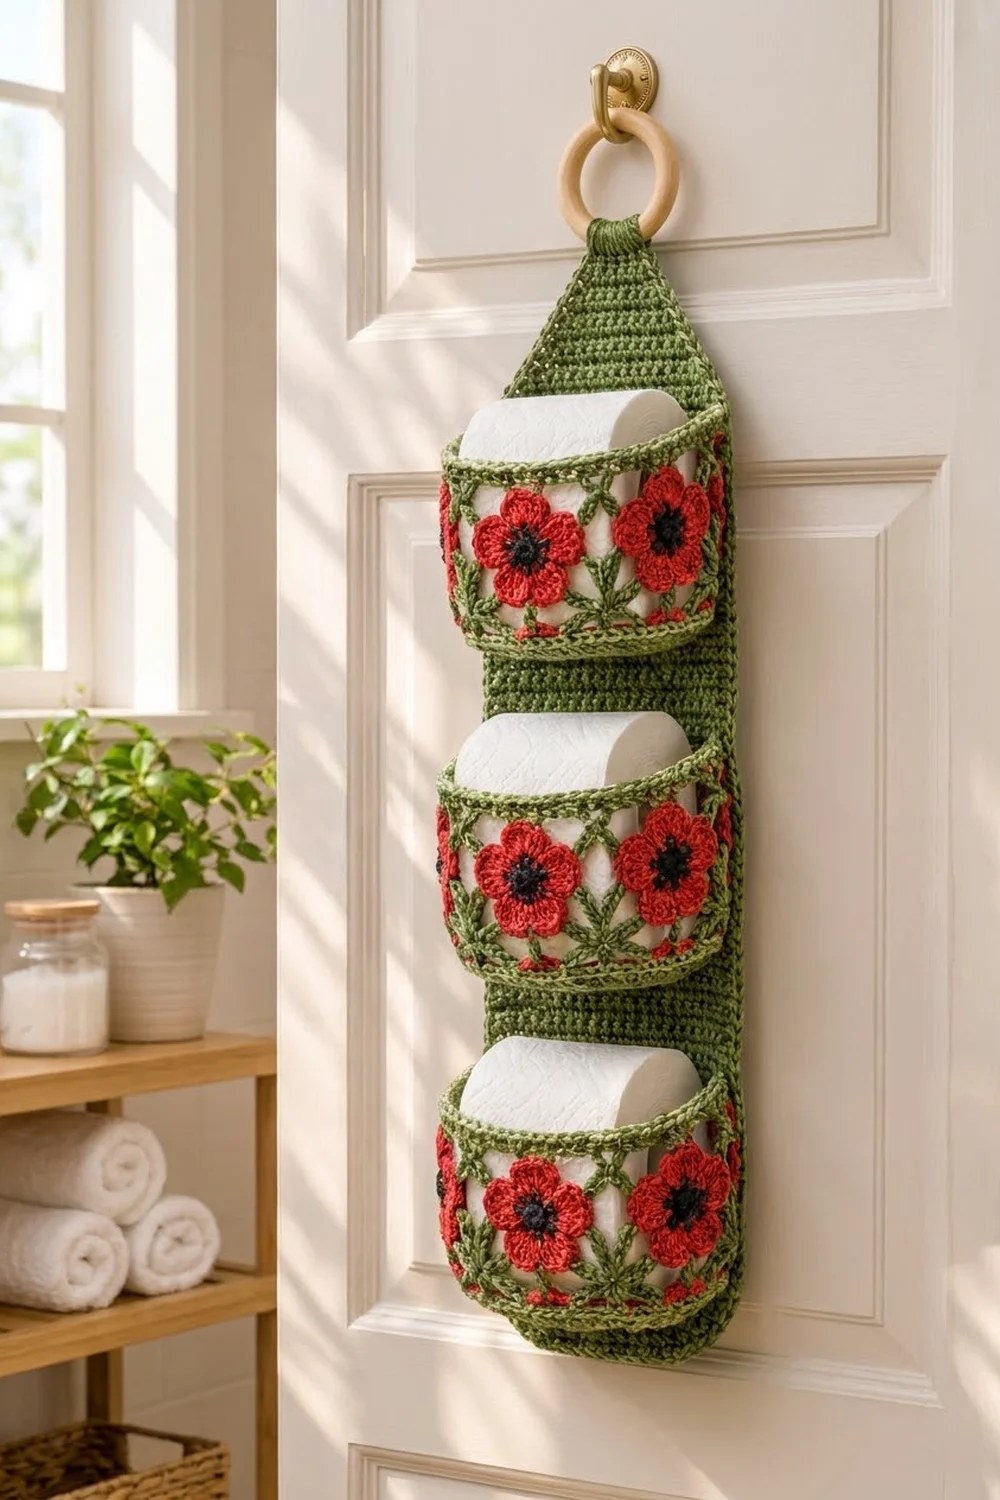
This hanging toilet paper holder brings a little garden into the bathroom. A long sage-green backing strip hangs from a wooden ring, and three rounded pockets each hold one roll. Every pocket has a solid green base, an open diamond lattice band, and a twisted rope rim.
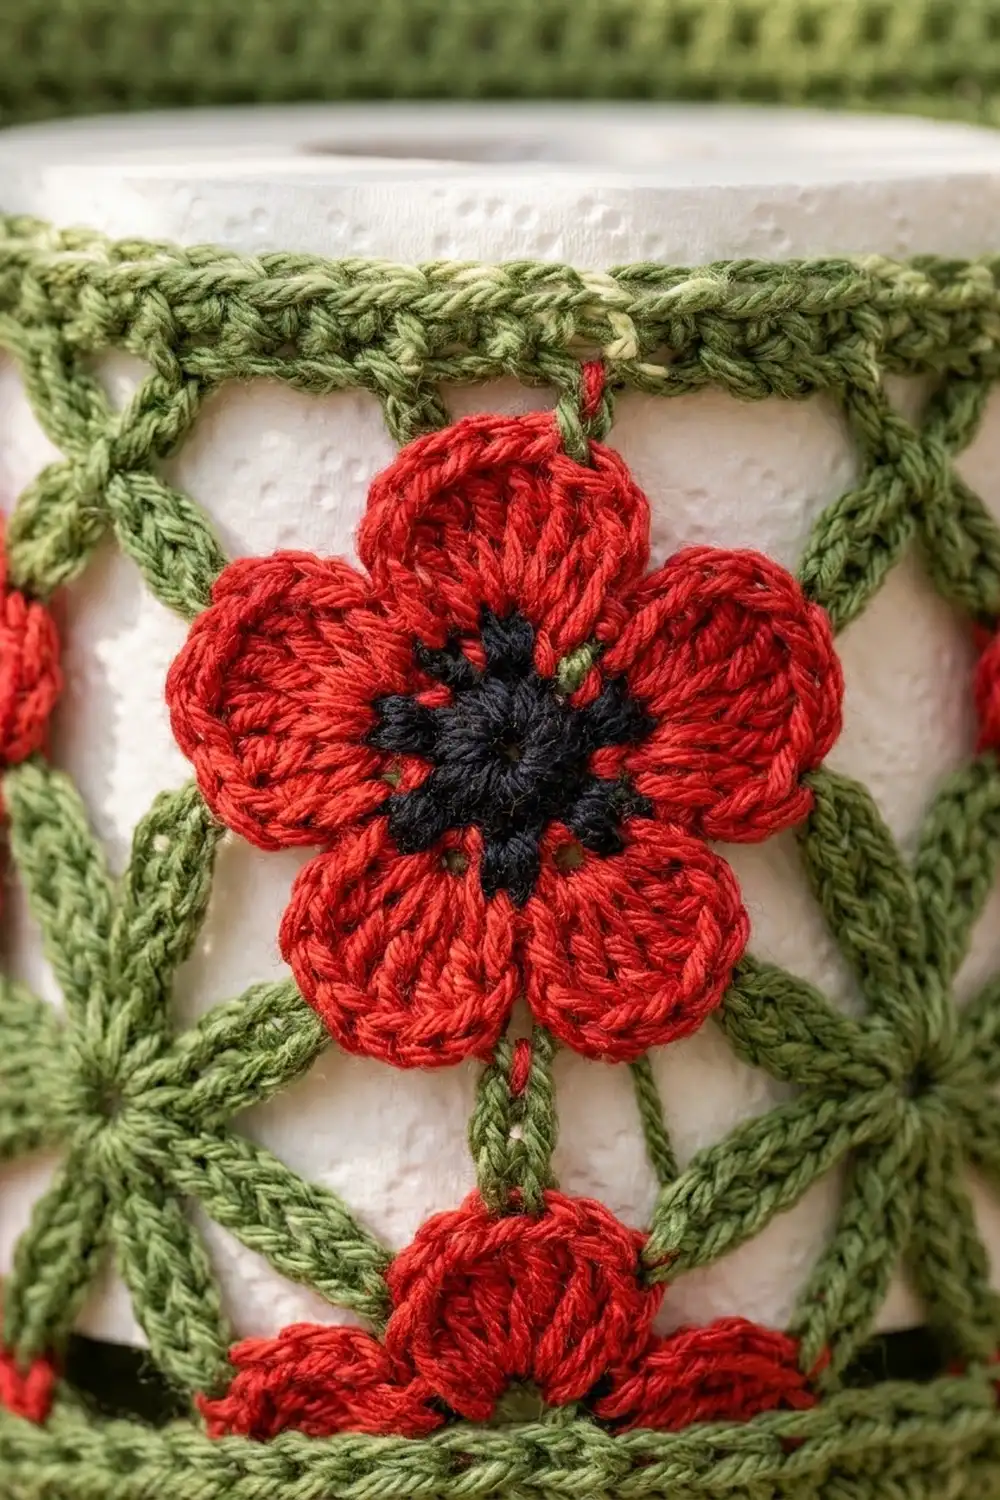
The colors are simple: sage green for the structure, bright red for the poppies, and black for the flower centers. Four poppies sit across the front of each pocket, with small green lazy-daisy starbursts tucked between them. The white paper roll shows through the lattice and acts as a background.
The pattern uses US crochet terms. Without the ring, the finished holder measures about 5.5 in (14.0 cm) wide and 27.25 in (69.2 cm) long. Each pocket is about 7.5 in (19.1 cm) across, 4 in (10.2 cm) deep and 4 in (10.2 cm) tall.
You crochet one flat strip in rows, three oval-based pockets in joined rounds and twelve small poppies. Then you border the strip, decorate the pockets and whipstitch them to the strip.
Finished Size and Construction
- Finished size: 5.5 in x 27.25 in (14.0 cm x 69.2 cm), excluding ring
- Skill level: Intermediate
- Terminology: US crochet terms
- Yarn weight: Worsted (#4) cotton
- Hook: 4.5 mm (US 7)
- Number of pieces: 1 backing strip, 3 pockets, 12 poppies (plus embroidery)
- Layout: 3 pockets stacked vertically, 7 in (17.8 cm) apart, center to center
- Piece size: each pocket 7.5 in (19.1 cm) across x 4 in (10.2 cm) deep x 4 in (10.2 cm) tall
- Size before border: strip 5 in x 27 in (12.7 cm x 68.6 cm) with the tab folded
- Border depth: 0.25 in (0.6 cm) on each edge
Materials
Choose a smooth, mercerized or combed worsted-weight cotton. Cotton holds the pocket shape, stands up to bathroom humidity, and shows the crab-stitch rope edge clearly. Avoid stretchy yarns, because the pockets will sag under a full roll.
- Color A, sage green: 220 g, about 396 m
- Color B, poppy red: 40 g, about 72 m
- Color C, black: 15 g, about 27 m
These amounts include a margin of about 15 percent for the gauge test, sewing and embroidery.
Tools:
– 4.5 mm (US 7) crochet hook
– Wooden ring, 3 in (7.6 cm) outer diameter
– Tapestry needle
– 6 locking stitch markers
– Rustproof pins
– Measuring tape and scissors
– Spray bottle and blocking surface
Abbreviations (US Terms)
- ch – chain
- sl st – slip stitch
- sc – single crochet
- hdc – half double crochet
- dc – double crochet
- sc2tog – single crochet 2 together
- inc – 2 sc in the same stitch
- BLO – back loop only
- sk – skip
- st(s) – stitch(es)
- RS – right side
Special stitch – crab stitch (reverse sc): Work from left to right (if you’re right-handed). Insert the hook into the next stitch to the right, yarn over and pull up a loop, then yarn over and pull through both loops. This makes the twisted rope edge on the pocket rims and the strip.
Gauge and Checkpoints
Gauge: 16 sc and 16 rows = 4 in (10.2 cm), worked firmly.
The square gauge matters. It lets you work exactly 1 border sc per row end, and it keeps the oval base flat with 6 increases per round.
Test one piece first. Make one pocket base (Rounds 1–8) before anything else. It checks both stitch width and round height.
Checkpoints:
– Pocket base after Round 8: about 7.5 in x 4 in (19.1 cm x 10.2 cm), with the outer edge about 18 in (45.7 cm) around
– Pocket wall after Round 18: about 4 in (10.2 cm) tall
– Poppy: about 2 in (5.1 cm) across
– Strip after Row 88: 5 in x 22 in (12.7 cm x 55.9 cm)
If your piece is too big, go down 0.5 mm. If it’s too small, go up 0.5 mm. If only the row height is off, change how far you pull up your loops instead of changing hooks.
Pocket (Make 3)
Use Color A. Join each round with a sl st to the first sc. The beginning ch 1 does not count as a stitch.
Oval Base
Foundation: Ch 15.
Round 1: 3 sc in 2nd ch from hook, sc in next 12 ch, 3 sc in last ch. Rotate and work along the underside of the chain: sc in next 12 ch; join. (30 sts: two end groups of 3 and two straight sides of 12)
Round 2: Ch 1, inc in each of next 3 sts, sc in next 12, inc in each of next 3, sc in next 12; join. (36)
Round 3: Ch 1, [sc 1, inc] 3 times, sc in next 12, [sc 1, inc] 3 times, sc in next 12; join. (42)
Round 4: Ch 1, [sc 2, inc] 3 times, sc in next 12, [sc 2, inc] 3 times, sc in next 12; join. (48)
Round 5: Ch 1, [sc 3, inc] 3 times, sc in next 12, [sc 3, inc] 3 times, sc in next 12; join. (54)
Round 6: Ch 1, [sc 4, inc] 3 times, sc in next 12, [sc 4, inc] 3 times, sc in next 12; join. (60)
Round 7: Ch 1, [sc 5, inc] 3 times, sc in next 12, [sc 5, inc] 3 times, sc in next 12; join. (66)
Round 8: Ch 1, [sc 6, inc] 3 times, sc in next 12, [sc 6, inc] 3 times, sc in next 12; join. (72)
Each round adds 6 stitches, all in the curved ends, so the straight sides stay at 12 stitches. The base should lie flat.
Wall
Round 9: Ch 1, sc BLO in each st around; join. (72) The unused front loops form a ridge where the base turns up into the wall.
Rounds 10–11: Ch 1, sc in each st around; join. (72)
Lattice Band
Round 12: Ch 1, sc in first st, [ch 5, sk 3 sts, sc in next st] 17 times, ch 5, sk last 3 sts; join to first sc. (18 ch-5 loops)
Math check: 1 sc plus 17 repeats of 4 sts uses 69 sts. Skipping the last 3 sts makes 72.
Round 13: Sl st in next 3 ch to reach the center of the first loop, ch 1, sc in same loop, [ch 5, sc in next loop] 17 times, ch 5; join to first sc. (18 loops)
Round 14: Repeat Round 13. (18 loops)
Each loop round adds about 0.75 in (1.9 cm), so the lattice band is about 2.25 in (5.7 cm) tall. Because each round’s loops are offset from the round below, they form a diamond mesh.
Rim
Round 15 (conversion round): Sl st into the first loop, ch 1, 4 sc in each ch-5 loop around; join. (18 loops x 4 sc = 72)
Rounds 16–17: Ch 1, sc in each st around; join. (72)
Round 18: Ch 1, crab stitch in each st around; join. (72) Fasten off and weave in ends.
Poppy (Make 12)
Round 1: With Color C, make a magic ring, ch 1, 10 sc in ring; join. (10) Pull the ring closed and fasten off.
Round 2: Join Color B in any st, ch 1, inc in each st around; join. (20)
Round 3: Ch 1, [sc in next st, (hdc, 2 dc) in next st, (2 dc, hdc) in next st, sc in next st] 5 times; join. (5 petals of 8 sts = 40 sts) Fasten off, leaving a 12 in (30.5 cm) tail.
Stamens: With Color C, work 5 French knots on Round 2, one at the base of each petal.
Backing Strip
Use Color A. Work in rows.
Foundation: Ch 21.
Row 1 (RS): Sc in 2nd ch from hook and in each ch across. (20)
Rows 2–88: Ch 1, turn, sc in each st across. (20)
Taper
Row 89: Ch 1, turn, sc2tog, sc in each st to last 2 sts, sc2tog. (18)
Row 90: Ch 1, turn, sc in each st across. (18)
Rows 91–102: Repeat Rows 89–90 six more times. (Each decrease row leaves 16, 14, 12, 10, 8, then 6 sts.)
The taper is 14 rows, about 3.5 in (8.9 cm).
Tab
Rows 103–114: Ch 1, turn, sc in each st across. (6)
The tab is 12 rows, about 3 in (7.6 cm), for a total of 114 rows. Fasten off.
Make All Pieces
- Color A: 1 strip, 3 pockets and 15 lazy-daisy starbursts (embroidered later)
- Color B: 12 poppy petal rounds
- Color C: 12 poppy centers and 60 French knots
Layout (top to bottom):
          [ ring ]
          / tab  \
         / taper  \
        |  strip   |
   [ Pocket 3: rows 61–76 ]
        |          |
   [ Pocket 2: rows 33–48 ]
        |          |
   [ Pocket 1: rows 5–20  ]
        |__________|
Joining
Work the strip border first (see Border, below). Then decorate the pockets and attach them.
Decorate each pocket. Flatten the pocket and choose 5 loops of Round 14 for the back, centered over one straight side of the base. The other 13 loops are the front. Number them 1 to 13 from left to right.
- Pin 4 poppies on the lattice, centered on the junctions between loops 2 and 3, 5 and 6, 8 and 9, and 11 and 12. This spaces the poppy centers 3 loops apart, about 3 in (7.6 cm).
- Sew on each poppy with its Color B tail, tacking the petal tips to the mesh so they lie flat.
- With Color A, embroider a 6-petal lazy-daisy starburst, about 1 in (2.5 cm) across, in the lower lattice (Round 12) below loops 1, 4, 7, 10 and 13. That makes 5 starbursts per pocket.
Attach to the strip. Whipstitch with Color A.
- Stitch-to-stitch logic: The 5 back loops span exactly 20 stitches in Rounds 8 and 17, and the strip is also 20 stitches wide. Sew 1 pocket stitch to 1 strip stitch with no easing.
- Base seam: Sew the 20 back ridge loops (left free by Round 9) across one strip row.
- Rim seam: Sew the 20 back stitches of Round 17 across the strip row 15 rows higher. The wall from Round 9 to Round 17 is about 3.75 in (9.5 cm), the same as 15 strip rows at gauge.
- Positions: Pocket 1 at rows 5 and 20, Pocket 2 at rows 33 and 48, Pocket 3 at rows 61 and 76. The pockets repeat every 28 rows, or 7 in (17.8 cm).
Tension: Pull each whipstitch snug but not tight. These seams carry the weight of the rolls, so go through both strip loops and knot securely at both ends.
Attach the ring. Fold the tab through the ring to the back and sew Row 114 to Row 103.
Size checkpoint: The strip should still measure 5.5 in x 27.25 in (14.0 cm x 69.2 cm). The top pocket’s rim seam sits 19 in (48.3 cm) above the bottom of Row 1.
Border
Work the border on the flat strip before attaching the ring or pockets. Use Color A.
Border gauge: 16 sts = 4 in (10.2 cm) across the top and bottom, and 16 row ends = 4 in (10.2 cm) along the sides.
Round 1 (trim round): With RS facing, join in the first stitch of Row 114.
– Tab top: 3 sc in first st, sc in next 4, 3 sc in last st. (6 sts + 4 extra = 10)
– Long side: 1 sc in each row end down the side, including the taper. (114)
– Bottom edge: Working into the foundation chain, 3 sc in first ch, sc in next 18, 3 sc in last ch. (20 sts + 4 extra = 24)
– Long side: 1 sc in each row end up the side. (114)
– Join to first sc. (10 + 114 + 24 + 114 = 262)
Round 2: Ch 1, crab stitch in each st around; join. (262: 10 top, 114 per side, 24 bottom) Fasten off.
Why the math works: With square gauge, a row end is as wide as a stitch, so 114 row ends take 114 sc without ruffling or pulling in. Each corner gets 2 extra stitches, which is enough to turn a square corner. The taper edge is slightly longer than its rows, but blocking evens out the small difference.
Final Blocking
- Spray the strip until it is damp but not soaked.
- Pin it flat to 5.5 in x 27.25 in (14.0 cm x 69.2 cm), keeping the taper symmetrical.
- Fill each pocket with a paper roll in a plastic bag, or with a rolled towel.
- Mist the pockets and smooth the lattice so the diamonds open evenly.
- Press each poppy flat with your fingers and round out the petals.
- Let everything dry completely before sewing or hanging.
Final Quality-Control Checklist
- Each pocket has 72 sts in Rounds 8, 9, 15, 16, 17 and 18.
- Each lattice round has 18 ch-5 loops.
- Each poppy has 5 petals and 40 sts in Round 3.
- The strip has 114 rows and 262 border sts.
- The pockets are level and 7 in (17.8 cm) apart.
- All seams are knotted and all ends are woven in.
- The ring tab is sewn through both layers.
Troubleshooting
- The base ruffles: Your rounds are too short. Check your row gauge or use a smaller hook.
- The base cups before Round 9: Your stitches are too tight. Go up a hook size.
- The lattice looks twisted: Make sure each sc in Rounds 13–14 goes into a loop, not around a single chain.
- A pocket sags forward: Add a third seam, tacking the back of Round 15 to the strip.
- The long border edges wave: Your rows are short. Skip 1 row end in every 10.
- A poppy cups: Work the petal stitches more loosely, or block it flat.
Care
Hand wash in cool water with mild soap, roll in a towel and dry flat. While it’s damp, reshape each pocket around a roll.
Final Notes
Everything in this pattern follows from one gauge: 16 sts and 16 rows per 4 in (10.2 cm). At that gauge, the 72-stitch pocket base is about 18 in (45.7 cm) around. Eighteen lattice loops of 4 stitches each turn back into 72 stitches at the rim. The 5 back loops equal 20 stitches, the same width as the strip. The strip’s 114 rows take 114 border stitches per side, for a finished holder of 5.5 in x 27.25 in (14.0 cm x 69.2 cm).
Happy crocheting!