

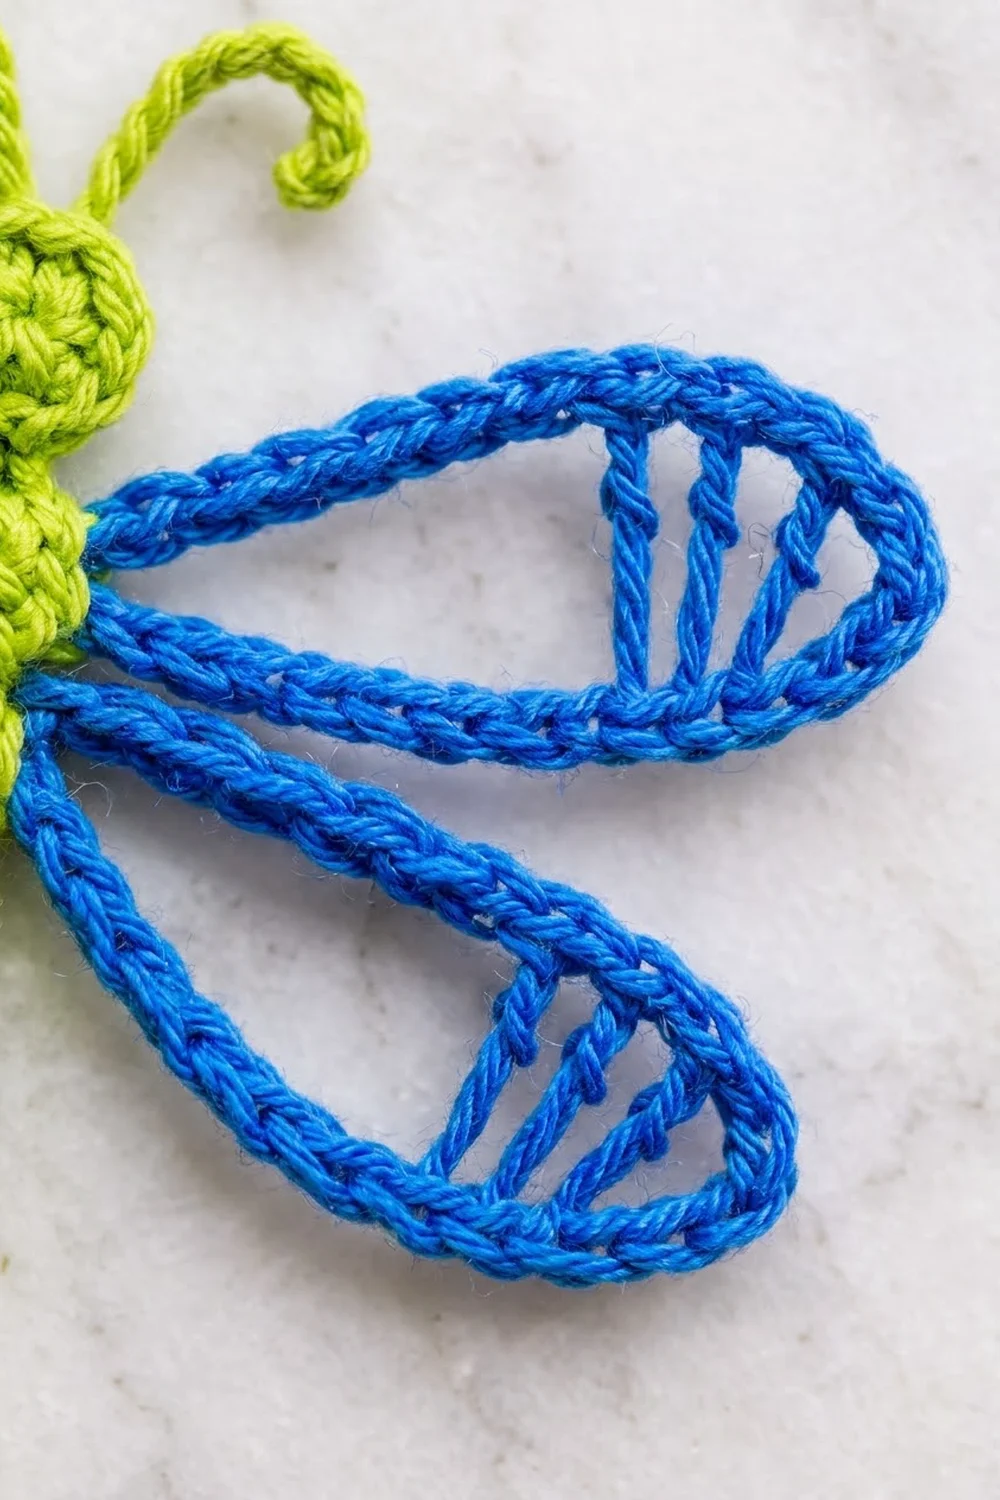
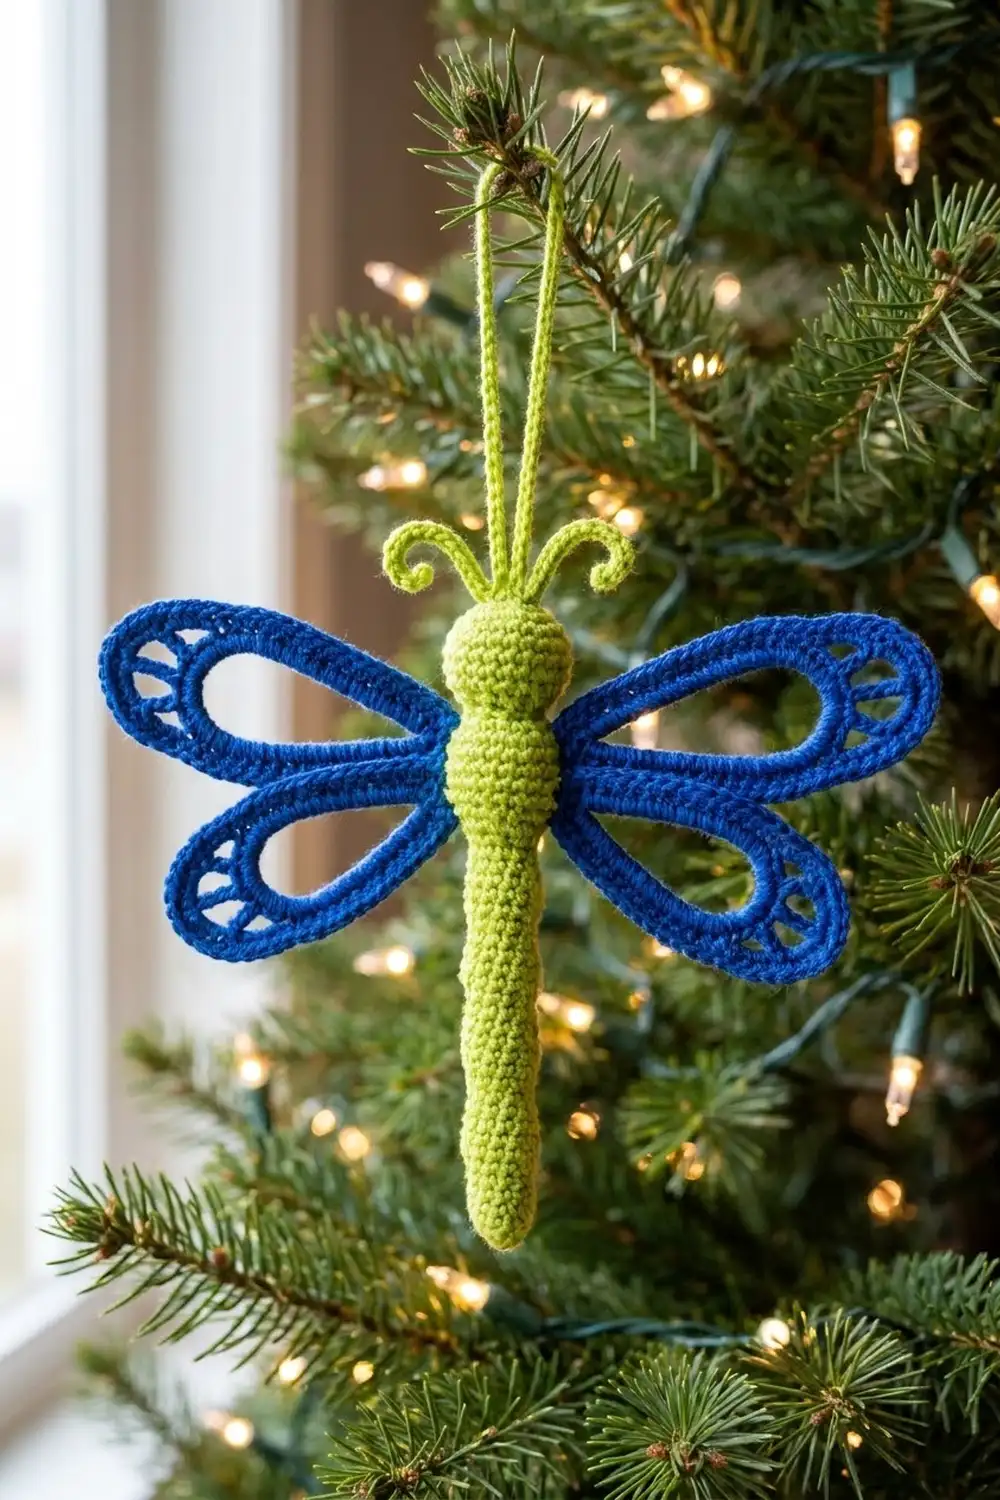
This lightweight dragonfly ornament has a lime green body and open blue wings. The wings are outlined in single crochet, and the tip of each wing is crossed by small treble “veins,” which makes it look like stained glass. It looks great hanging on a Christmas tree, but it also works on a gift tag, a window, or a car mirror.
The design uses two colors: bright lime for the head, thorax, abdomen, antennae and hanging loop, and royal blue for the four wings. The finished ornament is flat, airy and graphic, so it reads clearly from across the room.
All instructions use US crochet terms. The finished dragonfly is 5.5 in (14.0 cm) across the wings and 4.5 in (11.4 cm) from the top of the head to the tail. The antennae add 0.75 in (1.9 cm), and the hanging loop is 3 in (7.6 cm) tall.
You make it in this order:
– A small flat head round.
– A chain that becomes the abdomen and thorax as you work back along it.
– Four chain-loop wings in blue, each covered in single crochet and finished with tip veins.
– The antennae and hanging loop last.
Everything is worked as one piece, so you only sew in ends. There is no assembly.
Finished Size and Construction
- Finished size: 5.5 in (14.0 cm) wingspan × 4.5 in (11.4 cm) body length
- Skill level: Easy-intermediate
- Terminology: US crochet terms
- Yarn weight: DK (light #3)
- Hook: 3.5 mm (E-4)
- Number of pieces: 1 (single piece, no joining)
- Layout: Central body with 2 wings on each side
- Piece size: each wing 2.5 in (6.4 cm) long × 0.75 in (1.9 cm) wide; head 0.75 in (1.9 cm) across
- Size before border: each bare 24-chain wing loop is about 2.4 in (6.1 cm) long when folded flat
- Border depth: the single crochet wing edging adds about 0.125 in (0.3 cm) all around
Materials
Yarn advice: Use a smooth, tightly plied DK cotton or a cotton-acrylic blend. Mercerized cotton gives the crisp, slightly shiny stitch definition you want here, and it holds the wing shape well after blocking. Avoid fuzzy or very stretchy yarns, because the open wings will sag.
- Color A, Lime Green: 6 g / about 14 m (15 yd), for the head, body, antennae and hanging loop
- Color B, Royal Blue: 8 g / about 18 m (20 yd), for all four wings
The quantities above include a margin of about 25% for your gauge swatch and weaving in ends.
Tools:
– 3.5 mm (E-4) crochet hook
– Tapestry needle
– Scissors
– Stitch markers (2 or more)
– Blocking mat and rustproof pins
– Spray bottle with water
– Optional: diluted fabric stiffener
Abbreviations (US Terms)
- ch – chain
- sl st – slip stitch
- sc – single crochet
- hdc – half double crochet
- tr – treble crochet
- MR – magic ring
- st(s) – stitch(es)
- FLO – front loop only
Special stitch – Vein tr: Yarn over twice. Insert the hook into the indicated sc on the wing edging, pull up a loop, then (yarn over, pull through 2 loops) 3 times. The stitch spans the gap between the inner chain line and the outer edge.
Gauge and Checkpoints
Gauge: 20 sc = 4 in (10.2 cm), which is 5 sc per 1 in (2.5 cm). For a chain gauge, 10 ch should measure 2 in (5.1 cm).
Test first: Make the head and the body (Parts 1–2) before you start the wings. If those measurements match, everything else will fit.
Checkpoints:
– After the head: 0.75 in (1.9 cm) across.
– After the body: 4.5 in (11.4 cm) from the top of the head to the tail tip, with the thorax 1 in (2.5 cm) long and the abdomen 2.8 in (7.1 cm) long.
– After the first wing: 2.5 in (6.4 cm) long from the thorax to the tip.
– At the end: 5.5 in (14.0 cm) wingspan.
If your piece is too big: Go down to a 3.25 mm (D-3) hook, or chain more tightly.
If your piece is too small: Go up to a 3.75 mm (F-5) hook.
Do not change the stitch counts. The wing proportions depend on them.
Pattern
Part 1: Head (Color A)
Rnd 1: MR, 6 sc into the ring, sl st to the first sc. (6 sts)
Rnd 2: Ch 1, 2 sc in each st around, sl st to the first sc. (12 sts)
Pull the ring closed tightly. The head should lie flat and measure 0.75 in (1.9 cm) across. Do not fasten off.
Part 2: Body (Color A)
The working stitch sits at the bottom of the head. Place a marker in this sl st and call it the head base.
Foundation: Ch 20.
Row 1: Starting in the 2nd ch from the hook, work toward the head:
– Abdomen: sc in the 2nd ch from the hook and in each of the next 13 ch. (14 sc)
– Thorax: hdc in each of the next 5 ch. (5 hdc)
– Sl st into the head base to join.
Count: 14 sc + 5 hdc = 19 sts, worked over the 19 usable chains (20 ch minus the 1 skipped).
The sc section makes a tight, ridged abdomen. The hdc section is slightly taller, so the thorax looks thicker, just like the real insect.
Fasten off and leave a 4 in (10.2 cm) tail.
Checkpoint: The abdomen is 2.8 in (7.1 cm), the thorax is 1 in (2.5 cm), and the head is 0.75 in (1.9 cm), for a total of about 4.5 in (11.4 cm).
Number the thorax stitches from the abdomen up: hdc 1 is next to the last sc, and hdc 5 is next to the head.
– Upper wings attach at hdc 4.
– Lower wings attach at hdc 2.
– The right-side wings go into the tops of these hdc.
– The left-side wings go into the free loops of the foundation chain directly opposite them.
Mark all four attachment points.
Part 3: Wings (Color B, make 4, all attached directly)
Work each wing the same way. Start with the right upper wing, at the top of hdc 4.
Step A – Frame: Join Color B with a sl st in the marked thorax st. Ch 24, then sl st back into the same thorax st to close the loop. (24-ch loop)
Step B – Edging: Work 30 sc over the chain loop, inserting the hook into the center of the loop rather than into the individual chains. Sl st into the thorax st. (30 sc)
This is a conversion round: 24 sts covered one-for-one + 6 extra sts = 30 sc. The 6 extra stitches let the edging curve around the tip without cupping. Each side of the wing has 15 sc. The tip falls between sc 15 and sc 16.
Fold the wing flat into a teardrop, with sc 1–15 along the top edge and sc 16–30 along the bottom edge.
Step C – Inner line and veins: Do not fasten off.
1. Ch 8. This chain runs along the inside of the wing toward the tip.
2. Vein tr into sc 12, ch 1.
3. Vein tr into sc 14, ch 2.
4. Vein tr into sc 17, ch 1.
5. Vein tr into sc 19.
6. Ch 8 back toward the body, and sl st into the same thorax st.
Vein count: 4 tr. Two veins sit on each side of the tip, at sc 12/14 and sc 17/19, which are mirror positions around the tip at 15.5. That keeps the fan symmetrical. The two 8-ch lines form a narrow inner loop, and the tr stitches bridge it to the outer edge, leaving an open window at the tip.
Fasten off. Leave a 4 in (10.2 cm) tail.
Checkpoint: The wing is 2.5 in (6.4 cm) long and about 0.75 in (1.9 cm) wide at its widest point.
Remaining wings: Repeat Steps A–C in the following order:
– Right lower wing, at hdc 2.
– Left upper wing, at the free loop opposite hdc 4.
– Left lower wing, at the free loop opposite hdc 2.
Make sure every wing’s sc 1–15 side faces the head, so the veins mirror correctly on both sides.
Part 4: Antennae and Hanging Loop (Color A)
Join Color A in the head st directly opposite the head base, at the top center of the head.
Hanging loop: Ch 30, sl st into the same st. (30-ch loop, about 3 in / 7.6 cm tall when folded)
Right antenna: Sl st into the next st to the right.
1. Ch 7.
2. Working back along the chain: 2 sc in the 2nd ch from the hook, 2 sc in the next ch. (4 sc, the curl)
3. Sl st in each of the remaining 4 ch.
4. Sl st into the head st.
Left antenna: Sl st back across the top center and into the next st to the left. Repeat the antenna steps.
The increases at the tip make each antenna curl into a hook shape. Each antenna is about 0.75 in (1.9 cm) long.
Fasten off and weave in all ends. Run the blue tails through the edging of their own wings so they don’t show through the open frames.
Border
This ornament has no separate outer border. The single crochet edging on each wing (Step B) does the job of a border, so its math matters:
- Border gauge: 5 sc per 1 in (2.5 cm), worked over the chain rather than into it.
- Starting count: 24-ch frame.
- Edging round: 24 sts covered one-for-one + 6 added = 30 sc in total.
- Count per side: 15 sc along the top edge and 15 sc along the bottom edge. There are no separate corner stitches, because the teardrop tip is a smooth curve, not a corner.
Why the math works: The 15 sc on each side at 5 sc per inch gives 3 in (7.6 cm) of edge along each curved side. Because the curve bows outward, that 3 in of edge covers a straight length of about 2.5 in (6.4 cm). The 6 extra stitches (25% more than the chain count) are what let the sc lie flat without stretching the frame. With fewer than 30 sc the wing puckers. With more, it ruffles.
Final wingspan: 2 wings × 2.5 in (6.4 cm) + 0.5 in (1.3 cm) of body = 5.5 in (14.0 cm).
Final Blocking
- Lightly spray the ornament with water until it is damp but not dripping.
- Lay it face up on the blocking mat.
- Pin the body straight. Check that it measures 4.5 in (11.4 cm) from the top of the head to the tail.
- Shape each wing into an even teardrop. Pin the tip of each wing so the wingspan measures 5.5 in (14.0 cm).
- Angle the upper wings slightly up and the lower wings slightly down, leaving a 0.25 in (0.6 cm) gap between the wings on the same side.
- Pin the inner chain line so the veins stand straight and the window at the tip stays open.
- Curl the antennae outward with your fingers.
- Optional: brush on diluted fabric stiffener, focusing on the wings.
- Let it dry completely, at least 6 hours, before you unpin it.
Final Quality-Control Checklist
- Head is 0.75 in (1.9 cm) across and lies flat.
- Body is 4.5 in (11.4 cm) long and straight, with 14 sc + 5 hdc.
- Each wing has 30 sc of edging (15 per side) and 4 vein tr.
- Wings are 2.5 in (6.4 cm) long, and the wingspan is 5.5 in (14.0 cm).
- The left wings mirror the right wings.
- Both antennae curl outward evenly.
- The hanging loop is centered and 3 in (7.6 cm) tall.
- All ends are hidden inside the edging, and none cross an open wing window.
Troubleshooting
- Wing cups or curls inward: Too few sc over the loop, or tight tension. Re-work the edging with exactly 30 sc, keeping them relaxed.
- Wing edge ruffles: Too many sc. Count again; 15 per side is the target.
- Veins slant or bunch up: The inner chain is too tight. Chain loosely, or use a hook one size larger for those 8 ch only.
- Body twists into a spiral: This is common with chain-based cords. Block it straight while damp, using pins every 0.5 in (1.3 cm).
- Thorax looks no thicker than the abdomen: Make sure the last 5 stitches are hdc, not sc.
- Antennae don’t curl: Check that you worked 2 sc in each of the first two chains.
- Wings sit uneven on the left side: You may have worked into the wrong free loop. Count from the abdomen using the thorax numbering.
Care
Spot clean or hand wash in cool water, then reshape and lay flat to dry. If you stiffened the ornament, re-apply stiffener after washing.
Final Notes
The measurement chain is short and easy to check as you go:
– The head is 0.75 in (1.9 cm).
– The 20-ch body gives 14 sc of abdomen at 2.8 in (7.1 cm) and 5 hdc of thorax at 1 in (2.5 cm), for a body of 4.5 in (11.4 cm).
– Each 24-ch wing frame takes 30 sc of edging, 15 per side, and makes a 2.5 in (6.4 cm) wing.
– Two wings plus the body give a 5.5 in (14.0 cm) wingspan.
If you hit the gauge on the head and body, the wings will follow. Make a few in different blues and greens for a whole flight of dragonflies on your tree.
Happy crocheting!