

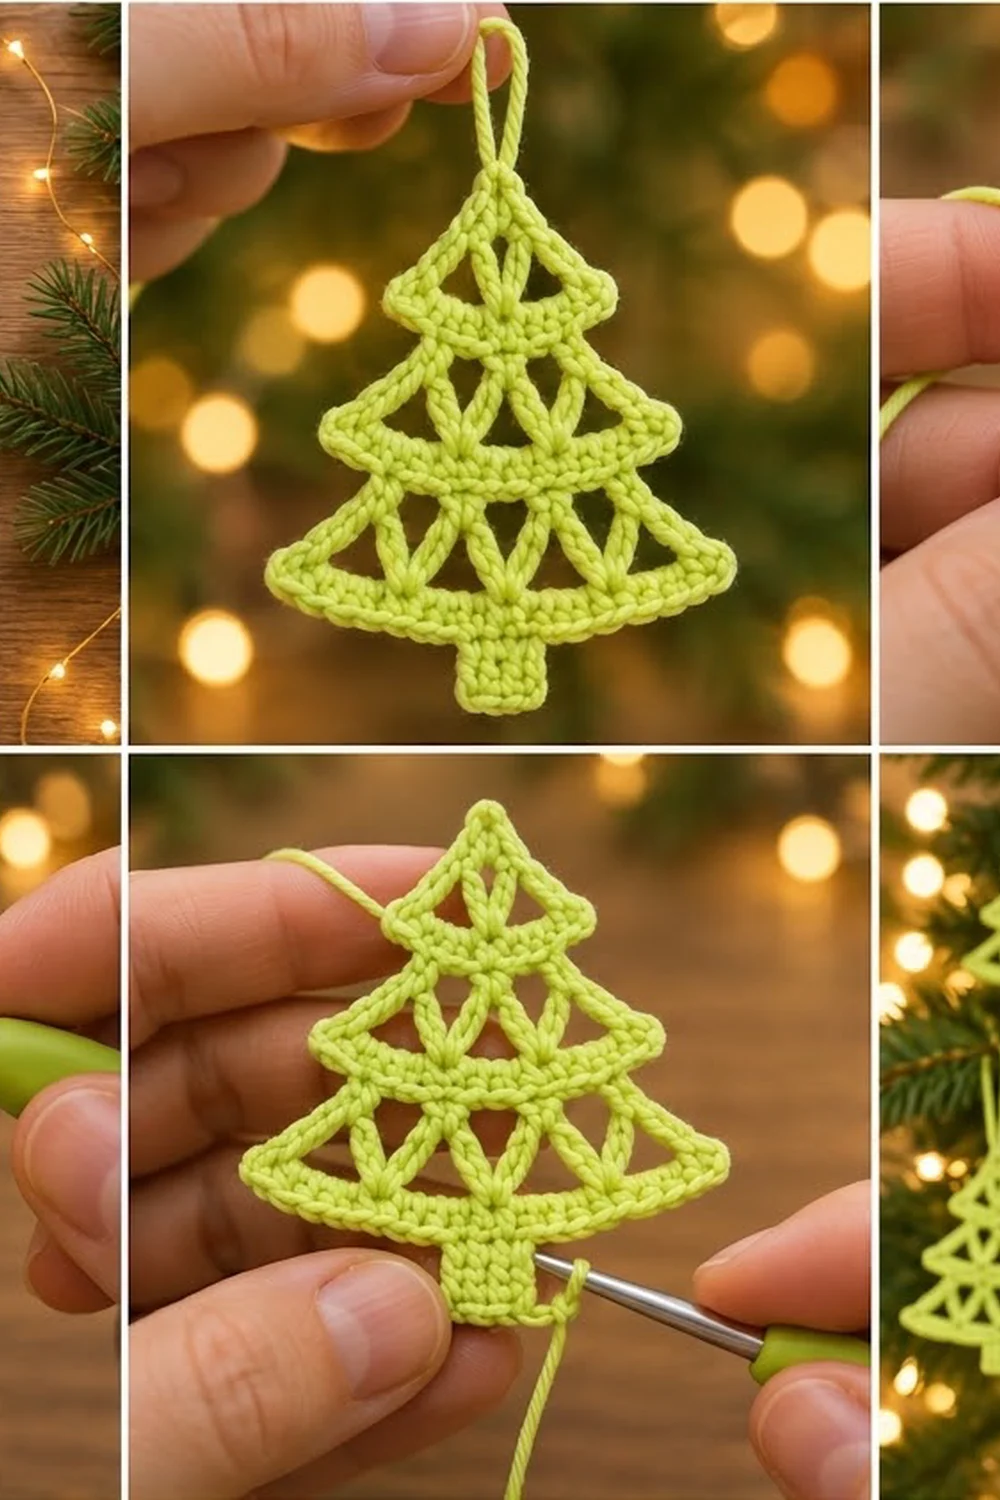
This little tree is all about open space. It has three stacked tiers, each filled with a lattice of tall V-shaped spokes, so it looks light and lacy and lets the lights behind it shine through. A smooth single crochet outline frames every tier, and each band flares into a small point at the sides. The shape reads as a classic fir tree even from across the room.
The sample is worked in one bright lime green, a fresh change from the usual deep pine shades. A solid trunk anchors the bottom, and a simple chain loop at the tip makes it ready to hang. It is a quick, satisfying make, and you can easily stitch a whole batch for the tree, gift tags, or garland hooks.
The pattern uses US crochet terms. The finished ornament is about 3 1/8 in (7.9 cm) wide and 3.5 in (8.9 cm) tall, not counting the hanging loop, which adds about 1.5 in (3.8 cm).
You work the tree flat in rows from the tip down. Each tier is one row of treble crochet spokes and clusters followed by two rows of single crochet. The trunk is added to the bottom tier. One round of single crochet edging then outlines the whole shape and makes the hanging loop at the end.
Finished Size and Construction
- Finished size: 3 1/8 in (7.9 cm) wide x 3.5 in (8.9 cm) tall, plus a 1.5 in (3.8 cm) loop
- Skill level: Easy-intermediate
- Terminology: US crochet terms
- Yarn weight: Fingering (super fine, #1) cotton
- Hook: 2.5 mm
- Number of pieces: 1
- Layout: Single flat piece, three tiers plus trunk
- Piece size before edging: 2 7/8 in (7.3 cm) wide x 3 1/4 in (8.3 cm) tall
- Edging depth: 1/8 in (0.3 cm) on every side
Materials
Choose a smooth, mercerized cotton or cotton blend in fingering weight. Mercerized cotton shows the lattice clearly, holds its shape after blocking, and does not fuzz over time. Avoid fluffy or brushed yarns, which blur the open spaces.
- Lime green: about 5 g / 20 m (22 yd) per ornament
- 2.5 mm crochet hook
- Tapestry needle
- Scissors
- Rust-proof pins and a blocking mat or folded towel
- Spray bottle with water
- Optional: fabric stiffener for a crisper ornament
These yarn amounts include a margin for your gauge swatch and weaving in ends.
Abbreviations (US Terms)
- ch: chain
- sl st: slip stitch
- sc: single crochet
- tr: treble crochet
- st(s): stitch(es)
- sp: space
- sk: skip
- RS: right side
Special stitch: tr2tog (treble two together).
- Yarn over twice, insert your hook in the first indicated st, yarn over and pull up a loop.
- [Yarn over and pull through 2 loops] twice. You now have 2 loops on the hook.
- Yarn over twice, insert your hook in the second indicated st, yarn over and pull up a loop.
- [Yarn over and pull through 2 loops] twice. You now have 3 loops on the hook.
- Yarn over and pull through all 3 loops.
The two legs of each tr2tog start in different stitches and meet at the top. This makes the V shapes in every tier: the legs spread apart along the band above and meet in a point on the band below.
Gauge and Checkpoints
Gauge: 8 sc and 8 rows = 1 in (2.5 cm) in sc. One row of tr is 0.5 in (1.3 cm) tall, the same height as 4 rows of sc.
Make a swatch first: ch 17, then work 16 rows of 16 sc. The swatch should measure 2 in (5.1 cm) square. Then work a row of tr across it and check that the row is 0.5 in (1.3 cm) tall.
Checkpoints:
- After Row 5 (Tier 1): 1 7/8 in (4.8 cm) wide x 1 in (2.5 cm) tall
- After Row 8 (Tier 2): 2 3/8 in (6.0 cm) wide x 1 3/4 in (4.4 cm) tall
- After Row 11 (Tier 3): 2 7/8 in (7.3 cm) wide x 2.5 in (6.4 cm) tall
- After Row 17 (trunk): 2 7/8 in (7.3 cm) wide x 3 1/4 in (8.3 cm) tall
- After edging: 3 1/8 in (7.9 cm) wide x 3.5 in (8.9 cm) tall
If your tree is too big, use a hook 0.25 mm smaller. If it is too small, use a hook 0.25 mm larger. If the width is right but the tiers look squat, your tr stitches are too short. Pull up the first loop of each tr a little taller instead of changing hooks.
Pattern
Work flat in rows. In sc rows, the ch 1 at the start does not count as a st. In tr rows, the ch 4 at the start counts as the first tr.
Tier 1 (Top)
Row 1: Ch 2, 3 sc in 2nd ch from hook. Turn. (3 sc)
Row 2: Ch 1, 2 sc in first st, sc in next st, 2 sc in last st. Turn. (5 sc)
Row 3 (spoke row):
– Ch 4 (counts as tr) in first st.
– Ch 3, tr2tog with first leg in st 1 and second leg in st 3.
– Ch 3, tr2tog with first leg in st 3 and second leg in st 5.
– Ch 3, tr in st 5. Turn.
(2 tr, 2 tr2tog, 3 ch-3 sps)
Each tr2tog starts in the same base st as the spoke before it. That opens an upward-pointing triangle between them, and the two legs of each tr2tog frame a downward-pointing V.
Row 4 (band): Ch 1, sc in first tr, 3 sc in next ch-3 sp, sc in top of next tr2tog; repeat from * once more, 3 sc in last ch-3 sp, sc in top of turning ch. Turn. (13 sc: 1 + 3 + 1 + 3 + 1 + 3 + 1)*
Row 5 (flare): Ch 1, 2 sc in first st, sc in next 11 sts, 2 sc in last st. Turn. (15 sc: 13 worked 1-per-stitch + 2 added)
Checkpoint: Tier 1 is 1 7/8 in (4.8 cm) wide and 1 in (2.5 cm) tall.
Tier 2 (Middle)
Row 6 (spoke row):
– Sl st in first st. St 1 stays free as a flare point.
– Ch 4 (counts as tr) in st 2.
– Ch 3, tr2tog with legs in st 2 and st 6.
– Ch 3, tr2tog with legs in st 6 and st 10.
– Ch 3, tr2tog with legs in st 10 and st 14.
– Ch 3, tr in st 14. Leave st 15 unworked. Turn.
(2 tr, 3 tr2tog, 4 ch-3 sps)
Here the legs are 4 sts apart, so Tier 2’s V’s are wider than Tier 1’s.
Row 7 (band): Ch 1, sc in first tr, 3 sc in next ch-3 sp, sc in top of next tr2tog; repeat from * twice more, 3 sc in last ch-3 sp, sc in top of turning ch. Turn. (17 sc: 2 edge sc + 4 sps x 3 sc + 3 cluster sc)*
Row 8 (flare): Ch 1, 2 sc in first st, sc in next 15 sts, 2 sc in last st. Turn. (19 sc: 17 worked 1-per-stitch + 2 added)
Checkpoint: the tree is now 2 3/8 in (6.0 cm) wide and 1 3/4 in (4.4 cm) tall.
Tier 3 (Bottom)
Row 9 (spoke row):
– Sl st in first st.
– Ch 4 (counts as tr) in st 2.
– Ch 3, tr2tog with legs in st 2 and st 6.
– Ch 3, tr2tog with legs in st 6 and st 10.
– Ch 3, tr2tog with legs in st 10 and st 14.
– Ch 3, tr2tog with legs in st 14 and st 18.
– Ch 3, tr in st 18. Leave st 19 unworked. Turn.
(2 tr, 4 tr2tog, 5 ch-3 sps)
Row 10 (band): Ch 1, sc in first tr, 3 sc in next ch-3 sp, sc in top of next tr2tog; repeat from * 3 more times, 3 sc in last ch-3 sp, sc in top of turning ch. Turn. (21 sc: 2 edge sc + 5 sps x 3 sc + 4 cluster sc)*
Row 11 (flare): Ch 1, 2 sc in first st, sc in next 19 sts, 2 sc in last st. (23 sc: 21 worked 1-per-stitch + 2 added) Fasten off.
Checkpoint: the tree is now 2 7/8 in (7.3 cm) wide and 2.5 in (6.4 cm) tall.
Trunk
Row 12: With the last row facing you, sk the first 9 sts of Row 11 and join yarn in the 10th st. Ch 1, sc in the same st and in the next 4 sts. Turn. (5 sc, centered, with 9 free sts on each side)
Rows 13–17: Ch 1, sc in each st across. Turn. (5 sc)
Fasten off after Row 17. The trunk is 6 rows deep: 3/4 in (1.9 cm) tall and 5/8 in (1.6 cm) wide.
Checkpoint: the whole piece is now 2 7/8 in (7.3 cm) wide x 3 1/4 in (8.3 cm) tall.
Edging and Hanging Loop
The edging is one round of sc around the whole tree. It outlines the slanted sides of each tier, sharpens the flare points, and ends with the hanging loop.
Edging gauge: Use the same gauge as the body, 8 sc per 1 in (2.5 cm). Work 1 sc in the end of each sc row and 4 sc around each tr spoke at the sides. A tr is as tall as 4 sc rows, so 4 sc matches its height exactly. That keeps the sides flat, without rippling or pulling in.
Round 1: With RS facing, join yarn with a sl st in the free loop of the foundation ch at the tip. Ch 1, sc in the same place (first tip sc). Then work down the first side:
- Tier 1: Sc in end of Row 1, sc in end of Row 2, 4 sc around edge tr of Row 3, sc in end of Row 4, (sc, ch 1, sc) in end of Row 5, sc in free flare st of Row 5. (10 sc, 1 ch-1 point)
- Tier 2: 4 sc around edge tr of Row 6, sc in end of Row 7, (sc, ch 1, sc) in end of Row 8, sc in free flare st of Row 8. (8 sc, 1 ch-1 point)
- Tier 3: 4 sc around edge tr of Row 9, sc in end of Row 10, (sc, ch 1, sc) in end of Row 11, sc in each of the 9 free sts of Row 11. (16 sc, 1 ch-1 point)
- Trunk side: Sc in the end of each of Rows 12–17. (6 sc)
Side total: 10 + 8 + 16 + 6 = 40 sc and 3 ch-1 points.
- Trunk bottom: 3 sc in first st of Row 17, sc in next 3 sts, 3 sc in last st. (9 sc)
Work up the second side in reverse order with the same counts:
– 6 sc along the trunk
– 16 sc and 1 point for Tier 3
– 8 sc and 1 point for Tier 2
– 10 sc and 1 point for Tier 1
(40 sc, 3 ch-1 points)
At the tip, sc in the same free loop as the first sc (second tip sc). Ch 24 for the hanging loop, then sl st in the first tip sc. Fasten off.
Round total: 1 + 40 + 9 + 40 + 1 = 91 sc, plus 6 ch-1 points and the ch-24 loop.
Why the math works:
– Width: The body is 23 sts, or 2 7/8 in (7.3 cm). The edging adds one sc on each side, which is 1/8 in (0.3 cm) per side, so the tree ends up 3 1/8 in (7.9 cm) wide.
– Body height: Count height in sc-row units. Rows 1–2 are 2 units, the three tr rows are 4 units each (12), the three 2-row bands are 6, and the trunk is 6. That is 2 + 12 + 6 + 6 = 26 units, or 3 1/4 in (8.3 cm).
– Finished height: The edging adds one sc at the tip and one along the trunk bottom. That makes 28 units, or 3.5 in (8.9 cm).
– Loop: The ch 24 is about 3 in (7.6 cm) of chain. Folded, it makes a loop about 1.5 in (3.8 cm) tall.
Final Blocking
- Weave in all ends along the sc bands, where they won’t show through the open spaces.
- Lightly mist the ornament with water until it is damp but not dripping.
- Lay it RS up on a blocking mat and gently stretch it to 3 1/8 in (7.9 cm) wide x 3.5 in (8.9 cm) tall.
- Pin each ch-1 flare point outward, matching the points on each tier.
- Open each triangle with your fingertip, and pin the trunk straight and centered.
- Pin the hanging loop straight up from the tip.
- If you want a stiffer ornament, brush on fabric stiffener now.
- Let it dry completely, at least 4 hours, before you remove the pins.
Final Quality-Control Checklist
- Tier 1 has 2 V’s, Tier 2 has 3 and Tier 3 has 4.
- All tr2tog tops meet the band below in clean points.
- The flares on both sides of each tier are level with each other.
- The trunk is centered, with 9 free sts on each side.
- The edging has 40 sc per side and 9 sc across the trunk bottom.
- The finished size is 3 1/8 in (7.9 cm) x 3.5 in (8.9 cm).
- The loop is centered on the tip and is about 1.5 in (3.8 cm) tall.
- No ends show through the openings.
Troubleshooting
Bands are wavy: Your ch-3 sps may be too long for 3 sc. Chain more tightly, or work the 3 sc firmly into each space.
V’s look crooked: Make sure the first leg of each tr2tog goes into the same st as the last leg of the stitch before it. Count base sts carefully: Tier 1 uses sts 1, 3 and 5, and Tiers 2 and 3 use every 4th st starting with st 2.
Sides pull in: Work 4 sc around each tr spoke, not 3, and don’t tug the yarn while edging.
Sides ripple: Your tr stitches are shorter than 0.5 in (1.3 cm). Work 3 sc around each spoke instead, or make your tr stitches taller.
Trunk is off center: Count again. There should be exactly 9 free sts on each side of Row 11.
Points are rounded: Pin each ch-1 point firmly while blocking.
Loop twists: Before joining the ch 24, check that the chain is not twisted.
Care
Hand wash in cool water with mild soap, press out the water in a towel, and reshape flat to dry. Store the ornament flat or hanging, away from heavy decorations that could crush the lattice.

Final Notes
You can measure every stage of this ornament:
– Gauge: 8 sc and 8 rows to 1 in (2.5 cm).
– Tiers: They widen from 15 to 19 to 23 sts, which is 1 7/8 in (4.8 cm), 2 3/8 in (6.0 cm) and 2 7/8 in (7.3 cm).
– Body: With the trunk, the body is 3 1/4 in (8.3 cm) tall.
– Edging: The 91-sc edging brings the tree to 3 1/8 in (7.9 cm) x 3.5 in (8.9 cm), and the chain loop is ready for a branch.
If you check your size at each tier, the finished tree will come out right.
Happy crocheting!