

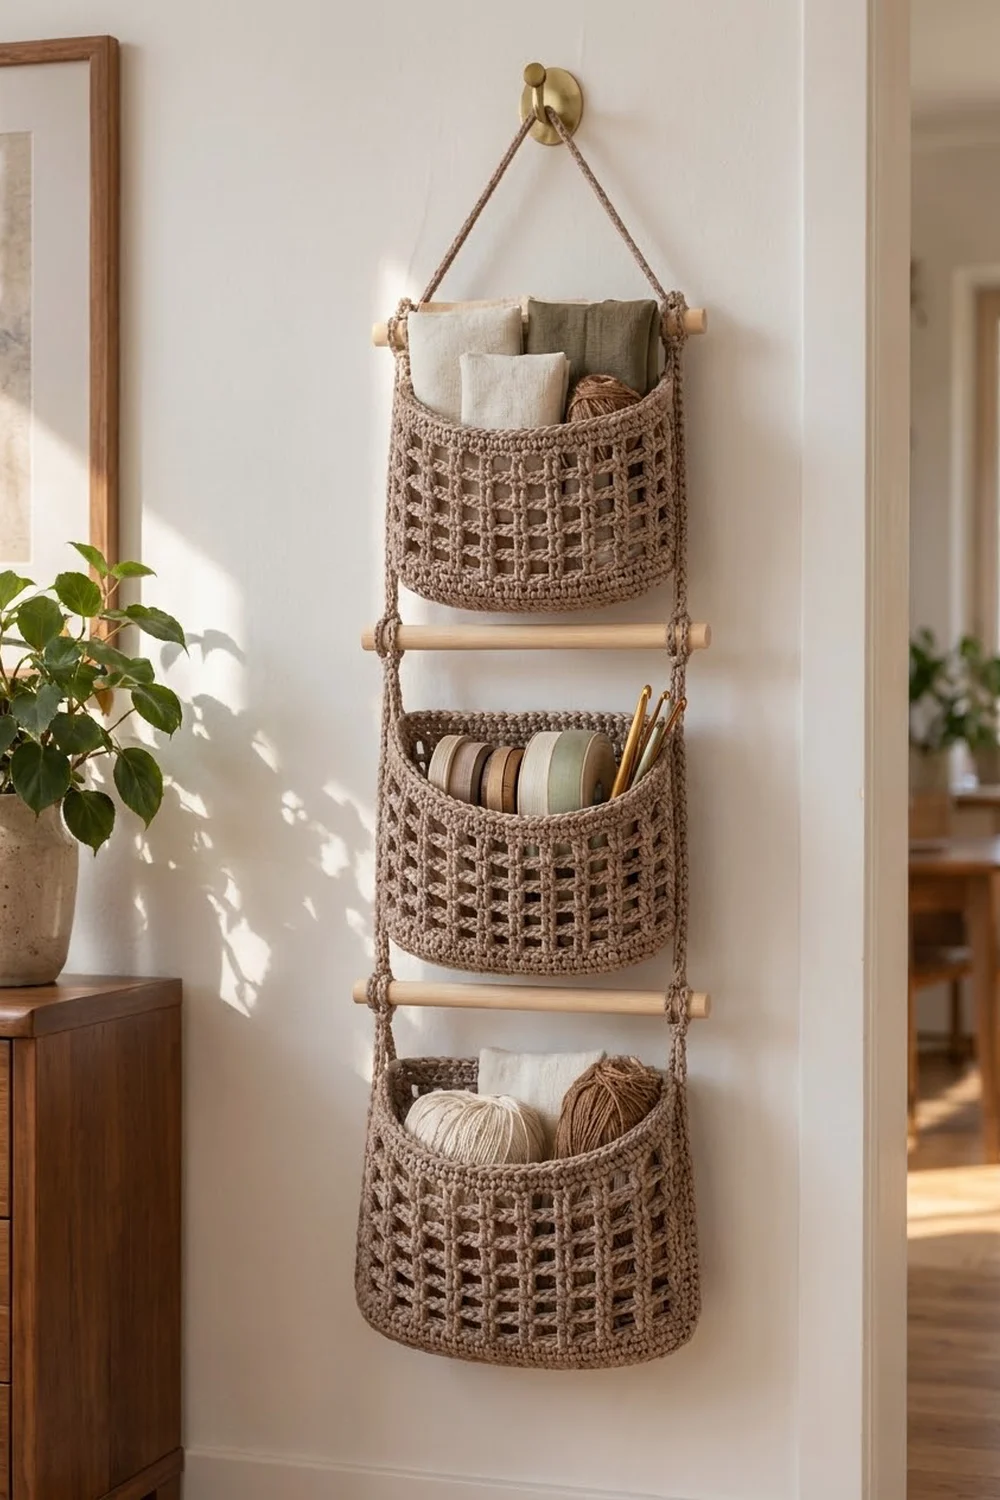
The Linen Loft organizer is a three-tier wall caddy made of open-mesh baskets hung on natural wooden dowels. It fits a craft corner, an entryway or a bathroom wall, and it keeps fabric scraps, ribbon spools and small yarn balls easy to see and reach.
The sample is worked in one warm taupe cotton-blend yarn. Each basket has solid bands at the top and bottom with a mesh of square windows between them, so the piece looks light but still holds its shape. With the pale wood and a brass hook, the result is calm and natural.
This pattern uses US crochet terms. Each basket measures 9.75 in (24.8 cm) wide, 3.5 in (8.9 cm) deep and 5.25 in (13.3 cm) tall. The assembled organizer is 12 in (30.5 cm) wide, set by the dowels, and 26.25 in (66.7 cm) tall from the top of the hanging loop to the bottom of the lowest basket.
You’ll make three identical baskets. Each one has an oval base worked in rounds, walls worked straight up without increases, and its own rim. You’ll then add two small tabs to each basket, slide the baskets onto dowels and tie everything together with slip-stitch cords.
Finished Size and Construction
- Finished size: 12 in × 26.25 in (30.5 cm × 66.7 cm) when hanging
- Skill level: Intermediate
- Terminology: US
- Yarn weight: Aran / heavy worsted (#4)
- Hook: 5.0 mm (H-8)
- Number of pieces: 3 baskets, 6 tabs, 2 side cords, 1 hanging cord
- Layout: 1 column × 3 tiers
- Piece size: 9.75 in × 3.5 in × 5.25 in (24.8 cm × 8.9 cm × 13.3 cm)
- Size before border: wall height 4 in (10.2 cm) above the base
- Border (rim) depth: 1.25 in (3.2 cm): 4 rounds of sc plus 1 round of crab stitch
Materials
Yarn: Use a firm cotton or cotton-blend aran yarn, about 170 m per 100 g. Cotton holds its shape well under weight. Soft acrylic will sag.
- Taupe: 180 g (306 m / 335 yd)
- Baskets: about 50 g (85 m) each
- Tabs and cords: about 10 g (17 m) in total
These amounts include a margin of roughly 10% for swatching and tails.
Tools:
- 5.0 mm (H-8) crochet hook
- 3 wooden dowels, 12 in (30.5 cm) long and 3/8 in (1.0 cm) thick
- 1 brass or wooden wall hook
- 4 stitch markers
- Tapestry needle
- Scissors and a tape measure
- Spray bottle and a folded towel for blocking
Abbreviations (US Terms)
- ch – chain
- sl st – slip stitch
- sc – single crochet
- dc – double crochet
- BLO – back loop only
- sk – skip
- sp – space
- st(s) – stitch(es)
- rep – repeat
- rnd(s) – round(s)
Special stitch – crab stitch (reverse sc): Work from left to right (right to left if you crochet left-handed). Insert the hook into the next stitch to the right, yarn over, pull up a loop, yarn over and pull through both loops. This makes a rounded, rope-like edge.
Gauge and Checkpoints
Gauge: 14 sc × 16 rnds = 4 in (10.2 cm). Each mesh round is 0.5 in (1.3 cm) tall.
Test one piece first. Work the base of Basket 1 (Rnds 1–7) before you buy all the dowels or start the other baskets. The base doubles as your gauge swatch.
Checkpoints:
- After Rnd 7 (base): 9.75 in × 3.5 in (24.8 cm × 8.9 cm), lying flat
- After Rnd 11: solid wall band 1 in (2.5 cm) tall
- After Rnd 17: wall 4 in (10.2 cm) tall
- After Rnd 21: wall 5 in (12.7 cm) tall
- After Rnd 22: finished height 5.25 in (13.3 cm)
Base too big, or ruffling? Go down to a 4.5 mm hook.
Base too small, or cupping? Go up to a 5.5 mm hook.
Measure again after changing hooks. Every later measurement depends on the base being the right size.

Basket (Make 3)
Base
Each round starts at the beginning of End A. The base has two straight sides of 22 sts each and two curved ends that grow by 3 sts every round. To check any base round, add 44 to twice the stitch count of one end.
Rnd 1: Ch 25. Work 3 sc in 2nd ch from hook (End A). Sc in next 22 ch. Work 3 sc in last ch (End B). Working along the opposite side of the foundation chain, sc in next 22 ch. Join with sl st to first sc. (50 sts)
Place a marker in the first st of each end and move the markers up as you go.
Rnd 2: Ch 1. [2 sc in next st] 3 times, sc in next 22 sts; rep from * once more. Join. (56 sts; each end 6)*
Rnd 3: Ch 1. [Sc in next st, 2 sc in next st] 3 times, sc in next 22 sts; rep from * once more. Join. (62 sts; each end 9)*
Rnd 4: Ch 1. [Sc in next 2 sts, 2 sc in next st] 3 times, sc in next 22 sts; rep from * once more. Join. (68 sts; each end 12)*
Rnd 5: Ch 1. [Sc in next 3 sts, 2 sc in next st] 3 times, sc in next 22 sts; rep from * once more. Join. (74 sts; each end 15)*
Rnd 6: Ch 1. [Sc in next 4 sts, 2 sc in next st] 3 times, sc in next 22 sts; rep from * once more. Join. (80 sts; each end 18)*
Rnd 7: Ch 1. [Sc in next 5 sts, 2 sc in next st] 3 times, sc in next 22 sts; rep from * once more. Join. (86 sts; each end 21)*
Checkpoint: 9.75 in × 3.5 in (24.8 cm × 8.9 cm). The base should lie flat.
Lower Solid Band
Rnd 8: Ch 1. Sc in BLO of each st around. Join. (86 sts)
Working in the back loop leaves a ridge that turns the wall up from the base.
Rnds 9–11: Ch 1. Sc in each st around. Join. (86 sts)
Checkpoint: wall 1 in (2.5 cm) tall.
Mesh Section
Rnd 12: Ch 4 (counts as dc + ch 1). Sk next st. Dc in next st, ch 1, sk next st; rep from * around. Join with sl st to 3rd ch of beg ch-4. (43 dc + 43 ch-1 sps = 86 sts)*
Rnds 13–17: Ch 4 (counts as dc + ch 1). Sk ch-1 sp. Dc in next dc, ch 1, sk next ch-1 sp; rep from * around. Join to 3rd ch of beg ch-4. (43 dc + 43 ch-1 sps)*
Keep each dc directly above the dc below it. This stacks the posts into straight vertical columns and forms 43 square windows in each round, 6 windows tall.
Checkpoint: wall 4 in (10.2 cm) tall. That’s 1 in (2.5 cm) of solid band plus 3 in (7.6 cm) of mesh.
Make All Pieces
Everything is worked in Taupe.
| Piece | Quantity | Yarn |
|---|---|---|
| Basket | 3 | about 50 g (85 m) each |
| Tab | 6 | about 0.7 g (1.2 m) each |
| Side cord, 28 in (71.1 cm) | 2 | about 2 g each |
| Hanging cord, 24 in (61.0 cm) | 1 | about 2 g |
Tab (make 6): Ch 4. Sc in 2nd ch from hook and in next 2 ch, then turn. (3 sts) For Rows 2–12, ch 1, sc in each st across and turn. (3 sts) The finished tab is 0.9 in × 3 in (2.3 cm × 7.6 cm). Leave a 10 in (25.4 cm) tail for sewing.
Side cord (make 2): Ch 95. Sl st in the back bump of 2nd ch from hook and in each ch across. (94 sl sts) The cord should be about 28 in (71.1 cm) long. Add or remove chains if your cord comes out shorter or longer.
Hanging cord (make 1): Ch 82. Sl st in the back bump of 2nd ch from hook and in each ch across. (81 sl sts) The cord should be about 24 in (61.0 cm) long.
Layout grid (front view):
            /\        hanging cord
           /  \
  |====== Dowel 1 ======|
  |   [  Basket 1  ]    |
  |====== Dowel 2 ======|
  |   [  Basket 2  ]    |
  |====== Dowel 3 ======|
  |   [  Basket 3  ]    |
  side cord      side cord
Rim Border (Each Basket)
Each basket gets its own rim before assembly. Work the rim at the same gauge as the base, 14 sc = 4 in (10.2 cm).
Rnd 18 (conversion round): Ch 1. Sc in each dc and in each ch-1 sp around. Join. (43 sc into dc + 43 sc into ch-1 sps = 86 sts)
Rnds 19–21: Ch 1. Sc in each st around. Join. (86 sts)
Stitches per side, counting from the start of the round:
- End A: 21 sts (sts 1–21)
- Front: 22 sts (sts 22–43)
- End B: 21 sts (sts 44–64)
- Back: 22 sts (sts 65–86)
The sides add up to 21 + 22 + 21 + 22 = 86. The “front” and “back” labels are interchangeable.
Checkpoint: wall 5 in (12.7 cm) tall.
Rnd 22: Ch 1. Work a crab stitch in each st around. Join and fasten off. (86 sts: 21 / 22 / 21 / 22)
Why the math works: The base finishes at 86 sts. Every wall round also has 86 sts: 86 sc, then 43 dc + 43 ch-1 sps, then 86 sc again. Because the count never changes, the walls rise straight without flaring or pulling in.
The mesh uses 2 sts per repeat, and 86 ÷ 2 = 43, so the mesh closes evenly with no partial repeat. Rnd 18 puts back exactly one stitch for each mesh position.
Weave in all ends on the inside.
Joining
Method: Sew the tabs to the inside of each basket, slide a dowel through the tab loops, then tie the dowels into a ladder with the side cords.
Stitch-to-stitch logic:
- Mark the 3 center stitches of each end on Rnd 21: sts 10–12 on End A and sts 53–55 on End B. Each tab is 3 sts wide, so it lines up with these 3 sts exactly.
- On the inside of the basket, place Rows 1–3 of a tab flat against Rnds 18–20 under the marked stitches. Fold the tab up into a loop and lay Rows 10–12 on top of Rows 1–3.
- Whipstitch through both tab layers and the basket fabric with the tab tail. Sew all 3 sts along both side edges and the bottom edge.
- Rows 4–9 form the loop, which stands about 0.75 in (1.9 cm) above the rim. Repeat on End B and then on all three baskets.
- Slide one dowel through both tabs of each basket. You should have about 1.1 in (2.8 cm) of dowel showing at each end.
Ladder assembly:
- Lay the baskets out in a column on a table.
- Starting 2 in (5.1 cm) from the end of a side cord, wrap it twice around the left end of Dowel 1, just outside the tab, and tie a firm knot.
- Measure 6.75 in (17.1 cm) down to Dowel 2. Wrap it twice and knot.
- Repeat for Dowel 3.
- Repeat steps 2–4 on the right side with the second side cord.
- Wrap each end of the hanging cord twice around Dowel 1, outside the side cords, and knot.
Tension advice: Pull each wrap snug, but don’t stretch the cord. Before you tighten each knot, measure both sides so the dowels stay level.
Size checkpoint:
- Dowel center to dowel center: 6.75 in (17.1 cm)
- Gap between baskets: 1 in (2.5 cm)
- Dowel 1 to the bottom of Basket 3: 19.25 in (48.9 cm)
- Hanging loop peak: 7 in (17.8 cm) above Dowel 1
- Overall height: 26.25 in (66.7 cm)
Trim the cord tails to 1 in (2.5 cm) and dab them with fabric glue if you like.
Final Blocking
- Lightly mist each basket with water until it’s damp but not wet.
- Pack each basket firmly with a rolled towel so the walls stand straight and the oval keeps its shape.
- Line up the mesh columns with your fingers so every window is square.
- Pinch the crab-stitch rim into an even roll.
- Let the baskets dry completely, upright and stuffed, for 24 hours.
- Remove the towels and hang the organizer.
Final Quality-Control Checklist
- Each base measures 9.75 in × 3.5 in (24.8 cm × 8.9 cm) and lies flat.
- Each basket has 86 sts in every solid round and 43 mesh windows in every mesh round.
- The mesh columns are vertical and don’t spiral.
- All three baskets are 5.25 in (13.3 cm) tall, within 0.25 in (0.6 cm) of each other.
- The tabs sit at the exact end centers.
- The dowels are level, spaced 6.75 in (17.1 cm) apart.
- The knots are tight and the ends are woven in on the inside.
Troubleshooting
- Base ruffles: Your tension is loose. Use a smaller hook or redo Rnd 7.
- Base cups: Your tension is tight. Use a larger hook.
- Mesh columns drift sideways: You worked into a ch-1 sp instead of the dc. Count 43 dc each round.
- Walls flare outward: Check for an extra stitch at the joins. Every round should be 86.
- Baskets tilt forward: The tabs are off-center. Re-sew them at sts 10–12 and 53–55.
- Dowels are uneven: Undo one knot, re-measure 6.75 in (17.1 cm) and retie.
- Rim waves: Your crab stitch is too loose. Work it more tightly, or use a hook one size smaller for that round only.
Care
Spot clean while the organizer is hanging. If it needs a full wash, remove the dowels, hand wash the baskets in cool water, then reshape and dry them flat over a towel roll.
Final Notes
The whole design comes down to a few checks. The base must measure 9.75 in × 3.5 in (24.8 cm × 8.9 cm) at 86 sts. That count holds through every wall round, so the walls reach 4 in (10.2 cm) before the rim and 5.25 in (13.3 cm) when finished. The dowels are spaced 6.75 in (17.1 cm) apart, which makes the organizer 26.25 in (66.7 cm) tall overall. If you check each of these numbers as you go, the three baskets will match and hang level. Happy crocheting!