

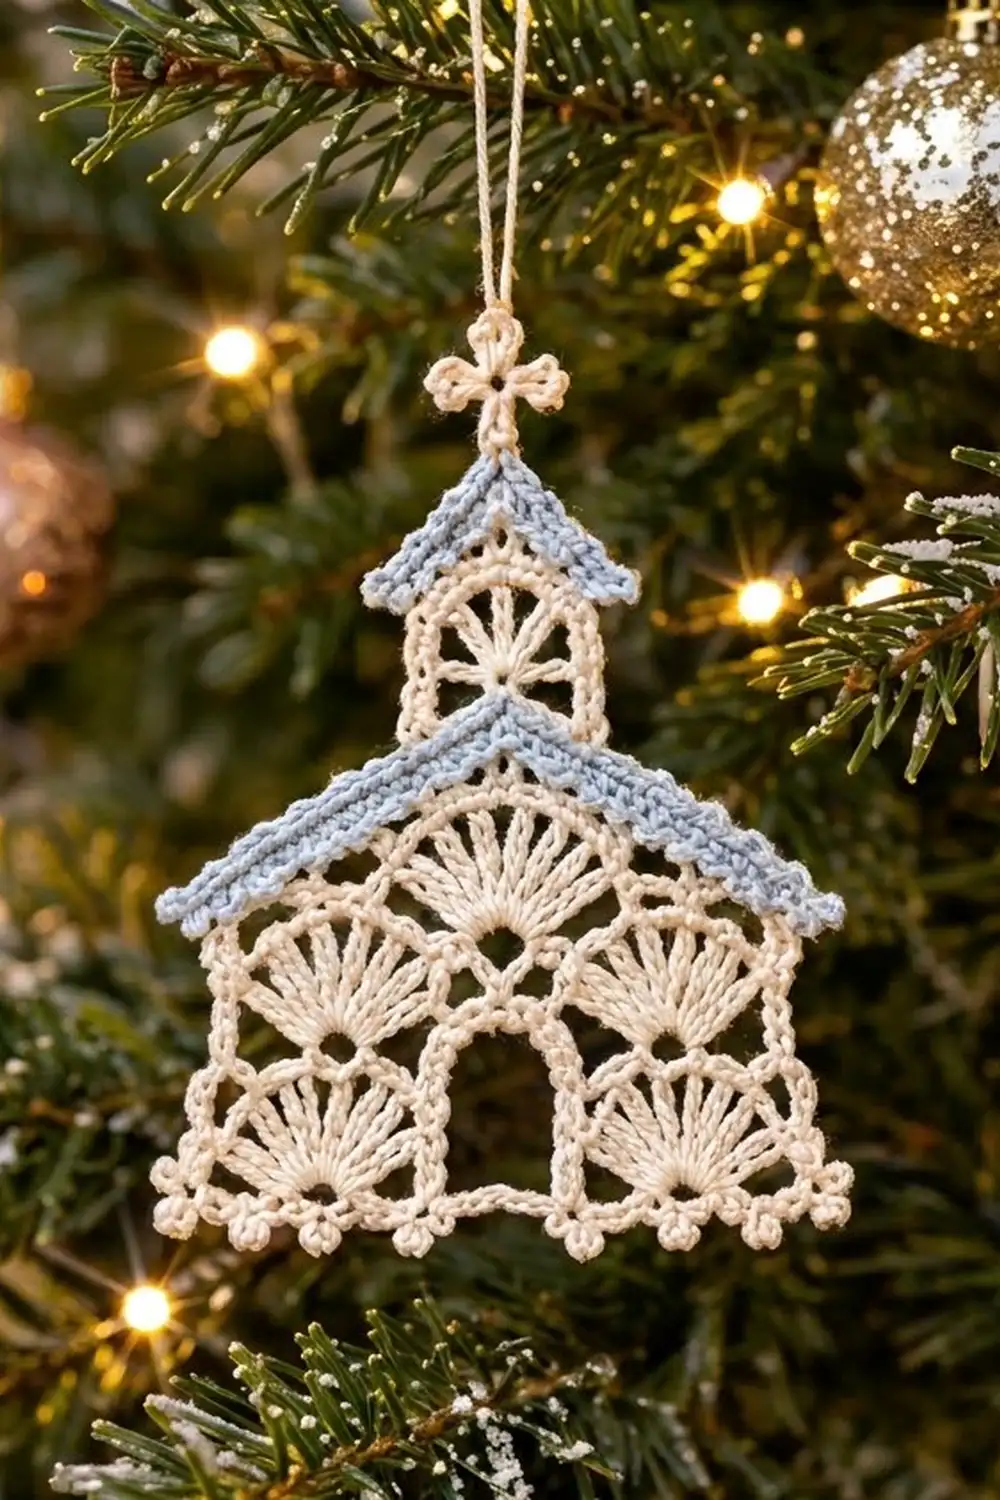
This lace church ornament looks like a tiny snowy chapel. The cream body is a trapezoid of open fan stitches with an arched door at the center. A pale blue roof with a picot edge sits on the gable, and a slim bell tower with a fan-shaped rose window rises behind it. A small blue tower roof and a cream picot cross finish the top.
There are just two colors: cream for the lace and pale blue for both roofs. The style is classic thread lace, with open fans and a beaded picot edge along the bottom and sides.
The pattern uses US crochet terms. The finished ornament is about 4.4 in (11.2 cm) wide at the bottom picots and 5.5 in (14.0 cm) tall to the top of the cross, not counting the hanging loop.
You crochet four flat pieces: the body (worked from the bottom up, with two short legs that form the door), the tower with its cross, the main roof and the tower roof. Add a picot border to the body, then sew the pieces together stitch to stitch and stiffen.
Finished Size and Construction
- Finished size: 4.4 in (11.2 cm) wide x 5.5 in (14.0 cm) tall, not counting the loop
- Skill level: Intermediate
- Terminology: US
- Yarn weight: Lace (size 10 crochet cotton thread)
- Hook: 1.75 mm steel hook
- Number of pieces: 4 (body, tower with cross, main roof, tower roof)
- Layout: One ornament. The tower sits behind the main roof, the main roof sits on the body’s gable, and the tower roof sits on the tower’s gable.
- Body size before border: 4 in (10.2 cm) wide at the bottom, 3.3 in (8.4 cm) between the top corners, 2 in (5.1 cm) tall at the sides, 2.7 in (6.9 cm) tall at the peak
- Tower size: 1.1 in (2.8 cm) wide x 1.75 in (4.4 cm) tall
- Border depth: 0.2 in (0.5 cm)
Materials
Use mercerized size 10 cotton thread. It gives crisp fans and takes stiffener well. Soft or fuzzy threads blur the lace.
- Cream: 6 g, about 34 m (37 yd), for the body, tower, cross and loop
- Pale blue: 2 g, about 11 m (12 yd), for both roofs
These amounts include a margin of about 30% for swatching and sewing tails.
Tools:
- 1.75 mm steel hook
- Fine tapestry needle and scissors
- Fabric stiffener (or a 1:1 mix of white glue and water)
- Blocking board, rust-proof pins and plastic wrap
- 2 stitch markers
Abbreviations (US Terms)
- ch – chain
- sl st – slip stitch
- sc – single crochet
- dc – double crochet
- tr – treble crochet
- dtr – double treble crochet
- sc2tog / sc3tog – single crochet 2 / 3 together
- dc3tog – double crochet 3 together
- sk – skip
- sp(s) – space(s)
- st(s) – stitch(es)
- RS / WS – right side / wrong side
Special stitches:
- Fan: 9 tr in the same stitch.
- Picot: ch 3, sl st in 3rd ch from hook.
- Big picot (bp): ch 4, sl st in 4th ch from hook (used in the border only).
Gauge and Checkpoints
Gauge: 10 sc and 10 sc rows = 1 in (2.5 cm). One fan worked on sc is about 1.4 in (3.6 cm) across and 0.4 in (1.0 cm) tall.
Make the tower first. It uses every stitch except the border, so it works as your gauge swatch.
Checkpoints:
- Tower Row 1: 1.1 in (2.8 cm) wide. Finished tower: 1.75 in (4.4 cm) tall.
- Body Row 1: 4 in (10.2 cm) wide
- Body after Row 3: each leg is 1.5 in (3.8 cm) wide and 0.65 in (1.7 cm) tall
- Body after Row 5: 1.2 in (3.0 cm) tall. The door is 1 in (2.5 cm) wide and 1.1 in (2.8 cm) tall.
- Body after Row 8: 2 in (5.1 cm) tall at the sides, 2.7 in (6.9 cm) at the peak
- Main roof Row 1: 4.5 in (11.4 cm) long
Too big? Try a 1.5 mm hook. Too small? Try a 2 mm hook. If only the fans are too tall, pull each tr yarn-over a little snugger.
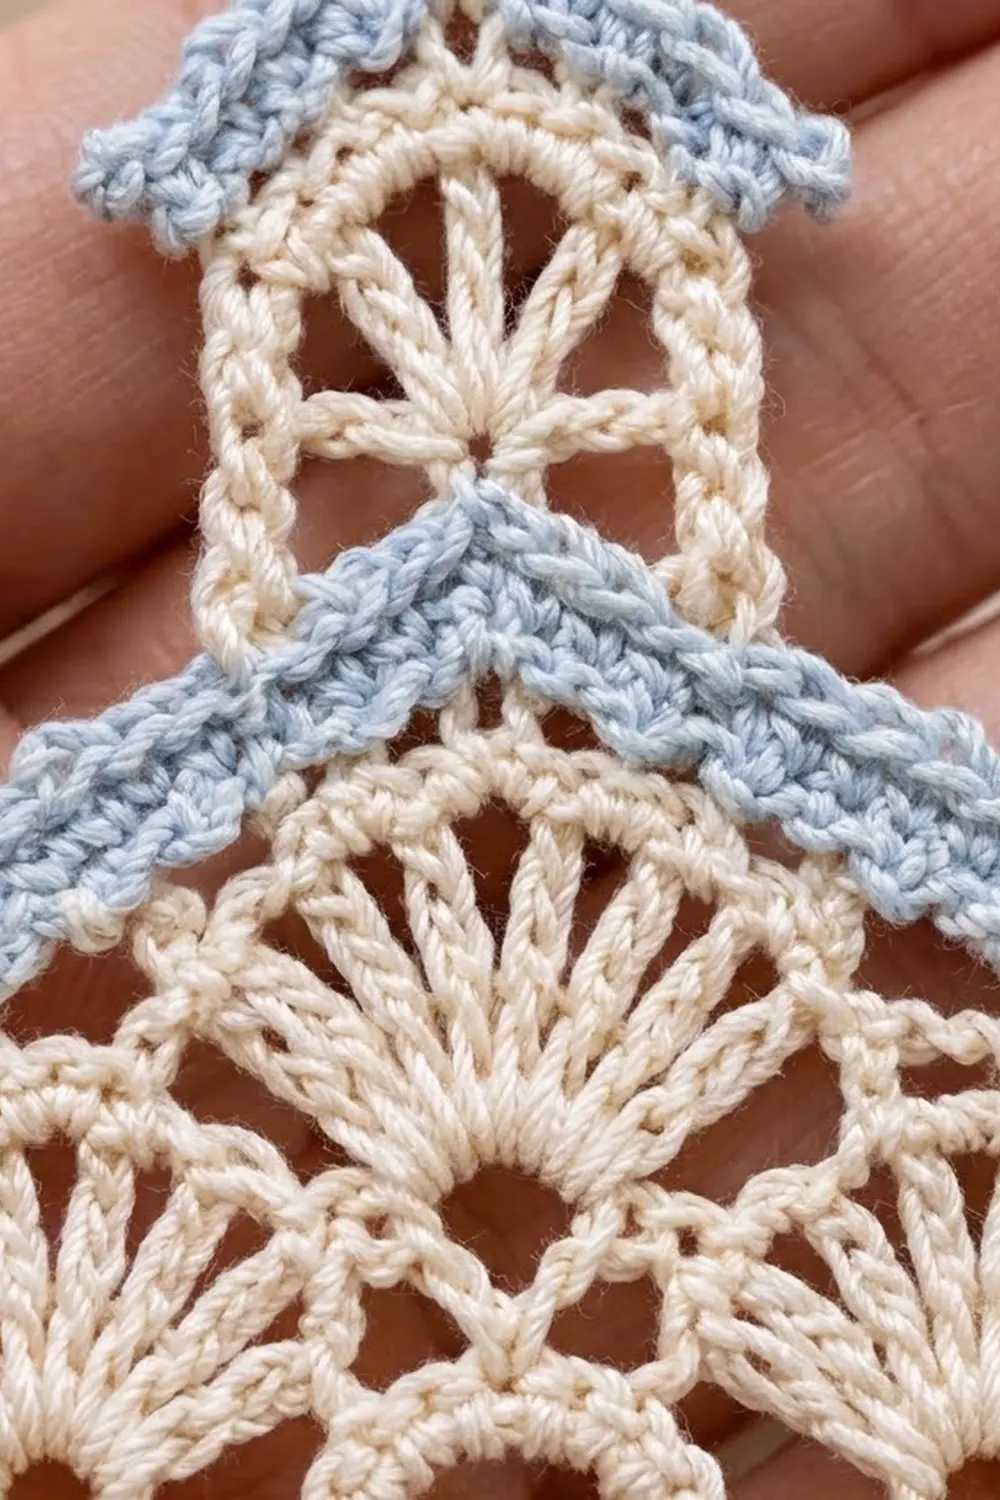
Tower and Cross (Cream)
Row 1 (RS): Ch 12, sc in 2nd ch from hook and in each ch across. Turn. (11 sc)
Row 2: Ch 4 (counts as tr), ch 1, sk next sc, tr in next sc; rep from * 4 more times. Turn. (6 tr, 5 ch-1 sps)* These are the window bars.
Row 3: Ch 1, sc in first tr, sc in next ch-1 sp, sc in next tr; rep from * across, working the last sc in the top of the turning ch. Turn. (11 sc)*
Row 4: Ch 1, sc in first sc, sk 4 sc, fan in next sc, sk 4 sc, sc in last sc. Turn. (2 sc + 9 tr = 11 sts) This is the rose window.
Row 5: Ch 1, sc in first sc, ch 2, (sc in next tr, ch 1) 8 times, sc in next tr, ch 2, sc in last sc. Turn. (11 sc, 8 ch-1 sps, 2 ch-2 sps)
Row 6: Ch 1, sc in each sc, skipping all ch sps. Turn. (11 sc)
Rows 7–10: Ch 1, sc2tog, sc in each sc to last 2 sts, sc2tog. Turn. (9, 7, 5, then 3 sc)
Row 11: Ch 1, sc3tog. (1 st) This is the gable point. Do not fasten off.
Cross: Ch 4 for the stem. Work a picot 3 times to make the three lobes. Sl st in the 4th stem ch to gather the lobes into a cross head. Sl st in each of the 3 remaining stem ch and in the gable point. Fasten off.
Hanging loop: Join cream in the top lobe, ch 40, sl st in the same lobe. Fasten off. The chain is about 3.5 in (8.9 cm) long.
Body (Cream)
Row 1 (RS): Ch 41, sc in 2nd ch from hook and in each ch across. Fasten off. (40 sc)
Sts 16–25 form the door threshold. Leave them unworked.
Left leg, Row 2 (RS): Join in st 1. Ch 1, sc in st 1, sk 6 sts, fan in st 8, sk 6 sts, sc in st 15. Turn. (2 sc + 9 tr = 11 sts)
Left leg, Row 3 (WS): Ch 1, sc in first sc, ch 2, (sc in next tr, ch 1) 8 times, sc in next tr, ch 2, sc in last sc. Fasten off. (11 sc)
Right leg, Rows 2–3: Join in st 26 and repeat Rows 2–3 over sts 26–40, with the fan in st 33 and the last sc in st 40. (11 sc)
Row 4 (RS): Join in the first sc of Row 3 on the right-hand leg. Ch 1, sc in first sc, sk 4 sc, fan in next sc, sk 4 sc, sc in last sc. Ch 14 for the door arch. On the other leg, sc in first sc, sk 4 sc, fan in next sc, sk 4 sc, sc in last sc. Turn. (22 sts + ch-14)
From here on, work only into sc and the stitches named. Skip ch sps unless the pattern says otherwise.
Row 5 (WS): Ch 1, [sc in first sc, ch 2, (sc in next tr, ch 1) 8 times, sc in next tr, ch 2, sc in next sc]; 15 sc in the ch-14 arch; repeat the bracket over the second fan. Turn. (11 + 15 + 11 = 37 sc)
The extra sc in the arch make the top of the door curve upward. Number the sc: 1–11 (fan), 12–26 (arch), 27–37 (fan).
Row 6 (RS): Sl st in first 2 sc. Ch 4 (counts as tr), 4 tr in st 3; sk 7, sc in st 11; sk 7, fan in st 19; sk 7, sc in st 27; sk 7, 5 tr in st 35. Leave sts 36–37 unworked. Turn. (5 + 1 + 9 + 1 + 5 = 21 sts)
The 5-tr groups are the half fans at the edges. The center fan sits above the door.
Row 7 (WS, gable): Ch 1, sc in first tr, ch 3, sk 3 tr, sc in next tr; ch 4, dc in next sc; ch 4, sk 2 tr, tr in next tr, dtr in next tr, (dtr, ch 3, dtr) in next tr, dtr in next tr, tr in next tr; ch 4, sk last 2 tr of fan, dc in next sc; ch 4, sc in first tr of edge group, ch 3, sk 3 tr, sc in top of turning ch. Turn. (12 sts, 3 ch-3 sps, 4 ch-4 sps)
The stitches get taller toward the center, from sc up to dtr, which raises the gable peak.
Row 8 (RS): Ch 1, sc in each st, 3 sc in each ch-3 sp, 4 sc in each ch-4 sp. Fasten off. (12 + 9 + 16 = 37 sc)
The middle sc of the center 3-sc group is the peak (st 19). Each slope has 18 sc. Mark the peak.
Main Roof (Pale Blue)
Row 1 (RS): Ch 46, sc in 2nd ch from hook and in each ch across. Turn. (45 sc) Mark the 23rd sc.
Row 2 (WS): Ch 3 (counts as dc), dc in each sc to 1 st before the marker, dc3tog centered on the marker, dc in each sc to end. Turn. (21 + 1 + 21 = 43 sts)
Row 3 (RS): Ch 1, sc in first dc, (picot, sc in next 2 dc) 10 times; picot, sc in dc3tog, picot; (sc in next 2 dc, picot) 10 times, sc in last dc. Fasten off. (43 sc, 22 picots)
Each side has 21 sc. The center sc sits on the dc3tog.
Tower Roof (Pale Blue)
Row 1 (RS): Ch 20, sc in 2nd ch from hook and in each ch across. Turn. (19 sc) Mark the 10th sc.
Row 2 (WS): Ch 3 (counts as dc), dc in each sc to 1 st before the marker, dc3tog centered on the marker, dc in each sc to end. Turn. (8 + 1 + 8 = 17 sts)
Row 3 (RS): Ch 1, sc in first 2 dc, (picot, sc in next 2 dc) 3 times; picot, sc in dc3tog, picot; (sc in next 2 dc, picot) 3 times, sc in last 2 dc. Fasten off. (17 sc, 8 picots)
Make All Pieces
- Cream: 1 body, 1 tower with cross and loop
- Pale blue: 1 main roof, 1 tower roof
Front view, top to bottom:
        [ cross + loop ]
        [ tower roof   ]
        [    tower     ]
   [      main roof       ]
   [  body: fans + door   ]
   [    picot border      ]
Joining
Work the body border (next section) first. Then pin each piece flat and steam it lightly. Sew with matching thread, using small whipstitches through the back loops so nothing shows on the front. Keep the tension snug but relaxed, with no puckering.
Main roof to body: Lay the roof over the body’s gable, RS up. The roof’s Row 3 sc match the body’s Row 8 sc one to one:
- Roof sc 4–21 to body sc 1–18
- Roof center sc (22) to the body peak (19)
- Roof sc 23–40 to body sc 20–37
Roof sc 1–3 and 41–43 hang free as eaves, and the picots hang over the top fans.
Tower to roof: Center the tower behind the roof peak. Tack its Row 1 sc 1–11 to the back of the roof’s center 11 Row 2 sts (5 dc, dc3tog, 5 dc).
Tower roof to tower: On each side, sew tower roof sc 3–8 to the row ends of tower Rows 6–11, one sc per row end. Sew the center sc to the gable point. Sc 1–2 on each side stay free as eaves.
Size checkpoint: The assembled ornament is about 5.5 in (14.0 cm) from the bottom picots to the top of the cross.
Border
Work the border on the body only, along the bottom and both slanted sides.
Border gauge: About 10 sc per 1 in (2.5 cm), the same as the body. Each bp sticks out 0.2 in (0.5 cm).
Border Round (RS): Join cream at the top right corner, in the row end of Row 8.
- Right side (19 sc, 5 bp): Work 1 sc in each sc-row end (Rows 8, 7, 5, 3, 1), 4 sc in each tr-row end (Rows 6, 4, 2) and 2 sc along the 2 Row 5 sts left at the step. That is 5 + 12 + 2 = 19 sc, placed as: sc, (bp, sc in next 3) 5 times.
- Bottom (40 sc, 14 bp): Working into the foundation chain loops: sc in first ch (corner), bp, (sc in next 3 ch, bp) 13 times.
- Left side (19 sc, 5 bp): Working upward, (sc in next 3, bp) 5 times, sc in last.
Fasten off. (78 sc, 24 bp)
Why the math works: 19 = 1 + (5 x 3) and 40 = 1 + (13 x 3), so a bp falls after every third sc, with one bp on each bottom corner. The bottom keeps the same 40 sc as Row 1, so it stays 4 in (10.2 cm) wide. The border adds 0.2 in (0.5 cm) on each side, for a total of 4.4 in (11.2 cm). The 4 sc in each tr-row end match the 0.4 in (1.0 cm) height of each fan row, so the sides lie flat.
Final Blocking
- Weave in all ends along stitches of the same color.
- Soak the assembled ornament in stiffener and press out the extra with a towel.
- Pin it RS up on a board covered with plastic wrap.
- Pin the bottom to 4.4 in (11.2 cm), with a pin through every bp.
- Pin the roof eaves level and the tower straight and centered.
- Pin the outer edge of each fan into a smooth arc.
- Shape the door arch and open out the cross lobes.
- Let it dry completely, for at least 24 hours.
Final Quality-Control Checklist
- Body Row 1 has 40 sc and Row 8 has 37 sc
- Each fan has 9 tr and each edge group has 5 tr
- The door is 1 in (2.5 cm) wide and open down to the threshold
- The main roof has 43 sc and 22 picots; the tower roof has 17 sc and 8 picots
- The border has 19 / 40 / 19 sc with 24 bp
- The roof eaves overhang by 3 sc on each side
- The ornament is 4.4 in x 5.5 in (11.2 cm x 14.0 cm)
- The loop is secure and centered
Troubleshooting
- Fans cup or ruffle: The tr are too loose. Use a smaller hook.
- Door arch sags: Check that there are 15 sc in the ch-14, and pin the arch up while it dries.
- Peak too flat: Make full-height dtr in Row 7 and pin the peak up.
- Roof doesn’t line up: Recount Row 3 (43 sc) and match the centers first.
- Sides pull in: Work 5 sc in each tr-row end instead of 4.
- Ornament droops: Use a stronger stiffener and let it dry longer.
Care
Dust with a soft brush. If needed, rinse in cool water, then stiffen and block it flat again.
Final Notes
The measurement chain is short. A gauge of 10 sc = 1 in (2.5 cm) gives a 4 in (10.2 cm) body base and a 1.1 in (2.8 cm) tower. Rows 2–8 build three tiers of fans and a gable with 18 sc per slope. The roof’s 21 sc per side cover those 18 sc plus 3 eave sc. The 19 / 40 / 19 border brings the ornament to 4.4 in x 5.5 in (11.2 cm x 14.0 cm).
Happy crocheting!