

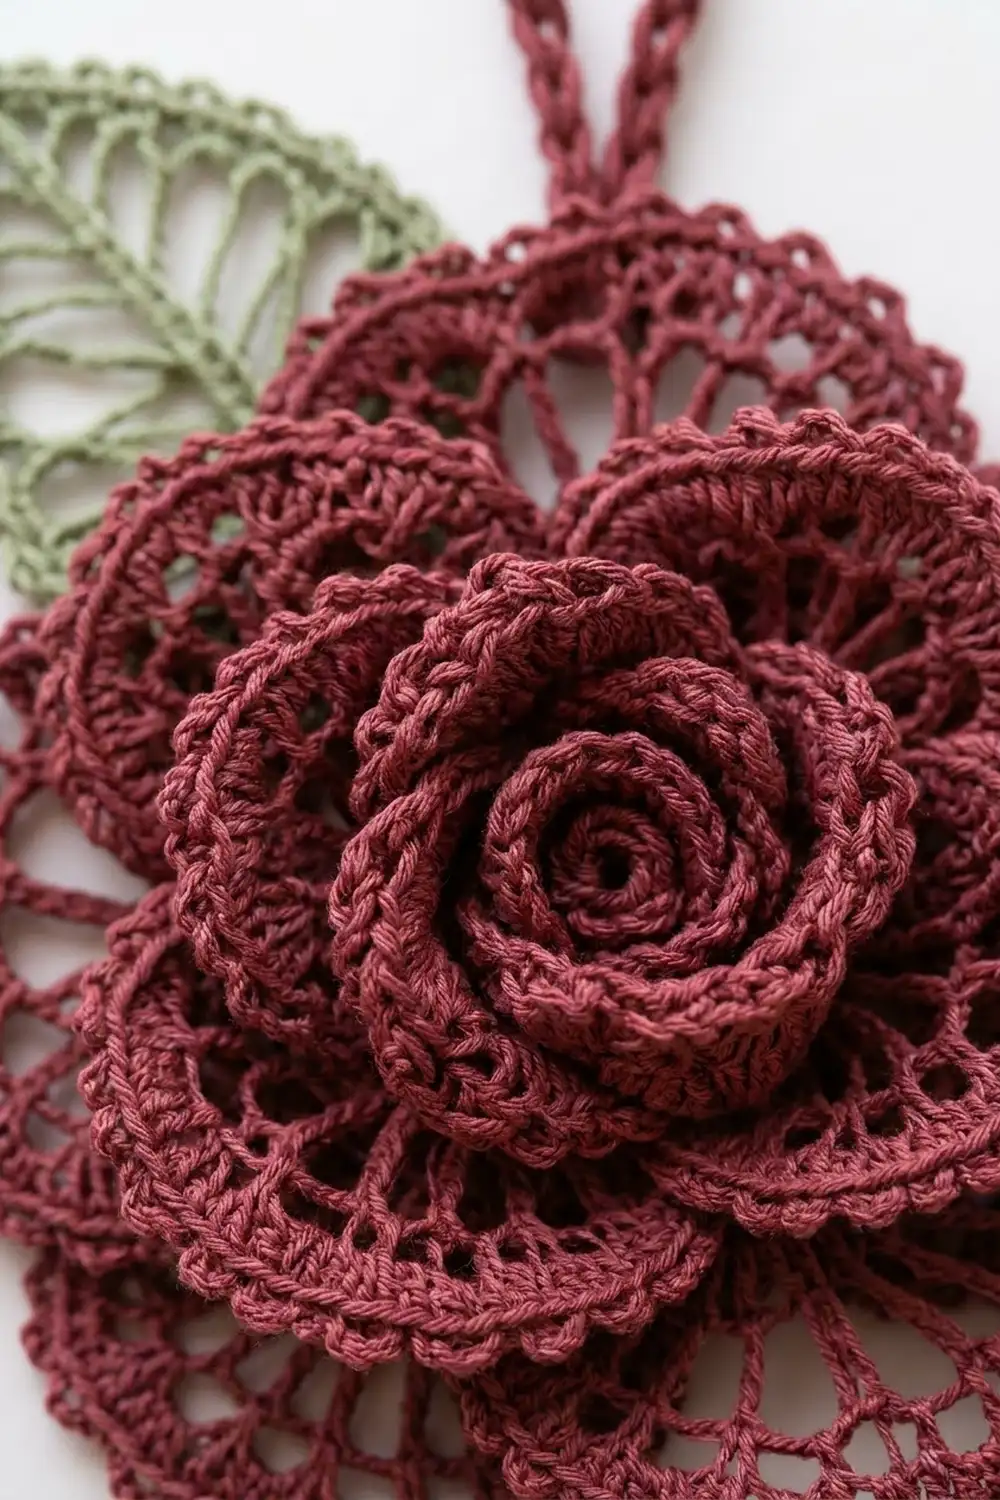
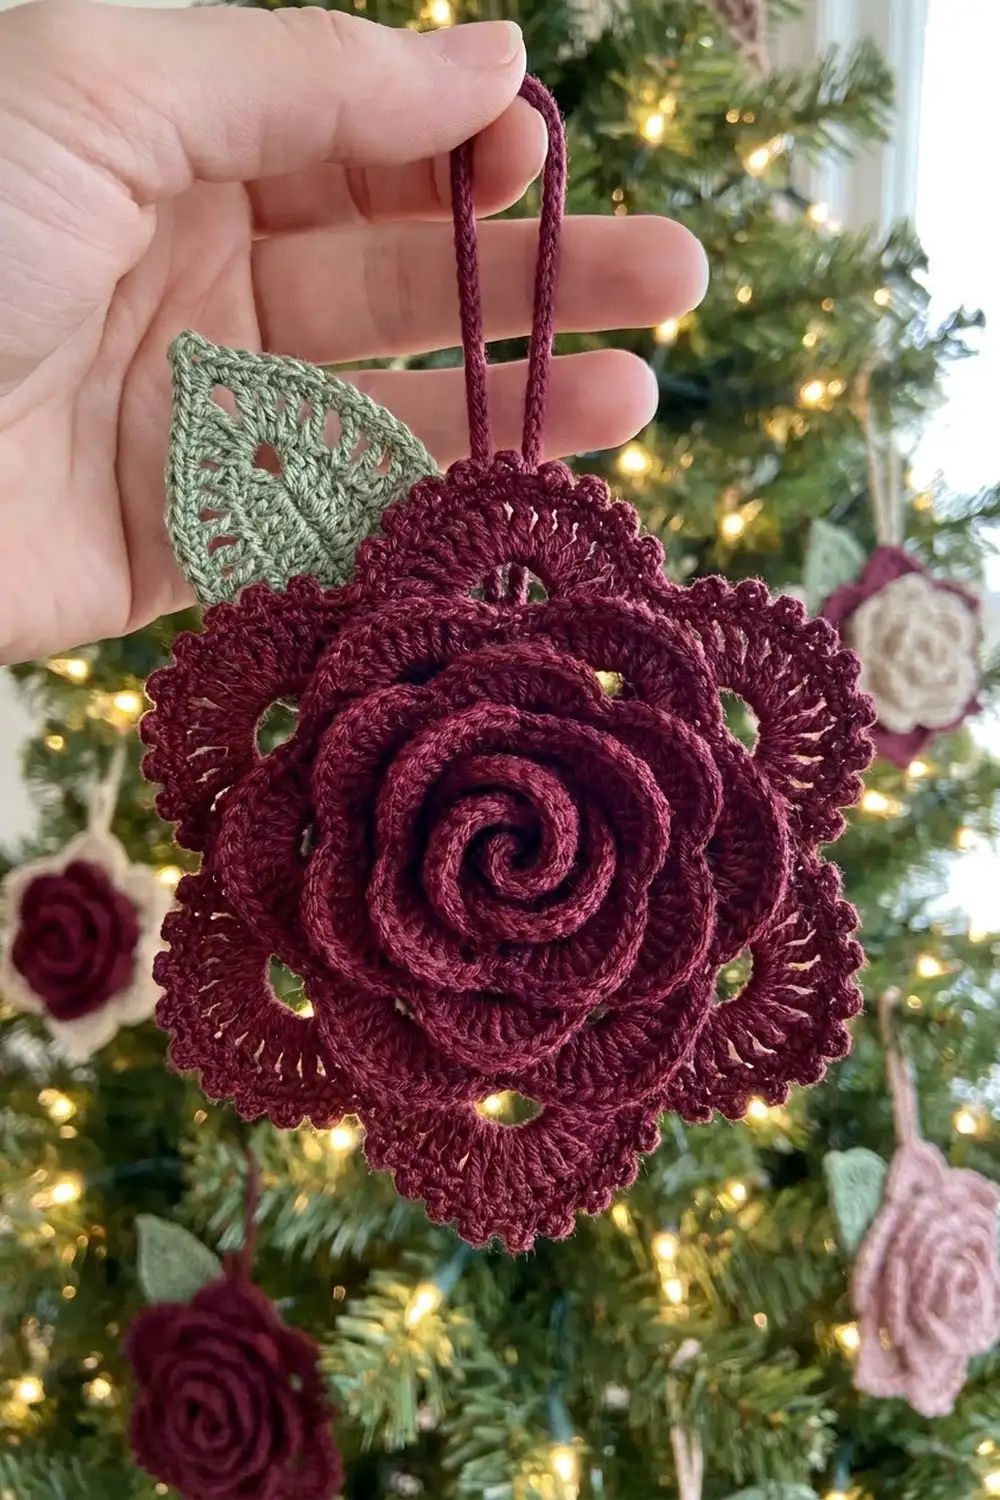
This Burgundy Lace Rose Ornament is a single layered rose made to hang on a tree, a wreath, or a gift package. A tight spiral center opens into two rings of solid, cupped petals, then two rings of lacy petals with picot edges. A small sage green lace leaf sits behind the upper left, and a firm cord loop at the top makes it easy to hang.
The rose is deep burgundy (wine red) and the leaf is soft sage green. The style is vintage, close to a classic Irish crochet rose, but in a yarn weight that works up in an evening.
All instructions use US crochet terms. The finished rose measures about 4.5 in (11.4 cm) across. With the leaf, the ornament is about 5.25 in (13.3 cm) wide. The loop stands about 1.5 in (3.8 cm) above the top petal.
The rose is worked in rounds as one continuous piece. You make a spiral center, then build four petal tiers, each on a ring of chain loops worked behind the tier before it. The leaf is worked separately around a foundation chain, and the cord is a slip-stitched chain. Both are sewn to the back of the rose.
Finished Size and Construction
- Finished size: rose 4.5 in (11.4 cm) across; ornament with leaf 5.25 in (13.3 cm) wide
- Skill level: Intermediate
- Terminology: US crochet terms
- Yarn weight: Sport weight (2) cotton or cotton blend
- Hook: 2.5 mm (US B/1 or C/2)
- Number of pieces: 1 rose (one continuous piece) + 1 leaf appliqué + 1 hanging cord
- Layout: leaf behind the upper left of the rose, cord at top center
- Piece size: leaf 2 in (5.1 cm) long by 1 in (2.5 cm) wide
- Size before border: rose 4.25 in (10.8 cm) across after Rnd 10
- Border depth: about 0.125 in (0.3 cm), a picot edge on the outer petals
Materials
Use a smooth, mercerized sport weight cotton. It shows stitch detail clearly and holds a cupped petal shape. Avoid fuzzy or very soft yarns, because they blur the lace and picots.
- Burgundy (wine red): 15 g, about 63 m (69 yd)
- Sage green: 3 g, about 13 m (14 yd)
Both quantities include a safety margin of about 25%.
Tools:
- 2.5 mm crochet hook
- Tapestry needle
- Scissors
- Stitch marker
- Blocking mat and rust-proof pins
- Spray bottle with water
- Optional: fabric stiffener, so the ornament keeps its shape
Abbreviations (US Terms)
- ch: chain
- sl st: slip stitch
- sc: single crochet
- hdc: half double crochet
- dc: double crochet
- BLO: back loop only
- MR: magic ring
- sp(s): space(s)
- st(s): stitch(es)
- rnd: round
- rep: repeat
Special stitches:
- Picot: ch 3, sl st in the 3rd ch from the hook.
- Sc around post (from behind): Fold the petals toward you. From the back of the work, insert the hook from right to left around the post of the named stitch, yarn over, pull up a loop, and finish as a normal sc. This anchors a chain loop behind a petal.
Gauge and Checkpoints
Exact gauge matters less for an ornament than for a garment, but it controls how much the petals cup. Work the center disc (Rnds 1–3) first and measure it before going on.
Gauge: Rnds 1–3 = 1 in (2.5 cm) across.
Checkpoints (measure flat, petals pressed down lightly, edge to edge):
- After Rnd 3 (center disc): 1 in (2.5 cm)
- After Rnd 4 (Tier 1): 1.5 in (3.8 cm)
- After Rnd 6 (Tier 2): 2.5 in (6.4 cm)
- After Rnd 8 (Tier 3): 3.5 in (8.9 cm)
- After Rnd 10 (Tier 4): 4.25 in (10.8 cm)
- After Rnd 11 (border): 4.5 in (11.4 cm)
If your disc is too big, change to a 2.25 mm hook. If it is too small, change to a 2.75 mm hook. If the rose is off by more than 0.25 in (0.6 cm) at an early checkpoint, the gap will grow by the end, so fix it early.
Rose
Work the rose in one piece with the right side facing you. Do not turn.
Center Disc
Using burgundy, work Rnds 1–3 in a continuous spiral without joining. Mark the first st of each round. Working in back loops leaves the front loops standing up as a spiral ridge, which forms the rolled center.
Rnd 1: MR, 6 sc in ring. Pull the ring closed. (6 sc)
Rnd 2: 2 sc BLO in each st around. (12 sc)
Rnd 3: *Sc BLO in next st, 2 sc BLO in next st; rep from * 5 more times. (18 sc)
Sl st in the next st to smooth the step. Checkpoint: 1 in (2.5 cm).
Tier 1: Small Cupped Petals
Rnd 4: Ch 1. Working in both loops, *sc in next st, 5 dc in next st, sc in next st; rep from * 5 more times. Sl st to first sc. (6 petals; 42 sts: 12 sc + 30 dc)
Each petal has 7 sts (sc, 5 dc, sc), and the 3rd dc marks its center. The petals cup upward around the spiral. Checkpoint: 1.5 in (3.8 cm).
Tier 2: Large Solid Petals
Rnd 5 (loop base 1): Ch 1. Fold Tier 1 forward. Sc around post (from behind) of the 3rd dc of the first petal. *Ch 5, sc around post of the 3rd dc of next petal; rep from * 4 more times, ch 5, sl st to first sc. (6 sc, 6 ch-5 loops)
Because each anchor sits behind the center of a petal, the new petals fall between the old ones. That offset gives the staggered look.
Rnd 6: Sl st in first ch-5 loop. *(Sc, hdc, 7 dc, hdc, sc) in ch-5 loop; rep from * in each loop around. Sl st to first sc. (6 petals; 66 sts, 11 per petal)
The 4th dc (6th st) marks the center of each petal. Checkpoint: 2.5 in (6.4 cm).
Tier 3: Picot Petals
Rnd 7 (loop base 2): Ch 1. Sc around post (from behind) of the 4th dc of the first Tier 2 petal. *Ch 7, sc around post of the 4th dc of next petal; rep from * 4 more times, ch 7, sl st to first sc. (6 sc, 6 ch-7 loops)
Rnd 8: Sl st in first ch-7 loop. *(Sc, hdc, [dc, picot] 6 times, dc, hdc, sc) in ch-7 loop; rep from * in each loop around. Sl st to first sc. (6 petals; 66 sts + 36 picots. Per petal: 2 sc, 2 hdc, 7 dc, 6 picots)
The picots between the dc give these petals their beaded, lacy edge. The 4th dc marks each center. Checkpoint: 3.5 in (8.9 cm).
Tier 4: Lacy Fan Petals
Rnd 9 (loop base 3): Ch 1. Sc around post (from behind) of the 4th dc of the first Tier 3 petal. *Ch 9, sc around post of the 4th dc of next petal; rep from * 4 more times, ch 9, sl st to first sc. (6 sc, 6 ch-9 loops)
Rnd 10: Sl st in first ch-9 loop. *(Sc, hdc, dc, [ch 2, dc] 8 times, hdc, sc) in ch-9 loop; rep from * in each loop around. Sl st to first sc. (6 petals; 78 sts + 48 ch-2 sps. Per petal: 2 sc, 2 hdc, 9 dc, 8 ch-2 sps)
As you work, slide the sts together along each loop so they all fit. The dc spread into a fan of spokes with eyelets between them, which makes the open outer petals. Checkpoint: 4.25 in (10.8 cm).
Do not fasten off. Go straight into the border.
Leaf
Using sage green, ch 13.
Rnd 1: Working in the back bumps of the chain, start in the 2nd ch from the hook: sc in it, hdc in next ch, dc in next ch, [ch 1, skip 1 ch, dc in next ch] 3 times, ch 1, skip 1 ch, hdc in next ch. In the last ch, work (sc, ch 2, sc) for the tip.
Rotate the work and continue along the free loops of the chain: hdc in next ch, ch 1, skip 1 ch, [dc in next ch, ch 1, skip 1 ch] 3 times, dc in next ch, hdc in next ch, sc in last ch. Ch 2, sl st to first sc. (Each side: 1 sc, 2 hdc, 4 dc, 4 ch-1 sps; plus 2 tip sc, 1 tip ch-2 sp, 1 base ch-2 sp)
Rnd 2: Ch 1. Along the first side, sc in each st and each ch-1 sp (11 sc). Sc in tip sc, (sc, ch 2, sc) in tip ch-2 sp, sc in next tip sc. Along the second side, sc in each st and each ch-1 sp (11 sc). Work 3 sc in base ch-2 sp, then sl st to first sc. (29 sc + 1 tip ch-2 sp)
The foundation chain becomes the center vein and the ch-1 sps become the openwork. Fasten off and leave a 12 in (30.5 cm) tail. Checkpoint: 2 in (5.1 cm) long and 1 in (2.5 cm) wide.
Hanging Cord
Using burgundy, ch 30. Sl st in the back bump of the 2nd ch from the hook and of each ch across. (29 sl st)
The cord is about 4 in (10.2 cm) long. Fasten off and leave a 6 in (15.2 cm) tail.
Border
Border gauge: One repeat of 3 sc + 1 picot covers about 0.25 in (0.6 cm) of edge. That makes about 2 in (5.1 cm) of scalloped edge per outer petal.
Rnd 11: Work into the sts of Rnd 10. *Sl st in sc, sc in hdc, sc in first dc, [2 sc in next ch-2 sp, sc in next dc, picot] 8 times, sc in hdc, sl st in sc; rep from * for each of the 6 petals. Fasten off and leave a 6 in (15.2 cm) tail.
Per petal: 2 sl st, 27 sc, 8 picots.
Round count: 78 sts worked one into each existing st (12 sl st + 66 sc), plus 96 sc added in the ch-2 sps (48 sps × 2), for 174 sts and 48 picots. That totals 12 sl st, 162 sc, and 48 picots.
Why the math works: Each ch-2 sp gets exactly 2 sc, so the edge matches the length of the chains under it and doesn’t ruffle or pull. Each dc gets 1 sc, so the spokes stay evenly spaced. The picots add only height, about 0.125 in (0.3 cm), so the rose grows from 4.25 in (10.8 cm) to 4.5 in (11.4 cm) without cupping.
Assembly
- Lay the rose face down. Pick one Tier 4 petal to be the top, at 12 o’clock.
- Fold the cord in half. Place both ends on the back of the top petal, overlapping 0.5 in (1.3 cm), so the loop stands 1.5 in (3.8 cm) above the edge. Sew the ends through the loop base round with small stitches.
- Place the leaf behind the upper left of the rose, at about 10 o’clock, with the tip pointing up and out. Tuck the base about 0.5 in (1.3 cm) under the petals. Sew it to the back of Rnds 7 and 9 with the leaf tail.
- Weave in all ends on the back.
Final Blocking
- Spray the ornament until it is damp but not dripping.
- Pin it face up on the mat to 4.5 in (11.4 cm) across.
- Pin each outer petal at its center, and open the fan eyelets with your fingers.
- Pin out the picots on Tier 4 one by one if you want a crisp lace edge.
- Pinch the Tier 1 and Tier 2 petals upward to cup them. Roll the spiral center gently with a fingertip.
- Pin the leaf flat to 2 in (5.1 cm) long, with the tip pinned to a point.
- If you’re using stiffener, brush it on now. Leave the loop free of stiffener.
- Let it dry completely before unpinning.
Final Quality-Control Checklist
- Center disc has 18 sc and a visible spiral ridge
- Tier 1: 6 petals, 7 sts each
- Tier 2: 6 petals, 11 sts each
- Tier 3: 6 petals, 7 dc and 6 picots each
- Tier 4: 6 petals, 9 dc and 8 ch-2 sps each
- Border: 27 sc and 8 picots per outer petal
- Each tier sits between the petals of the tier in front of it
- Rose measures 4.5 in (11.4 cm) across
- Leaf is 2 in (5.1 cm) long and hidden at the base
- Loop is centered and stands 1.5 in (3.8 cm) high
- No ends visible from the front
Troubleshooting
- Petals in one tier line up with the tier in front: Anchor the loop base sc behind the center dc of each petal, not between petals.
- Outer petals crowd or curl: The ch-9 loops are too tight. Make looser chains or go up 0.25 mm for Rnd 9 only.
- Outer petals flop: Your chains are too loose. Chain more firmly, or use stiffener.
- Spiral center is not visible: Make sure Rnds 2–3 are worked in BLO only.
- Border waves: You have more than 2 sc in some ch-2 sps. Count each repeat.
- Leaf twists: Block it flat, pinned at the tip and base.
Care
Hand wash in cool water with mild soap, press out the water in a towel, and reshape it flat to dry. A stiffened ornament should be dusted rather than washed.
Final Notes
Each stage builds on the one before it. The 1 in (2.5 cm) center disc grows to 1.5 in (3.8 cm) at Tier 1, then 2.5 in (6.4 cm) at Tier 2, 3.5 in (8.9 cm) at Tier 3, and 4.25 in (10.8 cm) at Tier 4. The picot border brings the rose to 4.5 in (11.4 cm). The 2 in (5.1 cm) leaf and the 1.5 in (3.8 cm) loop complete the ornament. If you hit each checkpoint, the finished rose will match.
Happy crocheting!