

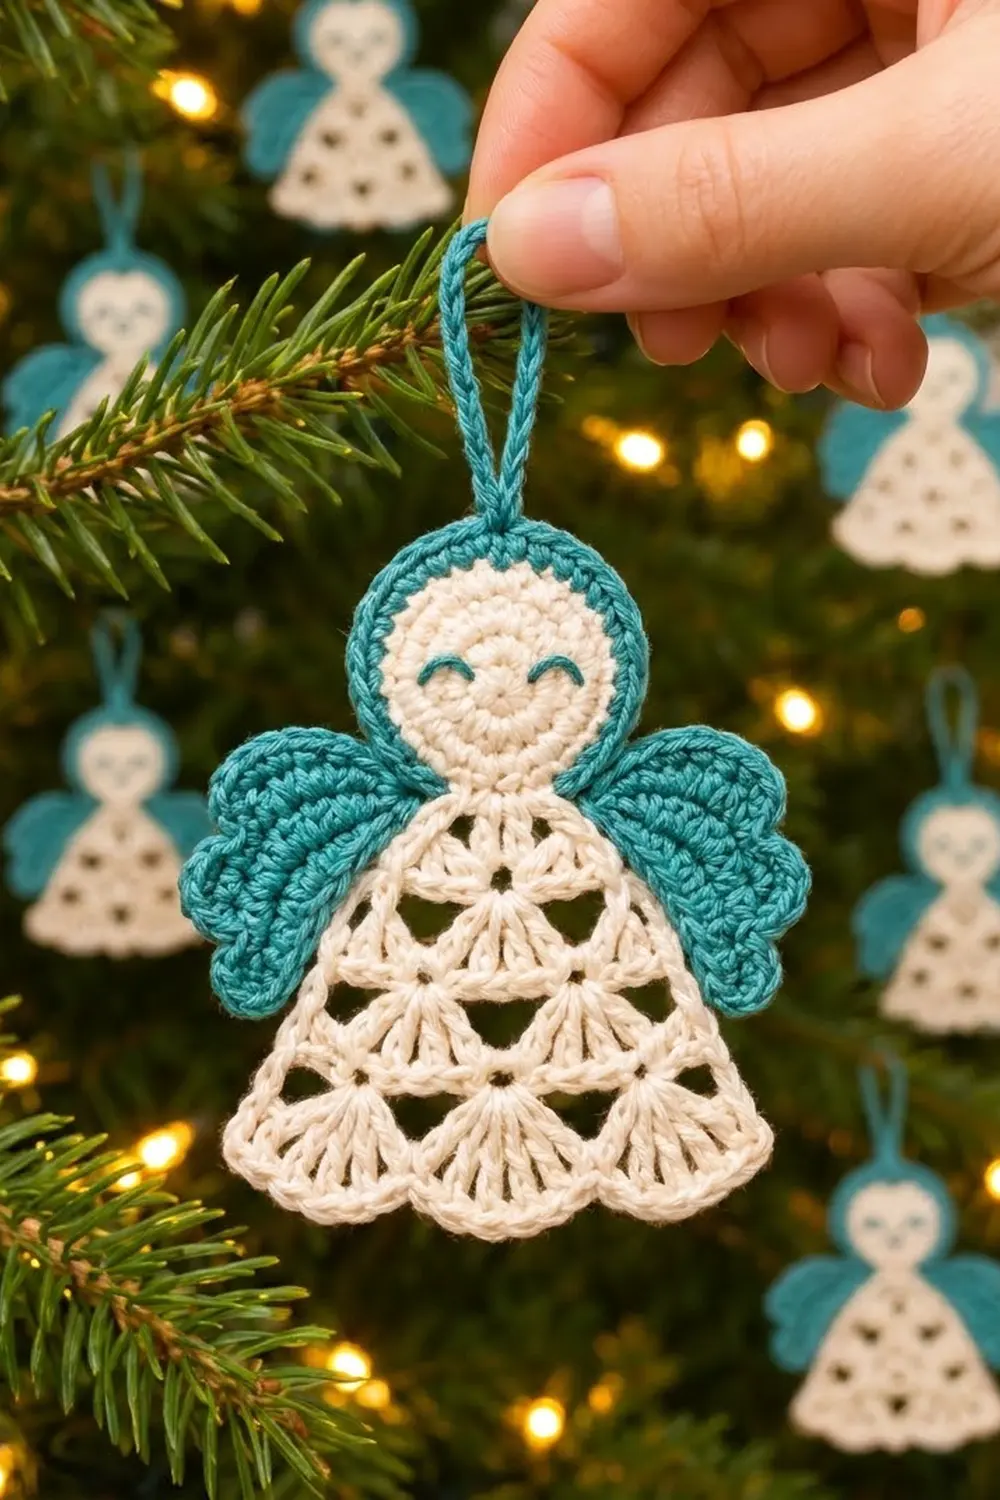
This little angel is a quick, lacy ornament made from just two colors. She has a cream face, a teal hood, two small teal wings with scalloped edges, and a cream dress of fan shells that ends in a soft scalloped hem.
The style is simple and Scandinavian-inspired. The open triangles in the dress let tree lights shine through, and the closed, smiling eyes add a little personality without needing safety eyes or extra colors. The pattern uses US crochet terms throughout.
The finished angel is about 4 in (10.2 cm) wide across the wings and 4.25 in (10.8 cm) tall without the loop, or 6 in (15.2 cm) tall with the loop.
You’ll make four pieces: a head, a body, and two wings. The teal hood and hanging loop are worked straight onto the head. Then you embroider the face and sew everything together.
Finished Size and Construction
- Finished size: 4 in (10.2 cm) wide × 4.25 in (10.8 cm) tall; 6 in (15.2 cm) tall including the loop
- Skill level: Easy / advanced beginner
- Terminology: US crochet terms
- Yarn weight: DK (light worsted, #3) cotton
- Hook: 3.25 mm (US D-3)
- Number of pieces: 4 (1 head, 1 body, 2 wings), plus a loop worked onto the head
- Layout: head centered over the body, one wing behind each shoulder
- Piece sizes: head 1.35 in (3.4 cm) across before the hood; body 3.25 in (8.3 cm) at the hem × 2.75 in (7.0 cm) tall; each wing 1.25 in (3.2 cm) × 1.5 in (3.8 cm)
- Size before border (hood): head 1.35 in (3.4 cm) across
- Border depth: teal hood adds 0.2 in (0.5 cm) on each side, so the head becomes 1.75 in (4.4 cm) across
Materials
Use a smooth, mercerized DK cotton. It shows the shell stitches clearly, blocks crisply and won’t fuzz on the tree. Cotton-acrylic blends also work, but they relax more, so block them a bit firmer.
- Cream: 8 g (about 19 m)
- Teal: 5 g (about 12 m)
- 3.25 mm (US D-3) crochet hook
- Tapestry needle
- Scissors
- 2 locking stitch markers
- Rustproof pins and a foam blocking mat
- Spray bottle with water
These quantities include a margin of about 20% for gauge swatching and sewing tails.
Abbreviations (US Terms)
- ch – chain
- sl st – slip stitch
- sc – single crochet
- hdc – half double crochet
- dc – double crochet
- BLO – back loop only
- st(s) – stitch(es)
- sp – space
- sk – skip
- RS – right side
Special stitches
- Shell: 7 dc in the same stitch.
- Half-shell: 4 dc in the same stitch. At the start of a row, work ch 3 (counts as the first dc) plus 3 dc in the same stitch.
Gauge and Checkpoints
Make the head first to test your gauge. It’s the smallest piece, and every other piece is sized to match it.
- Head after Round 2: 1.1 in (2.8 cm) across
- Head after Round 3: 1.35 in (3.4 cm) across
- Head with hood: 1.75 in (4.4 cm) across
- Body after Row 1: 0.75 in (1.9 cm) wide
- Body after Row 3: 1.5 in (3.8 cm) wide
- Body after Row 5: 2.4 in (6.1 cm) wide
- Body after Row 7: 3.25 in (8.3 cm) wide × 2.75 in (7.0 cm) tall
- One shell: about 0.8 in (2.0 cm) wide at its base
- Wing: 1.25 in (3.2 cm) × 1.5 in (3.8 cm)
If your head is too big (more than 1.45 in / 3.7 cm after Round 3), go down to a 3.0 mm hook. If it’s too small (under 1.25 in / 3.2 cm), go up to a 3.5 mm (US E-4) hook. A small difference is fine, as long as all pieces are made with the same hook and tension.
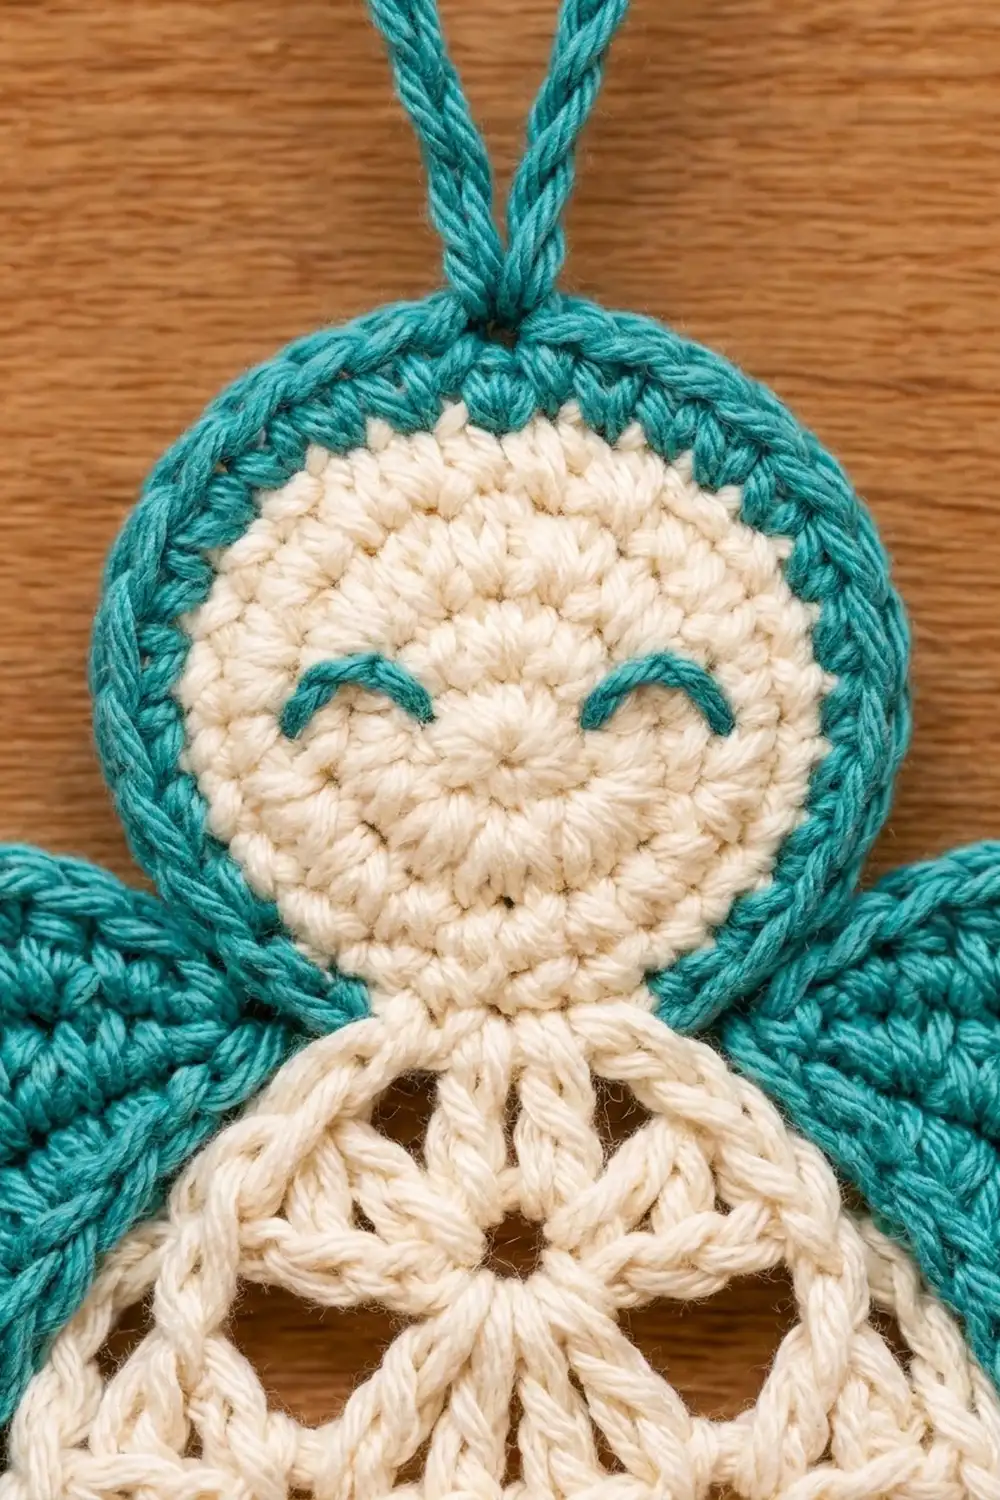
Head (Cream)
Work in continuous joined rounds with the RS facing you. The ch 2 at the start of each round does not count as a stitch.
Round 1: Make a magic ring. Ch 2, then work 12 hdc into the ring. Pull the ring closed and sl st to the first hdc. (12 hdc)
Round 2: Ch 2, then work 2 hdc in each st around. Sl st to the first hdc. (24 hdc)
Checkpoint: 1.1 in (2.8 cm) across.
Round 3: Ch 1, then work (sc in next 2 sts, 2 sc in next st) 8 times. Sl st to the first sc. (32 sc)
Checkpoint: 1.35 in (3.4 cm) across, lying flat.
Fasten off and leave a 6 in (15.2 cm) tail.
Mark the chin: Lay the head with the joining seam at the bottom center. Count 4 sts to the left and 4 sts to the right of the seam, so you have 8 chin sts in total. Place a marker in the first and last chin st. These 8 sts stay cream and will be sewn to the body. The other 24 sts get the hood.
Body (Cream)
The body is worked top-down in turned rows, starting at the neck ring.
- Dc rows (Rows 1, 3, 5 and 7) are the fan rows.
- Sc rows (Rows 2, 4 and 6) create the triangular openings.
Shells are only ever worked into sc stitches. Chain spaces are always skipped.
Foundation: Ch 4 and sl st to the first ch to form a ring. This is the small neck opening.
Row 1 (RS): Ch 3 (counts as dc), then work 6 dc into the ring. Turn. (7 dc: 1 fan)
Row 2: Ch 1 (does not count). Sc in the first dc, ch 3, sk 2 dc, sc in the 4th (center) dc, ch 3, sk 2 dc, sc in the top of the turning ch. Turn. (3 sc, 2 ch-3 sps)
Row 3: Work a half-shell in the first sc (ch 3 + 3 dc). Sk the ch-3 sp. Work a shell (7 dc) in the center sc. Sk the ch-3 sp. Work 4 dc in the last sc. Turn. (15 dc: half-shell, shell, half-shell)
Checkpoint: 1.5 in (3.8 cm) wide.
Row 4: Ch 1. Sc in the first dc, then ch 2. Sc in the gap between the half-shell and the shell, then ch 5. Sc in the gap between the shell and the next half-shell, then ch 2. Sc in the top of the turning ch. Turn. (4 sc, 2 ch-2 sps, 1 ch-5 sp)
The ch-5 sits over the center of the shell below. This leaves the first triangular opening.
Row 5: Work a half-shell in the first sc. Work a shell in each of the next 2 sc. Work 4 dc in the last sc. Turn. (22 dc: 4 + 7 + 7 + 4)
Checkpoint: 2.4 in (6.1 cm) wide.
Row 6: Ch 1. Sc in the first dc, then ch 2. Sc in the next gap between shells, ch 5. Repeat from * once more. Sc in the last gap, then ch 2. Sc in the top of the turning ch. Turn. (5 sc, 2 ch-2 sps, 2 ch-5 sps)
Row 7 (hem): Work a half-shell in the first sc. Work a shell in each of the next 3 sc. Work 4 dc in the last sc. (29 dc: 4 + 7 + 7 + 7 + 4)
The three full shells form the scalloped hem, and the two half-shells square off the corners.
Checkpoint: 3.25 in (8.3 cm) wide × 2.75 in (7.0 cm) tall.
Fasten off and weave in the ends. Leave the starting tail at the neck ring, about 8 in (20.3 cm) long, for sewing.
Wings (Teal, Make 2)
Wings are worked in hdc rows through the back loop only, which creates the visible ridges. The ch 2 at the start of each row does not count as a stitch.
Foundation: Ch 10.
Row 1: Hdc in the 3rd ch from the hook and in each ch across. Turn. (8 hdc)
Rows 2–5: Ch 2, then hdc in BLO of each st across. Turn. (8 hdc per row)
Edging (scalloped outer edge plus sc around): Working across Row 5:
- Sl st in the 1st st and sk the 2nd st.
- Work 5 dc in the 3rd st, sk the 4th st, and sl st in the 5th st.
- Sk the 6th st, work 5 dc in the 7th st, and sl st in the 8th st.
- Rotate the wing. Work 2 sc in each of the 5 row ends.
- Work 1 sc in each of the 8 foundation ch loops.
- Work 2 sc in each of the 5 row ends up the other side.
- Sl st to the first sl st.
(2 scallops of 5 dc, 3 sl st, 28 sc)
Checkpoint: 1.25 in (3.2 cm) × 1.5 in (3.8 cm).
Fasten off and leave a 10 in (25.4 cm) teal tail on the first wing. For the second wing, turn it over before sewing so the two wings mirror each other.
Border: Teal Hood and Loop
Border gauge: One round of teal hdc adds 0.2 in (0.5 cm) all around the head’s outer edge.
Hood round: With the RS facing and the chin at the bottom, join teal with a sl st in the first st after the left chin marker. Ch 2 (does not count). Work (2 hdc in next st, hdc in next 2 sts) 8 times. You start in the same st as the join and stop at the right chin marker. Sl st in the next (first chin) st. (32 hdc worked across 24 sts, plus 2 sl sts)
The chin’s 8 sts stay cream. Don’t fasten off.
Why the math works: The cream edge sits 0.675 in (1.7 cm) from the center, and the hood’s outer edge sits 0.875 in (2.2 cm) from the center. 0.875 ÷ 0.675 is about 1.30, so 24 sts × 1.30 = about 31 sts. Rounding up to 32, which is 1 increase every 3 sts, keeps the hood flat without ruffling.
Hanging loop:
- Sl st along the top of the hood to the 16th hdc, which is the top center.
- Ch 22 and sl st in the same st to form a loop.
- Turn and sl st in each of the 22 ch for a firm cord. (22 sl st)
- Sl st in the base st and fasten off.
The loop rises 1.75 in (4.4 cm) above the hood.
Face: Use a teal tail threaded on the tapestry needle. Embroider two small arcs that curve downward, each about 0.25 in (0.6 cm) wide, for closed, smiling eyes. Center them on Round 2, about 0.4 in (1.0 cm) apart. Use 2–3 backstitches per eye and knot the ends on the back.
Make All Pieces
- Cream: 1 head, 1 body
- Teal: 2 wings; the hood, loop and eyes are worked onto the head
Layout:
           [ loop ]
           [ head ]
[ wing ]   [ body ]   [ wing ]
Joining
Sew the pieces with the tapestry needle and matching yarn, using a whipstitch through the back loops only so the seams stay invisible from the front.
Head to body: Lay the 8 cream chin sts over the neck ring so the head overlaps the body by 0.25 in (0.6 cm). Use the cream tail from the neck ring. Make 1 whipstitch through each chin st and the ring behind it, so 8 stitches anchor 8 chin sts. Pull each stitch snug but not tight, so the ring doesn’t pucker.
Wings to body: Place each wing behind the body with its foundation edge, the straight edge without scallops, against the back of the body’s side edge. The top of each wing should touch the bottom of the hood, and the scallops should point outward and slightly downward. Each wing overlaps the body by about 0.25 in (0.6 cm).
The 8 foundation sc of the wing line up with the row ends of body Rows 1–4. Make 2 whipstitches per body row end, for 8 stitches matching the 8 wing sts.
Tension: Each stitch should just close the gap, with no ridge showing on the front. If the dress pulls in at the shoulders, loosen that seam.
Size checkpoint: The assembled angel should measure 4 in (10.2 cm) across the wings and 4.25 in (10.8 cm) tall from the hood top to the hem.
Final Blocking
- Weave in all the remaining ends along stitches of the same color.
- Pin the angel face-up on the blocking mat.
- Pin the hem first: one pin at the tip of each shell and one at each corner, for a 3.25 in (8.3 cm) width.
- Pin each ch-5 opening into a neat triangle by pinning its center point.
- Pin the wing scallops open and the hood into a smooth curve.
- Spray until the piece is evenly damp, but not soaked.
- Leave it to dry completely (2–4 hours) before you remove the pins.
- For a stiffer ornament, mist lightly with fabric stiffener before drying.
Final Quality-Control Checklist
- Head is 1.75 in (4.4 cm) across with the hood, and the hood leaves 8 chin sts cream.
- Loop is centered and 1.75 in (4.4 cm) tall.
- Eyes are level and evenly spaced.
- Body has 1 fan, then 1 full shell, then 2, then 3 full shells at the hem, plus half-shells.
- Hem is 3.25 in (8.3 cm) wide and both sides are straight.
- Wings mirror each other and sit at equal height.
- Total size is 4 in (10.2 cm) × 4.25 in (10.8 cm).
- No ends or seams show from the front.
Troubleshooting
- Head ruffles: Your tension on Round 3 is too loose. Redo it with a smaller hook.
- Head cups: You probably missed an increase. Recount to 24 and 32.
- Hood flares: Check that you worked exactly 8 increases, not more.
- Body curls toward the sides: Your sc rows are too tight. Loosen the ch-2 and ch-5 spaces.
- Openings look closed: Your ch-5s are too short. Chain more loosely, and pin the openings open when blocking.
- Edges are uneven: Check that every dc row starts and ends with a 4-dc half-shell.
- Wings droop: Sew them higher, so the top edge touches the hood.
Care
Hand wash in cool water with mild soap, press out the water in a towel, and reshape the angel to dry flat. Store her flat or hang her by the loop, away from direct sun.
Final Notes
Everything is sized from the head. Round 3 measures 1.35 in (3.4 cm), and the teal hood brings it to 1.75 in (4.4 cm).
The body grows one shell every two rows, from 0.75 in (1.9 cm) to 1.5 in (3.8 cm), then 2.4 in (6.1 cm), then 3.25 in (8.3 cm). It ends 2.75 in (7.0 cm) tall.
The wings are 1.25 in (3.2 cm) × 1.5 in (3.8 cm). Once everything is joined with 0.25 in (0.6 cm) overlaps, the angel measures 4 in (10.2 cm) wide and 4.25 in (10.8 cm) tall, or 6 in (15.2 cm) tall with the loop.
Make one, check the measurements, and then make a whole flock for the tree. Happy crocheting!