

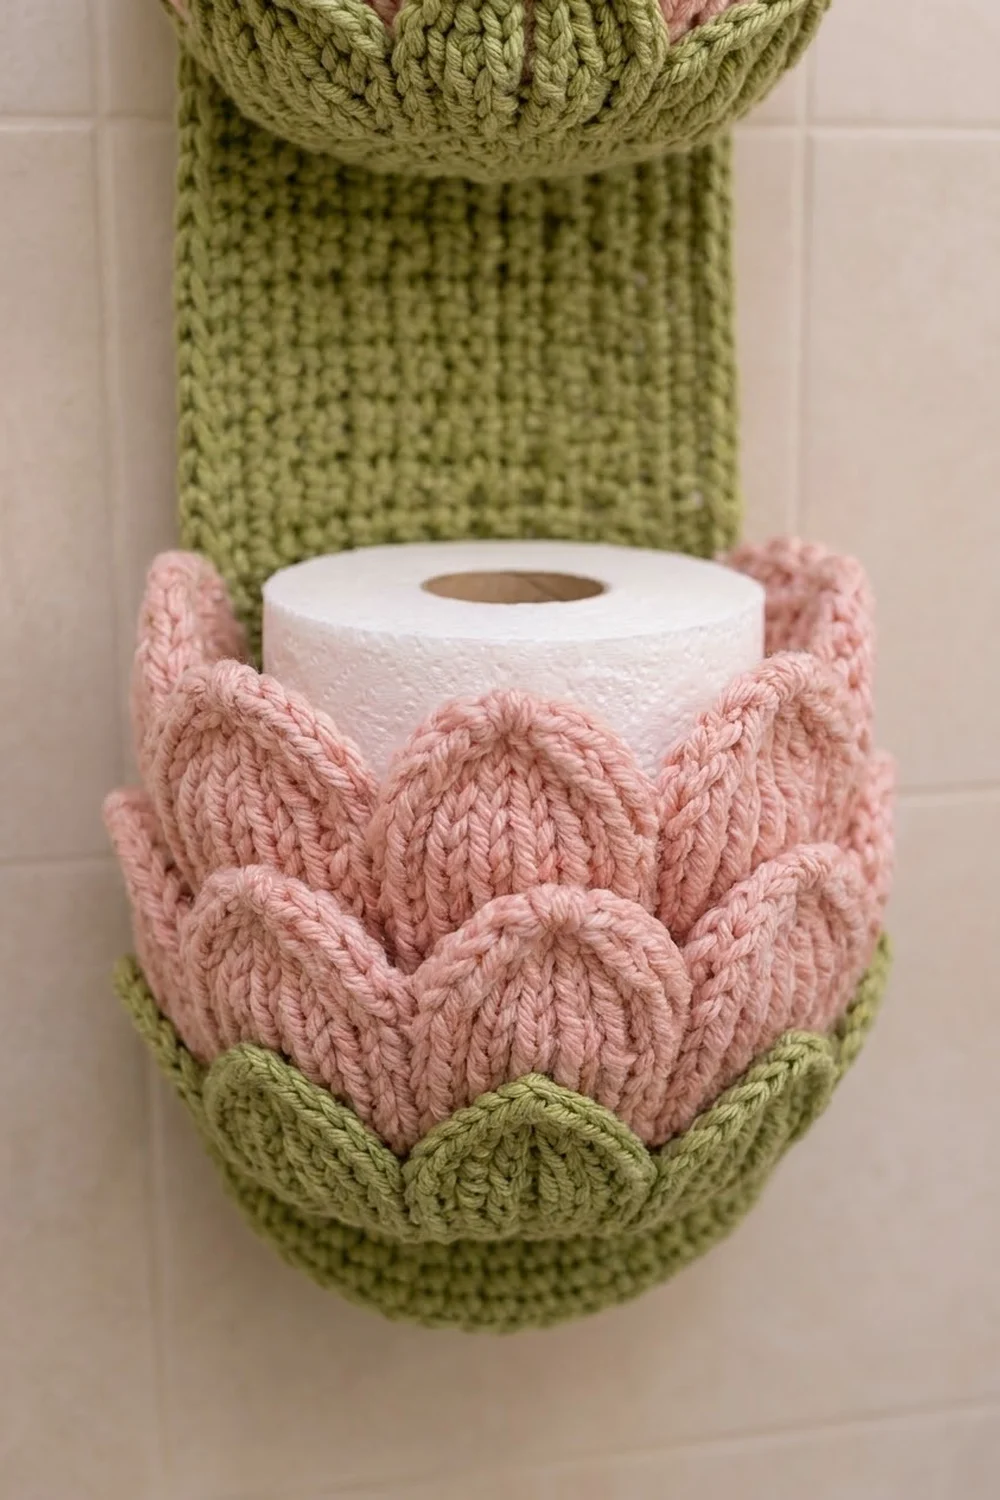
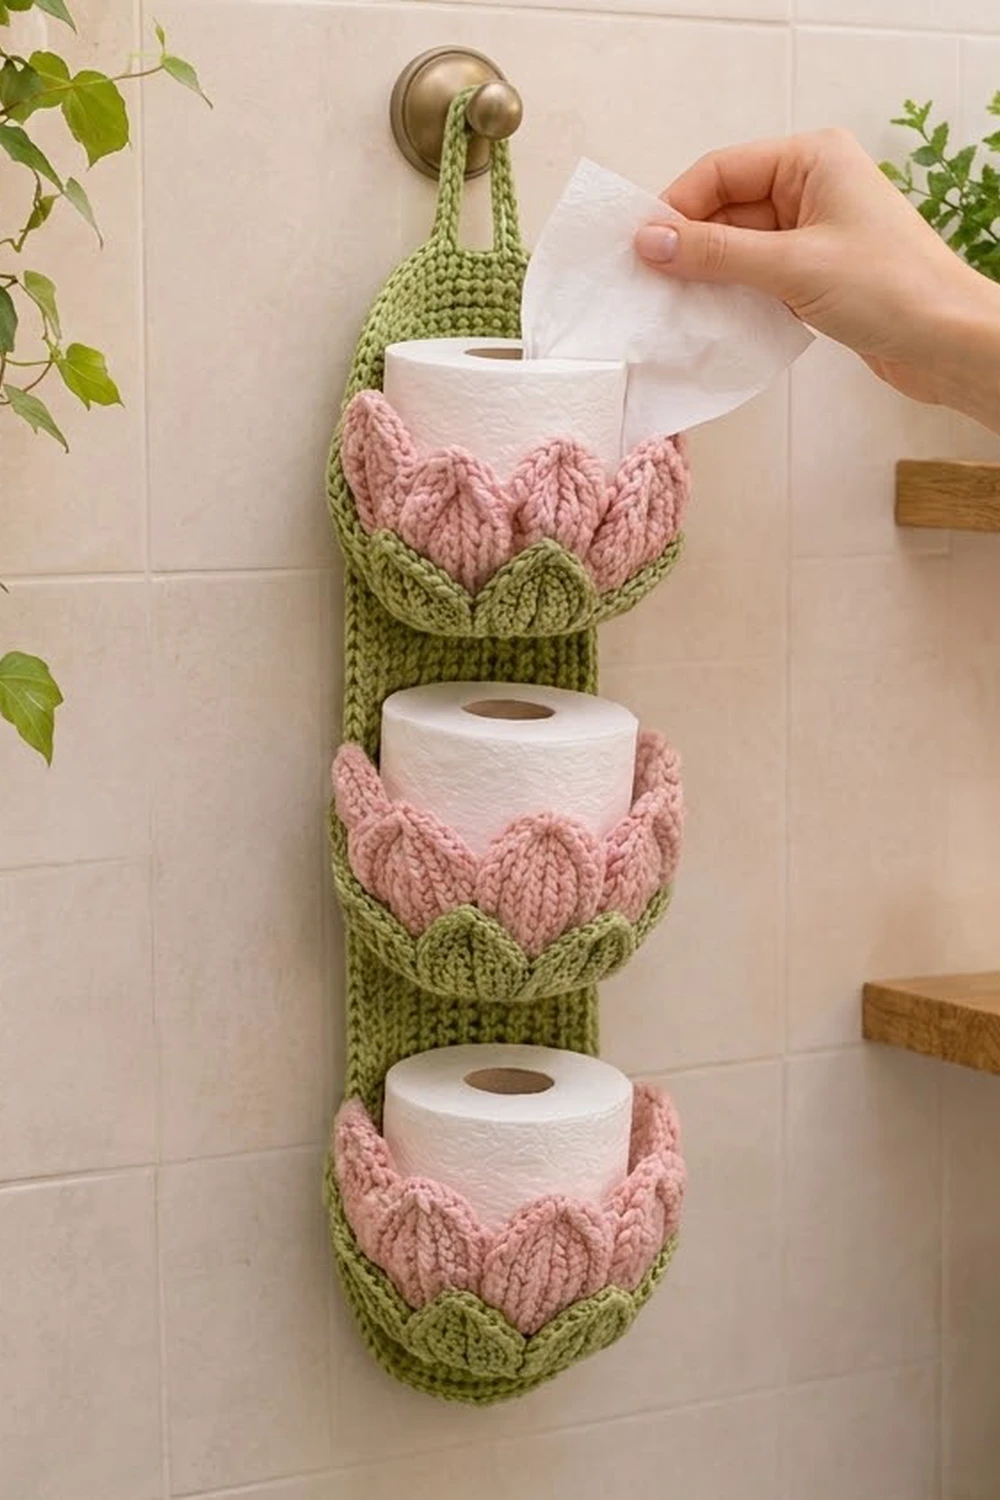
This hanging holder stores three spare rolls in a row of lotus-shaped pockets. A long sage-green backing panel with a rounded top and a hanging loop goes on a hook or towel knob. Three round baskets are sewn to the front, each one wrapped in pointed pink petals over a ring of small green leaves.
The palette is just two colors: sage green for the panel, the basket bases and the leaves, and soft dusty pink for the upper basket walls and two staggered tiers of petals. The petals are worked in back-loop rows, which gives each one a raised, ribbed texture that looks a little like knitting.
The pattern uses US crochet terms. The finished holder measures 4.5 in (11.4 cm) wide at the panel and 19.5 in (49.5 cm) tall without the loop, or 21.5 in (54.6 cm) with it. Each pocket is 5 in (12.7 cm) across and holds a standard roll.
Construction is simple. You crochet one flat panel in rows and give it a single-round border with a hanging loop. Then you make three pockets in the round from the base up, adding leaves and petals into spare front loops. Finally you sew the pockets onto the panel at set row positions.
Finished Size and Construction
- Finished size: 4.5 in (11.4 cm) wide x 19.5 in (49.5 cm) tall; 21.5 in (54.6 cm) including loop
- Skill level: Intermediate
- Terminology: US
- Yarn weight: Worsted (#4), cotton or cotton blend
- Hook: 5.0 mm (H-8)
- Number of pieces: 4 (1 back panel + 3 pockets)
- Layout: 3 pockets stacked vertically on 1 panel
- Pocket size: 5 in (12.7 cm) diameter, 3 in (7.6 cm) wall, 4 in (10.2 cm) to petal tips
- Panel size before border: 4 in (10.2 cm) x 19 in (48.3 cm)
- Border depth: 0.25 in (0.6 cm)
Materials
Choose a smooth worsted-weight cotton or cotton blend. Cotton holds the basket shape, and it stands up to a damp bathroom better than wool does. Stay away from fuzzy or very drapey yarns, because the pockets need to stand up on their own. A tight twist also shows off the ribbed petal texture best.
- Sage green: 220 g / 440 m (approx. 480 yd)
- Dusty pink: 250 g / 500 m (approx. 547 yd)
Tools:
- 5.0 mm (H-8) crochet hook
- Tapestry needle
- 8–10 locking stitch markers
- Measuring tape
- Rustproof pins and a blocking mat
- Scissors
- One toilet roll for fit tests and blocking
These quantities include a margin of about 10% for your gauge swatch and weaving in ends.
Abbreviations (US Terms)
- ch – chain
- sc – single crochet
- sc2tog – single crochet 2 together
- sl st – slip stitch
- st(s) – stitch(es)
- BLO / FLO – back loop only / front loop only
- rnd – round
- inc – 2 sc in the same st
Special stitch – Petal (worked over 6 front loops):
Row 1: ch 1, sc in FLO of each of the next 6 sts, turn (6).
Rows 2–4: ch 1, sc in BLO across, turn (6).
Row 5: ch 1, sc2tog, sc in next 2, sc2tog, turn (4).
Row 6: ch 1, sc in BLO across, turn (4).
Row 7: ch 1, (sc2tog) twice, turn (2).
Row 8: ch 1, sc2tog (1).
Then sl st 7 times down the side edge nearest the next unworked front loop, ending at the base. The petal is 6 sts wide and 2 in (5.1 cm) tall.
Special stitch – Leaf (worked over 6 front loops):
Row 1: ch 1, sc in FLO of each of the next 6 sts, turn (6).
Row 2: ch 1, sc2tog, sc in next 2, sc2tog, turn (4).
Row 3: ch 1, (sc2tog) twice, turn (2).
Row 4: ch 1, sc2tog (1).
Then sl st 3 times down the side edge nearest the next unworked front loop. The leaf is 1 in (2.5 cm) tall.
Gauge and Checkpoints
Gauge: 14 sc x 16 rows = 4 in (10.2 cm) in sc worked in rows.
Make one complete pocket before you start the panel. The pocket is a better test than a flat swatch, since it shows whether a roll fits and how firm the walls are.
- After Rnd 10 (base): 5 in (12.7 cm) across.
- After Rnd 22 (wall): wall is 3 in (7.6 cm) tall from the fold.
- After petals: 4 in (10.2 cm) from base to the tips of the inner petals.
- Panel after Row 72: 4 in (10.2 cm) x 18 in (45.7 cm).
If your base is too big (over 5.25 in / 13.3 cm), go down to a 4.5 mm hook. If it is too small (under 4.75 in / 12.1 cm), go up to a 5.5 mm hook. Test the fit with a roll after Rnd 22, then use the same hook for every piece.
Soft walls that fold over are a sign your tension is loose. Go down a hook size even if the base measurement is close.
Back Panel
With green, ch 15.
Row 1: Sc in 2nd ch from hook and in each ch across, turn. (14 sc)
Rows 2–72: Ch 1, sc in each st across, turn. (14 sc)
Checkpoint: 4 in (10.2 cm) wide x 18 in (45.7 cm) long.
Row 73: Ch 1, sc2tog, sc in next 10, sc2tog, turn. (12 sc)
Row 74: Ch 1, sc2tog, sc in next 8, sc2tog, turn. (10 sc)
Row 75: Ch 1, sc2tog, sc in next 6, sc2tog, turn. (8 sc)
Row 76: Ch 1, sc2tog, sc in next 4, sc2tog. (6 sc) Do not fasten off.
These four rows narrow the top into the rounded arch. Panel before border: 4 in (10.2 cm) x 19 in (48.3 cm).
Pocket (make 3)
Base
With green, make a magic ring.
Rnd 1: 6 sc in ring, join with sl st to first sc. (6)
Rnd 2: Ch 1, inc in each st, join. (12)
Rnd 3: Ch 1, (sc 1, inc) around, join. (18)
Rnd 4: Ch 1, (sc 2, inc) around, join. (24)
Rnd 5: Ch 1, (sc 3, inc) around, join. (30)
Rnd 6: Ch 1, (sc 4, inc) around, join. (36)
Rnd 7: Ch 1, (sc 5, inc) around, join. (42)
Rnd 8: Ch 1, (sc 6, inc) around, join. (48)
Rnd 9: Ch 1, (sc 7, inc) around, join. (54)
Rnd 10: Ch 1, (sc 8, inc) around, join. (60)
Checkpoint: flat disc, 5 in (12.7 cm) across.
Wall
Rnd 11: Ch 1, sc in BLO of each st, join. (60) This turns the edge up into a wall and leaves the front loops of Rnd 10 free for the leaves.
Rnds 12–14: Ch 1, sc in each st, join. (60)
Rnd 15: Change to pink. Ch 1, sc in BLO of each st, join. (60) The front loops of Rnd 14 stay free for the outer petals.
Rnds 16–18: Ch 1, sc in each st, join. (60)
Rnd 19: Ch 1, sc in BLO of each st, join. (60) The front loops of Rnd 18 stay free for the inner petals.
Rnds 20–22: Ch 1, sc in each st, join. (60) Fasten off pink.
Checkpoint: 12 wall rounds, 3 in (7.6 cm) tall. A roll should drop in easily.
Leaf Ring
Turn the pocket upside down. Join green in any free front loop of Rnd 10.
Work 10 Leaves around, each over 6 consecutive front loops. 10 x 6 = 60, so you use every loop exactly once. Join with sl st to the first leaf base and fasten off. (10 leaves)
Outer Petal Tier
Join pink in any free front loop of Rnd 14. Mark this loop as st 1.
Work 10 Petals around, each over 6 front loops (10 x 6 = 60). Join and fasten off. (10 petals) The tips come up to about the rim.
Inner Petal Tier
Count 3 sts to the left of the st directly above st 1 and join pink in the free front loop of Rnd 18 there. This 3-st shift puts each inner petal between two outer petals.
Work 10 Petals around (60 loops). Join and fasten off. (10 petals) The tips stand 1 in (2.5 cm) above the rim.
Pocket checkpoint: 5 in (12.7 cm) across and 4 in (10.2 cm) tall to the inner petal tips, with 30 leaves and petals in total.
Make All Pieces
- Back panel: 1 in green
- Pockets: 3, each with green Rnds 1–14 and leaf ring, and pink Rnds 15–22 and both petal tiers
Layout (panel rows, bottom to top):
        ( loop )
      /  arch   \     Rows 73–76
     |  panel    |    Rows 61–72
    [ POCKET 3  ]     Rows 49–60
     |  panel    |    Rows 37–48
    [ POCKET 2  ]     Rows 25–36
     |  panel    |    Rows 13–24
    [ POCKET 1  ]     Rows 1–12
Joining
Work the panel border and loop (next section) before you sew anything, because the pockets cover the panel edges once they are attached.
Method: Whipstitch with green yarn and a tapestry needle.
Stitch-to-stitch logic: Each pocket attaches along 12 sts at the back, which is one-fifth of its 60-st circumference. They match the 12 center sts of the panel (sts 2–13), so the outer st on each side stays free. Lift the back petals and leaves forward while you sew.
- Pocket 1: Sew the 12 back sts of Rnd 11 to sts 2–13 of Row 1. Sew the matching 12 sts of Rnd 22 to sts 2–13 of Row 12.
- Pocket 2: Sew Rnd 11 to Row 25 and Rnd 22 to Row 36.
- Pocket 3: Sew Rnd 11 to Row 49 and Rnd 22 to Row 60.
- Whipstitch the two vertical side lines of each pocket wall to the panel (12 rows to 12 rounds).
Tension: Pull each stitch snug but not tight. The panel should stay flat, without dimples behind the pockets.
Size checkpoint: Pocket rims sit 6 in (15.2 cm) apart. Rows 61–76 show 4 in (10.2 cm) of plain panel above the top pocket.
Border
Border gauge: Along the long sides, work 7 sc for every 8 row-ends. That matches the 14 sts / 16 rows gauge ratio, so the edges don’t ruffle or pull in.
Pick up the green loop left at Row 76 and work down the left side.
Rnd 1:
– Left side: 1 sc in each of the 4 shaping row-ends (Rows 76–73). Then across Rows 72–1, work (1 sc in each of the next 7 row-ends, skip 1) 9 times. That’s 4 + 63 = 67 sc.
– Bottom: Working into the foundation ch, 3 sc in first ch, sc in next 12, 3 sc in last ch. That’s 3 + 12 + 3 = 18 sc. Both bottom corners are counted here and nowhere else.
– Right side: Same as left, in reverse: 63 sc up Rows 1–72, then 4 sc in the shaping row-ends = 67 sc.
– Top: 1 sc in each of the 6 sts of Row 76 = 6 sc.
– Join with sl st to the first sc. Total: 67 + 18 + 67 + 6 = 158 sc.
The top corners get no extra stitches, because the decreases already form a curve.
Hanging loop: Sl st into the next sc (top st 2), ch 16, skip top sts 3–4, and sl st into top st 5. Work 24 sc into the ch-16 space, sl st into top st 5, and fasten off. The loop stands about 2 in (5.1 cm) tall.
Why the math works: 72 straight rows x 7/8 = 63 sc. The bottom edge (12 + 3 + 3) covers 14 sts plus 2 corner turns. The border adds 0.25 in (0.6 cm) to each edge: 4 + 0.5 = 4.5 in (11.4 cm) wide and 19 + 0.5 = 19.5 in (49.5 cm) tall.
Final Blocking
- Weave in all ends along the wall or panel stitches, going in the same direction as the stitches.
- Mist the holder lightly with cool water until it is damp but not wet.
- Lay it flat face up. Pin the panel to 4.5 in (11.4 cm) x 19.5 in (49.5 cm).
- Put a toilet roll, or a roll wrapped in plastic, inside each pocket to shape the wall into a round.
- Push the petals outward with your fingers so they flare a little and the tips point up.
- Let it dry completely, then take out the rolls and unpin.
Final Quality-Control Checklist
- Panel measures 4.5 in (11.4 cm) x 19.5 in (49.5 cm).
- Border has 158 sc with no gaps along the sides.
- Hanging loop is centered and firmly anchored.
- Each pocket has 10 leaves, 10 outer petals and 10 inner petals.
- Inner petals are staggered between the outer ones.
- Pocket rims are 6 in (15.2 cm) apart and level.
- Every roll slides in and out easily.
Troubleshooting
- Base cups or ruffles: Check that each round from 1 to 10 has 6 more sts than the one before. If it does, change hook size.
- Wall flares outward: Rnd 11 must go into the BLO. Working both loops gives you no fold line.
- Petals lean or twist: Make sure you worked Rows 2–4 and 6 in the BLO and that each petal starts in its own 6 loops.
- Petal count comes out at 9 or 11: You skipped or doubled a front loop. Count to 60 before you start each tier.
- Panel edges wave: Keep to 7 sc per 8 row-ends. If they pull in, skip 1 in every 10 instead.
- Pocket sags: Add a second whipstitch line halfway up the wall.
- Holder tilts on the hook: Check that the loop is anchored at top sts 2 and 5, the same distance from each edge.
Care
Hand wash in cool water with mild soap, press out the water in a towel, and dry flat with rolls inside to reshape. Don’t tumble dry.
Final Notes
The sizes all come from one measurement chain. A 60-st base 5 in (12.7 cm) across carries a 3 in (7.6 cm) wall and 10 leaves and 20 petals of 6 sts each. A 14-st panel 4 in (10.2 cm) wide grows to 4.5 in (11.4 cm) once the 158-st border is on. Pockets set 24 rows (6 in / 15.2 cm) apart fill the 19.5 in (49.5 cm) holder. If your first pocket matches gauge, the rest of the holder will come out to these sizes too.
Happy crocheting!