

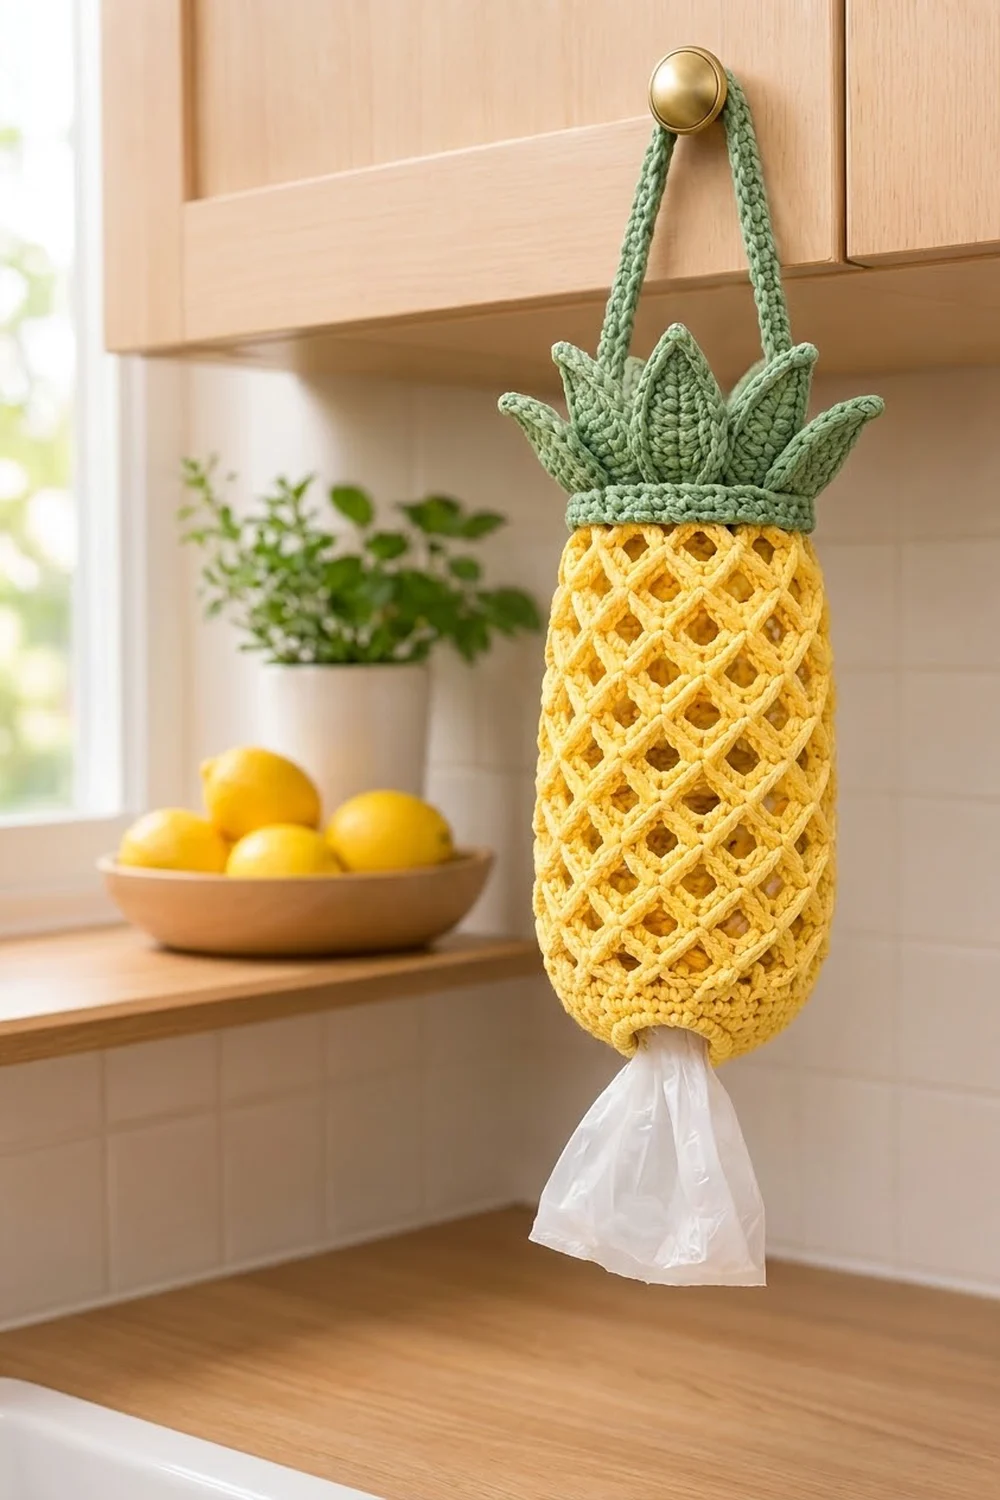
This cheerful pineapple keeps a whole stash of plastic grocery bags in one tidy place. You stuff bags in at the top and pull them out one at a time through the small hole in the base. It hangs from a cabinet knob or hook by a sturdy green strap.
The body is butter yellow, worked in an open diamond lattice that looks just like pineapple skin. A sage green crown of ten pointed leaves sits on top, and a matching green strap finishes the look. The style is bright, simple, and kitchen-friendly.
The pattern uses US crochet terms. The finished body measures 7.5 in (19.1 cm) wide when flat and 15.75 in (40.0 cm) tall. With the crown, it measures 18 in (45.7 cm) to the leaf tips.
Construction is simple. You crochet the body in the round from the bottom hole up: a solid base, a lattice of foundation single crochet bars, then a solid rim. The crown band and its leaves are worked as one piece. The strap is a short oval strip. Finally, you sew the three pieces together.
Finished Size and Construction
- Finished size: 7.5 in (19.1 cm) wide flat x 15.75 in (40.0 cm) tall body; 18 in (45.7 cm) to leaf tips
- Skill level: Intermediate
- Terminology: US crochet terms
- Yarn weight: Worsted (#4) cotton
- Hook: 5.0 mm (H-8); 5.5 mm (I-9) for the crown band only
- Number of pieces: 3 (body, crown, strap)
- Layout: Strap at top, crown over the body rim, body below
- Body circumference: 60 sts = 15 in (38.1 cm)
- Body size before border: 14.75 in (37.5 cm) tall
- Border (rim) depth: 1 in (2.5 cm)
Materials
Choose a smooth worsted weight cotton or cotton blend. Cotton holds its shape, doesn’t stretch much under the weight of bags, and washes well. Avoid fuzzy yarn, which hides the lattice texture.
- Yellow (body): 150 g / 255 m
- Sage green (crown and strap): 70 g / 120 m
These amounts include a margin of about 15 percent, so you won’t run short.
Tools:
- 5.0 mm (H-8) crochet hook
- 5.5 mm (I-9) crochet hook
- Stitch marker
- Tapestry needle
- Scissors
- Measuring tape
- Rust-proof pins and a spray bottle for blocking
Abbreviations (US Terms)
- ch – chain
- sc – single crochet
- sc2tog – single crochet 2 together
- inc – 2 sc in the same stitch
- sl st – slip stitch
- fsc – foundation single crochet
- st(s) – stitch(es)
- rnd – round
Special stitch – Bar: Ch 2, insert hook in 2nd ch from hook, yarn over and pull up a loop, yarn over and draw through 1 loop (this makes the “chain” of the stitch), yarn over and draw through 2 loops. That’s the first fsc. Insert hook under the 2 loops of the “chain” at the base of the stitch you just made, yarn over and pull up a loop, yarn over and draw through 1 loop, yarn over and draw through 2 loops; repeat from * 2 more times. One Bar = 4 fsc. The Bars give the lattice its thick, stitch-textured look.
Working around a Bar: Insert your hook into the opening under the Bar, between its 2nd and 3rd fsc, and work the sc around the whole Bar.
Gauge and Checkpoints
Gauge: 16 sc x 18 rnds = 4 in (10.2 cm) with a 5.0 mm hook. One Bar measures about 1 in (2.5 cm) long.
Make the body base first and use it as your test piece. If the base measures correctly, the rest of the body will follow.
Checkpoints:
- After Rnd 1: the hole measures about 1.9 in (4.8 cm) across.
- After Rnd 7: the flat base measures about 4.75 in (12.1 cm) across.
- After Rnd 12: the base measures 7.5 in (19.1 cm) wide when flattened.
- After Rnd 28: the body measures about 14.75 in (37.5 cm) tall.
- After Rnd 33: the body measures 15.75 in (40.0 cm) tall.
If your base is too big, go down a hook size. If it’s too small, go up a hook size. Each lattice round should add about 0.75 in (1.9 cm) of height. If your lattice is much taller than that, your Bars are too loose, so tighten your tension on the fsc.
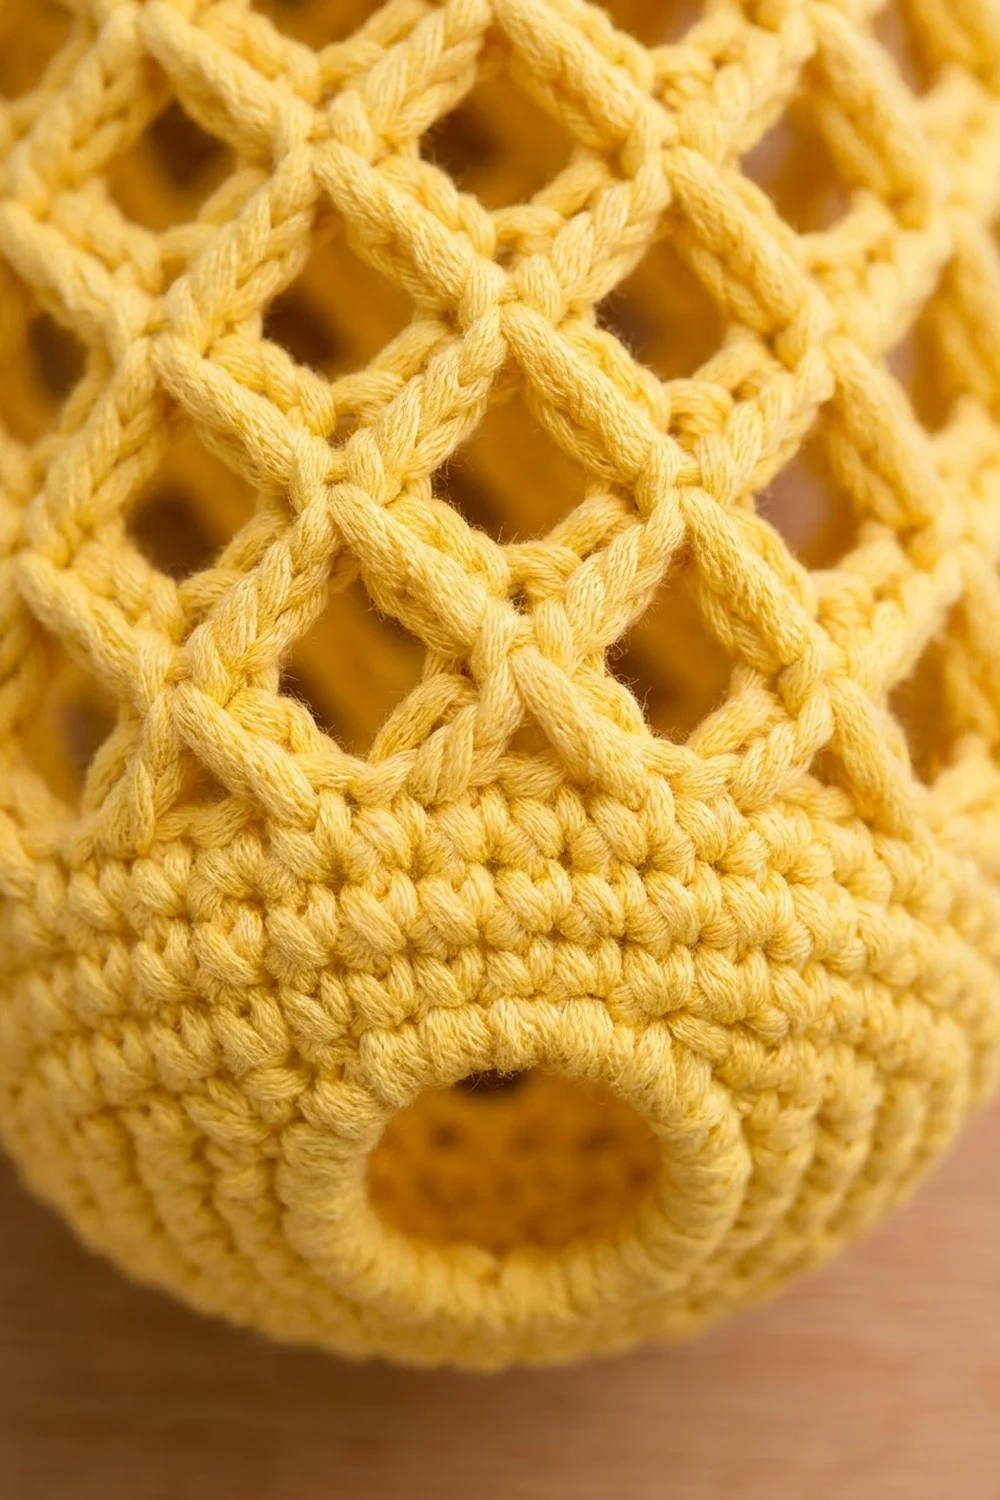
Body
With yellow and a 5.0 mm hook.
Base
Rnd 1: Ch 24 and join with sl st to first ch, without twisting the chain. Ch 1, sc in each ch around, join with sl st to first sc. (24 sts)
Place a marker in the first st of each round and move it up as you go.
Rnd 2: Ch 1, sc in next 3 sts, inc; repeat from * 5 more times, join. (30 sts)
Rnd 3: Ch 1, sc in next 4 sts, inc; repeat from * 5 more times, join. (36 sts)
Rnd 4: Ch 1, sc in next 5 sts, inc; repeat from * 5 more times, join. (42 sts)
Rnd 5: Ch 1, sc in next 6 sts, inc; repeat from * 5 more times, join. (48 sts)
Rnd 6: Ch 1, sc in next 7 sts, inc; repeat from * 5 more times, join. (54 sts)
Rnd 7: Ch 1, sc in next 8 sts, inc; repeat from * 5 more times, join. (60 sts)
Rnds 8–12: Ch 1, sc in each st around, join. (60 sts)
The base is a flat ring that turns up into the sides. Once you fill it with bags, it rounds into a soft dome with the hole at the bottom.
Lattice
Rnd 13: Ch 1, sc in first st, Bar, skip next 3 sts, sc in next st; repeat from * 13 more times, Bar, skip last 3 sts, join with sl st to first sc. (15 sc + 15 Bars)
The math: 60 sts split into 15 repeats of 4 sts (1 sc + 3 skipped) = 60.
Rnd 14: Sl st across the first 2 fsc of the first Bar, ch 1, sc around the same Bar, Bar, sc around next Bar; repeat from * 13 more times, Bar, join with sl st to first sc. (15 sc + 15 Bars)
Rnds 15–28: Repeat Rnd 14. (15 sc + 15 Bars each round)
You now have 16 lattice rounds. Each sc sits in the center of a Bar below, so the openings form clean diamonds. Don’t fasten off; go straight on to the border.
Make All Pieces
You need 3 pieces in total:
- Body: 1 in yellow
- Crown: 1 in green
- Strap: 1 in green
Layout (front view):
      [ STRAP LOOP ]
   [ CROWN: 10 LEAVES ]
   [ CROWN BAND over RIM ]
   [ BODY: LATTICE ]
   [ BODY: BASE + HOLE ]
Crown
Band. With green and a 5.5 mm hook.
Rnd 1: Ch 60 and join with sl st to first ch, without twisting the chain. Ch 1, sc in each ch around, join. (60 sts)
Rnds 2–4: Ch 1, sc in each st around, join. (60 sts)
Checkpoint: the band measures 8 in (20.3 cm) wide when flat. The larger hook gives 1 in (2.5 cm) of ease, so the band slides over the yellow rim. Fasten off.
Leaves. Switch to a 5.0 mm hook. Each leaf is worked in rows over 6 sts of Rnd 4. Join green in the first st of Rnd 4.
Row 1: Ch 1, sc in same st and next 5 sts, turn. (6 sts)
Row 2: Ch 1, sc in next 2 sts, inc in each of next 2 sts, sc in next 2 sts, turn. (8 sts)
Rows 3–5: Ch 1, sc in each st across, turn. (8 sts)
Row 6: Ch 1, sc2tog, sc in next 4 sts, sc2tog, turn. (6 sts)
Row 7: Ch 1, sc in each st across, turn. (6 sts)
Row 8: Ch 1, sc2tog, sc in next 2 sts, sc2tog, turn. (4 sts)
Row 9: Ch 1, sc2tog twice, turn. (2 sts)
Row 10: Ch 1, sc2tog. (1 st) Fasten off.
Join green in the next unworked st of Rnd 4 and repeat Rows 1–10. Make 10 leaves in total: 10 x 6 sts = 60 sts. Each leaf widens to 8 sts, so neighboring leaves overlap slightly, just like a real pineapple top.
Vein. With green, work a surface sl st up the center of each leaf, from the band to the tip. This makes the raised center line.
Each leaf is about 2.25 in (5.7 cm) tall and 2 in (5.1 cm) wide at its widest point.
Strap
With green and a 5.0 mm hook.
Rnd 1: Ch 49. Sc in 2nd ch from hook and next 46 ch, 3 sc in last ch. Turn the piece and work along the free loops of the chain: sc in next 46 ch, 2 sc in the first ch (the one holding the first sc), join. (47 + 3 + 46 + 2 = 98 sts)
Rnd 2: Sl st in each st around, join. (98 sts) Fasten off, leaving a 12 in (30.5 cm) tail.
The slip stitch round keeps the strap from stretching. The strap measures 12 in (30.5 cm) long and 0.625 in (1.6 cm) wide.
Border
The border is the solid yellow rim at the top of the body, plus a firm edge around the bottom hole. Keep going with yellow and a 5.0 mm hook.
Border gauge: 4 sc = 1 in (2.5 cm). The body is a tube, so “per side” means the front and back halves when flattened: 30 sts per side, with no corners to count.
Rnd 29 (conversion round): Sl st across the first 2 fsc of the first Bar, ch 1, sc around the same Bar, ch 3, sc around next Bar; repeat from * 13 more times, ch 3, join. (15 sc + 45 ch = 60 sts; 30 per side)
The ch-3 spaces make the row of small rectangular openings under the rim.
Rnd 30: Ch 1, sc in each sc and in each ch around, join. (60 sts; 30 per side)
Rnds 31–33: Ch 1, sc in each st around, join. (60 sts; 30 per side) Fasten off.
Bottom edge: Join yellow in the free loop of any foundation ch on Rnd 1. Sl st in each free loop around, join. (24 sts; 12 per side) Fasten off. This firms up the dispensing hole.
Why the math works: The base ends at 60 sts. The lattice holds 15 Bars, and 15 x 4 sts = 60. The conversion round brings the count back to exactly 60 sts, so the rim matches the base and the sides hang straight. The rim adds 5 rounds, about 1 in (2.5 cm), which takes the body from 14.75 in (37.5 cm) to 15.75 in (40.0 cm).
Joining
Join the pieces in this order: strap first, then crown.
Strap. Flatten the body so the round join sits at one side fold. Mark st 1 and st 31 of Rnd 33; these sit at the two side folds. Tuck 1 in (2.5 cm) of each strap end inside the rim, centered over a marked st. Whipstitch each end to the inside of Rnds 30–33 with the strap tail. Check that the strap isn’t twisted.
Crown. Slide the crown band over the rim with the leaves pointing up. Line up band st 1 with body st 1. The gap between leaf 10 and leaf 1 now sits at st 1, and the gap between leaf 5 and leaf 6 sits at st 31. The strap comes up through these gaps.
Line up the bottom edge of the band with Rnd 29. With green, whipstitch the band’s bottom edge to the body, 1 band st to 1 body st, all the way around (60 sts). Then whipstitch the band’s top edge to the top of Rnd 33 the same way, 60 sts to 60 sts.
Tension: Keep your stitches snug but not tight. Spread the 1 in (2.5 cm) of ease evenly around, and don’t let it bunch up in one spot.
Size checkpoint: The finished holder measures 18 in (45.7 cm) from the bottom to the leaf tips. The strap loop rises about 5 in (12.7 cm) above the rim.
Final Blocking
- Weave in all ends securely.
- Lay the holder flat on a blocking mat with the strap at the top.
- Mist it evenly with water until damp.
- Shape the body to 7.5 in (19.1 cm) wide and 15.75 in (40.0 cm) tall.
- Ease each diamond opening into an even shape.
- Pin the two outer leaves on each side so they tip outward.
- Stand the center leaves up. Use spray starch on the leaves if you want them stiffer.
- Let it dry completely before you unpin it.
Final Quality-Control Checklist
- The base has 60 sts after Rnd 7.
- Each lattice round has 15 sc and 15 Bars.
- The rim has 60 sts, 30 per side.
- The body is 15.75 in (40.0 cm) tall.
- The crown band has 60 sts and 10 leaves.
- Each leaf has a visible center vein.
- The strap has 98 sts around and isn’t twisted.
- The strap ends are secure inside the rim.
- The crown band is sewn down at its top and bottom edges.
- All ends are woven in.
Troubleshooting
The lattice slants or spirals. Make sure you start each round by moving to the center of the first Bar.
The diamonds look uneven. Work every sc around the Bar between its 2nd and 3rd fsc.
The crown band is too tight to slide on. Remake it with a 6.0 mm (J-10) hook.
The leaves curl. Pin them flat and let them dry fully.
The strap stretches. Work Rnd 2 of the strap more tightly, or go down a hook size.
Bags fall out of the bottom. Work a second slip stitch round on the bottom edge to make the hole smaller.
Care
Hand wash in cool water and lay flat to dry. Reshape the leaves while they’re damp.
Final Notes
Each measurement builds on the one before. The 24-st ring makes a 1.9 in (4.8 cm) hole. The base grows to 60 sts, or 15 in (38.1 cm) around. The 15 Bars keep that 60-st count through the lattice. The rim comes back to 60 sts and finishes the body at 15.75 in (40.0 cm) tall. The 60-st crown band, with 10 leaves of 6 sts each, matches the rim stitch for stitch. If your gauge is right at the base, the rest falls into place.
Happy crocheting!