

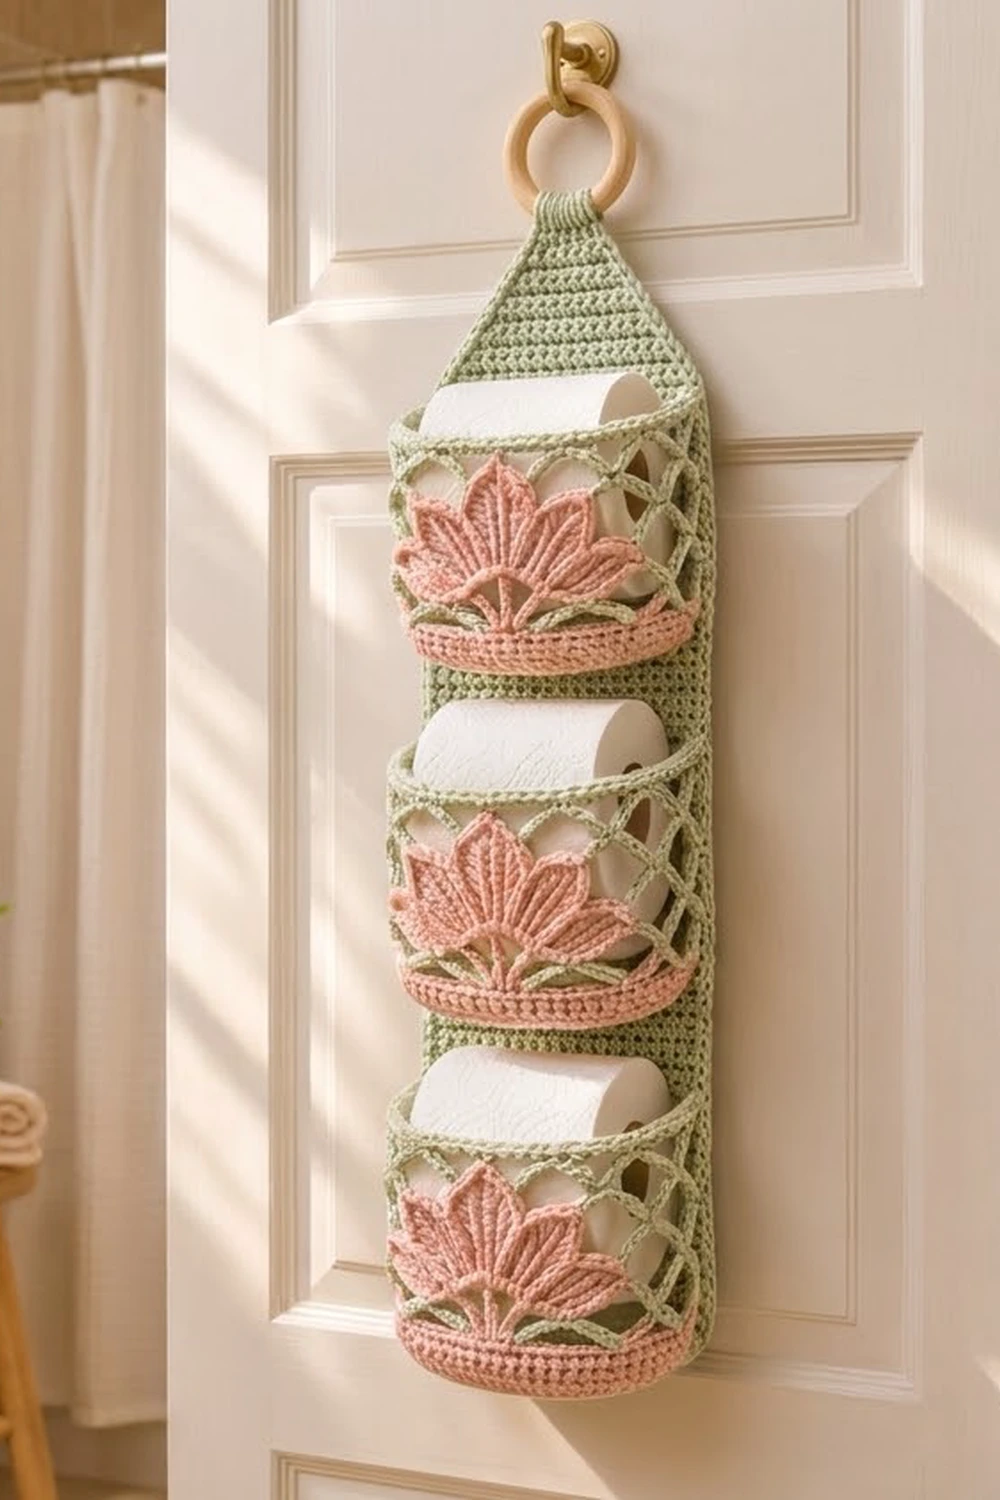
This hanging holder keeps three spare rolls tidy on the back of a door or on a wall hook. A long sage-green backing tapers to a point at the top and hangs from a wooden ring. Three pink-and-green pockets are stitched down its front.
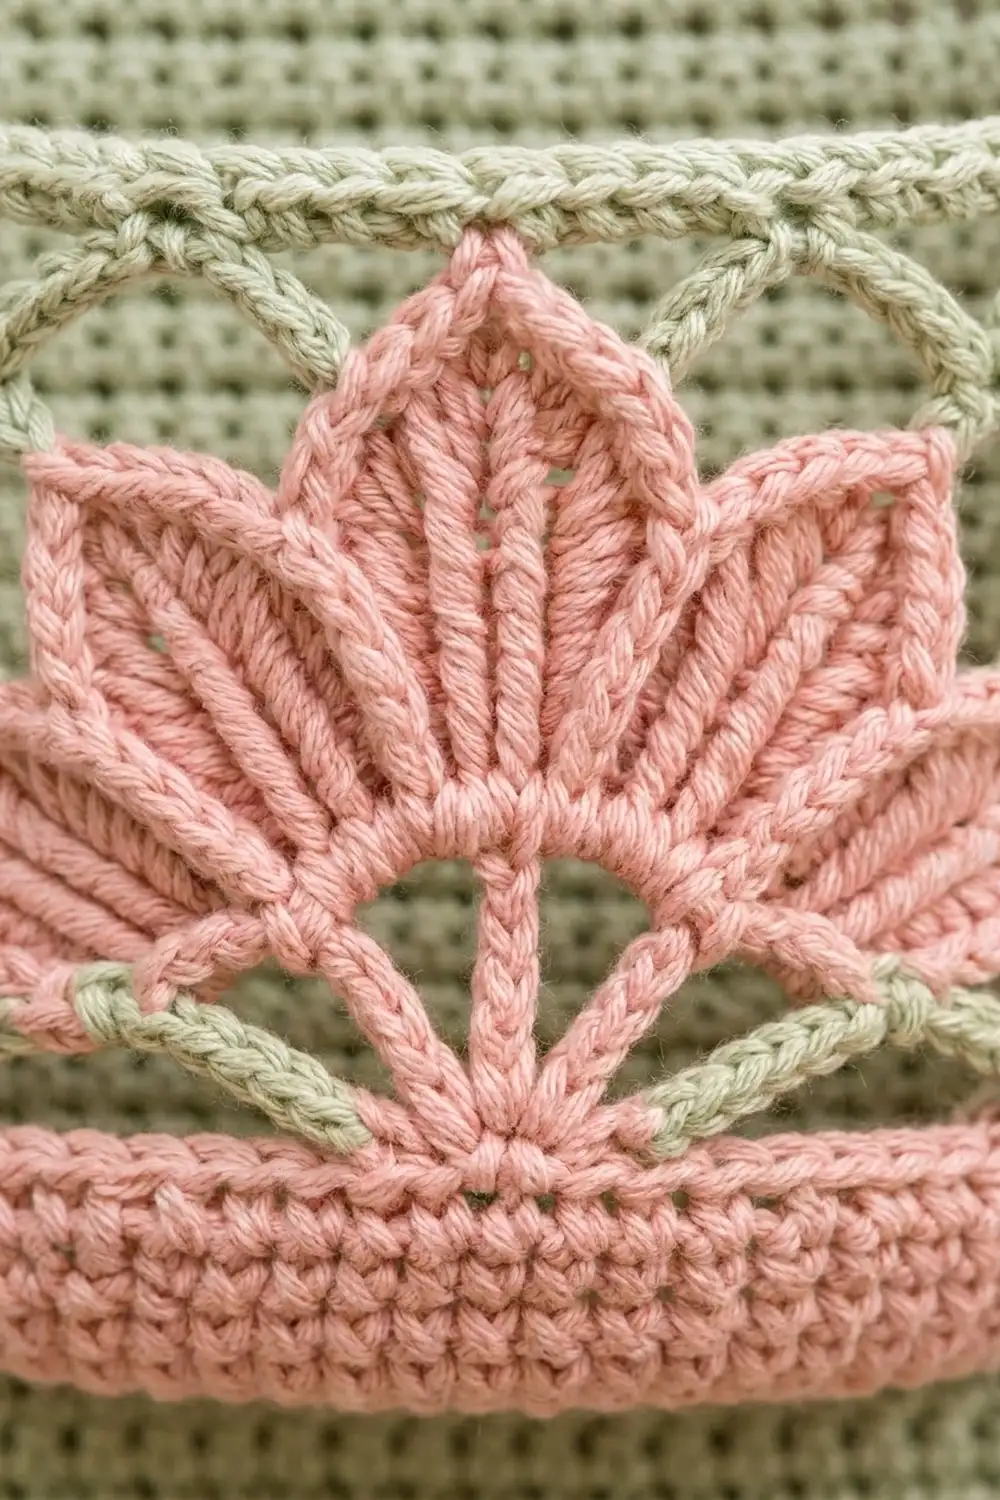
Each pocket starts with a solid coral-pink base. Above that is a light sage lattice of chain loops, finished with a rounded corded rim. A pink lotus fan with seven veined petals is sewn onto the front of each pocket. The look is soft, fresh and a little vintage, and it suits a pastel bathroom.
The pattern uses US crochet terms. The backing measures 6.5 in (16.5 cm) wide by 22.5 in (57.2 cm) long. With the ring, the whole holder hangs about 25 in (63.5 cm) tall. Each pocket is about 7 in (17.8 cm) wide when flattened and 4.5 in (11.4 cm) tall.
Construction overview: work the backing flat in rows, then the taper, a two-round border and the ring tab. Each pocket is worked in the round from an oval base, and each fan is worked flat and sewn on. Finally, the pockets are whipstitched to the backing.
Finished Size and Construction
- Finished size: 6.5 x 22.5 in (16.5 x 57.2 cm) backing; about 25 in (63.5 cm) overall with ring
- Skill level: Intermediate
- Terminology: US crochet terms
- Yarn weight: Worsted (#4) cotton
- Hook: 4.5 mm (US 7)
- Number of pieces: 7 crocheted pieces (1 backing, 3 pockets, 3 fans) plus 1 wooden ring
- Layout: 3 pockets stacked in a single vertical column
- Pocket size: 7 x 4.5 in (17.8 x 11.4 cm) flattened
- Backing size before border: 6 x 22 in (15.2 x 55.9 cm)
- Border depth: about 0.25 in (0.6 cm) per edge
Materials
Use a smooth, mercerized or combed worsted-weight cotton. Cotton holds its shape and keeps the lattice crisp. Acrylic will work, but the pockets will be floppier.
- Sage green: 150 g, about 270 m (backing, lattice, rims, tab)
- Coral pink: 100 g, about 180 m (bases, pink bands, fans)
These quantities include a margin of roughly 20% for swatching and tension differences.
Tools:
- 4.5 mm (US 7) crochet hook
- Wooden ring, 2.5 in (6.4 cm) outer diameter
- Tapestry needle
- 8–10 locking stitch markers
- Rust-proof pins and a blocking mat
- Measuring tape and scissors
Abbreviations (US Terms)
- ch – chain
- sl st – slip stitch
- sc – single crochet
- hdc – half double crochet
- dc – double crochet
- tr – treble crochet
- sc2tog – single crochet 2 together
- BLO – back loop only
- rev sc – reverse single crochet (crab stitch)
- rnd(s) – round(s)
- st(s) – stitch(es)
- sp – space
- RS / WS – right side / wrong side
Special stitches
Reverse sc (rev sc): Work from left to right (right-handers). Insert the hook into the next stitch to the right, yarn over, pull up a loop, then yarn over and pull through both loops. This makes the corded rim.
Petal:
- Ch 8. Working in the back bumps, starting in the 2nd ch from hook, work sc, hdc, dc, tr, dc, hdc, sc (7 sts), ending at the base.
- Turn the work. Working in the free loops of the same chains back toward the tip, work sc, hdc, dc, tr, dc, hdc, sc (7 sts).
- Work (sc, ch 2, sc) in the tip chain.
- Sl st down the center of the petal along the foundation chain, 7 sl sts back to the base. This raised line is the vein.
Gauge and Checkpoints
Gauge: 16 sc and 18 rows = 4 in (10.2 cm) in sc rows.
So 1 sc is 0.25 in (0.6 cm) wide, and 4.5 rows make 1 in (2.5 cm).
Test one piece first. Make one pocket base (Rnds 1–6) before starting the backing. It’s quick and shows whether your tension is right.
Checkpoints:
- After Rnd 6 of the pocket: the oval measures about 5.5 x 2.75 in (14.0 x 7.0 cm), and the edge measures 14 in (35.6 cm) around.
- Finished pocket, flattened: 7 in (17.8 cm) wide and 4.5 in (11.4 cm) from base to rim.
- Fan: about 6 in (15.2 cm) wide and 3 in (7.6 cm) tall.
- Backing after Row 81: 6 x 18 in (15.2 x 45.7 cm).
- Backing after Row 99: 22 in (55.9 cm) long.
If your piece is too big, go down one hook size (4.0 mm). If it is too small, go up one size (5.0 mm). Don’t change the stitch counts. The joining math depends on 24 sts across the backing matching 24 sts across each pocket back.
Backing
Use sage green.
Body
- Foundation: Ch 25.
- Row 1: Sc in 2nd ch from hook and in each ch across, turn. (24 sc)
- Rows 2–81: Ch 1 (does not count as a st), sc in each st across, turn. (24 sc)
Checkpoint: 6 x 18 in (15.2 x 45.7 cm).
Taper
- Row 82 (decrease row): Ch 1, sc2tog, sc in each st to last 2 sts, sc2tog, turn. (22 sc)
- Row 83: Ch 1, sc in each st across, turn. (22 sc)
- Rows 84–99: Repeat Rows 82–83 eight more times. The decrease rows give 20, 18, 16, 14, 12, 10, 8 and 6 sc. Row 99 ends with 6 sc.
That makes 9 decrease rows. Each one removes 2 sts: 24 − 18 = 6. The taper has 18 rows, which is 4 in (10.2 cm) at gauge.
Do not fasten off yet. Go straight into the border.
Size before border: 6 x 22 in (15.2 x 55.9 cm).
Pockets
Make 3. Work in joined rounds. Ch 1 at the start of a round does not count as a stitch.
Base (coral pink)
- Foundation: Ch 13.
- Rnd 1: Sc in 2nd ch from hook, sc in next 10 ch, 3 sc in last ch. Working along the other side of the chain, sc in next 10 ch, 2 sc in the last ch (the same ch as the first sc). Sl st to the first sc. (26 sc)
- Rnd 2: Ch 1, 2 sc in first st, sc in next 10, 2 sc in each of next 3, sc in next 10, 2 sc in each of last 2, sl st to join. (32 sc)
- Rnd 3: Ch 1, [2 sc in next, sc in next] once, sc in next 10, [2 sc in next, sc in next] 3 times, sc in next 10, [2 sc in next, sc in next] 2 times, join. (38 sc)
- Rnd 4: Work as Rnd 3, but with sc in next 2 inside each bracket. (44 sc)
- Rnd 5: Work as Rnd 3, but with sc in next 3 inside each bracket. (50 sc)
- Rnd 6: Work as Rnd 3, but with sc in next 4 inside each bracket. (56 sc)
The 56 sts are made up of two straight sides of 10 sts and two curved ends of 18 sts each.
Pink band (walls)
- Rnd 7: Ch 1, sc in BLO of each st around, join. (56 sc) This makes the ridge where the base turns up into the wall.
- Rnds 8–10: Ch 1, sc in each st around, join. (56 sc)
Fasten off pink. The band stands about 0.9 in (2.3 cm) tall.
Lattice (sage green)
- Rnd 11: Join green in any st on a curved end. Ch 1, sc in the same st, ch 5, skip 3 sts, sc in next st. Repeat from * around, ending with ch 5, skip 3. Sl st to the first sc. (14 ch-5 loops)
- Rnds 12–16: Sl st in the next 3 ch to reach the center of the loop. Ch 1, sc in the same loop, ch 5, sc in next loop. Repeat from * around, ending with ch 5, sl st to the first sc. (14 loops)
The six lattice rounds stand about 3 in (7.6 cm) tall.
Rim
- Rnd 17: Ch 1, sc in the same sc. Work 3 sc in the next ch-5 loop, sc in the next sc. Repeat from * around, ending with 3 sc in the last loop, join. (56 sc: 14 × 4)
- Rnd 18: Ch 1, sc in each st around, join. (56 sc)
- Rnd 19: Ch 1, rev sc in each st around, join. (56 rev sc)
Fasten off and leave a 30 in (76.2 cm) tail for sewing.
The pocket’s top edge goes back to 56 sts, matching the base. That keeps the walls straight instead of flared.
Lotus Fan Appliqué
Make 3 in coral pink. Work flat.
- Row 1: Make a magic ring. Ch 3 (counts as dc) and work 6 dc in the ring. Pull the ring closed so it forms a half circle, then turn. (7 dc)
- Row 2: Ch 4 (counts as dc + ch 1). Dc in next dc, ch 1. Repeat from * 4 more times, then dc in the top of the turning ch. Turn. (7 dc, 6 ch-1 sps) These are the open spokes.
- Row 3: Ch 1, sl st in the first dc. Work a Petal, sl st in the same dc, sl st in the next ch-1 sp, sl st in the next dc. Repeat from * across. After the 7th Petal, sl st in the same st. (7 petals)
Fasten off and leave a 24 in (61.0 cm) tail.
Checkpoint: 6 x 3 in (15.2 x 7.6 cm).
Make All Pieces
| Piece | Qty | Colors |
|---|---|---|
| Backing | 1 | Sage |
| 3 | Pink base and band, sage lattice and rim | |
| Fan | 3 | Pink |
Attach the fans first.
- Flatten each pocket. Find the center 32 sts of the front of Rnd 10 (the straight side plus 11 sts of each end).
- Center the fan’s straight hub edge on top of Rnd 10.
- Sew around the hub and along each spoke.
- Tack each petal at its base and at its tip with 2 small stitches. The petal edges stay free, so they sit raised over the lattice.
Layout grid (front view, rows of the backing body):
          (O)        wooden ring
          |_|        tab
          /\         taper, Rows 82–99
        | P3 |       base Row 57, rim Row 77
        | P2 |       base Row 30, rim Row 50
        | P1 |       base Row 3,  rim Row 23
Joining
Method: Whipstitch with green, sewing each pocket’s back wall flat against the RS of the backing.
Mark the pocket back. Flatten the pocket. On Rnd 7, mark the 10 back straight sts plus 7 sts of each end beside them. That gives 24 sts. Mark the 24 matching sts of Rnd 18 directly above, centered on the back.
Stitch-to-stitch logic:
- Base seam: Sew the 24 marked sts of Rnd 7 to the 24 sts of the backing row, one pocket stitch to one backing stitch. For Pocket 1, that is Row 3.
- Rim seam: Sew the 24 marked sts of Rnd 18 to the 24 sts of the rim row, one to one. For Pocket 1, that is Row 23.
- Side seams: Sew the wall from the end of the base seam up to the end of the rim seam, along backing stitch 1 and stitch 24. The pocket has 13 wall rounds against 20 backing rows. Take about 3 backing rows for every 2 pocket rounds. In the lattice, sew through the sc at each loop junction.
Do the same for Pocket 2 (Rows 30 and 50) and Pocket 3 (Rows 57 and 77).
The remaining 32 front sts make an arc 8 in (20.3 cm) long. That bulge is what gives each pocket its depth.
Tension: Snug the stitches so the seam sits flat, but don’t pull hard enough to pucker the backing. Check it from the WS every 2 in (5.1 cm).
Checkpoint: The backing should still measure 6 in (15.2 cm) wide at each pocket. The pockets are spaced every 6 in (15.2 cm) with 1.5 in (3.8 cm) between them.
Border
Sew the pockets on before or after the border; either order works. The border uses the same gauge: 4 sc per 1 in (2.5 cm).
Rnd 1 (sage). Keep the loop from Row 99 on the hook and work around the whole backing:
- Top edge: Ch 1, sc in each of the 6 sts. (6 sc)
- Left taper: 1 sc in each row end. (18 sc)
- Left side: Work 72 sc along the 81 row ends, skipping every 9th row end. (72 sc)
- Bottom edge: 3 sc in the first st, sc in the next 22 sts, 3 sc in the last st. (28 sc, corner groups included)
- Right side: Work 72 sc as on the left side. (72 sc)
- Right taper: 1 sc in each row end. (18 sc)
Sl st to the first sc. Total: 6 + 18 + 72 + 28 + 72 + 18 = 214 sc.
Rnd 2: Sl st loosely in each sc around. (214 sl sts) Fasten off.
Why the math works:
- 72 sc along 18 in (45.7 cm) is exactly 4 sc per inch, the same as gauge, so the sides won’t ruffle or draw in.
- The taper edges are about 4.6 in (11.7 cm) long. Their 18 sc sit just under gauge, which helps the point lie flat.
- The bottom’s 3-sc corners add the ease needed to turn the corners without cupping.
Tab. With RS facing, join green in the first of the 6 top sl sts.
- Row 1: Ch 1, sc in each of the 6 sts. (6 sc)
- Rows 2–14: Ch 1, turn, sc 6.
The tab is 3.1 in (7.9 cm) long. Fold it over the wooden ring to the WS. Whipstitch the last row to the WS of the taper, about 1.25 in (3.2 cm) below the fold.
Final Blocking
- Weave in all ends along seams or solid stitches, never through the lattice.
- Spray the whole holder until it is damp, or steam it lightly.
- Pin the backing flat at 6.5 x 22.5 in (16.5 x 57.2 cm), with the point centered.
- Stuff each pocket with a toilet roll wrapped in plastic so it dries in shape.
- Open each lattice loop with your fingertip. Smooth the petals so they radiate evenly.
- Leave it to dry completely, which takes 12–24 hours.
Final Quality-Control Checklist
- The backing measures 6.5 in (16.5 cm) across along its whole length.
- Each border side has 72 sc and the bottom edge has 28 sc.
- Every pocket has 56 sts at Rnd 6, Rnd 17 and Rnd 19.
- Every pocket has 14 even lattice loops in each round.
- Each fan has 7 petals with raised veins, centered on the pocket front.
- All three pocket rims are level and spaced every 6 in (15.2 cm).
- The tab is secure and the ring hangs straight.
- No ends show on the RS.
Troubleshooting
- Backing is wider than 6 in (15.2 cm): Your tension is loose. Go down one hook size.
- Pocket base cups up before Rnd 7: You missed increases. Recount: each base round adds 6 sts.
- Base ruffles: You added extra increases. Check the bracket repeats against the stitch count.
- Lattice loops twist or sag: Keep all ch-5 loops the same length and sc firmly into the center of each loop.
- Rim flares: Make sure you worked exactly 3 sc per loop in Rnd 17 (56 total).
- Petals curl: Block them pinned flat. Check that each side of the petal has exactly 7 sts.
- Pocket pulls the backing narrow: The side seams are too tight. Take out the seam and re-sew more loosely.
- Holder tilts: Check that the tab is centered and that the pockets sit on the stated rows.
Care
Hand wash in cool water with mild soap, press out the water in a towel, and dry flat with the pockets stuffed so they hold their shape. Do not tumble dry.
Final Notes
Everything in this pattern follows from one measurement chain:
- 16 sc = 4 in (10.2 cm), so the backing is 24 sts = 6 in (15.2 cm).
- 81 rows = 18 in (45.7 cm), split into three 27-row sections of 6 in (15.2 cm), one per pocket.
- Each pocket has 56 sts around: 24 sewn flat at the back and 32 forming the front bulge.
- The border’s 214 sc keeps every edge at gauge, giving a finished backing of 6.5 x 22.5 in (16.5 x 57.2 cm).
Check your gauge on the first pocket base and the rest falls into place.
Happy crocheting!