

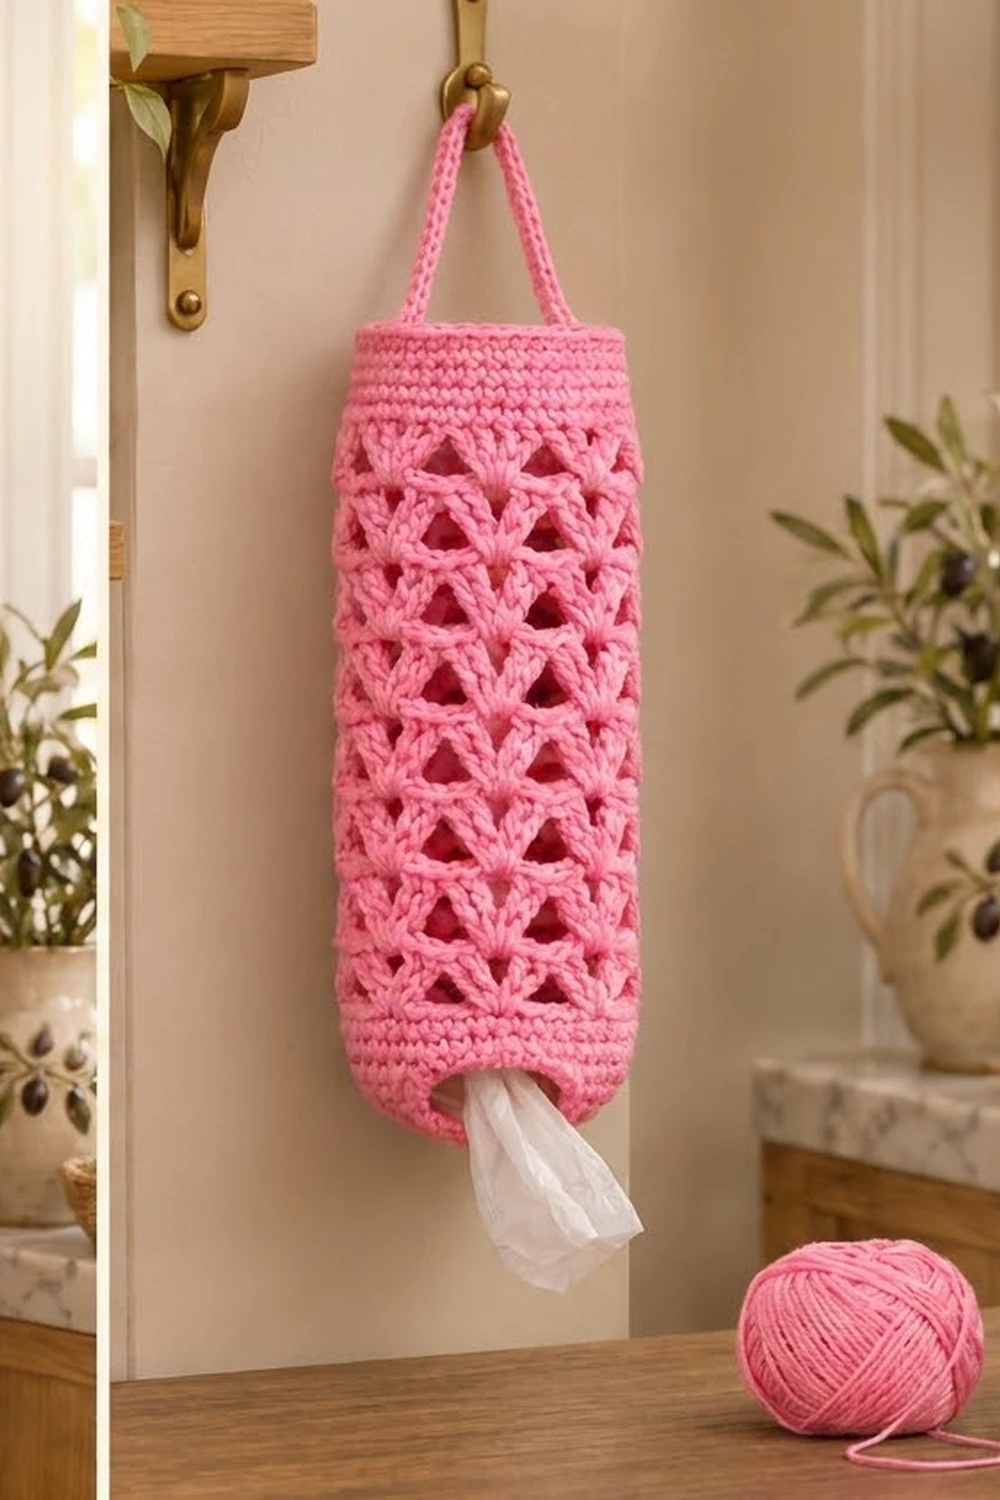
This bag holder is a tall, lacy tube that keeps your grocery bags in one tidy place. You stuff bags in at the top and pull them out one at a time through the round opening at the bottom. It’s practical, but the open fan lattice makes it look good enough to leave on display.
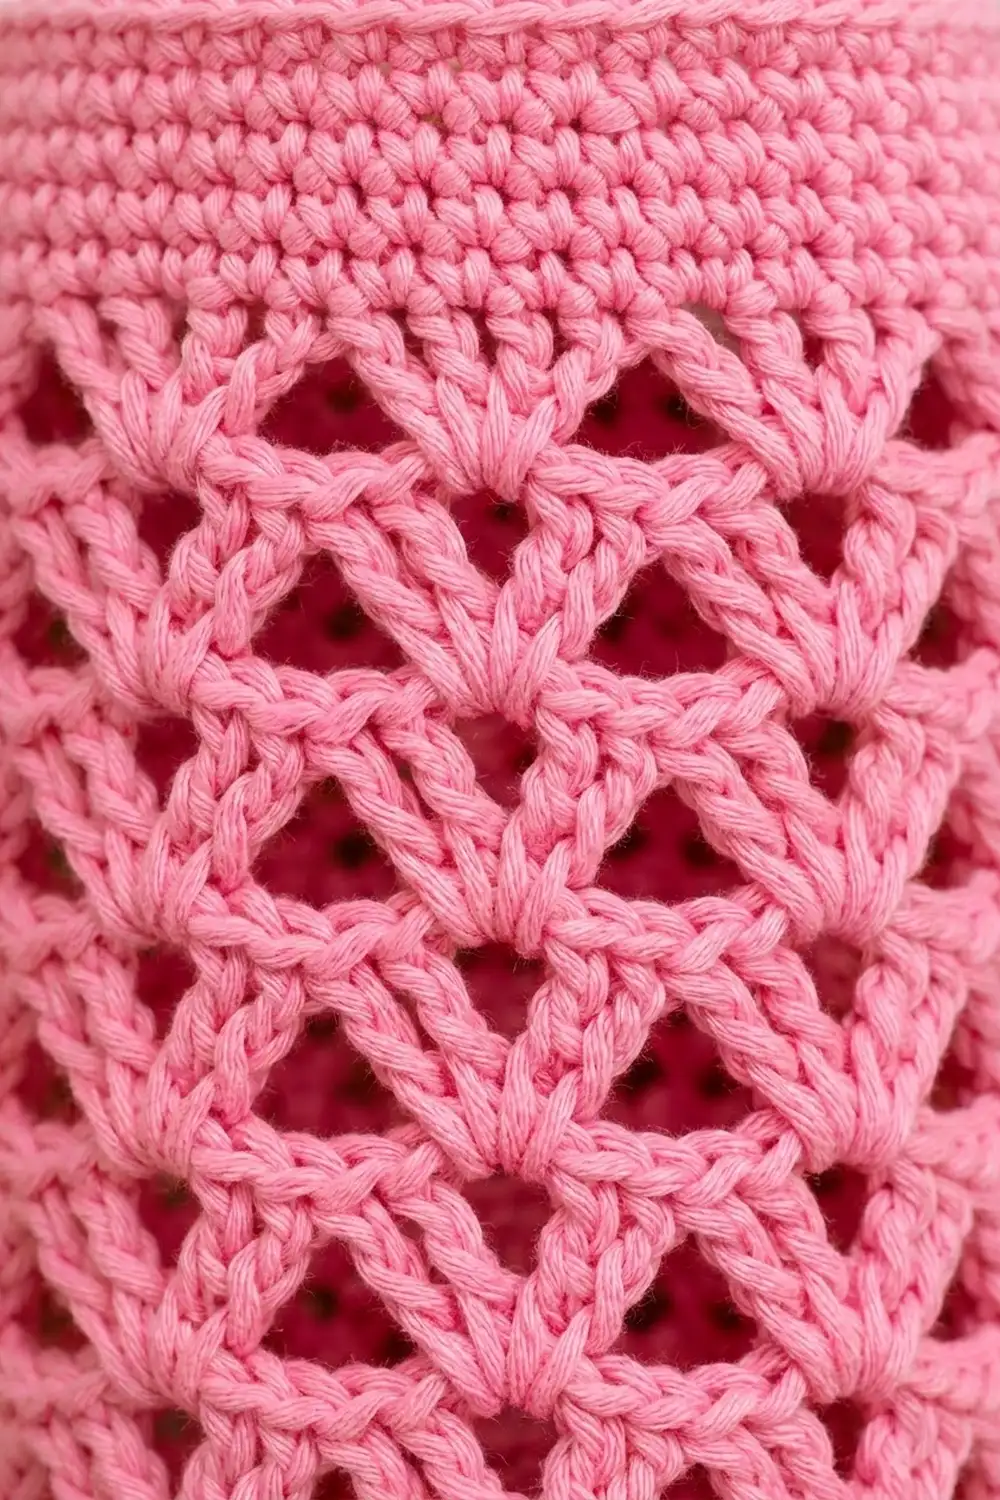
The sample is bubblegum pink cotton, which looks fresh against warm kitchen neutrals. Sage green, cream or soft yellow work just as well. The texture is a mesh of three-double-crochet fans that alternate with single crochets. Every round shifts by half a repeat, so the gaps line up as rows of neat inverted triangles. A solid band at each end and a slim strap finish it off.
This pattern uses US crochet terms. The finished holder measures 6 in (15.2 cm) wide when flat and about 16 in (40.6 cm) tall, not counting the strap. The strap arches about 3 in (7.6 cm) above the rim.
You work the whole holder in one piece from the bottom up. You start with a foundation ring for the dispensing opening, then increase into a solid single-crochet band, then work 20 rounds of fan lattice. A solid top band and a 3-stitch strap finish the holder. There is no sewing apart from weaving in ends.
Finished Size and Construction
- Finished size: 6 in (15.2 cm) wide flat × 16 in (40.6 cm) tall
- Circumference: 12 in (30.5 cm)
- Bottom opening: about 2.4 in (6.1 cm) across
- Skill level: Easy / Advanced Beginner
- Terminology: US crochet terms
- Yarn weight: Worsted (#4), cotton or cotton blend
- Hook: 4.5 mm (US 7)
- Number of pieces: 1 (seamless tube plus attached strap)
- Layout: Single vertical tube, worked in joined rounds
- Piece size: 6 in × 16 in (15.2 cm × 40.6 cm) flat
- Size before border (top band): 6 in × 14.25 in (15.2 cm × 36.2 cm)
- Border depth: Top band 1.75 in (4.4 cm), plus a 0.75 in (1.9 cm) wide strap
Materials
Yarn: Choose a smooth worsted-weight cotton or cotton-acrylic blend. Cotton holds the lattice open and doesn’t sag much when the holder is full of bags. Avoid fuzzy or very stretchy yarns, because they blur the triangles and the tube will grow in length.
- Pink (main color): 150 g, about 285 m (312 yd)
For the green version shown in some photos, swap in the same amount of sage green.
Tools:
– 4.5 mm (US 7) crochet hook
– 2 stitch markers (one for the round start, one for the strap position)
– Tapestry needle
– Scissors
– Measuring tape
– Spray bottle and a rolled towel or a 6 in (15.2 cm) wide piece of cardboard for blocking
The yarn amounts include a safety margin of about 25%. The holder itself uses roughly 115–120 g.
Abbreviations (US Terms)
- ch – chain
- sc – single crochet
- dc – double crochet
- sl st – slip stitch
- sk – skip
- st(s) – stitch(es)
- sp – space
- Rnd – round
Special stitch – Fan: (dc, ch 1, dc, ch 1, dc) all in the same stitch. A fan contains 3 dc and 2 ch-1 spaces. The middle dc is the center dc.
Beginning fan: ch 4 (counts as dc + ch 1), (dc, ch 1, dc) in the same stitch.
Gauge and Checkpoints
Single crochet gauge: 16 sc × 18 rnds = 4 in (10.2 cm) in the round.
Lace gauge: 4 lace rounds = 2.5 in (6.4 cm) tall. One fan repeat (6 base stitches) = 1.5 in (3.8 cm) wide around the tube.
Make a test piece first. Work Rnds 1–8 of the bottom band, then check before you start the lace. The holder is one piece, so this band is your swatch.
Checkpoints:
1. After Rnd 1: the ring of 30 sc measures 7.5 in (19.1 cm) around.
2. After Rnd 4: 48 sts, measuring 12 in (30.5 cm) around, or 6 in (15.2 cm) when pressed flat.
3. After Rnd 8: the bottom band is about 1.75 in (4.4 cm) tall.
4. After Lace Rnd 10: the lace section is 6.25 in (15.9 cm) tall.
5. After Lace Rnd 20: the lace section is 12.5 in (31.8 cm) tall.
6. After the top band: total height is 16 in (40.6 cm).
If your tube is too wide (more than 6.25 in / 15.9 cm flat), go down to a 4 mm (US G-6) hook. If it’s too narrow (less than 5.75 in / 14.6 cm flat), go up to a 5 mm (US H-8) hook. Don’t change the stitch count, because the lace needs exactly 48 stitches (8 repeats of 6).
Bottom Band
The dispensing opening is a ring of chains. The increase rounds make the bottom curve in slightly, which keeps bags from falling out on their own.
Foundation: Ch 30. Without twisting the chain, sl st to the first ch to form a ring. Place a marker in the first stitch of each round and move it up as you go.
Rnd 1: Ch 1, sc in each ch around, sl st to first sc. (30 sts)
Rnd 2: Ch 1, sc in next 4 sts, 2 sc in next st; repeat from * 6 times total, sl st to first sc. (36 sts)
Rnd 3: Ch 1, sc in next 5 sts, 2 sc in next st; repeat from * 6 times total, sl st to first sc. (42 sts)
Rnd 4: Ch 1, sc in next 6 sts, 2 sc in next st; repeat from * 6 times total, sl st to first sc. (48 sts)
Rnds 5–8: Ch 1, sc in each st around, sl st to first sc. (48 sts each round)
Check the size now: 6 in (15.2 cm) flat and about 1.75 in (4.4 cm) tall.
Fan Lattice Body
The lattice is a 6-stitch repeat, worked 8 times around the 48 stitches. The first lace round sets up the pattern. After that you alternate Rnd 2 and Rnd 3, so each fan sits above a single crochet and each single crochet sits in the center of a fan. That offset is what creates the triangular openings.
Lace Rnd 1 (setup): Ch 1, sc in first st, ch 2, sk 2 sts, fan in next st, ch 2, sk 2 sts, sc in next st; repeat from * 7 times, then ch 2, sk 2 sts, fan in next st, ch 2, sk 2 sts, sl st to first sc. (8 fans, 8 sc, 16 ch-2 sps)
Check: 1 + (6 × 7) + 5 = 48 base stitches used, which is every stitch exactly once.
Lace Rnd 2: Beginning fan in the same sc as the join, ch 2, sc in center dc of next fan, ch 2, fan in next sc; repeat from * 6 times, then ch 2, sc in center dc of last fan, ch 2, sl st to 3rd ch of beginning ch-4. (8 fans, 8 sc, 16 ch-2 sps)
Lace Rnd 3: Sl st in next ch-1 sp, sl st in center dc. Ch 1, sc in same center dc, ch 2, fan in next sc, ch 2, sc in center dc of next fan; repeat from * 6 times, then ch 2, fan in next sc, ch 2, sl st to first sc. (8 fans, 8 sc, 16 ch-2 sps)
Lace Rnds 4–20: Repeat Rnds 2 and 3 in turn, ending with a Rnd 2 repeat (Rnd 20). Every round has 8 fans, 8 sc and 16 ch-2 spaces.
Tips for neat triangles:
– Always put the sc into the center dc of the fan below, not into a ch-1 space.
– Keep the ch-2 spaces relaxed but even. Tight chains pucker the mesh, and loose chains turn the triangles into loops.
– The join will drift slightly because of the sl sts in Rnd 3. That’s normal, and the side fold hides it.
Checkpoint: After Lace Rnd 20, the lattice measures 12.5 in (31.8 cm) and the holder measures about 14.25 in (36.2 cm) total. That’s 10 pairs of offset rounds, so you’ll see about 10 tiers of triangles.
Top Band and Hanging Strap (Border)
Border gauge: 16 sc = 4 in (10.2 cm), the same as the bottom band. The top band must have the same 48 stitches as the bottom so the tube stays straight instead of flaring or pulling in.
Top Band
Rnd 1 (conversion round): Sl st in next ch-1 sp, sl st in center dc. Ch 1, sc in same center dc, 2 sc in next ch-2 sp, sc in next sc, 2 sc in next ch-2 sp, sc in center dc of next fan, 2 sc in next ch-2 sp, sc in next sc, 2 sc in next ch-2 sp; repeat from * 7 times, sl st to first sc.
Count: 16 sts worked into existing stitches (8 center dc + 8 sc) + 32 sts worked into spaces (2 in each of 16 ch-2 sps) = 48 sts.
Skip the outer dc and the ch-1 spaces of each fan. They are covered by the stitches around them.
Rnds 2–8: Ch 1, sc in each st around, sl st to first sc. (48 sts each round)
Fasten off. The top band is 8 rounds, about 1.75 in (4.4 cm), matching the bottom band.
Why the math works: 8 repeats × 6 stitches = 48 stitches. Each repeat converts back to exactly 6 sc: 1 in the center dc, 2 in a ch-2 sp, 1 in the sc and 2 in the next ch-2 sp. When you flatten the tube, each side (front and back) has 24 sts. 24 sts at 16 sts per 4 in = 6 in (15.2 cm), which matches the bottom band.
Hanging Strap
Flatten the tube so the round join sits at one side fold. With the join counted as st 1, mark sts 48, 1 and 2 at that fold. The opposite fold is centered on st 25, so its stitches are 24, 25 and 26.
Row 1: Join yarn in st 48 of Rnd 8. Ch 1, sc in st 48, st 1 and st 2, turn. (3 sts)
Rows 2–42: Ch 1, sc in each st across, turn. (3 sts each row)
The strap now measures about 9.25 in (23.5 cm) long and 0.75 in (1.9 cm) wide.
Attach: Bring the strap across the top opening without twisting it. Lay its last row against the inside of the rim over sts 24, 25 and 26. Sl st through each strap stitch and the matching rim stitch together. Fasten off.
The strap forms an arch about 3 in (7.6 cm) high above the rim. It’s wide enough to hang over a hook or a cabinet knob.
Final Blocking
- Weave in all ends along the solid bands, never through the lattice, where they would show.
- Spray the holder evenly with water until it’s damp but not dripping.
- Slide in a rolled towel or a 6 in (15.2 cm) wide strip of cardboard so the tube is gently filled.
- Pat the fans into shape so each triangle opening sits upright and the ch-2 spaces are even.
- Smooth the bottom band so the opening is round and about 2.4 in (6.1 cm) across.
- Measure: 6 in (15.2 cm) wide and 16 in (40.6 cm) tall. Ease the length gently if needed. Don’t stretch cotton hard, because it won’t spring back.
- Lay the strap flat and straight.
- Let it dry completely before you hang it.
Final Quality-Control Checklist
- [ ] Bottom ring is untwisted and has 30 sc
- [ ] Bottom band ends with 48 sts
- [ ] Each lace round has 8 fans and 8 sc
- [ ] Each sc sits in a center dc and each fan sits on an sc
- [ ] 20 lace rounds, about 10 tiers of triangles
- [ ] Top band conversion round has 48 sts
- [ ] Width is 6 in (15.2 cm) flat at the top, middle and bottom
- [ ] Total height is 16 in (40.6 cm)
- [ ] Strap has 3 sts and 42 rows, is untwisted, and is attached at opposite folds
- [ ] All ends are woven into the solid bands
Troubleshooting
The foundation ring twisted. If you notice before Rnd 2, rip back. A twist can’t be fixed later. Next time, work Rnd 1 as foundation single crochet and join.
The lattice looks skewed or spirals. You’ve probably put an sc into a ch-1 space instead of the center dc. Count back and correct the round.
The tube widens in the lace section. Your chains are too loose. Make the ch-2 spaces snugger, or use a 0.5 mm smaller hook for the lace only.
The top band ruffles or pulls in. Recount the conversion round. It must be exactly 48 sts, with 2 sc per ch-2 space and 1 sc per center dc and per sc.
Bags fall out of the bottom. Your opening is too large. Work the foundation with 27 ch instead of 30 and add 1 extra increase round, being careful to still end at 48 sts. Or work 1 extra round of 30 sc before Rnd 2.
The strap sags or stretches. Use a firmer tension, or work Rows 2–42 with a hook 0.5 mm smaller.
Care
Hand wash or machine wash cold on a gentle cycle in a mesh bag. Reshape while damp and lay flat to dry.
Final Notes
Everything in this pattern builds on one number: 48 stitches. The 30-stitch ring opens to 48 by Rnd 4, which gives you a 12 in (30.5 cm) tube that lies 6 in (15.2 cm) flat. The bottom band adds 1.75 in (4.4 cm). Twenty lace rounds of 8 fans add 12.5 in (31.8 cm). The conversion round brings you back to exactly 48 sc, and the top band adds another 1.75 in (4.4 cm), for a total of 16 in (40.6 cm). The 3-stitch strap links the two side folds at sts 1 and 25.
Check your gauge at each checkpoint and the holder will come out straight, even and ready to fill.
Happy crocheting!