

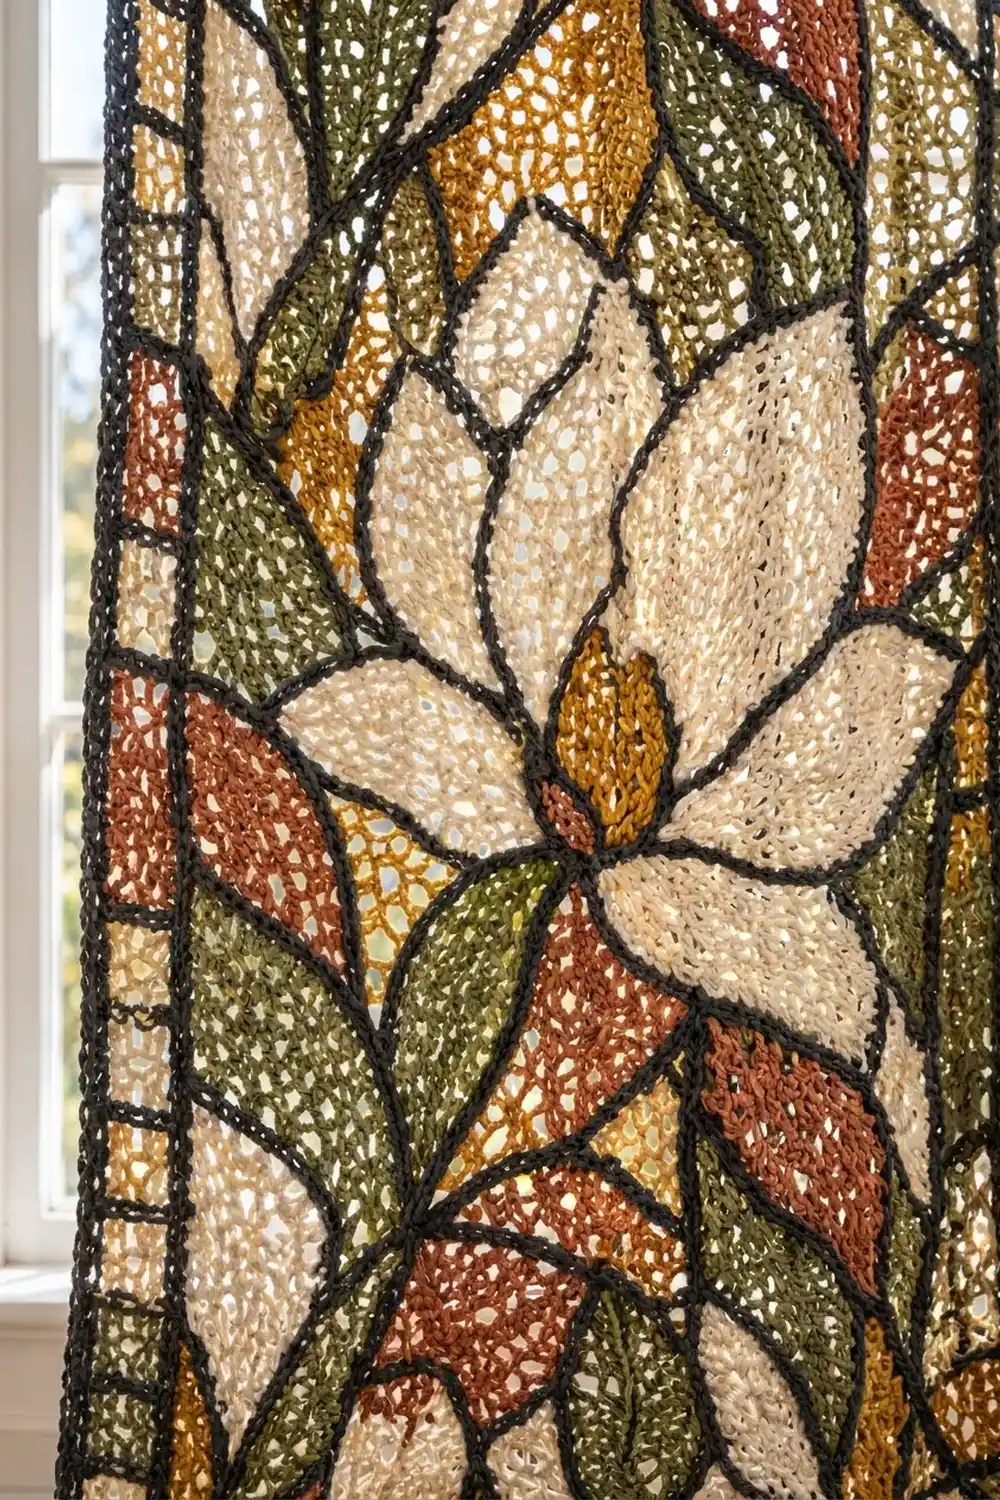
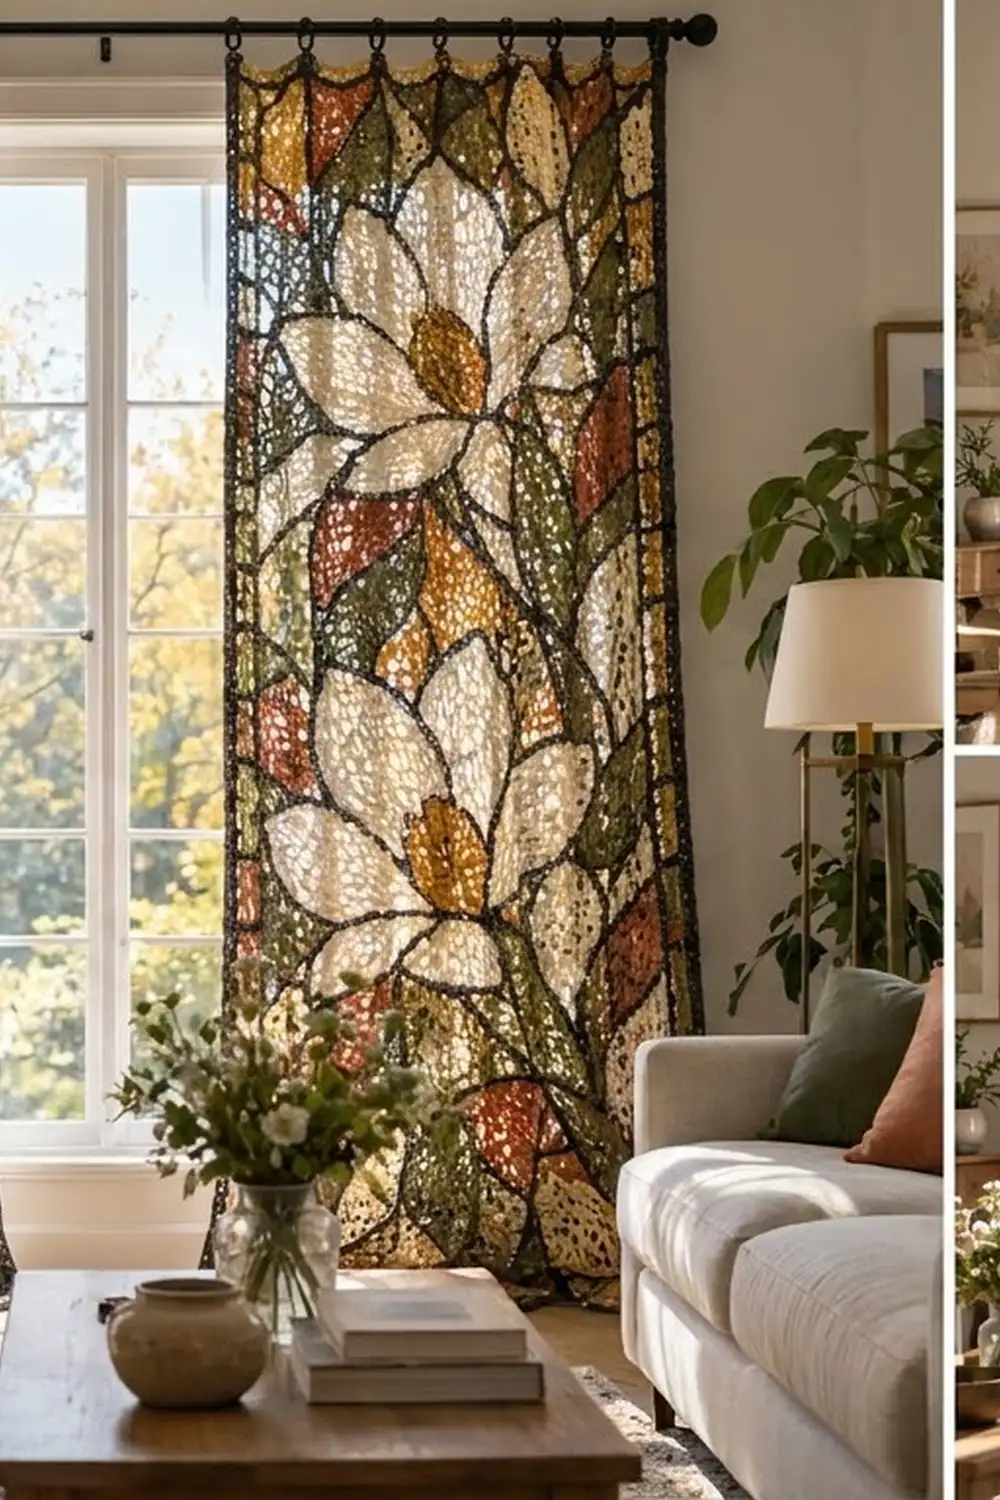
These curtain panels borrow their look from stained-glass windows. Each panel is a large rectangle of open crochet mesh, color-blocked into cream magnolia petals, a mustard flower center, olive leaves, and terracotta and mustard background shards. Charcoal surface slip stitch lines trace every color edge, so sunlight shows through the mesh and the dark outlines look like the lead in a glass window.
The palette is warm and earthy: cream, mustard gold, olive green, terracotta, and charcoal. Each panel stacks the same magnolia “window” twice, one above the other.
The pattern uses US crochet terms. Each finished panel measures 30.5 x 78.5 in (77.5 x 199.4 cm) and hangs from clip rings. You make two identical panels.
Construction is simple to follow. You work each panel from the bottom up in dc mesh, changing colors by intarsia using the placement table. Next you add the charcoal outlines with surface slip stitch, and then you work a four-round charcoal border.
Finished Size and Construction
- Finished size (each panel): 30.5 x 78.5 in (77.5 x 199.4 cm)
- Skill level: Intermediate
- Terminology: US
- Yarn weight: Worsted (#4) cotton
- Hook: 5 mm (H-8)
- Number of pieces: 2 separate panels, not joined to each other
- Layout: each panel is 1 continuous piece holding 2 stacked flower windows
- Panel body: 56 mesh squares wide x 152 rows tall
- Size before border: 28 x 76 in (71.1 x 193.0 cm)
- Border depth: 1.25 in (3.2 cm) on every side
Materials
Choose a smooth, mercerized or matte worsted cotton of about 200 m (219 yd) per 100 g (3.5 oz). Cotton keeps the mesh crisp and holds its shape under its own weight. Avoid stretchy acrylic, because long panels in acrylic tend to droop over time.
Yarn for both panels:
- Cream: 375 g / 750 m (820 yd)
- Olive green: 310 g / 620 m (678 yd)
- Mustard gold: 235 g / 470 m (514 yd)
- Terracotta: 170 g / 340 m (372 yd)
- Charcoal: 380 g / 760 m (831 yd)
All quantities include a margin of about 25% for swatching, intarsia tails, and outlining.
Tools:
- 5 mm (H-8) hook
- 4 mm (G-6) hook for surface slip stitch
- Yarn bobbins (at least 8)
- Locking stitch markers
- Tapestry needle
- Measuring tape, blocking pins, spray bottle
- 14 curtain clip rings (7 per panel)
Abbreviations (US Terms)
- ch – chain
- sc – single crochet
- dc – double crochet
- sl st – slip stitch
- sk – skip
- sp – space
- st(s) – stitch(es)
- rnd – round
Mesh square: the space between two dc posts, made of 1 ch. A square’s color is the color of its ch-1 and of the dc that closes it.
Surface slip stitch (surf sl st): hold the yarn behind the work. Insert the hook from front to back through a mesh space or between stitches, pull up a loop, and draw it through the loop on the hook. This makes a raised chain line on the front.
Gauge and Checkpoints
Gauge: 8 mesh squares and 8 rows = 4 in (10.2 cm), so 1 square is 0.5 in (1.3 cm) wide and 1 row is 0.5 in (1.3 cm) tall. Border gauge is 4 sc = 1 in (2.5 cm).
Test first: Ch 28 and work 12 rows of mesh as written below. That gives 12 squares. The swatch should measure 6 x 6 in (15.2 x 15.2 cm). Block it before measuring.
Checkpoints:
- After Row 1: 28 in (71.1 cm) wide
- After Row 19: 9.5 in (24.1 cm) tall
- After Row 76 (first window): 38 in (96.5 cm) tall
- After Row 152: 76 in (193.0 cm) tall
- After the border: 30.5 x 78.5 in (77.5 x 199.4 cm)
If your swatch is too big, go down half a hook size. If it is too small, go up half a size. If only the height is off, adjust how far you pull up the first loop of each dc. Don’t add or remove rows, because that would break the placement table.
Panel Body (Make 2)
Row 1 is the bottom edge. Odd rows are worked right to left and even rows left to right. Column 1 is always the left edge of the panel as it faces you.
Foundation: With olive, ch 116.
Row 1: Dc in the 6th ch from the hook. The skipped 5 ch count as dc, ch 1, and 1 skipped ch. Then ch 1, sk 1 ch, dc in the next ch; repeat from * across. (57 dc, 56 ch-1 sps = 56 squares)
Row 2 and all following rows: Ch 4 and turn (counts as dc + ch 1). Sk the ch-1 sp and dc in the next dc. Then ch 1, sk ch-1 sp, dc in the next dc; repeat from * across. Work the last dc in the turning ch. (56 squares)
Color changes (intarsia): Use a separate bobbin for each color run. Work the closing dc of the last square in the old color, but finish its final yarn over with the new color. Then make the next ch 1 in the new color. Drop the old yarn at the back (wrong side). Do not carry yarn across runs.
Placement Table (one window = 76 rows)
Runs read from column 1 to column 56. Every band totals 56 squares. Key: C = cream, M = mustard, O = olive, T = terracotta.
- Band A, Rows 1–19: O14, M12, O4, M12, O14
- Band B, Rows 20–29: T9, C14, T3, O4, T3, C14, T9
- Band C, Rows 30–33: T9, C14, M10, C14, T9
- Band D, Rows 34–41: O5, C18, M10, C18, O5
- Band E, Rows 42–56: O5, C46, O5
- Band F, Rows 57–64: T21, C14, T21
- Band G, Rows 65–76: M14, O28, M14
Work panel Rows 1–76 as the first window. Then work Rows 77–152 as the second window, repeating the table with 76 added to each row number (for example, Band A becomes Rows 77–95). Fasten off and weave in all tails along same-color mesh posts.
Each window holds 1,482 cream, 1,214 olive, 912 mustard, and 648 terracotta squares. That is 4,256 squares in total, which equals 56 x 76.
Charcoal Outlines
Use the 4 mm hook and charcoal. Work about 2 surf sl sts per square edge (4 per inch, or 4 per 2.5 cm). Lines that are too tight will pucker the mesh, so check often that the panel still lies flat. Start and end each line with a 6 in (15.2 cm) tail and weave it in on the back.
Work these lines in each window:
- Color boundaries: Outline every change in color. Vertical lines follow a dc post. Horizontal lines run between two rows.
- Rounded petals: Wherever a cream area steps out at a corner, work the line diagonally across that corner square instead of around it. This turns the stair steps into smooth curves.
- Center petal: In the cream area at columns 22–35, Rows 42–64, add vertical dividers between columns 21/22 and 35/36 from the top of Row 41 to the top of Row 56. Over Rows 61–64, angle both side lines in so they meet in a point between columns 28/29 at the top of Row 64.
- Side petals: Round the top outer corners of the column 6–21 and 36–51 petals at Rows 53–56. Add a horizontal line at the top of Row 33 across columns 10–23 and 34–47. This separates the lower petals (Rows 20–33) from the upper side petals.
- Flower center: Inside the mustard block, add 2 diagonal lines. Both start at the bottom center (between columns 28/29, at Row 30). One ends at the top of Row 41 between columns 25/26, and the other between columns 32/33. This makes the three-lobed bud.
- Leaves: In Band A, outline the stem (columns 27–30, Rows 1–29). Add a vein from the bottom inner corner of each 14-square olive block diagonally to its top outer corner.
- Shards: Split each 12-square mustard block in Band A with one diagonal line. Split each 21-square terracotta block in Band F with a diagonal from its outer bottom corner to its inner top corner. Split the olive 28-square block in Band G with a vertical line between columns 28/29.
Make Both Panels
Make 2 identical panels. The design is symmetric, so there is no mirrored version. Each panel uses half of each yarn quantity listed in Materials.
The panels stay separate. There is no joining and there are no seams.
Layout on the rod:
[ Panel 1 ][ Panel 2 ]
[ Window  ][ Window  ]   Rows 77-152
[ Window  ][ Window  ]   Rows 1-76
Border
Work the border in charcoal with the 5 mm hook. Border gauge is 4 sc per inch (2.5 cm). That equals 2 sc per square and 2 sc per row.
In Rnds 1–3, the per-side counts do not include the corner ch-2 sps.
Rnd 1 (sc): Join at the top right corner.
- Top and bottom edges: work 2 sc in each ch-1 sp. On the bottom edge, work them into the foundation spaces. (56 squares x 2 = 112 sc per side)
- Side edges: work 2 sc around each row-end post. (152 rows x 2 = 304 sc per side)
- Corners: ch 2 at each corner.
Total: 832 sc and 4 corner ch-2 sps. Join with a sl st.
Rnd 2 (mesh): Sl st into the corner sp. Ch 5 (counts as dc + ch 2) and dc in the same sp.
- Along each side: ch 1, sk 1 sc, dc in the next sc; repeat to the end of the side, then ch 1.
- In each following corner sp: (dc, ch 2, dc).
Per side: top and bottom have 56 dc and 57 ch-1 sps; sides have 152 dc and 153 ch-1 sps. Each corner has 2 dc around a ch-2 sp. Join.
Rnd 3 (sc): Sl st into the corner sp and ch 2.
- Along each side: sc in the corner dc, sc in each ch-1 sp and each dc, then sc in the next corner dc.
- At each following corner sp: ch 2.
Per side, the count is (stitches worked 1 per existing stitch) + (2 corner dc). That gives top and bottom 113 + 2 = 115 sc, and sides 305 + 2 = 307 sc. Join.
Rnd 4 (sc): Work sc in each sc and (sc, ch 2, sc) in each corner sp.
Per side, excluding the corner ch-2: top and bottom are 115 + 2 = 117 sc, and sides are 307 + 2 = 309 sc. Join and fasten off.
Why the math works: The mesh gauge (2 squares per inch) and the border gauge (4 sc per inch) match exactly. So 112 sc covers the 28 in (71.1 cm) top edge, and 304 sc covers the 76 in (193.0 cm) side edge, without ruffling or cupping. The four border rounds measure 0.25 + 0.5 + 0.25 + 0.25 = 1.25 in (3.2 cm). That brings each panel to 30.5 x 78.5 in (77.5 x 199.4 cm).
Final Blocking
- Lay the panel face up on blocking mats or a clean carpet covered with a sheet.
- Mist it until it is evenly damp, not soaked.
- Pin the four corners to 30.5 x 78.5 in (77.5 x 199.4 cm).
- Pin along every edge every 4 in (10.2 cm), keeping the border straight.
- Nudge the mesh squares square, and gently straighten any outline that wanders.
- Let it dry completely (24–48 hours) before unpinning.
- Clip 7 rings evenly along the top border, about 5 in (12.7 cm) apart, starting at the corners.
Final Quality-Control Checklist
- Each panel body measures 56 squares x 152 rows.
- Every band in the table totals 56 squares.
- Both flower windows line up vertically.
- No color carries show through the mesh.
- The outlines lie flat and close every color area.
- Petal tips are pointed and corners are rounded.
- The border counts match on opposite sides.
- Both panels measure 30.5 x 78.5 in (77.5 x 199.4 cm).
- All tails are woven in on the back.
Troubleshooting
- The panel narrows: You are missing the last dc into the turning ch. Count to 56 squares every few rows.
- Holes at color changes: Twist the old and new yarns once on the wrong side before you continue.
- Outlines pucker: Use a larger hook or work fewer surf sl sts per edge.
- The border ruffles: You have extra sc. Recheck Rnd 1 against 112 and 304 sc per side.
- The border cups: You have too few sc, or your tension is too tight. Rework Rnd 1.
- The panel grows when hung: Block it again. Choose cotton rather than a cotton blend next time.
Care
Hand wash cold, or machine wash on a gentle cycle in a mesh laundry bag, then lay flat to dry. Don’t hang the panels while wet, or the weight may stretch them.
Final Notes
The measurement chain is short. One square is 0.5 in (1.3 cm), so 56 squares make 28 in (71.1 cm) and 152 rows make 76 in (193.0 cm). The border adds 1.25 in (3.2 cm) on each side, for a finished size of 30.5 x 78.5 in (77.5 x 199.4 cm). If your swatch hits gauge, every later checkpoint will follow.
Happy crocheting!