

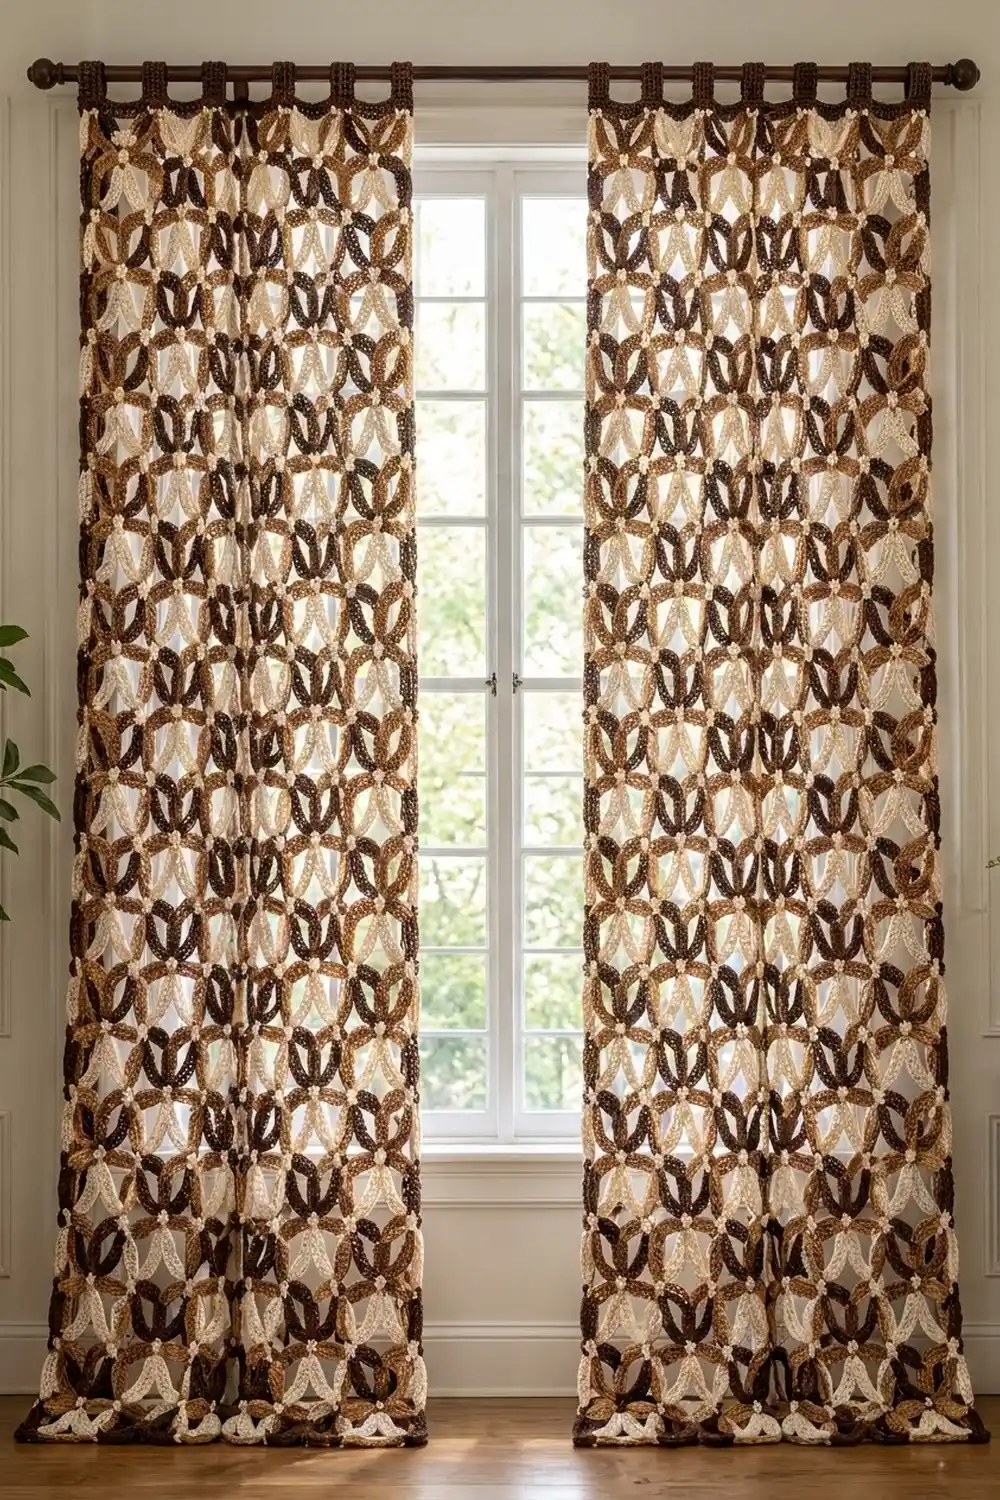
The Mocha Petal Lattice Curtain is a lacy, see-through panel made from four-petal flower motifs in dark chocolate brown, caramel and cream. Each motif has open, pointed-oval petals around a small dotted center. When you join the motifs, the petals line up into an interlocking ring pattern that lets soft light through without hiding the view.
The colors are warm and earthy, and the style sits between vintage boho and modern farmhouse. A solid dark brown border frames the lace, and dark brown tabs slide straight onto a curtain rod, so you don’t need any hardware clips.
This pattern uses US crochet terms. One finished panel measures 38 in x 74 in (96.5 cm x 188.0 cm) before the tabs. The photo shows a pair of panels, so make a second panel the same way if you want a pair.
Construction is modular. You crochet each motif in four steps: a center, four separate petals, and a dark brown frame round that turns the flower into a square. You join the motifs as you go during the frame round, then add a three-round border and seven hanging tabs.
Finished Size and Construction
- Finished panel size: 38 in x 74 in (96.5 cm x 188.0 cm), not including tabs
- Skill level: Intermediate
- Terminology: US crochet terms
- Yarn weight: Worsted (#4)
- Hook: 5.0 mm (H-8)
- Number of pieces: 72 motifs per panel
- Layout: 6 motifs wide x 12 motifs tall
- Motif size: 6 in x 6 in (15.2 cm x 15.2 cm)
- Size before border: 36 in x 72 in (91.4 cm x 182.9 cm)
- Border depth: 1 in (2.5 cm) on every side
- Tabs: 7 tabs, each about 3 in (7.6 cm) wide, forming 3 in (7.6 cm) loops
Materials
Use a smooth worsted-weight cotton or a cotton-acrylic blend with roughly 200 m per 100 g. Cotton keeps the petals crisp and holds up well near a sunny window. Avoid very fuzzy yarns, because the open petal loops look best when the stitches are clearly defined.
Yarn (one panel):
– Color A, dark chocolate brown (frames, some petals, border, tabs): 300 g / 600 m
– Color B, caramel tan (petals): 300 g / 600 m
– Color C, cream (centers, petals): 200 g / 400 m
These amounts include a margin of about 15% for gauge differences and swatching. Double them for a pair of panels.
Tools:
– 5.0 mm (H-8) crochet hook
– Tapestry needle
– Scissors
– Stitch markers
– Rust-proof pins and blocking mats or a large towel
– Tape measure
Abbreviations (US Terms)
- ch – chain
- sl st – slip stitch
- sc – single crochet
- hdc – half double crochet
- BLO / FLO – back loop only / front loop only
- sp – space
- st(s) – stitch(es)
- rnd – round
Special stitch: Picot. Ch 3, then sl st into the 3rd ch from the hook.
Gauge and Checkpoints
Border gauge: 14 sc = 4 in (10.2 cm) when worked across the frame chains.
Before you commit to 72 motifs, make one complete motif, block it lightly, and measure it. Check these points as you go:
- After the center: about 1.25 in (3.2 cm) across.
- After each petal: about 3.25 in (8.3 cm) from the center ring to the petal tip.
- After all 4 petals: about 8.5 in (21.6 cm) from tip to opposite tip, measured diagonally.
- After the frame round: 6 in (15.2 cm) per side, with the petal tips sitting exactly in the corners.
If the motif is too big, go down to a 4.5 mm hook. If it’s too small, go up to a 5.5 mm hook. Check the petal length first, because the petals set the motif’s size. The frame chains only work properly if the petal tips land at the corners.
Motif Pattern
Each motif uses Color C for the center and one color per petal. A motif has the same layout every time: the top-left petal is C, the top-right petal is B, the bottom-right petal is A, and the bottom-left petal is B. The checkerboard color effect comes from rotating every other motif when you join (see Make All Pieces).
Center (Color C)
Rnd 1: Make a magic ring, ch 1, work 8 sc into the ring, then sl st to the first sc. Pull the ring tight. (8 sc)
Rnd 2: Ch 1. Working in FLO only, sc in next st, sc in next st, picot, and repeat from * 3 more times. Sl st to the first sc and fasten off. (8 sc + 4 picots)
The back loops of Rnd 1 stay free. You’ll anchor the petals in them. Each picot sits between two petal bases and makes the small dotted ring you see in the photo.
Petals (make 4 per motif)
Work each petal over 2 free back loops of Rnd 1. Petal 1 uses the back loops of sts 1–2, Petal 2 uses sts 3–4, Petal 3 uses sts 5–6, and Petal 4 uses sts 7–8.
Setup: With the petal color, join with a sl st in the BLO of the first st of the pair. Ch 25, then sl st in the BLO of the second st of the pair. (25-ch loop)
Petal Rnd 1: Ch 1 and keep the stitches on the outside of the loop. Sc in each of the first 12 ch, work (sc, ch 2, sc) in the 13th ch, then sc in each of the last 12 ch. Sl st into the same BLO as the setup sl st. (26 sc + 1 ch-2 tip sp; 13 sc on each side of the tip)
Petal Rnd 2: Ch 1 and turn so you work back toward the tip.
- First side: Hdc in each of the next 6 sc, work 2 hdc in the next sc, then hdc in each of the next 6 sc. (14 hdc)
- Tip: In the ch-2 tip sp, work (2 hdc, ch 2, 2 hdc).
- Second side: Hdc in each of the next 6 sc, work 2 hdc in the next sc, then hdc in each of the next 6 sc. (14 hdc)
- Finish: Sl st into the center ring, then fasten off.
Petal count: 32 hdc + 1 ch-2 tip sp. Each side has 16 hdc when you count from the tip sp: 2 tip hdc plus 14 side hdc.
The single increase on each side of Rnd 2 makes the outer edge curve. The hole in the middle of the loop stays open, which gives you the open, pointed-oval petal from the photo. Make all 4 petals in the color order given above and weave in the ends.
Frame Round (Color A)
The frame turns the four-petal flower into a 6 in (15.2 cm) square. The petal tips become the corners.
Frame Rnd:
- Start: Join A in the tip ch-2 sp of any petal. Ch 1, then work (sc, ch 3, sc) in the same sp. This is the corner.
- Side: Ch 5. Counting from the tip along the side of this petal, sc in the 9th hdc. Ch 7. On the next petal, sc in the 9th hdc counting back from its tip. Ch 5.
- Next corner: Work (sc, ch 3, sc) in the next tip ch-2 sp.
- Repeat: Work Steps 2 and 3 two more times, then work Step 2 once more.
- Close: Sl st to the first sc and fasten off.
Per-side count: corner sc + 5 ch + sc + 7 ch + sc + 5 ch + corner sc = 21 sts per side. This count includes both corner sc. The ch-3 corner sp sits between the sides and isn’t counted in either one.
Frame total: 4 sides x 21 sts = 84 sts, plus 4 ch-3 corner sps.
Make All Pieces
Make 72 motifs in total for one panel. Each motif uses:
- Color C: 1 center + 1 petal
- Color B: 2 petals
- Color A: 1 petal + the frame round
Totals for one panel: 72 centers, 72 C petals, 144 B petals, 72 A petals and 72 frames.
All motifs are identical. When you join, place them as Motif X (the normal position) or Motif Y (turned 180°, so the A petal is at top left and the C petal is at bottom right). The grid below shows the layout, 6 across and 12 down:
Row 1:   X Y X Y X Y
Row 2:   Y X Y X Y X
Row 3:   X Y X Y X Y
Row 4:   Y X Y X Y X
Row 5:   X Y X Y X Y
Row 6:   Y X Y X Y X
Row 7:   X Y X Y X Y
Row 8:   Y X Y X Y X
Row 9:   X Y X Y X Y
Row 10:  Y X Y X Y X
Row 11:  X Y X Y X Y
Row 12:  Y X Y X Y X
When you turn a motif 180°, its cream and brown petals swap corners. Where motifs meet, the colors of neighboring petals alternate, which gives the mixed lattice look in the photo.
Joining
Join as you go during the frame round. Fully frame the first motif. For every later motif, work the frame round as written until you reach a side that touches a finished motif, then replace the chains on that side as follows:
- Corner ch 3: Ch 1, sl st in the neighbor’s corner ch-3 sp, ch 1. (still 3 sts)
- Each ch 5: Ch 2, sl st in the neighbor’s matching ch-5 sp, ch 2. (still 5 sts)
- Middle ch 7: Ch 3, sl st in the neighbor’s ch-7 sp, ch 3. (still 7 sts)
Each sl st replaces exactly one chain, so every side still has 21 sts. Joining never adds or removes stitches.
Where four motifs meet, sl st into the corner sp that is already joined, so all four corners lock together at one point.
Tension: Keep the joining chains at the same tension as the free chains. If the joining chains are tight, the panel will pucker. If they’re loose, the petals will sag when the curtain hangs. Lay each new motif flat before you start the join, and make sure the petal tips line up with the corners of the neighboring motif.
Size checkpoint: After the first row, the strip should measure 36 in (91.4 cm) wide. After all 12 rows, the panel should measure 36 in x 72 in (91.4 cm x 182.9 cm), give or take 0.5 in (1.3 cm).
Border and Hanging Tabs
Border gauge: 14 sc = 4 in (10.2 cm), or 3.5 sc per inch.
Rnd 1 (Color A): Join A in any panel-corner ch-3 sp and ch 1. Work 3 sc in each of the 4 panel-corner ch-3 sps. Along the edges:
- Sc in each frame sc.
- Work 5 sc in each ch-5 sp and 7 sc in each ch-7 sp.
- Skip the joined corner sps between motifs, because they lie at the seams.
Sl st to the first sc. Each motif side gives 4 sc + 5 + 7 + 5 = 21 sc, so the edges count like this:
- Short sides: 6 motifs x 21 = 126 sc
- Long sides: 12 motifs x 21 = 252 sc
- Panel corners: 3 sc each
In each 3-sc corner group, the middle sc is the corner stitch. The outer 2 belong to the sides, which brings the short sides to 128 and the long sides to 254.
(Total: 128 + 128 + 254 + 254 + 4 corner sts = 768 sts)
Rnd 2: Ch 1. Sc in each st and work 3 sc in each corner st. Sl st to the first sc.
(Short sides 130, long sides 256, 4 corner sts; total 776 sts)
Rnd 3: Ch 2 (doesn’t count as a st). Hdc in each st and work 3 hdc in each corner st. Sl st to the first hdc and fasten off.
(Short sides 132, long sides 258, 4 corner sts; total 784 sts)
Why the math works: The 126 sc across a short side divided by 3.5 sc per inch gives 36 in (91.4 cm), which matches the joined width. The 252 sc on a long side gives 72 in (182.9 cm). Because the stitch count matches the edge length, the border lies flat without ruffling or cupping. Each later round adds 2 sts per side, just enough to turn the corners. The three rounds add 1 in (2.5 cm) per side, bringing the panel to 38 in x 74 in (96.5 cm x 188.0 cm).
Hanging Tabs (Color A)
Work the tabs into the 132 Rnd 3 hdc along one short side, which becomes the top edge. Skip the first st after the corner. Then:
- Work a tab over the next 10 sts.
- Skip the next 10 sts.
- Repeat Steps 1 and 2 until you have 7 tabs.
Finish by skipping the last st before the corner. This uses all 132 sts: 1 + 7 tabs x 10 + 6 gaps x 10 + 1 = 132.
Each tab:
- Row 1: Join A in the first st. Ch 2 (doesn’t count as a st), then hdc in each of the next 10 sts. (10 hdc)
- Rows 2–14: Ch 2, turn, and hdc in each st. (10 hdc)
Fasten off and leave a 12 in (30.5 cm) tail. Each tab is about 3 in (7.6 cm) wide and 6 in (15.2 cm) long. Fold it to the back and sew Row 14 to the back of Border Rnd 1. That makes a 3 in (7.6 cm) loop.
Final Blocking
- Weave in all remaining ends, following the petal stitches so they stay hidden.
- Soak the panel in cool water for 15 minutes, then press the water out gently. Don’t wring it.
- Roll the panel in towels to remove most of the moisture.
- Lay it flat on mats or towels and pin it out to 38 in x 74 in (96.5 cm x 188.0 cm).
- Pin the petal tips at the motif corners, and open each petal loop with your fingers so the ovals are even.
- Straighten the border and tabs.
- Let the panel dry completely before you unpin it.
Final Quality-Control Checklist
- All 72 motifs are joined, and each motif side has 21 sts.
- The petal colors alternate according to the X/Y grid.
- Every petal loop is open and has a sharp tip.
- All four-corner joins are locked together at one point.
- The border lies flat and measures 1 in (2.5 cm) deep.
- The 7 tabs are evenly spaced and the same length.
- The panel measures 38 in x 74 in (96.5 cm x 188.0 cm).
Troubleshooting
- Petals are curling: Rnd 2 is too tight. Use a larger hook for the petals only, or block them harder.
- Petal tips don’t reach the corners: Your petals are too short. Check your chain tension on the 25-ch loop.
- The frame puckers: Your chains are too tight. Loosen up, or go up a hook size for the frame round only.
- The border ripples: You worked extra sc into the chain spaces. Recount 21 per motif side.
- The border cups: You skipped sts. Recount against 126 and 252.
- Tabs twist: Make sure each tab starts on the right side of the border and is folded straight before you sew it.
Care
Hand wash cool, or machine wash on a gentle cycle in a mesh bag, then lay flat to dry. Don’t hang the panel while it’s wet, because the weight will stretch the lace.

Final Notes
The measurements build on each other. Each petal is 3.25 in (8.3 cm), which makes an 8.5 in (21.6 cm) diagonal and a 6 in (15.2 cm) framed motif with 21 sts per side. Six motifs across and twelve down give 36 in x 72 in (91.4 cm x 182.9 cm). The border starts with 126 and 252 sc per side and finishes the panel at 38 in x 74 in (96.5 cm x 188.0 cm), with seven tabs on top. Check your measurements at each step, and the panel will hang straight.
Happy crocheting!