

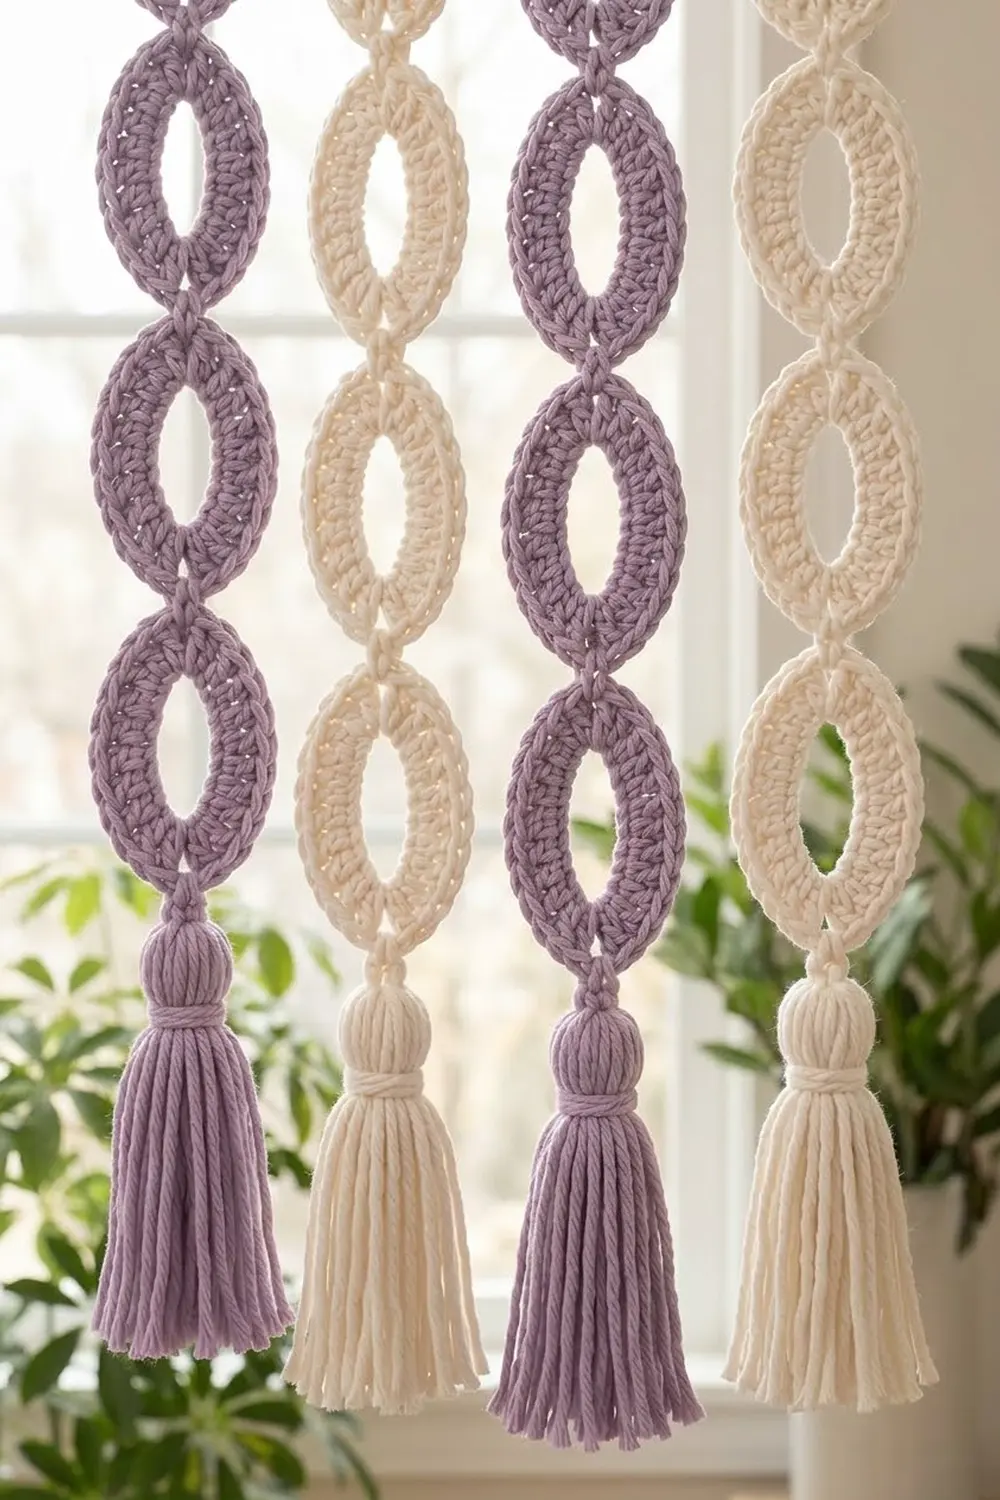
These four hanging garland strands each have three dense, ribbed oval rings and a small gathered tassel at the base. Hung side by side, they form soft vertical stripes of mauve and cream. They look lovely against a bright window, where light shows through the open center of every oval.
Each strand is a single color. The four strands alternate mauve, cream, mauve, cream, and each tassel matches the ovals above it. The style is calm and modern, close to macramé in feel but worked entirely in crochet.
This pattern uses US crochet terms. Each finished strand measures about 25.75 in (65.4 cm) long, including the hanging loop and tassel. Each oval is 3.75 in (9.5 cm) tall and 2.5 in (6.4 cm) wide. Each tassel is 3 in (7.6 cm) long.
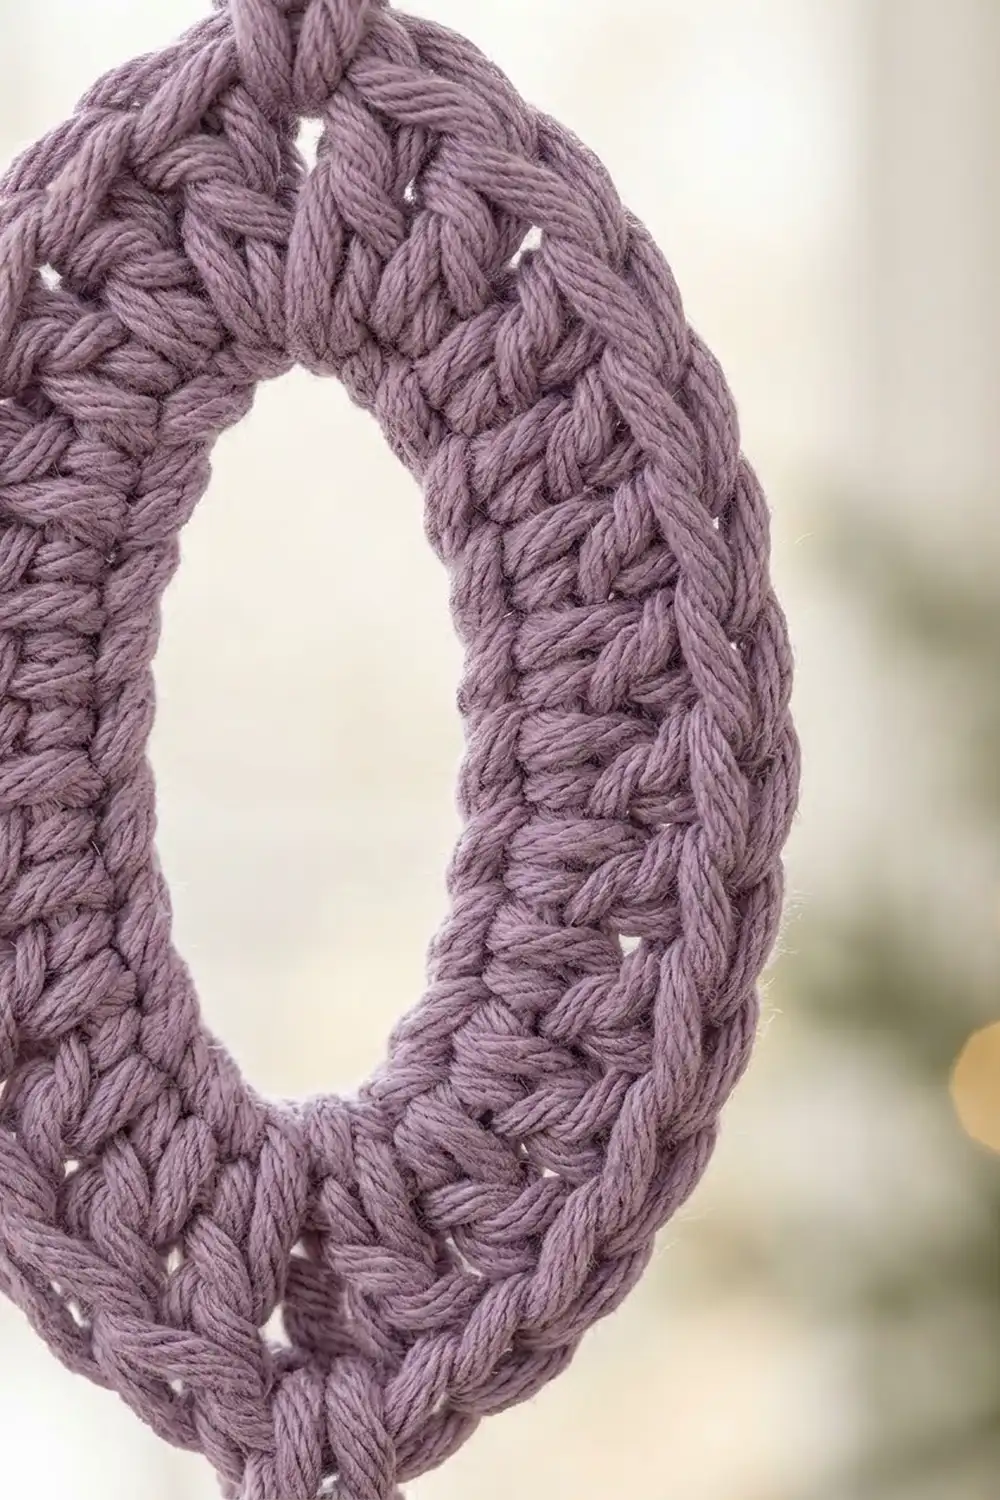
Construction is simple. Each oval starts as a chain ring and is worked outward in joined rounds of single crochet through the back loop only. This creates raised concentric ribs. Increases sit only at the two curved ends, so the ring grows into an oval. A two-round border finishes the edge. Short chain links join the ovals vertically at their center points, a chain cord with a loop goes on top, and a wrapped tassel hangs at the bottom.
Finished Size and Construction
- Finished strand length: 25.75 in (65.4 cm), including loop and tassel
- Skill level: Easy
- Terminology: US crochet terms
- Yarn weight: Worsted (#4)
- Hook: 4.0 mm (G-6), used for a dense, firm fabric
- Number of pieces: 12 ovals (6 mauve, 6 cream) and 4 tassels, assembled into 4 strands
- Layout: 4 separate vertical strands, 3 ovals each, hung side by side in the order mauve, cream, mauve, cream
- Oval size (finished): 3.75 in x 2.5 in (9.5 cm x 6.4 cm)
- Oval size before border: 3.25 in x 2 in (8.3 cm x 5.1 cm)
- Oval opening: about 2 in x 0.75 in (5.1 cm x 1.9 cm)
- Border depth: 0.25 in (0.6 cm) on every edge
- Connector length: 1 in (2.5 cm)
- Tassel length: 3 in (7.6 cm)
Materials
Choose a smooth worsted-weight yarn. Soft acrylic or an acrylic-cotton blend works well. Smooth yarn shows the back-loop ribs clearly. Avoid fuzzy or highly textured yarns because they blur the ridges. Plain cotton also works, but it makes slightly stiffer ovals.
- Mauve: 50 g, about 100 m (109 yd)
- Cream: 50 g, about 100 m (109 yd)
Each strand uses about 32 m of yarn: roughly 8 m per oval, 2 m for the connectors and cord, and 6 m for the tassel. The amounts above include a generous margin for gauge differences, tails, and a fuller tassel if you want one.
Tools:
- 4.0 mm (G-6) crochet hook
- Tapestry needle
- 4 stitch markers
- Stiff card cut to 3 in (7.6 cm) wide, for the tassels
- Sharp scissors
- Ruler or tape measure
- Pins and a blocking mat or folded towel
- Steam iron or spray bottle
Abbreviations (US Terms)
- ch – chain
- sl st – slip stitch
- sc – single crochet
- st(s) – stitch(es)
- BLO – back loop only
- rnd – round
- [ ] x times – repeat the instructions in brackets the stated number of times
Special stitches:
- BLO sc: Insert the hook under the back loop only of the stitch, then complete the sc as usual. The unused front loops form the raised ribs.
- BLO sl st: Insert the hook under the back loop only, yarn over, and pull through the stitch and the loop on the hook. Work loosely.
Gauge and Checkpoints
Gauge: 18 sc and 20 rows = 4 in (10.2 cm) in sc with a 4.0 mm hook. This means 4.5 sts per inch, and each round adds about 0.2 in (0.5 cm) to every edge.
Make one complete oval first and use it as your gauge test. Measure it flat, without stretching.
Checkpoints:
- After Rnd 1: the opening is about 2 in x 0.75 in (5.1 cm x 1.9 cm) when the ring is flattened into an oval.
- After Rnd 3 (before border): 3.25 in x 2 in (8.3 cm x 5.1 cm).
- After Rnd 5 (with border): 3.75 in x 2.5 in (9.5 cm x 6.4 cm).
If your oval is too big: switch to a 3.75 mm hook, or work slightly tighter.
If your oval is too small: switch to a 4.5 mm hook.
If the oval cups or ruffles: your stitch gauge is fine, but your round height is off. See Troubleshooting.
Oval Ring Pattern
Make 12 in total: 6 mauve and 6 cream.
Each round is divided into four segments: Long Side A, End 1, Long Side B, and End 2. These segments do not share stitches. Each stitch belongs to exactly one segment.
The long sides stay at 6 sts every round because they are straight. All increases happen on the two curved ends.
Join every round with a sl st to the first sc. The beginning ch 1 does not count as a stitch.
Foundation: Ch 24. Join with a sl st to the first ch to form a ring. Make sure the chain is not twisted.
Rnd 1: Ch 1, sc in the same ch and in each ch around. Join. (24 sts: 6 / 6 / 6 / 6)
Sts 1–6 are Long Side A, sts 7–12 are End 1, sts 13–18 are Long Side B, and sts 19–24 are End 2. Flatten the ring so the two ends form the curves. Your join seam sits at the start of Long Side A.
Rnd 2 (BLO): Ch 1, sc in next 6 sts; [2 sc in next st, sc in next st] 3 times; sc in next 6 sts; [2 sc in next st, sc in next st] 3 times. Join. (30 sts: 6 / 9 / 6 / 9)
Rnd 3 (BLO): Ch 1, sc in next 6 sts; [2 sc in next st, sc in next 2 sts] 3 times; sc in next 6 sts; [2 sc in next st, sc in next 2 sts] 3 times. Join. (36 sts: 6 / 12 / 6 / 12)
Checkpoint: The oval should now measure 3.25 in x 2 in (8.3 cm x 5.1 cm) and lie flat.
Continue with the Border section below to finish the oval.
Border
The border is worked on each oval and is part of the oval itself. It uses the same gauge as the body: 4.5 sts per inch, and about 0.2 in (0.5 cm) per sc round. Together, the two border rounds add 0.25 in (0.6 cm) to every edge.
Rnd 4 (Border Rnd 1, BLO): Ch 1, sc in next 6 sts; [2 sc in next st, sc in next 3 sts] 3 times; sc in next 6 sts; [2 sc in next st, sc in next 3 sts] 3 times. Join. (42 sts: 6 / 15 / 6 / 15)
This is a growth round. Each end grows from 12 to 15 sts, and the long sides stay at 6.
Rnd 5 (Border Rnd 2, trim): Ch 1, BLO sl st loosely in each st around. Join and fasten off, leaving a 8 in (20.3 cm) tail.
This is a conversion round. It has 42 sts worked one per existing stitch, plus 0 extra sts: 6 / 15 / 6 / 15. It adds a crisp raised ridge without changing the shape.
Mark the center points: On Rnd 5, End 1 covers sts 7–21, so its center is st 14. End 2 covers sts 28–42, so its center is st 35. Place a marker in st 14 and another in st 35. These are the joining points.
Why the math works: As the oval grows outward, each curved end acts like a half circle. A half circle’s outer edge grows by about π x 0.2 in, or 0.63 in (1.6 cm), per round. At 4.5 sts per inch, that equals 2.8 sts, so adding 3 sts per end per round keeps the oval flat.
The long sides are straight and gain no length, so they stay at 6 sts. The totals check out: 24 + 6 = 30, 30 + 6 = 36, 36 + 6 = 42, and the trim round stays at 42.
Make All Pieces
- Mauve: 6 ovals and 2 tassels
- Cream: 6 ovals and 2 tassels
Weave in all oval tails except the one long tail from Rnd 5. You will use that tail to wrap the connectors.
Layout grid (strands left to right):
HANGING CORD: MAUVE  CREAM  MAUVE  CREAM
TOP OVAL:     MAUVE  CREAM  MAUVE  CREAM
MIDDLE OVAL:  MAUVE  CREAM  MAUVE  CREAM
BOTTOM OVAL:  MAUVE  CREAM  MAUVE  CREAM
TASSEL:       MAUVE  CREAM  MAUVE  CREAM
Each strand is one color from top to bottom. The color alternates from strand to strand.
Joining
The ovals are joined vertically, center to center, using short chain links. In each strand, every oval sits with st 35 at the top and st 14 at the bottom. Keep all join seams on the same side, which will be the back.
Connector (make 2 per strand):
- With matching yarn, insert the hook into st 14 of the upper oval. Go under the Rnd 5 sl st and the Rnd 4 sc beneath it for strength. Pull up a loop.
- Ch 4.
- Sl st into st 35 of the next oval, again under both rounds.
- Sl st into the back bump of each of the 4 ch, working back toward the upper oval.
- Sl st into st 14 of the upper oval. Fasten off.
- Thread a tail onto the needle and wrap it snugly 5 times around the connector. Pass the needle under the wraps, then weave the tail in.
This is a stitch-to-stitch join: one center stitch connects to one center stitch. This keeps every oval centered and hanging straight.
Tension: Keep the chains relaxed but consistent. Measure each connector. It should be 1 in (2.5 cm) from oval edge to oval edge. If you chain tightly, use ch 5 instead.
Hanging cord: Join matching yarn at st 35 of the top oval. Ch 46. Sl st in the 10th ch from the hook to form the hanging loop. Then sl st in the back bump of each of the remaining 36 ch, working down to the oval. Sl st into st 35 and fasten off.
The finished cord is about 8 in (20.3 cm), plus a loop about 1 in (2.5 cm) tall, for a total of 9 in (22.9 cm).
Size checkpoint: Three ovals plus two connectors should measure 11.25 in + 2 in = 13.25 in (33.7 cm) from the top of oval 1 to the bottom of oval 3.
Tassels
- Wrap matching yarn 35 times around the 3 in (7.6 cm) card.
- Slide a 10 in (25.4 cm) tie strand under the loops at the top edge. Knot it tightly.
- Cut through all the loops along the bottom edge.
- With a separate strand, wrap the bundle 6 times, 0.5 in (1.3 cm) below the top. This forms a rounded head. Knot the strand and bury the ends inside the tassel.
- Trim the tassel evenly to 3 in (7.6 cm).
- Thread the tie strand ends through st 14 of the bottom oval. Knot them so the tassel head hangs 0.5 in (1.3 cm) below the oval. Hide the ends inside the head.
Strand total: 9 in cord + 13.25 in ovals and connectors + 0.5 in drop + 3 in tassel = 25.75 in (65.4 cm).
Final Blocking
- Lightly mist each strand, or hold a steam iron just above it. Do not press the iron onto acrylic yarn.
- Lay the strand flat and pin each oval to 3.75 in x 2.5 in (9.5 cm x 6.4 cm). Use a pin through the opening to keep it centered.
- Check that each connector is 1 in (2.5 cm) and runs straight.
- Steam the tassel and smooth the strands downward with your fingers.
- Let the strand dry completely, about 2–4 hours.
- Hang the strand and check its length. Trim the tassel ends again if needed.
- To display, space the hooks 3 in (7.6 cm) apart center to center. The four strands will span about 11.5 in (29.2 cm).
Optional: If you want a wider display, you can make more strands in the same alternating sequence.
Final Quality-Control Checklist
- Each oval has 42 sts in Rnd 4 and Rnd 5 (6 / 15 / 6 / 15).
- Each oval measures 3.75 in x 2.5 in (9.5 cm x 6.4 cm) and lies flat.
- Ribs are visible on every round, because every sc after Rnd 1 was worked in BLO.
- All join seams are on the back of the strand.
- Connectors are 1 in (2.5 cm) long and joined at st 14 and st 35.
- Each strand is 25.75 in (65.4 cm) long, and all four strands match within 0.25 in (0.6 cm).
- Tassels are 3 in (7.6 cm) long, match their ovals, and have firm, even heads.
- The colors run mauve, cream, mauve, cream from left to right.
- All tails are woven in securely.
Troubleshooting
Oval cups into a bowl: Your round height is shorter than 0.2 in. Loosen your tension slightly, or use a 4.5 mm hook.
Oval ruffles at the ends: You are working too loosely. Go down a hook size. Check that each end has exactly 3 increases per round.
Ends look pointed: Stagger the increase positions on Rnd 4. For example, work [sc in next 2 sts, 2 sc in next st, sc in next st] 3 times instead. The count stays the same.
Ribs don’t show: You may have slipped back into working through both loops. Check every round after Rnd 1.
Strand twists when hung: The seams are not all on the same side. Re-join the ovals so they all face the same way. Blocking also helps.
Connector stretches over time: Add the sl st return row and wrap the connector more tightly.
Tassel splays open: Make the neck wrap tighter and add 2–3 more wraps.
Strands are uneven lengths: Adjust the hanging cord by adding or removing ch, 4–5 ch per inch.
Care
Hand wash in cool water with mild soap, gently press out the water, and lay flat to dry, reshaping the ovals. Refresh the tassels with light steam.
Final Notes
The measurement chain is simple to follow. Gauge is 4.5 sts and 5 rounds per inch. Each oval measures 3.25 in x 2 in (8.3 cm x 5.1 cm) before the border and 3.75 in x 2.5 in (9.5 cm x 6.4 cm) after it. Three ovals and two connectors make 13.25 in (33.7 cm). With the cord, the drop, and the tassel added, each strand is 25.75 in (65.4 cm). Check the gauge, check the oval, and the four strands will match.
Happy crocheting!