

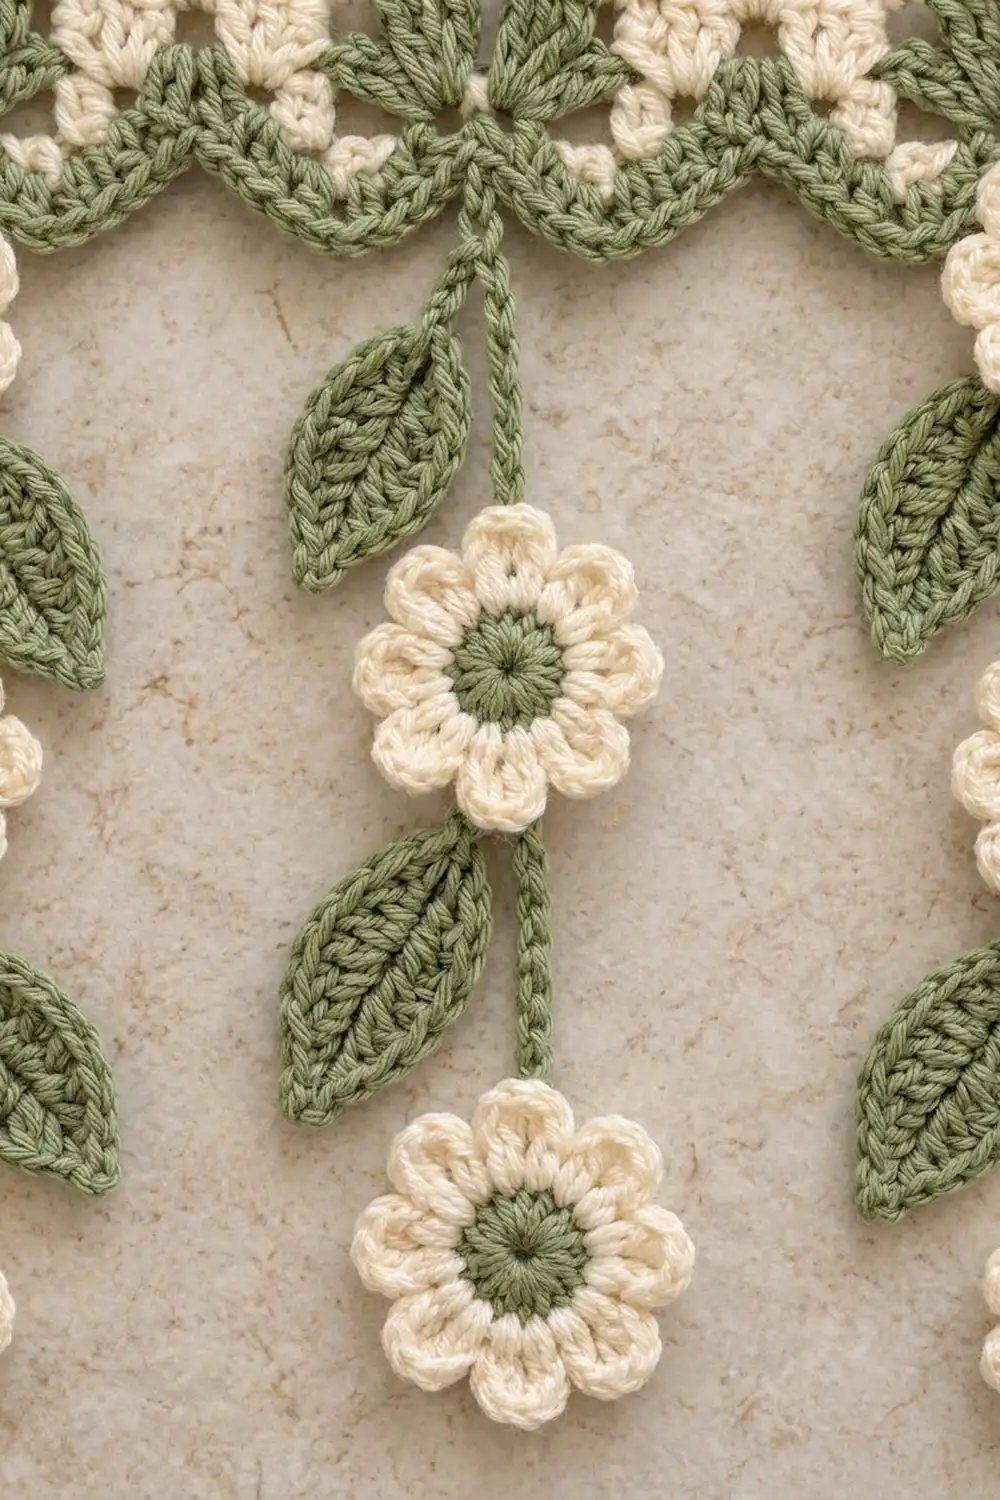
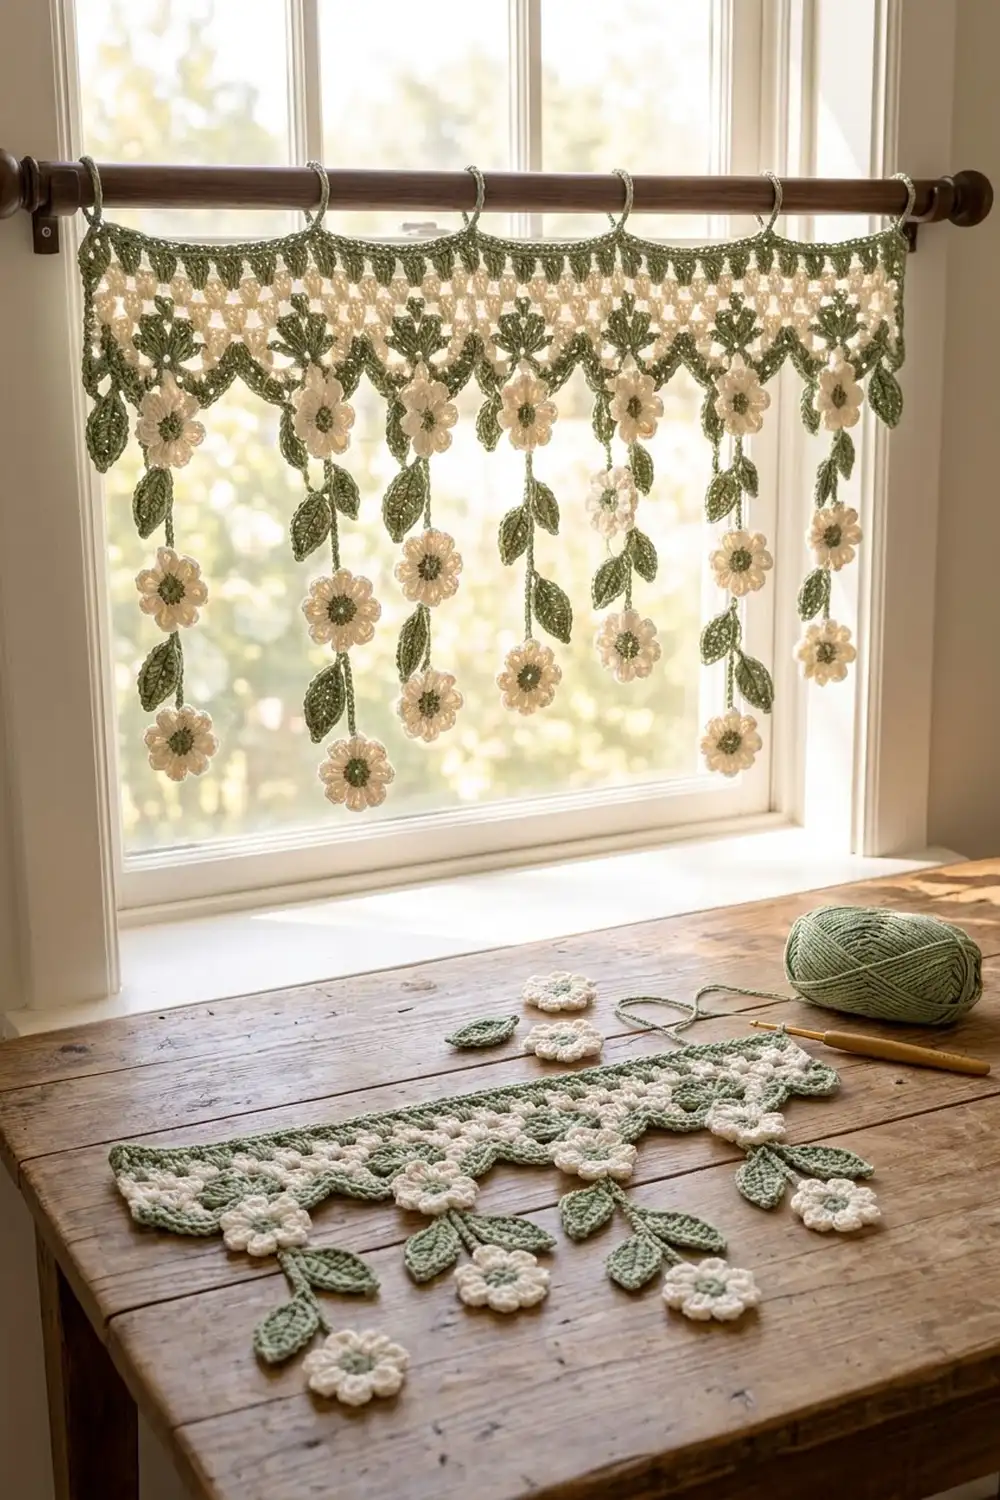
The Meadow Daisy Window Valance is a soft lace band with a trail of daisies hanging below it. A sage-green and cream header sits across the top of the window. Thirteen chain strands hang from it, each carrying cream flowers with green centers and small green leaves.
The palette is just two colors: sage green and cream. The style is cottage-garden. It is light enough to let the sun through and detailed enough to look special. The pattern uses US crochet terms throughout.
The finished band measures 40¼ in (102.2 cm) wide and 5¾ in (14.6 cm) deep, including the border. The long drops hang 15½ in (39.4 cm) below the band and the short drops hang 11 in (27.9 cm), so the deepest point is 21¼ in (54.0 cm) from the top edge.
You work the band flat in rows from the top down, ending in 13 pointed fans. Then you make the flowers and leaves, chain a strand down from each fan point, and join the flowers and leaves on as you go. Last, a two-row border neatens the top and side edges.
Finished Size and Construction
- Finished size: 40¼ in × 5¾ in (102.2 × 14.6 cm) band; 21¼ in (54.0 cm) at the deepest drop
- Skill level: Easy–Intermediate
- Terminology: US crochet terms
- Yarn weight: Medium / worsted (#4), cotton
- Hook: 5 mm (H-8)
- Number of pieces: 60 (1 band, 33 flowers, 26 leaves)
- Layout: 13 drops, alternating Long–Short–Long, starting and ending with Long
- Piece sizes: flower 2½ in (6.4 cm) across; leaf 2¼ × 1 in (5.7 × 2.5 cm)
- Size before border: 39¼ × 5¼ in (99.7 × 13.3 cm)
- Border depth: ½ in (1.3 cm)
Materials
Use a smooth, worsted-weight mercerized or matte cotton of about 80 m per 50 g. Cotton holds the points and petals crisply, and it doesn’t stretch much as the drops hang.
- Color A – Sage Green: 160 g (about 256 m)
- Color B – Cream: 125 g (about 200 m)
These amounts include a margin of roughly 20% for your swatch, tails, and small tension differences.
Tools:
– 5 mm (H-8) crochet hook
– Tapestry needle
– 6–8 stitch markers
– Scissors
– Measuring tape
– Blocking mats, rust-proof pins, and a spray bottle
– A curtain rod up to 1 in (2.5 cm) thick
Abbreviations (US Terms)
- ch – chain
- sl st – slip stitch
- sc – single crochet
- hdc – half double crochet
- dc – double crochet
- tr – treble crochet
- rsc – reverse single crochet (crab stitch)
- sp – space
- MR – magic ring
- RS – right side
Special stitches:
– Fan: 9 dc worked into the same stitch.
– Reverse sc (rsc): Without turning, work single crochet from left to right (right-handed). Insert the hook into the next stitch to the right, yarn over, pull up a loop, yarn over, and pull through both loops.
– Leaf branch: Ch 4, sl st into the base sc of a leaf, then sl st back into each of the 4 ch to return to the main strand.
Gauge and Checkpoints
Gauge: 16 dc and 8 dc rows = 4 in (10.2 cm). Single crochet worked in this yarn also gives 4 sts per 1 in (2.5 cm), and sc rows are about ¼ in (0.6 cm) tall. Chain gauge: 20 ch = 5 in (12.7 cm).
Test one piece first. Make one flower before you start the band. Round 1 should measure 1¼ in (3.2 cm) across, and the finished flower 2½ in (6.4 cm).
Checkpoints:
– Band after Row 3: 39¼ in (99.7 cm) wide, 1 in (2.5 cm) deep
– After Row 8: 3½ in (8.9 cm) deep
– After Row 9: 3¾ in (9.5 cm) deep
– After Row 11 (to the point tips): 5¼ in (13.3 cm) deep
– Leaf: 2¼ in (5.7 cm) long
If your piece is too big, go down one hook size. If it is too small, go up one hook size. Fix the gauge rather than changing the stitch counts. Every count in this pattern is built on a 12-stitch repeat.
Part 1: The Lace Band
The band is worked in rows from the top down. The foundation chain becomes the top edge.
Foundation (A): Ch 158.
Row 1 (A): Sc in the 2nd ch from the hook and in each ch across. Turn. (157 sc)
Row 2 (A) – rod row: Ch 4 (counts as dc + ch 1), skip the next sc, dc in the next sc. Ch 1, skip 1 sc, dc in the next sc. Repeat from * across. Turn. (79 dc, 78 ch-1 sps)
Row 3 (A): Ch 1, sc in the first dc. Sc in the next ch-1 sp, sc in the next dc. Repeat from * across, working the last sc into the 3rd ch of the turning ch. Fasten off A. (157 sc = 79 worked 1 per dc + 78 added in the spaces)
Checkpoint: 39¼ in (99.7 cm) wide, 1 in (2.5 cm) deep.
Row 4 (B) – granny row: Join B. Ch 3 (counts as dc) and dc in the same st. Skip 2 sc, 3 dc in the next sc. Repeat from * 51 times. Skip 2 sc, then work 2 dc in the last sc. Turn. (157 dc: 2 + 51 groups × 3 + 2, giving 52 sps between groups)
Row 5 (B): Ch 3 (counts as dc), then 3 dc in each of the 52 sps between groups. Dc in the top of the turning ch. Change to A in the final yarn-over. Turn. (158 dc: 1 + 52 groups × 3 + 1)
Row 6 (A): Ch 3 (counts as dc) and dc in the first dc. Work 3 dc in each of the 51 sps between groups. Work 2 dc in the top of the turning ch. Change to B in the final yarn-over. Turn. (157 dc: 2 + 51 × 3 + 2)
Row 7 (B): Repeat Row 5. (158 dc)
Row 8 (B): Repeat Row 6 without changing color. Fasten off B. (157 dc)
Checkpoint: 3½ in (8.9 cm) deep.
Row 9 (A): Join A. Ch 1, then sc in each dc across, including the top of the turning ch. Turn. (157 sc = 157 worked 1 per stitch + 0 added)
Row 10 (A) – fans: Ch 1, sc in the first sc. Skip 5 sc, Fan in the next sc, skip 5 sc, sc in the next sc. Repeat from * 13 times. Turn. (13 fans + 14 sc = 131 sts)
The math: each repeat uses 12 stitches, and 13 × 12 + 1 = 157.
Row 11 (A) – points: Ch 1, sc in the first sc. Hdc in the next dc, dc in the next 3 dc, then (tr, ch 3, tr) in the next dc (the 5th, center dc of the fan). Dc in the next 3 dc, hdc in the next dc, sc in the next sc. Repeat from * 13 times. Fasten off. (131 sts = 1 + 13 × 10, plus 13 ch-3 point sps)
The stitches rise from hdc to dc to tr toward each fan’s center, which makes a sharp V point.
Checkpoint: 5¼ in (13.3 cm) deep at the tips.
Part 2: Daisy Flowers (make 33)
Round 1 (A): MR, ch 3 (counts as dc), 15 dc in the ring. Pull the ring closed and sl st to the top of the ch-3. Fasten off. (16 dc)
This round should measure 1¼ in (3.2 cm) across.
Round 2 (B): Join B in any st with a sl st. Ch 1. Sc in the next st, 5 dc in the next st. Repeat from * 8 times. Sl st to the first sc and fasten off, leaving a 6 in (15.2 cm) tail. (8 sc + 40 dc = 48 sts, 8 petals)
The finished flower is 2½ in (6.4 cm) across. The 3rd dc of each 5-dc shell is the petal’s center dc, which you will use for joining.
Part 3: Leaves (make 26)
Leaf (A): Ch 10. Starting in the 2nd ch from the hook, work:
– sc, hdc, dc in the next 4 ch, hdc, sc (8 sts)
– (sc, ch 2, sc) in the last ch, for the tip
Rotate the piece and work along the free loops on the other side:
– sc, hdc, dc in the next 4 ch, hdc, sc (8 sts)
Sl st to the first sc and fasten off. (18 sts + ch-2 tip)
Optional vein: Surface sl st along the center line.
The leaf measures 2¼ × 1 in (5.7 × 2.5 cm). The first sc is its base.
Make All Pieces
Totals:
– Band: 1, in A and B
– Flowers: 33, with A centers and B petals
– Leaves: 26, in A
Per drop:
– Long drop (make 7): 3 flowers, 2 leaves
– Short drop (make 6): 2 flowers, 2 leaves
Check: 7 × 3 + 6 × 2 = 33 flowers, and 7 × 2 + 6 × 2 = 26 leaves.
Layout grid (drops across the band, numbered left to right):
DROP:  1  2  3  4  5  6  7  8  9  10 11 12 13
TYPE:  L  S  L  S  L  S  L  S  L  S  L  S  L
Order from top to bottom:
LONG:  POINT – ch 8 – FLOWER – ch 6 – LEAF (left) – ch 6 – FLOWER – ch 6 – LEAF (right) – ch 6 – FLOWER
SHORT: POINT – ch 6 – LEAF (left) – ch 6 – FLOWER – ch 6 – LEAF (right) – ch 6 – FLOWER
Joining: Building the Drops
Method: Make a continuous chain strand in A, joining each flower and leaf with slip stitches as you go.
Flower join: Chain down to the flower and sl st into the center dc of its top petal. Hold the flower flat against the strand and ch 10 behind it. Then sl st into the center dc of the opposite petal, which is 4 petals around. Continue chaining from there. The 10 hidden chains match the flower’s 2½ in (6.4 cm) width, so the flower stays flat and supported.
Leaf join: At the marked point on the strand, work a leaf branch so the leaf hangs beside the strand. Alternate left and right as shown in the grid.
Long drop: With RS facing, join A with a sl st in the ch-3 point sp of fan 1. Follow the Long sequence. After the final flower’s ch-10 and sl st, fasten off.
– Main-strand chains: 8 + 10 + 6 + 6 + 10 + 6 + 6 + 10 = 62 ch
– 62 ch ÷ 4 ch per in = 15½ in (39.4 cm)
Short drop: Join A in the next point and follow the Short sequence.
– Main-strand chains: 6 + 6 + 10 + 6 + 6 + 10 = 44 ch
– 44 ch ÷ 4 ch per in = 11 in (27.9 cm)
Tension: Keep your chains even and slightly relaxed. Tight chains pucker the drops, and loose chains stretch under the flowers’ weight.
Size checkpoint: Lay the valance flat. Every Long drop should measure 15½ in (39.4 cm) and every Short drop 11 in (27.9 cm), measured from the point tip. They should match within ¼ in (0.6 cm).
Border
The border covers the top and both side edges. The pointed lower edge is left as it is.
Border gauge: 4 sc per 1 in (2.5 cm), matching the band.
Row 1 (A): With RS facing, join A at the lower right corner, at the end of Row 9. Ch 1.
– Right side: Work 15 sc evenly up the side edge, 1 sc per sc row and 2 sc per dc row, for Rows 9 to 1.
– Top corner: Ch 1.
– Top: 1 sc in each free loop of the foundation chain. (157 sc)
– Top corner: Ch 1.
– Left side: 15 sc evenly down to the end of Row 9.
– Total: 187 sc and 2 ch-1 corner sps. The corner sps are not counted as stitches or included in the side counts.
Side math: Rows 1–9 are 1 + 2 + 1 + (5 × 2) + 1 = 15 sc.
Row 2 (A): Do not turn. Ch 1, then rsc in each sc and in each corner ch-1 sp, working back along the edge. Fasten off.
– Per side: 15 + 1 + 157 + 1 + 15
– Total: 189 rsc
Why the math works:
– The 157 top stitches match the band’s 157 stitches exactly, so the top lies flat without rippling.
– The 15 side stitches cover a 3¾ in (9.5 cm) edge at 4 sc per inch, which is exact.
– The two border rows add ½ in (1.3 cm) to each side and to the top. The band grows from 39¼ × 5¼ in (99.7 × 13.3 cm) to 40¼ × 5¾ in (102.2 × 14.6 cm).
Final Blocking
- Weave in all ends, working each one through stitches of its own color.
- Spray the whole valance until it is damp, but not dripping.
- Pin the band to 40¼ × 5¾ in (102.2 × 14.6 cm), with one pin at each of the 13 point tips.
- Straighten each drop and check it against the 15½ in (39.4 cm) and 11 in (27.9 cm) lengths.
- Pin each flower open with 8 pins at the petal tips. Pin each leaf to a sharp point.
- Let everything dry completely, about 24 hours.
- Unpin and weave the rod through the Row 2 ch-1 spaces.
Final Quality-Control Checklist
- [ ] Band counts: 157 sts in Rows 1, 3, 4, 6, 8, and 9; 131 sts in Rows 10 and 11
- [ ] All 13 points are sharp and evenly spaced 3 in (7.6 cm) apart
- [ ] Drops alternate L–S starting and ending with L, and you have 33 flowers and 26 leaves
- [ ] Every flower has 8 even petals
- [ ] Border has 15 / 157 / 15 sc
- [ ] Finished size is 40¼ × 5¾ in (102.2 × 14.6 cm)
- [ ] All ends are secure and invisible from the RS
Troubleshooting
- Band too narrow or too wide: Your gauge is off. Re-swatch rather than changing the 157-stitch count.
- Granny rows lean or drift: Check the turning-chain placement. Rows 5 and 7 end with 1 dc, and Rows 4, 6, and 8 end with 2 dc.
- Points look rounded: Make sure the (tr, ch 3, tr) goes into the 5th dc of each fan.
- Flower cups: Round 1 is too tight. Work a looser magic ring, or go up a hook size for Round 2.
- Drops twist: Block them straight, and keep the ch-10 behind each flower on the same side every time.
- Drops stretch over time: Use mercerized cotton and re-block every so often.
Care
Hand wash in cool water with a mild soap, press out the water in a towel, and lay flat to dry. Re-pin the points and petals while the piece is still damp.
Final Notes
Here is the full measurement chain:
– Gauge of 16 dc = 4 in (10.2 cm)
– A 157-stitch band, 39¼ in (99.7 cm) wide, with thirteen 12-stitch fan repeats
– A two-row border to 40¼ × 5¾ in (102.2 × 14.6 cm)
– Chain drops at 4 ch per inch: 15½ in (39.4 cm) long and 11 in (27.9 cm) short
If each checkpoint matches, the finished valance will hang evenly. Happy crocheting!