

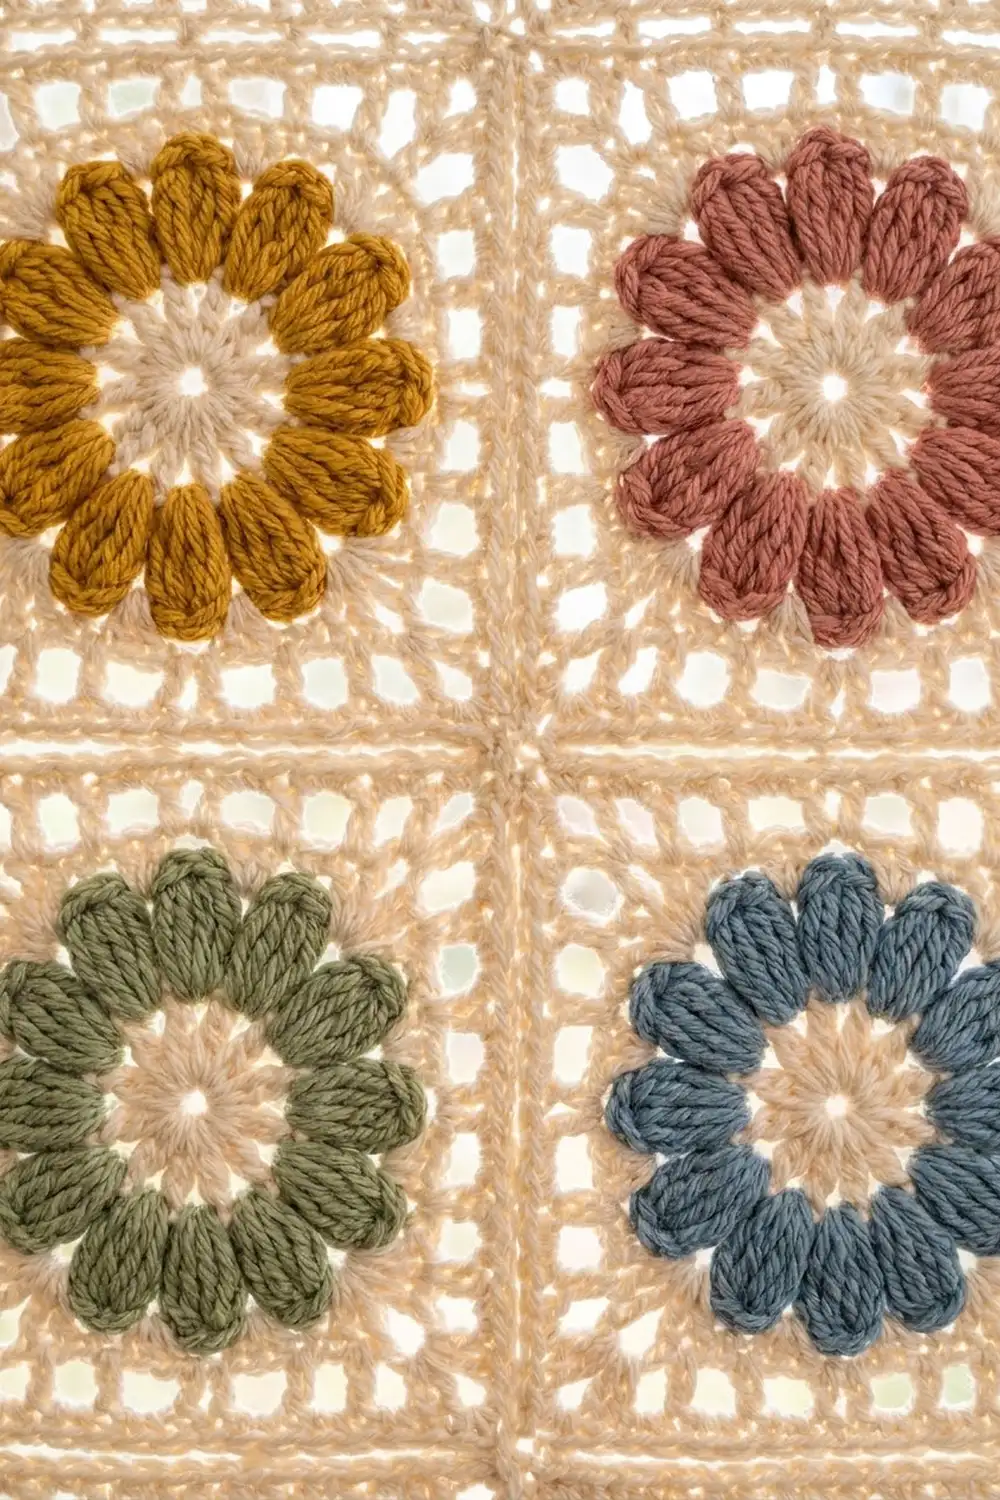
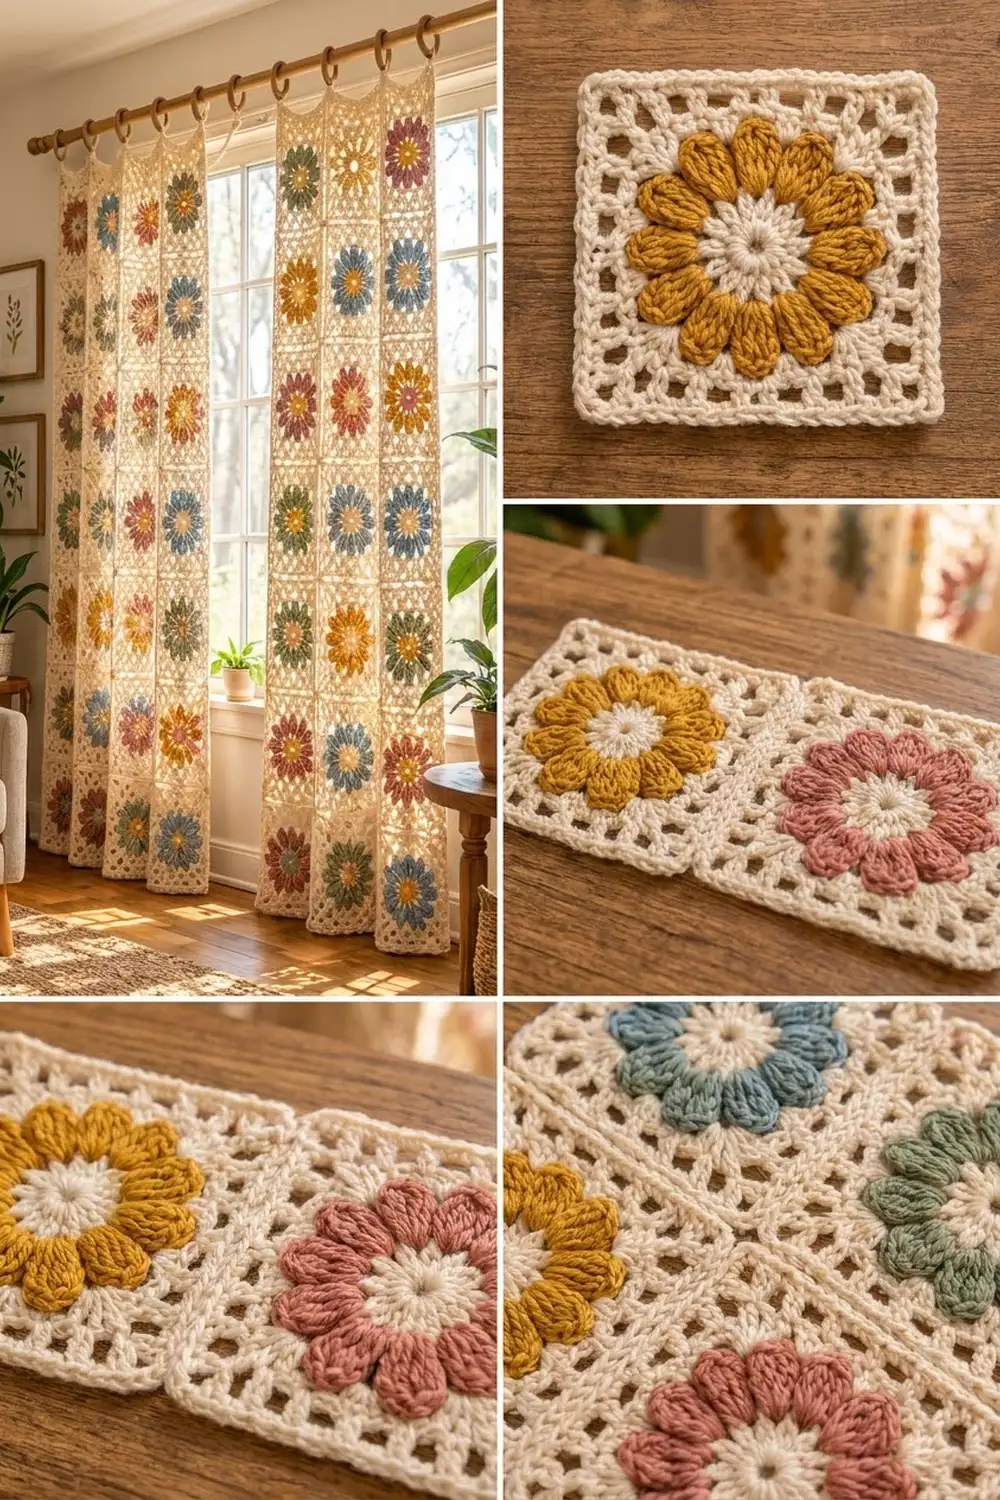
These curtain panels are built from cheerful flower granny squares in a warm, vintage palette. Each square has a cream center and a ring of twelve plump puff-stitch petals. A lacy cream frame with a band of open mesh windows lets the light glow through.
The petals rotate through four soft colors: mustard, dusty rose, sage green and dusty blue. Every square is framed in the same cream, so the panels read as one calm, airy fabric with flowers in neat diagonal lines.
This pattern uses US crochet terms. Each finished panel measures 31.5 in x 61.5 in (80.0 cm x 156.2 cm), including the border but not the hanging loops. The pattern makes a matching pair, just like the set shown.
Construction is simple. Crochet 100 identical 6 in (15.2 cm) squares and join them into two panels of 5 x 10 squares with a flat slip stitch seam. Add a three-round border, then finish the top edge with seven hanging loops for curtain rings.
Finished Size and Construction
- Finished panel size: 31.5 in x 61.5 in (80.0 cm x 156.2 cm), each
- Skill level: Intermediate
- Terminology: US crochet terms
- Yarn weight: #4 worsted, cotton or cotton blend
- Hook: 5.0 mm (H-8)
- Number of pieces: 100 squares (50 per panel)
- Layout: 5 squares wide x 10 squares tall, per panel
- Square size: 6 in x 6 in (15.2 cm x 15.2 cm)
- Panel size before border: 30 in x 60 in (76.2 cm x 152.4 cm)
- Border depth: 0.75 in (1.9 cm) per side
Materials
Choose a smooth worsted cotton or cotton blend at about 200 m per 100 g. Cotton holds its shape on a window, shows the puff stitches clearly and does not stretch much when hung. Avoid fuzzy yarns, which fill in the mesh windows.
- Cream (A): 1,400 g / 2,800 m
- Mustard (B1): 130 g / 260 m
- Dusty rose (B2): 130 g / 260 m
- Sage green (B3): 120 g / 240 m
- Dusty blue (B4): 120 g / 240 m
Tools:
- 5.0 mm (H-8) crochet hook
- Tapestry needle
- Stitch markers
- Measuring tape
- Blocking mats and rust-proof pins
- Spray bottle
- 14 curtain rings with clips or hooks (7 per panel)
Quantities include a margin of about 10–15 percent for gauge differences and the test square.
Abbreviations (US Terms)
- ch – chain
- sl st – slip stitch
- sc – single crochet
- hdc – half double crochet
- dc – double crochet
- tr – treble crochet
- st(s) – stitch(es)
- sp – space
- rep – repeat
- RS / WS – right side / wrong side
Special stitch – Puff Petal (pp): (Yo, insert hook in st, pull up a loop to 0.75 in / 1.9 cm tall) 5 times, for 11 loops on the hook. Yo, pull through 10 loops, yo, pull through the remaining 2 loops, then ch 1 to lock.
Beginning Puff Petal (beg pp): Ch 2, then work a pp in the same st.
Gauge and Checkpoints
Gauge: 16 dc = 4 in (10.2 cm) along the side of the square. Make one full test square first and check it at every stage:
- After Rnd 3 (flower): 3 in (7.6 cm) across, petal tip to petal tip
- After Rnd 4: 3.5 in (8.9 cm) square
- After Rnd 5: 4.25 in (10.8 cm) square
- After Rnd 6: 4.75 in (12.1 cm) square
- After Rnd 7: 5.5 in (14.0 cm) square
- After Rnd 8: 6 in (15.2 cm) square
If your square is larger than 6 in (15.2 cm), go down a hook size. If it is smaller, go up a hook size. Being off by just 0.25 in (0.6 cm) per square changes the panel length by 2.5 in (6.4 cm), so it is worth getting right.
Flower Square Pattern
Make 100. Work in rounds with the RS facing; do not turn.
Rnd 1 (A): Magic ring, ch 3 (counts as dc), 11 dc in ring. Join with sl st to top of ch-3. (12 dc)
Rnd 2 (A): Ch 1, 2 sc in each st around. Join to first sc. Fasten off. (24 sc)
Rnd 3 (B): Join B in any sc. Beg pp in same st, ch 2, skip next sc. Pp in next sc, ch 2, skip next sc; rep from * 10 more times. Join to top of beg pp. Fasten off. (12 petals, 12 ch-2 sps)*
Skipping a sc between petals gives each petal room to sit flat. The ch-2 sps become the anchor points for the square.
Rnd 4 (A) – squaring round: Join A in any ch-2 sp. Ch 3 (counts as dc), 2 dc in same sp, 3 dc in next sp. *(3 tr, ch 3, 3 tr) in next sp for the corner, 3 dc in each of next 2 sps; rep from * 2 more times. (3 tr, ch 3, 3 tr) in last sp. Join to top of ch-3.
(12 sts per side: 3 tr + 3 dc + 3 dc + 3 tr; 48 sts + 4 ch-3 corner sps)
The diagonal spaces are farther from the center, so the taller tr stitches go there. This squares off the round without cupping.
Rnd 5 (A): Ch 3 (counts as dc), dc in each st to next corner. *(2 dc, ch 2, 2 dc) in corner sp, dc in each st to next corner; rep from * around, then dc in each remaining st. Join to top of ch-3.
(16 dc per side = 12 worked 1-per-stitch + 4 added at corners; 64 dc)
Rnd 6 (A) – mesh round: Sl st in each st to next corner sp (10 sl sts), sl st in sp. Ch 5 (counts as dc + ch 2), dc in same sp. *(Ch 1, skip next st, dc in next st) 8 times, (dc, ch 2, dc) in corner sp; rep from * 2 more times. (Ch 1, skip next st, dc in next st) 8 times. Join to 3rd ch of beg ch-5.
(18 sts per side, counting each dc and each ch-1 as one st: 1 corner dc + 8 ch-1 + 8 dc + 1 corner dc; 8 mesh windows per side)
This round makes the open windows that frame the flower.
Rnd 7 (A): Sl st in ch-2 sp. Ch 3 (counts as dc), (dc, ch 2, 2 dc) in same sp. *Dc in each dc and each ch-1 sp across (18 dc), (2 dc, ch 2, 2 dc) in corner sp; rep from * 2 more times, dc in each st across last side. Join to top of ch-3.
(22 dc per side = 18 worked 1-per-stitch + 4 added at corners; 88 dc)
Rnd 8 (A): Sl st in next dc, sl st in ch-2 sp. Ch 1. *(Sc, ch 2, sc) in corner sp, sc in each of next 22 sts; rep from * around. Join to first sc. Fasten off, leaving a 6 in (15.2 cm) tail.
(24 sc per side, including the 2 corner sc; 96 sc + 4 ch-2 corner sps)
Measure the square: it should be 6 in x 6 in (15.2 cm x 15.2 cm). Weave in all tails except the last one, which you can use for joining.
Make All Pieces
Petal colors for both panels combined:
- Mustard (B1): 26 squares
- Dusty rose (B2): 26 squares
- Sage green (B3): 24 squares
- Dusty blue (B4): 24 squares
- Total: 100 squares, all with cream centers and frames
Each panel uses 13 mustard, 13 rose, 12 sage and 12 blue. The four-color sequence repeats across a five-square row, so each row starts one color later and the flowers form diagonals. Lay out each panel like this (M = mustard, R = rose, S = sage, B = blue):
ROW 1:  M R S B M
ROW 2:  R S B M R
ROW 3:  S B M R S
ROW 4:  B M R S B
ROW 5:  M R S B M
ROW 6:  R S B M R
ROW 7:  S B M R S
ROW 8:  B M R S B
ROW 9:  M R S B M
ROW 10: R S B M R
Row 1 is the top of the panel. Make the second panel with the same layout.
Joining
Join with A using a flat slip stitch seam through the back loops only, with both squares RS up and side by side. This gives a neat, flat ridge on the RS like the seams shown.
Stitch-to-stitch logic: Each square edge has 1 corner ch-2 sp, 24 sc and 1 more corner ch-2 sp. Work 1 sl st through the corner sps of both squares, then 1 sl st through each matching pair of sc (24 sl sts). Finish with 1 sl st through the next pair of corner sps. That is 26 sl sts per square edge, and every stitch lines up with its partner.
- Join the 5 squares of Row 1 into a strip by working the 4 short vertical seams.
- Repeat for all 10 rows.
- Join the strips with long horizontal seams, working straight across each strip’s 5 square edges. Where seams cross, sl st through the corner sps and continue.
Tension: Keep the slip stitches as loose as the sc beneath them. If a seam puckers, switch to a hook one size larger for joining only.
Size checkpoint: The joined panel should measure 30 in x 60 in (76.2 cm x 152.4 cm). Measure it on a flat surface, not hanging.
Border
Border gauge: 4 sts = 1 in (2.5 cm), the same as the square edges. The squares’ corner ch-2 sps are used up in the seams, so the border works only into the 24 sc on each square edge.
Rnd 1 (A): With RS facing, join with sc in the first sc after the top-right corner sp. Sc in each sc across every square edge, skipping the sps at the seams. At each of the 4 outer panel corners, ch 2 over the corner sp. Join to first sc.
- Width sides: 5 x 24 = 120 sc
- Length sides: 10 x 24 = 240 sc
Rnd 2 (A): Sl st in corner ch-2 sp. Ch 2 (does not count as st). *(Hdc, ch 2, hdc) in corner sp, hdc in each sc across; rep from * around. Join to first hdc.
- Width sides: 120 + 2 = 122 hdc
- Length sides: 240 + 2 = 242 hdc
Rnd 3 (A): Sl st in corner ch-2 sp. Ch 1. *(Sc, ch 2, sc) in corner sp, sc in each hdc across; rep from * around. Join to first sc. Fasten off.
- Width sides: 122 + 2 = 124 sc
- Length sides: 242 + 2 = 244 sc
Why the math works: Rnd 1 matches the squares exactly, with no extra stitches at the seams, so the border lies flat. Rnds 2 and 3 each add only 2 sts per side, both at the corners. That is just enough to turn each corner as the border grows outward.
At 4 sts per inch, 124 sts measure 31 in (78.7 cm). The two corner ch-2 sps add about 0.25 in (0.6 cm) each, which gives the 31.5 in (80.0 cm) width. The same logic gives the length: 244 sts = 61 in (154.9 cm), plus 0.5 in (1.3 cm) = 61.5 in (156.2 cm).
Hanging loops (top edge only): With RS facing, join A with sl st in the first sc of the top edge (the corner sc). Sl st in next st, ch 12, sl st in same st. *Sl st in each of next 20 sts, ch 12, sl st in same st; rep from * 5 more times. Sl st in last 2 sts. Fasten off.
The loops sit on sts 2, 22, 42, 62, 82, 102 and 122 of the 124-st top edge, spaced 5 in (12.7 cm) apart. For extra strength, work 16 sc into each ch-12 loop before you fasten off. Clip one curtain ring through each loop.
Final Blocking
- Weave in all remaining tails along the seams, never across the mesh windows.
- Lay the panel RS up on blocking mats.
- Pin the four corners to 31.5 in x 61.5 in (80.0 cm x 156.2 cm).
- Pin along each edge every 3 in (7.6 cm), keeping the edges straight.
- Gently open each mesh window with your fingers so the holes are even.
- Mist until damp, but do not flatten the puff petals.
- Let the panel dry completely, about 24 hours.
- Repeat for the second panel.
Final Quality-Control Checklist
- Each square measures 6 in (15.2 cm) with 24 sc per side.
- Every flower has 12 petals and 12 ch-2 sps.
- Every square has 8 mesh windows per side.
- The color layout matches the grid, with Row 1 at the top.
- Each panel measures 30 in x 60 in (76.2 cm x 152.4 cm) before the border.
- After Rnd 3, the border has 124 sts across and 244 sts down.
- Each panel has 7 evenly spaced hanging loops.
- Both panels measure 31.5 in x 61.5 in (80.0 cm x 156.2 cm).
Troubleshooting
Petals look flat or uneven: Pull every loop up to the same 0.75 in (1.9 cm) height before closing the puff.
Square cups after Rnd 4: Your tr stitches may be too tight. Loosen the corners, or go up a hook size for that round only.
Square ruffles after Rnd 4: Lower the corners by working them as (2 tr, dc, ch 3, dc, 2 tr).
Mesh windows are uneven: Keep every ch-1 the same size and skip exactly 1 st each time.
Seams pucker: Join with a larger hook and check that you are matching stitch for stitch.
Border waves: Count the sts on each side. Extra sts at the seams are the usual cause.
Panel stretches when hung: Cotton relaxes a little. Reblock it, then let it hang for a day before you adjust the length.
Care
Hand wash in cool water with mild detergent, press out the water in a towel and dry flat. Reblock lightly before hanging again.
Final Notes
The measurement chain is simple. Each square has 24 sc per side and measures 6 in (15.2 cm). Five squares give 120 sts and 30 in (76.2 cm) across; ten squares give 240 sts and 60 in (152.4 cm) down. Three border rounds bring the sides to 124 and 244 sts, for a finished panel of 31.5 in x 61.5 in (80.0 cm x 156.2 cm). Check each stage, and the pair will hang straight and even in your window.
Happy crocheting!