

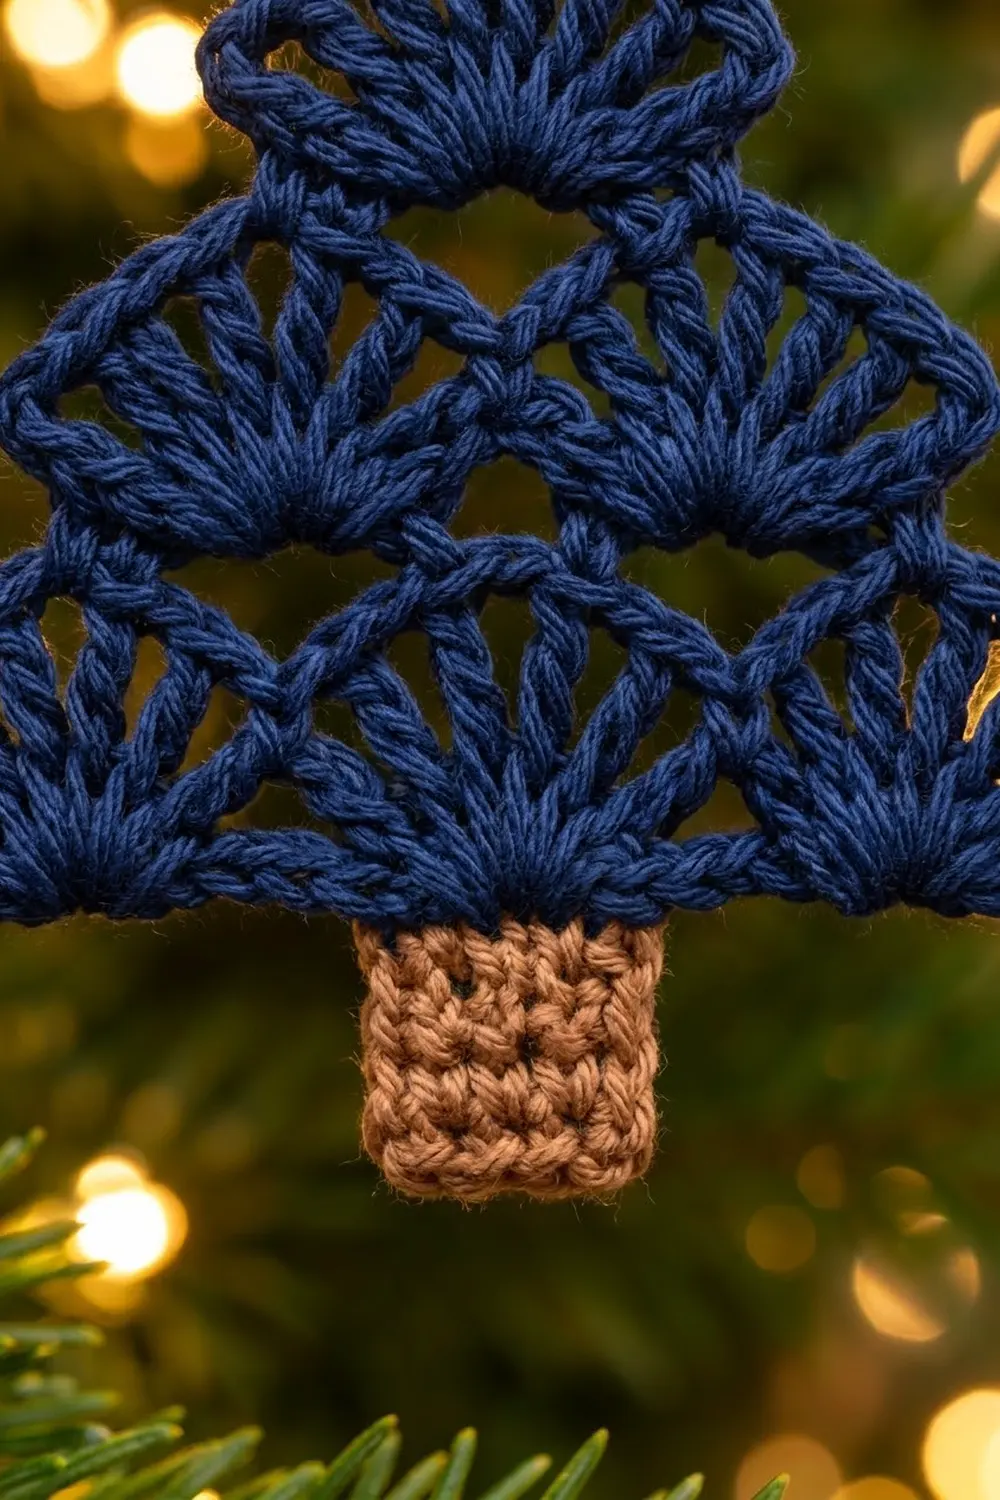
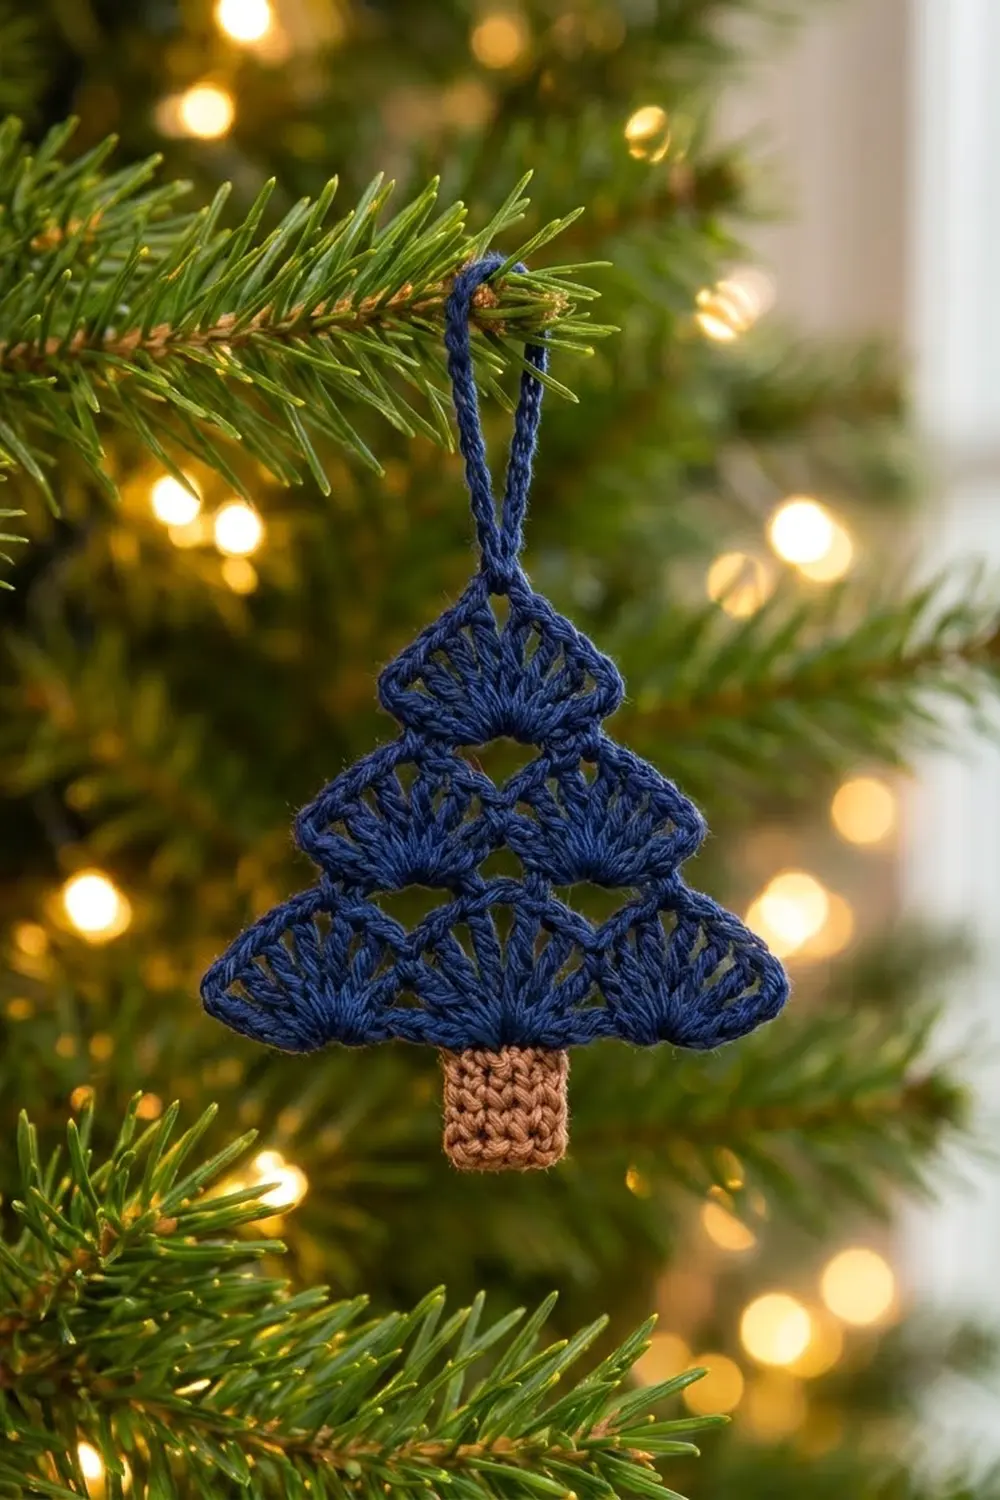
This little tree is built entirely from shells. Three fans sit along the bottom, two sit above those, and one makes the point. The result is a lacy, scalloped triangle that looks good on a real tree, a gift package or a window.
The sample uses deep navy blue for the tree and a soft tan for the trunk. Navy gives the ornament a calm, modern look that stands out against green branches and warm lights. A simple navy chain loop at the top makes it ready to hang.
The pattern uses US crochet terms. The finished tree body measures about 4 in (10.2 cm) wide and 3 in (7.6 cm) tall. With the trunk, the ornament is about 4 in (10.2 cm) tall. With the hanging loop, it is about 6 in (15.2 cm) tall.
Construction is quick and flat. You chain a foundation, add three chain arches and fill them with shells. Then you slip stitch to the shell centers to build the next tiers. You work the hanging loop at the end of the last tier. The tan trunk goes on last, worked directly into the foundation chain, so there is no sewing.
Finished Size and Construction
- Finished size: 4 in (10.2 cm) wide x 4 in (10.2 cm) tall, plus a 2 in (5.1 cm) loop
- Skill level: Easy
- Terminology: US crochet terms
- Yarn weight: Worsted (#4), cotton or cotton blend
- Hook: 4.0 mm (US G-6)
- Number of pieces: 1 ornament, worked as a single piece (the trunk is crocheted on, not sewn)
- Layout: 3 shells, then 2 shells, then 1 shell, plus trunk and loop
- Single shell size: about 1 1/3 in (3.4 cm) wide x 1 in (2.5 cm) tall
- Size before border: 4 in (10.2 cm) x 3 in (7.6 cm) tree body
- Border depth: none; the shell tops form the finished edge
Materials
Choose a smooth worsted-weight cotton with good stitch definition. Cotton holds the fan shape well and blocks crisply. Acrylic also works but may need a little more steam to lie flat.
- Navy (tree and loop): 10 g, about 17 m
- Tan (trunk): 3 g, about 5 m
These amounts include a small safety margin. One ornament uses less than this, so it’s a good way to use up leftovers.
Tools:
- 4.0 mm (US G-6) crochet hook
- Tapestry needle
- Scissors
- Stitch marker (optional, for the center dc)
- Rustproof pins and a blocking mat or folded towel
- Ruler or tape measure
Abbreviations (US Terms)
- ch = chain
- sl st = slip stitch
- sc = single crochet
- dc = double crochet
- sp = space
- st(s) = stitch(es)
- RS / WS = right side / wrong side
Special stitch – Shell: 9 dc worked into the same ch-5 space. The 5th dc of each shell is its center dc, with 4 dc on each side of it.
Gauge and Checkpoints
Gauge: 18 sc and 20 rows = 4 in (10.2 cm) in sc with a 4.0 mm hook.
Gauge is not critical for an ornament, but it controls the final size and how neatly the shells fan out. The quickest test is to make the bottom tier (Rows 1–2) and measure it. To measure one shell, lay it flat without stretching. Measure straight across its widest point, from the outer tip of the 1st dc to the outer tip of the 9th dc.
Checkpoints:
- Foundation chain (17 ch): about 3.5 in (8.9 cm) long when relaxed
- After Row 2: about 4 in (10.2 cm) wide x 1.25 in (3.2 cm) tall
- After Row 4: about 2.25 in (5.7 cm) tall; middle tier about 2 2/3 in (6.8 cm) wide
- After Row 6: about 3 in (7.6 cm) tall; top shell about 1 1/3 in (3.4 cm) wide
- Trunk: about 0.9 in (2.3 cm) wide x 1 in (2.5 cm) tall
If the tier is too big: go down to a 3.75 mm hook, or chain more tightly. If it’s too small or the shells cup: go up to a 4.5 mm hook, or work the ch-5 arches more loosely. Cupping usually means the arches are too short to hold 9 dc.
Pattern
Before You Begin
The tree is worked in rows, and you turn after every row. Shells look almost the same from both sides, so either face can be the front. Mark the side you like best as the RS after Row 2.
The key move is the step-in row. You slip stitch along the top of a shell to its center dc, then anchor the next tier there. A stitch marker in each center dc after Rows 2 and 4 makes counting easy.
Tier 1: Foundation and Bottom Shells
With navy, ch 17.
Row 1 (RS): Sc in 2nd ch from hook, [ch 5, skip next 4 ch, sc in next ch] 3 times.
Count: 4 sc and 3 ch-5 sps.
The 17-chain foundation stays as a straight base line, and the three ch-5 loops rise above it. The 4 skipped chains under the middle loop will hold the trunk later.
Row 2: Ch 1, turn. Sc in first sc, [9 dc in next ch-5 sp, sc in next sc] 3 times.
Count: 31 sts (4 sc + 27 dc), 3 shells.
Use your fingers to spread each shell into an even fan. Measure: about 4 in (10.2 cm) wide.
Tier 2: Middle Shells
Row 3 (step-in row): Turn. Do not chain. Sl st in first sc and in each of next 5 dc (6 sl sts). You are now in the center dc of the first shell. Ch 1, sc in same dc, ch 5, sc in center dc of next shell, ch 5, sc in center dc of last shell. Leave the remaining 4 dc and 1 sc unworked.
Count: 3 sc + 2 ch-5 sps (the 6 sl sts are not counted).
Each ch-5 arch now bridges from one shell center to the next. The small open gap under each arch is the lacy hole you see between tiers.
Row 4: Ch 1, turn. Sc in first sc, [9 dc in next ch-5 sp, sc in next sc] 2 times.
Count: 21 sts (3 sc + 18 dc), 2 shells.
Each new shell sits directly above the sc joint between two bottom shells. Measure: about 2.25 in (5.7 cm) tall overall.
Tier 3: Top Shell
Row 5 (step-in row): Turn. Sl st in first sc and in each of next 5 dc (6 sl sts). Ch 1, sc in same dc, ch 5, sc in center dc of next shell. Leave the rest unworked.
Count: 2 sc + 1 ch-5 sp.
Row 6: Ch 1, turn. Sc in first sc, 9 dc in ch-5 sp, sc in last sc.
Count: 11 sts (2 sc + 9 dc), 1 shell.
Measure: about 3 in (7.6 cm) tall, with the top shell centered over the middle of the bottom tier.
Hanging Loop
Row 7: Turn. Sl st in first sc and in each of next 5 dc (6 sl sts). This puts you in the center dc at the very top of the tree. Ch 20, sl st in same center dc.
Fasten off, leaving a 6 in (15.2 cm) tail. Weave the tail back through the base of the loop to strengthen it. The loop stands about 2 in (5.1 cm) above the tree.
Trunk
Turn the tree upside down so the foundation chain is on top. Find the 4 skipped chains directly under the middle bottom shell, between the 2nd and 3rd sc of Row 1.
Row 1: With tan, join with sl st in the free loop of the first of these 4 chains. Ch 1, sc in same loop and in each of next 3 free loops.
Count: 4 sc.
Rows 2–5: Ch 1, turn, sc in each sc across.
Count: 4 sc per row.
Fasten off. The trunk measures about 0.9 in (2.3 cm) wide x 1 in (2.5 cm) tall and hangs centered under the tree. Weave in all ends through stitches of the same color.
Edge Finish (No Separate Border)
This ornament has no added border. The tops of the shells are the finished edge, and a border would hide the scallops that give the tree its shape.
Edge gauge: every tier uses the same 9 dc fan, so every scallop is the same size, about 1 1/3 in (3.4 cm) across.
Counts along each edge:
- Bottom edge: 17 foundation ch, with the 4-st trunk at the center
- Left sloping side: 4 outer dc of bottom shell 1, 4 outer dc of middle shell 1, 4 outer dc of the top shell
- Right sloping side: the same 4 + 4 + 4 dc, mirrored
- Top point: the center dc of the top shell, which holds the 20-ch loop
Why the math works: every shell has 9 dc, so its center dc (the 5th) has exactly 4 dc on each side. Each step-in row is anchored only on center dcs, so each new tier moves in by half a shell on both sides. Three shells become two, two become one, and the triangle stays symmetric. The trunk uses the 4 chains under the middle arch, which sit exactly at the center of the 17-chain foundation. That’s 6 chains to the left, the 4 trunk chains and 6 chains to the right, plus the turning chain.
Final Blocking
- Wet the ornament in cool water, or mist it well with a spray bottle.
- Press it gently in a towel to remove extra water. Do not wring it.
- Lay it flat, RS up, on a blocking mat or towel.
- Open each fan so the 9 dc spread out evenly, like spokes.
- Pin the bottom edge straight to 4 in (10.2 cm).
- Pin the top point so the tree body is 3 in (7.6 cm) tall.
- Pin the outer tip of each shell to form two straight sloping sides.
- Square the trunk to 0.9 in (2.3 cm) x 1 in (2.5 cm), centered under the tree.
- Lay the hanging loop straight up from the top point.
- Let it dry completely before you unpin it.
For acrylic, skip the water. Hold a steam iron about 0.5 in (1.3 cm) above the pinned piece instead. Never press the iron onto the stitches.
Final Quality-Control Checklist
- Bottom tier has 3 shells, middle tier has 2, top tier has 1
- Every shell has exactly 9 dc
- Row 2 = 31 sts, Row 4 = 21 sts, Row 6 = 11 sts
- Each step-in row starts with 6 sl sts and ends up in a center dc
- Tree body is about 4 in (10.2 cm) x 3 in (7.6 cm)
- Trunk is 4 sc wide and 5 rows tall, centered
- Hanging loop is about 2 in (5.1 cm) and anchored in the top center dc
- All ends are woven in securely and out of sight
Troubleshooting
Shells cup. The ch-5 arches are too tight. Chain more loosely, or try ch 6 for each arch.
Shells ruffle. The arches are too long for 9 dc. Chain more tightly, or try ch 4.
The tree leans to one side. You probably worked a sc into the 4th or 6th dc instead of the 5th. Count to the center dc again and mark it.
Gaps between tiers look too big. Your arches are loose. Use a smaller hook for the step-in rows only.
Trunk is off-center. Count the free loops again. The trunk must start right after the 2nd sc of Row 1.
Foundation chain twists. Keep the “V”s of the chain facing you as you work Row 1. If it twists, pull it out and start again; it only takes a minute.
Trunk looks too long or too short. Add or remove one row. Each sc row adds about 0.2 in (0.5 cm).
Loop stretches or twists. Weave the tail through the loop chain once, then straighten the loop before blocking so it lies flat.
Care
Hand wash in cool water with mild soap and lay flat to dry, reshaping the fans while damp. Store the ornament flat, or hang it by its loop, to keep the shells crisp.
Final Notes
The sizes all build on each other. A 17-chain foundation holds 3 arches. Each arch holds a 9 dc shell about 1 1/3 in (3.4 cm) wide, so the bottom tier reaches 4 in (10.2 cm). The middle tier moves in by half a shell on each side, to about 2 2/3 in (6.8 cm). The top shell brings the tree to 3 in (7.6 cm) tall. The 4 sc trunk adds 1 in (2.5 cm) and the loop adds 2 in (5.1 cm), for a finished ornament about 6 in (15.2 cm) tall.
If your first tree comes out a little larger or smaller, the proportions will still be right as long as every shell has 9 dc and every step-in row lands on a center dc. Make one in navy, then try forest green, cream or red for a full set of tree decorations.
Happy crocheting!