

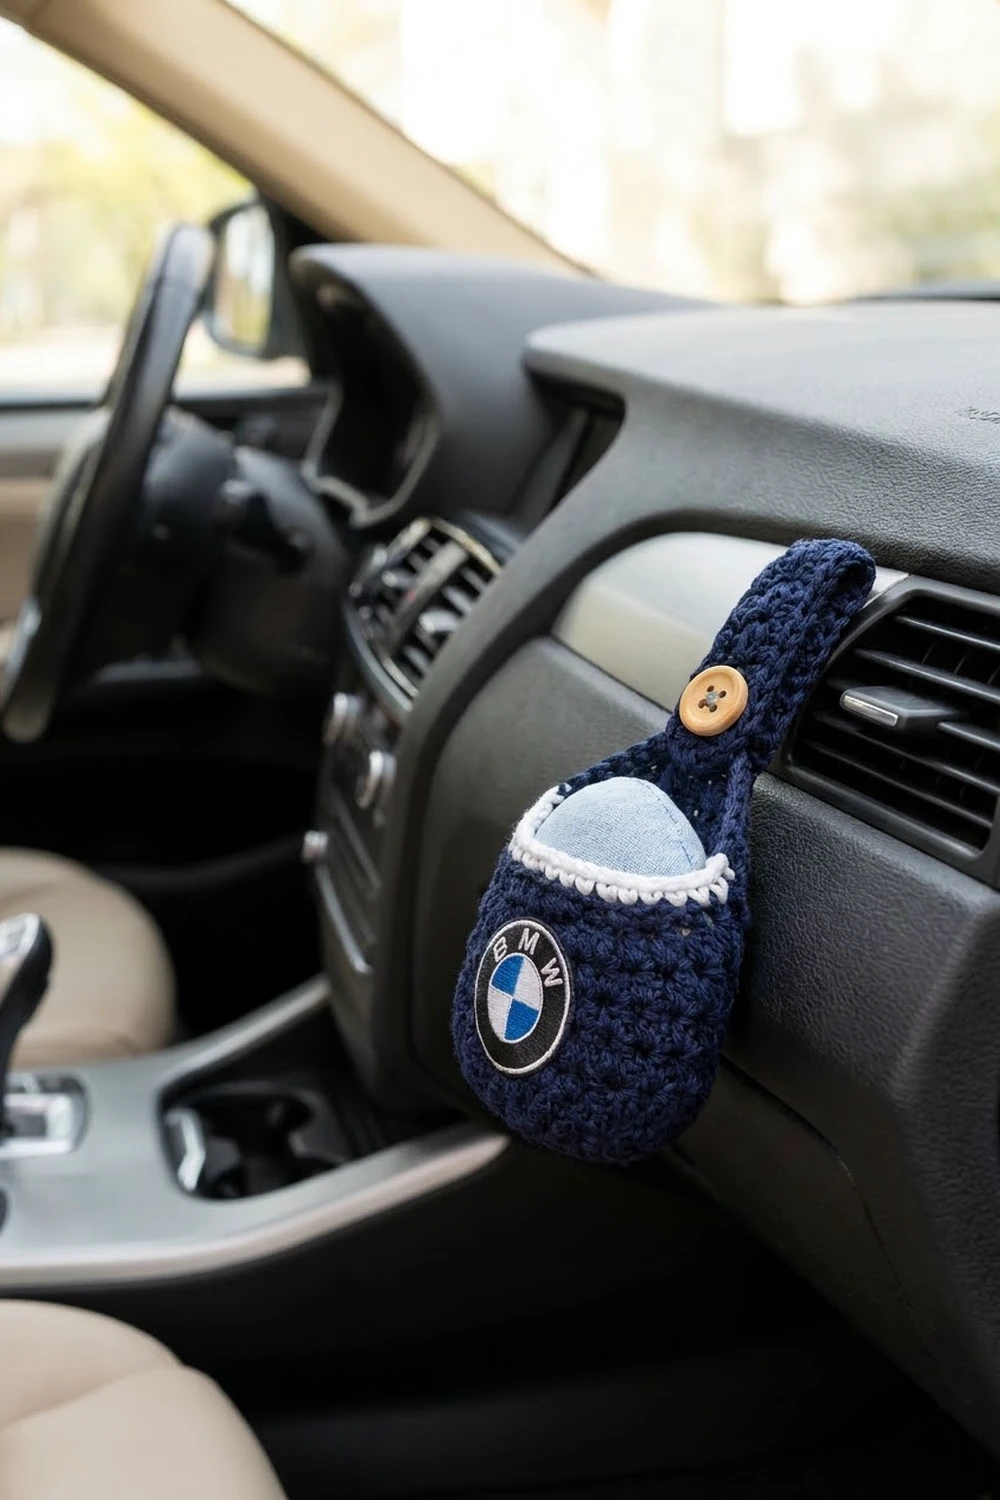
This little pouch hangs from a car air vent and holds a scented sachet, stone or felt pad, so the airflow carries the fragrance through the car. It is worked in deep navy cotton with a staggered V-stitch texture that looks like a field of tiny stars. A crisp white crab-stitch rim and a button-down strap finish it.
The front is plain enough to show off a round embroidered patch of your choice. You can use a car emblem, an initial, a sports badge or a simple appliqué. The sample is navy and white, but any dark main color with a bright rim works well.
The pattern uses US crochet terms. The finished pouch is about 3.25 in (8.3 cm) wide and 3.25 in (8.3 cm) tall, on a base about 1.5 in (3.8 cm) deep. With the strap standing up, the full height is about 5.75 in (14.6 cm).
Construction is seamless. You crochet an oval base in the round, turn the wall up with a back-loop round, then work alternating V-stitch and single crochet rounds. Next comes a two-round white rim, and finally the strap is worked in rows directly off the back of the rim. A button and a sewn-on patch complete the piece.
Finished Size and Construction
- Finished pouch size: 3.25 in (8.3 cm) wide x 3.25 in (8.3 cm) tall x 1.5 in (3.8 cm) deep
- Height with strap: about 5.75 in (14.6 cm)
- Skill level: Easy / advanced beginner
- Terminology: US crochet terms
- Yarn weight: DK / light (#3) cotton
- Hook: 3.75 mm (F-5)
- Number of pieces: 1 (pouch with the strap worked on; button and patch sewn on)
- Layout: Single standalone piece, no joining
- Base size: 3 in (7.6 cm) x 1.5 in (3.8 cm)
- Height before rim: 3 in (7.6 cm)
- Rim (border) depth: 0.25 in (0.6 cm)
- Strap: 1.1 in (2.8 cm) wide x 3.8 in (9.7 cm) long before folding
Materials
Choose a smooth mercerized or combed cotton in DK weight. Cotton holds its shape on the vent slats, does not fuzz and handles warm air from the heater. Avoid acrylic blends if your vents run very hot, and avoid fuzzy yarns that hide the star texture.
- Navy (main color): 20 g / 42 m (46 yd)
- White (rim): 4 g / 8 m (9 yd)
- 3.75 mm (F-5) crochet hook
- 1 wooden button, 0.75 in (1.9 cm) across
- 1 round embroidered patch, about 1.75 in (4.4 cm) across (sew-on or iron-on)
- Matching sewing thread and a sharp sewing needle
- Tapestry needle
- 2 stitch markers
- Scissors and a ruler or tape measure
- Scented sachet, felt pad or aroma stone, about 2.75 in (7.0 cm) x 2 in (5.1 cm)
The yarn amounts include a margin of about 20 percent for tails and any re-work.
Abbreviations (US Terms)
- ch – chain
- sl st – slip stitch
- sc – single crochet
- dc – double crochet
- BLO – back loop only
- sk – skip
- sp – space
- st(s) – stitch(es)
- rep – repeat
- rev sc – reverse single crochet (crab stitch)
Special stitches
- V-st (V-stitch): (dc, ch 1, dc) in the same stitch.
- Rev sc (crab stitch): Working from left to right (if you are right-handed), insert the hook into the next stitch to the right, yarn over, pull up a loop, yarn over and pull through both loops on the hook.
Gauge and Checkpoints
- Double crochet: 16 dc = 4 in (10.2 cm)
- Single crochet: 18 sc x 20 rows = 4 in (10.2 cm)
- Wall pattern: 4 V-st rounds plus 4 sc rounds = about 2.75 in (7.0 cm) tall
Because the pouch is small, the base is your gauge test. Crochet it first and measure before you go on.
Checkpoints:
- After Round 3, the base measures 3 in (7.6 cm) x 1.5 in (3.8 cm).
- After Round 8, the wall is about 1.5 in (3.8 cm) tall.
- After Round 12, the wall is 3 in (7.6 cm) tall.
- After Round 14, the pouch is 3.25 in (8.3 cm) tall.
- After Row 19 of the strap, the strap is 3.8 in (9.7 cm) long.
If your base is too big, go down to a 3.5 mm (E-4) hook. If it is too small, go up to a 4 mm (G-6) hook. A pouch that is too big will droop off the vent, and one that is too small will not hold your sachet.

Pattern
Base
With navy, ch 9.
Round 1: Sc in 2nd ch from hook, sc in next 6 ch, 3 sc in last ch. Rotate to work along the other side of the foundation chain: sc in next 6 ch, 2 sc in the last ch (the same ch as the first sc). Sl st to first sc. (18 sts)
Round 2: Ch 2 (does not count as a st), 2 dc in first st, dc in next 6 sts, 2 dc in each of next 3 sts, dc in next 6 sts, 2 dc in each of last 2 sts. Sl st to first dc. (24 sts)
Round 3: Ch 2, 2 dc in first st, dc in next st, dc in next 6 sts, [2 dc in next st, dc in next st] 3 times, dc in next 6 sts, [2 dc in next st, dc in next st] 2 times. Sl st to first dc. (30 sts)
Each long side now has 6 sts and each curved end has 9 sts (6 + 9 + 6 + 9 = 30). Check that the base measures 3 in (7.6 cm) x 1.5 in (3.8 cm) and lies flat.
Wall
Round 4 (turning round): Ch 1, sc BLO in each st around. Sl st to first sc. (30 sc)
The unworked front loops leave a neat ridge around the base and turn the fabric upward.
Round 5 (V-st round): Ch 4 (counts as dc and ch 1), dc in same st as join, sk next st, V-st in next st; rep from * 14 more times, sk last st. Sl st to 3rd ch of beginning ch-4. (15 V-sts)*
Round 6 (sc round): Sl st into first ch-1 sp, ch 1, sc in same sp, sc in the space between this V-st and the next, sc in next ch-1 sp, sc in the space between V-sts; rep from * 14 more times. Sl st to first sc. (30 sc)*
Each V-st turns into 2 sc (15 x 2 = 30). The count goes back to the base number, so the wall stays straight.
Round 7 (offset V-st round): Sl st in next sc (the one between two V-sts), ch 4 (counts as dc and ch 1), dc in same st, sk next sc, V-st in next sc; rep from * 14 more times. The last V-st lands in the final sc, and the first sc of the round is skipped. Sl st to 3rd ch of beginning ch-4. (15 V-sts)*
Starting one stitch over places each new V-st between the V-sts below, which gives the staggered “star” look.
Round 8: Rep Round 6. (30 sc)
Checkpoint: the wall is about 1.5 in (3.8 cm) tall.
Round 9: Rep Round 7. (15 V-sts)
Round 10: Rep Round 6. (30 sc)
Round 11: Rep Round 7. (15 V-sts)
Round 12: Rep Round 6. (30 sc) Fasten off navy.
Checkpoint: the wall is 3 in (7.6 cm) tall.
Flatten the pouch so the long sides of the base are the front and back, and pick the neater side as the front. On the back, find the 5 center stitches and put a marker in the first and fifth.
White Rim (Border)
Border gauge: The rim keeps exactly 30 sts, the same as the wall, so it measures the same 7.5 in (19.1 cm) around. Laid flat, that is 15 sts across the front and 15 sts across the back.
Round 13: Join white with a sl st in any st at one side fold. Ch 1, sc in each st around. Sl st to first sc. (30 sc: 15 front + 15 back)
Round 14: Ch 1, rev sc in each st around. Sl st to first rev sc. (30 rev sc: 15 front + 15 back) Fasten off white.
Why the math works: Both rim rounds are worked 1 stitch into 1 stitch, so the opening stays at 30 sts. Adding stitches would make the rim ruffle, and skipping stitches would pull the opening in and make the sachet hard to insert. The crab stitch adds a corded edge about 0.125 in (0.3 cm) tall, for a total rim depth of 0.25 in (0.6 cm).
Strap
The strap is worked in rows straight onto the back of the rim, so there is no seam.
Row 1: With the inside of the pouch facing you, join navy with a sl st in the first of the 5 marked center-back stitches of Round 13. Insert the hook under both loops; the crab stitch sits on top, so you are working into the same stitches from the inside. Ch 1, sc in same st, sc in next 4 sts. (5 sc)
Rows 2–16: Ch 1, turn, sc in each st across. (5 sc)
Checkpoint: the strap is 3.2 in (8.1 cm) long and 1.1 in (2.8 cm) wide.
Row 17 (buttonhole): Ch 1, turn, sc in next 2 sts, ch 1, sk next st, sc in last 2 sts. (4 sc + 1 ch-1 sp)
Row 18: Ch 1, turn, sc in next 2 sts, sc in ch-1 sp, sc in last 2 sts. (5 sc)
Row 19: Ch 1, turn, sc in each st across. (5 sc)
Fasten off, leaving a 6 in (15.2 cm) tail, and weave it in along the strap edge.
Button
Sew the button to the outside face of the strap, centered on Row 8, about 1.6 in (4.1 cm) above the rim. To hang the pouch, fold the strap over a vent slat at about Row 12, bring the end down over the front and push the button through the buttonhole in Row 17. The top of the loop then sits about 2.5 in (6.4 cm) above the rim.
Test the fold before you sew. With the strap lying flat and not stretched, the buttonhole should line up with Row 8.
Patch
Center the round patch on the front over Rounds 7–11, about 0.75 in (1.9 cm) below the rim. Pin it, then whipstitch around the edge with sewing thread, catching the sc rounds rather than the V-st spaces. Sew it on even if it is iron-on, because heat-set glue can loosen in a hot car.
Final Blocking
- Weave in any remaining tails on the inside.
- Lightly mist the pouch with water.
- Stuff it with a folded plastic bag or cloth roll that fills the 3 in (7.6 cm) x 1.5 in (3.8 cm) base.
- Pat the walls straight and ease the white rim into an even oval.
- Lay the strap flat, straighten its edges and pin if needed.
- Let it dry completely before you remove the stuffing.
- Do not steam or iron over the patch if it has heat-set backing.
Final Quality-Control Checklist
- The base measures 3 in (7.6 cm) x 1.5 in (3.8 cm) and lies flat.
- The wall is 3 in (7.6 cm) tall before the rim.
- Every V-st round has 15 V-sts, and every sc round has 30 sc.
- The V-sts are staggered from round to round, not stacked.
- Both rim rounds have 30 sts, and the rim does not ruffle.
- The strap is centered on the back and is 5 sts wide in every row.
- The button meets the buttonhole without stretching the strap.
- The patch is centered, flat and stitched down all the way around.
- All tails are woven in securely.
Troubleshooting
The wall flares outward. You are probably adding stitches in the sc rounds. Work only 2 sc per V-st, for 30 in total.
The wall leans inward. Your sc rounds are too tight. Loosen your tension, or go up half a hook size for the sc rounds only.
The V-sts stack in columns. You missed the opening sl st of an offset round. From Round 7 on, start every odd round in the sc between two V-sts.
The rim ruffles. Work exactly 1 rev sc per st, and keep the crab stitch loose enough that it does not bunch.
The strap twists. Turn and ch 1 at the start of every row, and put the first sc into the first stitch.
The pouch slips off the vent. Fold the strap lower so the loop is tighter, or add 2 rows before the buttonhole if your slats are thick.
The sachet will not fit. Use a slimmer insert, or make the pouch again with a 4 mm (G-6) hook.
Care
Take out the sachet, then hand wash the pouch in cool water with mild soap, roll it in a towel to press out the water and dry it flat. When it is completely dry, refresh the sachet with a few drops of fragrance oil and put it back.
Final Notes
The size depends on a short chain of measurements. A 30-stitch base measuring 3 in (7.6 cm) x 1.5 in (3.8 cm) sets the footprint. The wall keeps those 30 stitches through four V-st rounds and four sc rounds to reach 3 in (7.6 cm). The white rim keeps the same 30 stitches and adds 0.25 in (0.6 cm), for a 3.25 in (8.3 cm) pouch. A 5-stitch, 19-row strap with its buttonhole in Row 17 folds over the vent and buttons at Row 8.
Before you hang it, check that the pouch does not block your view, get in the way of any controls or rattle while you drive. Keep the insert light so the vent slat is not strained.
Happy crocheting!