

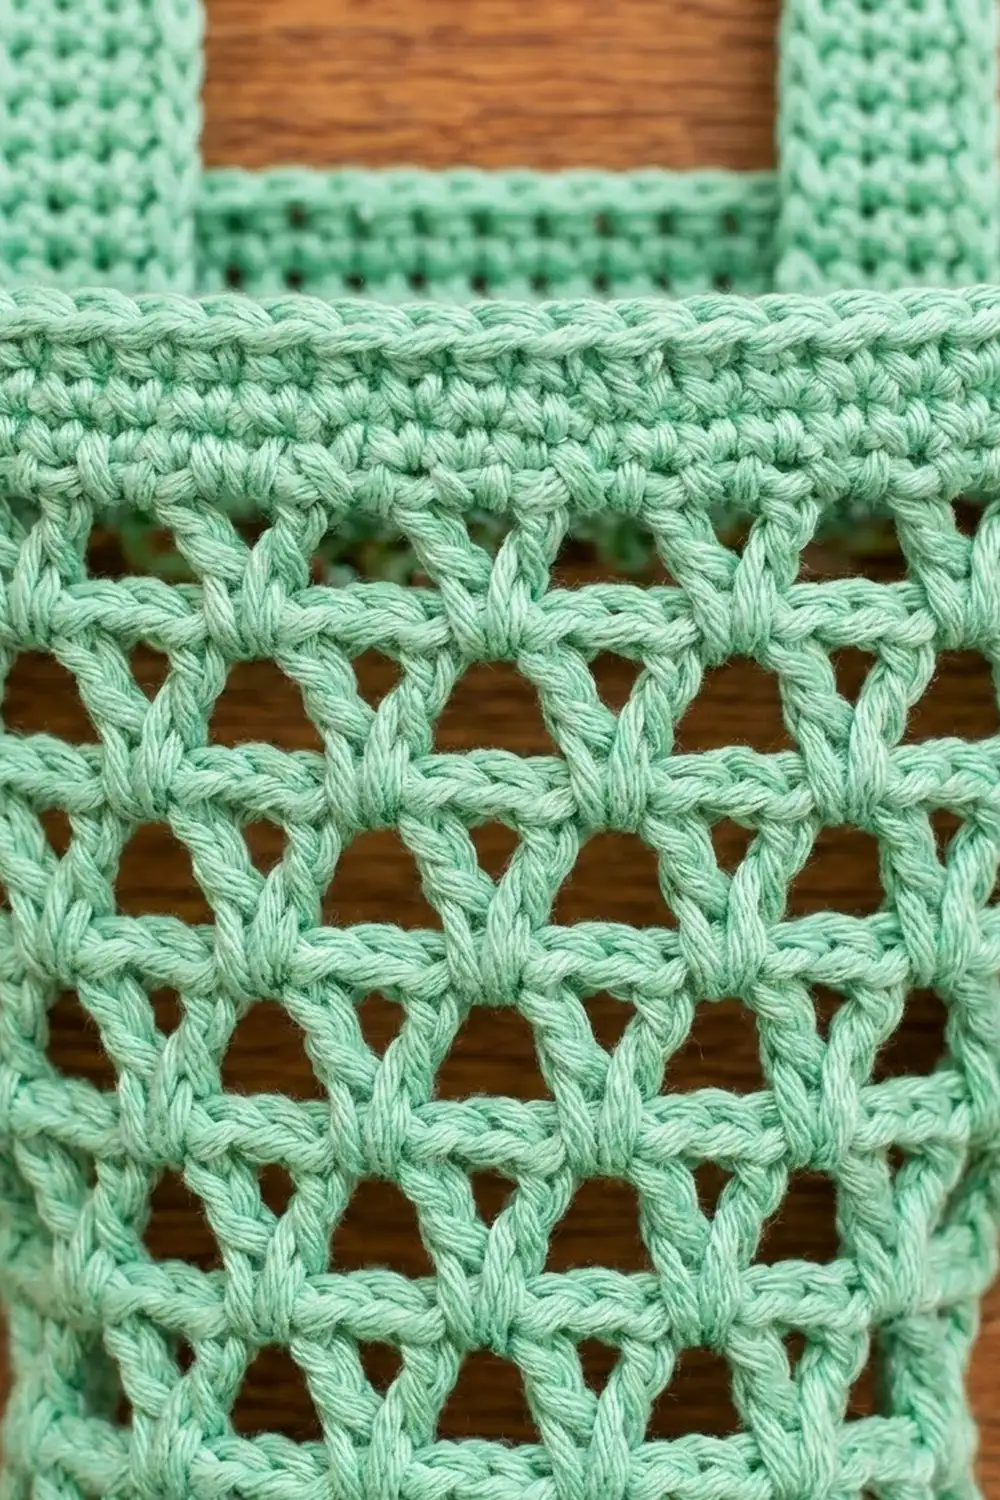
Every kitchen ends up with a drawer full of crumpled grocery bags. This hourglass bag holder gives them a tidy home. You stuff bags in at the top and pull them out one at a time through a slot in the base. The lacy V-stitch mesh shows you how many bags are left, and the curved shape looks good on the wall.
The design uses one soft color: mint green worsted-weight cotton. The body has a solid oval base, an open mesh with an hourglass shape, and a sturdy single-crochet rim. Two small tabs with buttonholes slip over wall hooks. The style is clean, modern and a little retro.
The pattern uses US crochet terms. The finished body is about 13″ (33.0 cm) tall and 10″ (25.4 cm) wide across the top when flat. Hung on its tabs, the holder is about 15.7″ (39.9 cm) tall overall.
Here is how it’s built. You start with a chain ring that becomes the dispensing slot, then work oval single-crochet rounds outward to form the base. From there you work the V-stitch mesh upward in joined rounds. Every round has the same 20 V-stitches, and the hourglass comes from changing the number of chains between them. A single-crochet band finishes the top. Finally you make two tabs and sew them inside the back of the rim.
Finished Size and Construction
- Finished size (flat): 10″ (25.4 cm) wide at top x 13″ (33.0 cm) tall
- Hanging height with tabs: 15.7″ (39.9 cm)
- Skill level: Easy (advanced beginner)
- Terminology: US crochet terms
- Yarn weight: Medium / worsted (#4) cotton
- Hook: 5.0 mm (H-8)
- Number of pieces: 3 (1 body, 2 tabs)
- Layout: One seamless tube-shaped body; two tabs sewn to the inside back of the rim, 5″ (12.7 cm) apart center to center
- Piece size: Body 10″ x 13″ (25.4 x 33.0 cm); each tab 1.5″ x 4″ (3.8 x 10.2 cm)
- Size before border (rim band): 10″ (25.4 cm) wide x 11.7″ (29.7 cm) tall
- Border depth: 1.5″ (3.8 cm) single-crochet rim band
Materials
Yarn: Use a smooth worsted-weight cotton or a cotton blend. Cotton holds the mesh shape, doesn’t stretch much under the weight of the bags, and washes well. Acrylic will work, but the waist may stretch over time.
- Mint green: 110 g / 190 m (208 yd)
These amounts include about a 15% margin for your gauge swatch and weaving in ends.
Tools:
- 5.0 mm (H-8) crochet hook
- 4 locking stitch markers
- Tapestry needle
- Scissors
- Measuring tape
- Rust-proof pins
- Spray bottle with water
- Optional: a rolled towel or a 4″ (10.2 cm) wide cardboard tube for blocking
Abbreviations (US Terms)
- ch – chain
- sl st – slip stitch
- sc – single crochet
- dc – double crochet
- sc2tog – single crochet 2 together
- sk – skip
- sp – space
- st(s) – stitch(es)
- rnd(s) – round(s)
- inc – 2 sc in the same st
Special stitch – V-stitch (V): (dc, ch 1, dc) in the stitch or space given. The ch-1 in the middle is called the “V sp.”
Beginning V: Ch 4 (counts as dc + ch 1), dc in the same st or sp.
Gauge and Checkpoints
Single crochet gauge: 16 sts and 16 rows = 4″ (10.2 cm).
Mesh gauge (ch-1 spacing): 5 V repeats (V + ch 1) = 4″ (10.2 cm); 5 rnds = 3″ (7.6 cm).
Before you start the body, make one test tab (instructions below). It should measure 1.5″ (3.8 cm) wide and 4″ (10.2 cm) long. If it does, your single-crochet gauge is right, and you can keep it as one of your two tabs.
Checkpoints along the way:
- After Rnd 1: The slot ring, flattened, is 3″ (7.6 cm) long.
- After Rnd 7: The base has 60 sc and measures 15″ (38.1 cm) around the outer edge.
- After Rnd 12 (hip): Flattened width is 8″ (20.3 cm), a 16″ (40.6 cm) circumference.
- After Rnd 17 (waist): Flattened width is 6″ (15.2 cm), a 12″ (30.5 cm) circumference.
- After Rnd 24 (top of mesh): Flattened width is 10″ (25.4 cm), and the body is 11.7″ (29.7 cm) tall.
- After Rnd 30: The body is 13″ (33.0 cm) tall.
If your piece is too big: Go down 0.5 mm in hook size. If only the mesh is too wide, crochet your chains more tightly.
If your piece is too small: Go up 0.5 mm in hook size. If only the waist is too narrow, let the dc stitches stand a bit taller.
Body
Base (Slot and Oval)
Foundation: Ch 24 and join with a sl st to the first ch to make a ring. Don’t twist the chain. This ring becomes the bag slot.
Rnd 1: Ch 1, sc in each ch around. Join with a sl st to the first sc. (24 sc)
Place a marker in sc 1 and another in sc 13. These mark the two ends of the oval. The slot runs between them when the base is flattened.
Rnd 2: Ch 1, [2 sc in each of next 3 sts, sc in next 9 sts] twice. Join. (30 sc)
Rnd 3: Ch 1, [(sc in next st, inc) 3 times, sc in next 9 sts] twice. Join. (36 sc)
Rnd 4: Ch 1, [(sc in next 2 sts, inc) 3 times, sc in next 9 sts] twice. Join. (42 sc)
Rnd 5: Ch 1, [(sc in next 3 sts, inc) 3 times, sc in next 9 sts] twice. Join. (48 sc)
Rnd 6: Ch 1, [(sc in next 4 sts, inc) 3 times, sc in next 9 sts] twice. Join. (54 sc)
Rnd 7: Ch 1, [(sc in next 5 sts, inc) 3 times, sc in next 9 sts] twice. Join. (60 sc)
Each round adds 3 sts at each end of the oval, and the 9-st straight sections stay the same. That keeps the base long and narrow rather than round. Move your markers up each round so they stay on the end increases.
Checkpoint: 60 sc, about 15″ (38.1 cm) around.
Set-Up Round
Rnd 8: Beginning V in the first st, ch 1, sk 2 sts, V in next st, ch 1, sk 2 sts; repeat from * 18 more times. Join with a sl st to the 3rd ch of the beginning ch-4. (20 V, 20 ch-1 sps)
Each repeat uses 3 base sts (1 for the V and 2 skipped), and 60 ÷ 3 = 20 repeats. The outer edge of the base will start to cup upward like a shallow bowl. That’s the rounded bottom of the holder.
Hip (Ch-1 Spacing)
Rnds 9–12: Sl st into the first V sp. Beginning V in the same sp, ch 1, V in next V sp, ch 1; repeat from * 18 more times. Join to the 3rd ch of the beginning ch-4. (20 V, 20 ch-1 sps per rnd)
Work every V into the V sp of the V below it, and skip the ch-1 sps between V’s. This stacks the V’s into columns. The ch-1 gaps between them open into the triangular holes you see in the mesh.
Checkpoint: Flattened width is 8″ (20.3 cm).
Waist (No Chains Between)
Rnds 13–17: Sl st into the first V sp. Beginning V in the same sp, V in next V sp; repeat from * 18 more times. Join. (20 V per rnd, no ch sps between)
Leaving out the ch-1 between V’s makes each repeat about 0.2″ (0.5 cm) narrower. Across 20 repeats, that takes 4″ (10.2 cm) off the circumference and pulls in the waist.
Checkpoint: Flattened width is 6″ (15.2 cm).
Upper Body (Ch-1 Spacing)
Rnds 18–20: Work the same as Rnds 9–12. (20 V, 20 ch-1 sps per rnd)
The first round here will look tight as it widens back out from the waist. That’s expected, and blocking evens it out.
Top Flare (Ch-2 Spacing)
Rnds 21–24: Sl st into the first V sp. Beginning V in the same sp, ch 2, V in next V sp, ch 2; repeat from * 18 more times. Join. (20 V, 20 ch-2 sps per rnd)
Checkpoint: Flattened width is 10″ (25.4 cm), a 20″ (50.8 cm) circumference. The body is about 11.7″ (29.7 cm) tall: about 1.5″ (3.8 cm) of curved base plus 17 mesh rounds at 0.6″ (1.5 cm) each, or 10.2″ (25.9 cm).
Rim Band (Border)
The solid band at the top acts as the border. It makes the opening sturdy enough to hold its shape when you push bags in.
Border gauge: 16 sc = 4″ (10.2 cm), which is 4 sc per inch (2.5 cm).
Rnd 25 (conversion round): Ch 1. Sc in the next dc, sc in the V sp, sc in the next dc, sc in the ch-2 sp; repeat from * around. Join to the first sc.
Count: 40 sc worked one into each existing dc, plus 40 sc added into spaces (20 V sps and 20 ch-2 sps). Total: 80 sc.
Rnds 26–30: Ch 1, sc in each st around. Join. (80 sc per rnd)
At the end of Rnd 30, fasten off with an invisible join and weave in the end.
Per-side counts: Flatten the body so the slot runs side to side and the round joins line up along one side fold. Each flat face (front and back) then has 40 sc between the folds. Count the fold stitches as part of the face they lead into, so you don’t count them twice.
Why the math works: At 4 sc per inch, 80 sc is 20″ (50.8 cm) around. That matches the 20″ (50.8 cm) circumference of the ch-2 mesh, where each repeat is 1″ (2.5 cm) and there are 20 repeats. Each repeat converts to exactly 4 sc. Because 4 sc also measure 1″ (2.5 cm), the band sits flat on the mesh without ruffling or pulling in. Six sc rounds at 4 rows per inch give a band depth of 1.5″ (3.8 cm).
Checkpoint: Total body height is 13″ (33.0 cm).
Tabs (Make 2)
Foundation: Ch 7.
Row 1: Sc in the 2nd ch from the hook and in each ch across. Turn. (6 sc)
Rows 2–12: Ch 1, sc in each st across. Turn. (6 sc)
Row 13 (buttonhole): Ch 1, sc in next 2 sts, ch 2, sk 2 sts, sc in next 2 sts. Turn. (4 sc, 1 ch-2 sp)
Row 14: Ch 1, sc in next 2 sts, 2 sc in the ch-2 sp, sc in next 2 sts. Turn. (6 sc)
Row 15: Ch 1, sc in each st across. Turn. (6 sc)
Row 16: Ch 1, sc2tog, sc in next 2 sts, sc2tog. (4 sc)
Fasten off and leave a 12″ (30.5 cm) tail for sewing. Row 16 rounds off the top corners.
Checkpoint: Each tab is 1.5″ (3.8 cm) wide and 4″ (10.2 cm) long.
Attaching the Tabs
Flatten the body and choose the face opposite the round joins as the back. Number the 40 back-face sts of Rnd 30 from left to right.
- Tab 1: sts 8–13
- Tab 2: sts 28–33
That leaves 7 sts outside each tab and 14 sts between them, so the tabs are centered and their centers are 20 sts, or 5″ (12.7 cm), apart.
Place the bottom 1.5″ (3.8 cm) of each tab (Rows 1–6) against the inside of the rim band, with the buttonhole pointing up. Pin it in place. Whipstitch all four edges of the overlap through the band. Don’t let the stitches show on the outside. About 2.5″ (6.4 cm) of each tab stands above the rim.
Final Blocking
- Weave in all ends before blocking, but don’t trim them yet.
- Wet the whole piece and gently squeeze out the water. Don’t wring it.
- Roll a towel to about 4″ (10.2 cm) across and slide it into the waist to support the shape.
- Lay the holder flat with the slot running side to side and the tabs at the back.
- Pin the outline to the checkpoint widths: hip 8″ (20.3 cm), waist 6″ (15.2 cm), top 10″ (25.4 cm).
- Pin the rim band straight across, and pin each tab straight up.
- Ease the mesh with your fingers so every triangle opens evenly and the V’s line up in straight columns.
- Let it dry completely. Unpin it, then trim the woven ends.
Final Quality-Control Checklist
- The slot is 3″ (7.6 cm) long, with a smooth edge and no gaps.
- The base has 60 sc, and the V columns rise straight up from it.
- Every mesh round has 20 V’s.
- Hip 8″ (20.3 cm), waist 6″ (15.2 cm), top 10″ (25.4 cm).
- The rim band has 80 sc, lies flat and is 1.5″ (3.8 cm) deep.
- The tabs are 5″ (12.7 cm) apart center to center and stand straight.
- The buttonholes fit over your wall hooks.
- All ends are secure and hidden.
Troubleshooting
The base ruffles: Your increases are too loose. Use a hook 0.5 mm smaller for Rnds 1–7 only.
The base cups too much: Check that you have 3 increases at each end, not 2.
The V columns spiral: You may be working into the ch sp between V’s instead of the V sp. Always go into the center of the V.
The waist isn’t pinched: Make sure you left out every ch between V’s on Rnds 13–17.
The rim band ruffles: You may have put 2 sc in each ch-2 sp. Use exactly 1.
The tabs sag: Sew all four edges of the overlap, not just the bottom.
The slot is too tight: Rework the foundation with 28 ch. Then add 4 sts to the straight sections of every base round, and work Rnd 8’s set-up across 64 sts as follows: skip 2 after most V’s, and skip 3 after 4 evenly spaced V’s.
Care
Hand wash or machine wash on a gentle cycle in cool water, then lay flat and reshape to dry. Don’t tumble dry, because heat can loosen the waist.

Final Notes
The measurements build on each other. A 24-ch slot ring grows into a 60-sc oval base that measures 15″ (38.1 cm) around. That base sets up 20 V-stitches, which hold steady from bottom to top. Changing only the chains between the V’s gives the 8″ (20.3 cm) hip, 6″ (15.2 cm) waist and 10″ (25.4 cm) top. The 80-sc rim matches the top circumference exactly, and two 4″ (10.2 cm) tabs finish the holder at 15.7″ (39.9 cm) tall when hanging. Check your measurements at each stage and the holder will come out the right size.
Happy crocheting!