

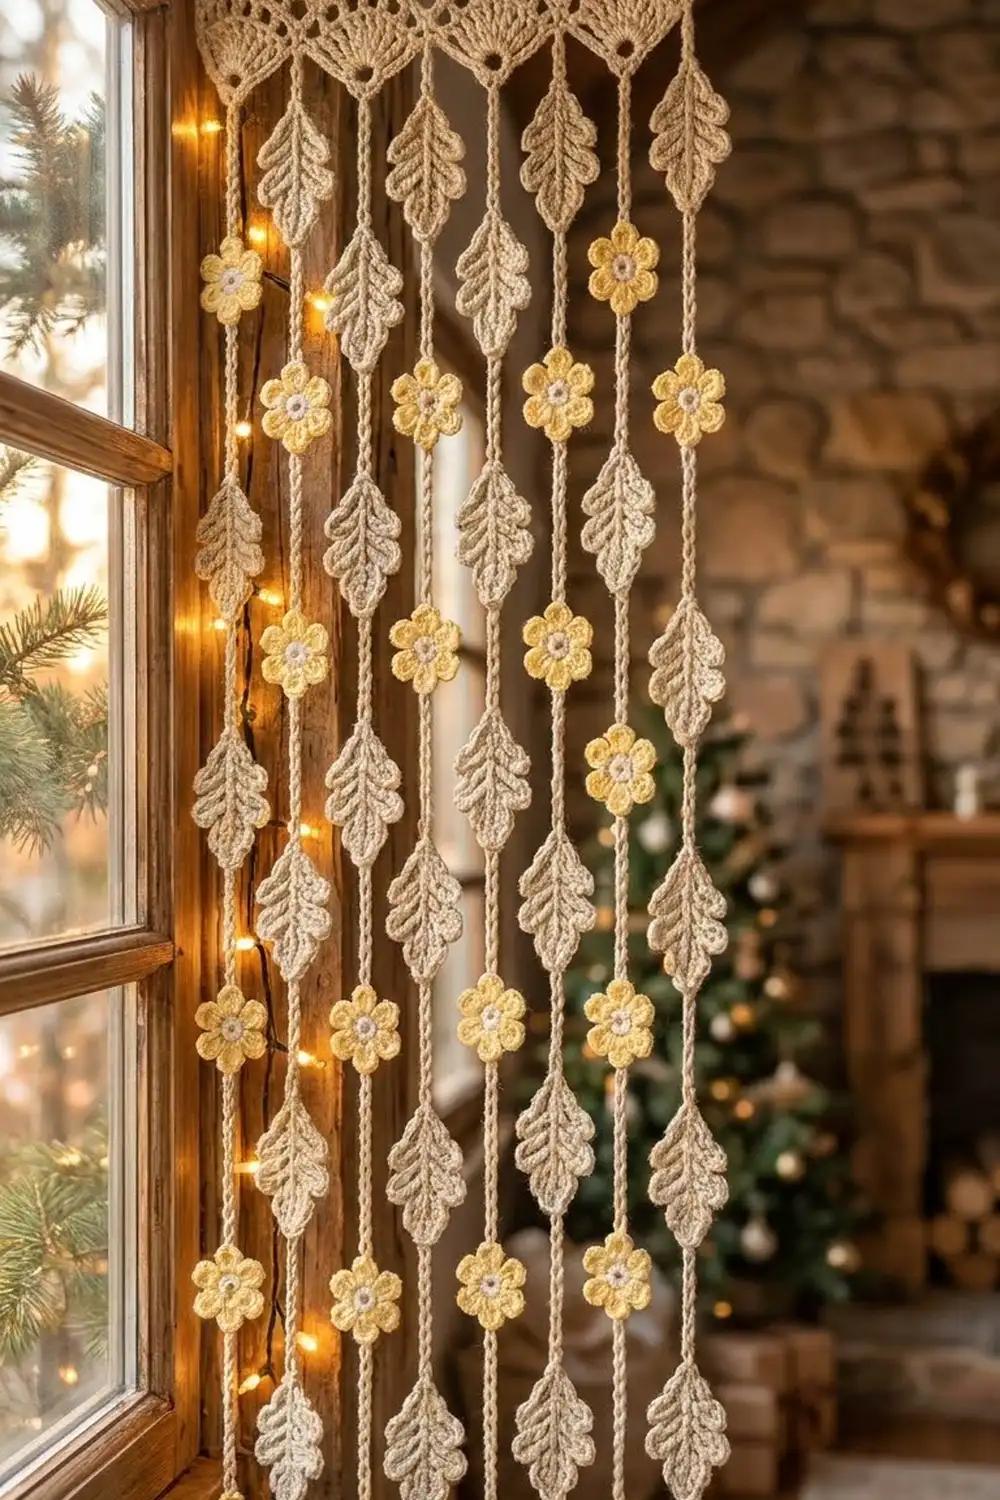
This airy lace curtain hangs like a soft cream waterfall. A scalloped header of connected fan motifs runs across the top. Below it, ten slim chain strands carry alternating veined leaves and small four-petaled flowers, with open space between every strand.
Everything is worked in one cream/off-white cotton. Warm string lights placed behind or woven through the strands make the lace glow. The style is romantic and botanical, and it suits a doorway, window, or wall nook.
The pattern uses US crochet terms. The finished curtain measures 30 1/4 in (76.8 cm) wide and 42 in (106.7 cm) tall, from the top edge of the header to the bottom of the strands.
Construction is simple and modular. You make 50 leaves and 50 flowers, then link them onto 10 continuous chain strands. Finally, you crochet the fan header and attach one strand to the point of each fan.
Finished Size and Construction
- Finished size: 30 1/4 in (76.8 cm) wide x 42 in (106.7 cm) tall
- Skill level: Easy-Intermediate (simple stitches, lots of repetition)
- Terminology: US crochet terms
- Yarn weight: Worsted (weight 4) cotton
- Hook: 4.5 mm (US 7)
- Number of pieces: 101 (50 leaves, 50 flowers, 1 header)
- Layout: 10 strands x 10 motifs each, alternating leaf/flower
- Piece size: leaf 3 in (7.6 cm) tall x 2 in (5.1 cm) wide; flower 2 in (5.1 cm) across
- Size before border: strand panel about 29 in (73.7 cm) wide across the outer motif edges x 40 in (101.6 cm) tall
- Border depth: fan header 2 in (5.1 cm) deep, plus rod loops
Materials
Choose a smooth, mercerized or matte worsted cotton. Cotton holds the leaf veins and petal shapes crisply and does not stretch much when hanging. Avoid fuzzy yarns, which blur the lace.
Yarn (one color):
– Cream/off-white: 400 g / 680 m total
– Leaves and veins: about 300 m
– Flowers: about 200 m
– Strand chains: about 15 m
– Header and rod loops: about 75 m
These quantities include a margin of roughly 15% for swatching and tails.
Tools:
– 4.5 mm (US 7) crochet hook
– Tapestry needle
– Scissors
– Stitch markers
– Rust-proof pins and blocking mats
– Measuring tape
– Curtain rod up to 1 in (2.5 cm) in diameter
– Optional: 50 small pearl beads (6 mm) and sewing thread for flower centers
Abbreviations (US Terms)
- ch – chain
- sl st – slip stitch
- sc – single crochet
- hdc – half double crochet
- dc – double crochet
- tr – treble crochet
- sp – space
- st(s) – stitch(es)
- RS – right side
Special stitches:
– Picot: ch 3, sl st in 3rd ch from hook.
– Surface sl st: With yarn held behind the work, insert the hook from front to back through the fabric, pull up a loop, and draw it through the loop on the hook. This makes a raised chain line on the surface, used for leaf veins.
Gauge and Checkpoints
Gauge: 16 sc and 18 rows = 4 in (10.2 cm). Chain gauge: 4 ch = 1 in (2.5 cm), worked relaxed.
Make one leaf and one flower before anything else. Block them and measure:
- Leaf: 3 in (7.6 cm) tall x 2 in (5.1 cm) wide, not counting picots
- Flower: 2 in (5.1 cm) across, tip to tip
- Chain: 8 ch = 2 in (5.1 cm)
- Header Row 1: 121 sc = 30 1/4 in (76.8 cm)
- Each finished strand: 40 in (101.6 cm)
Too big? Go down 0.5 mm in hook size. Too small? Go up 0.5 mm. If only your chains are off, adjust your chain tension and leave the hook as is, since strand length depends on chain gauge.
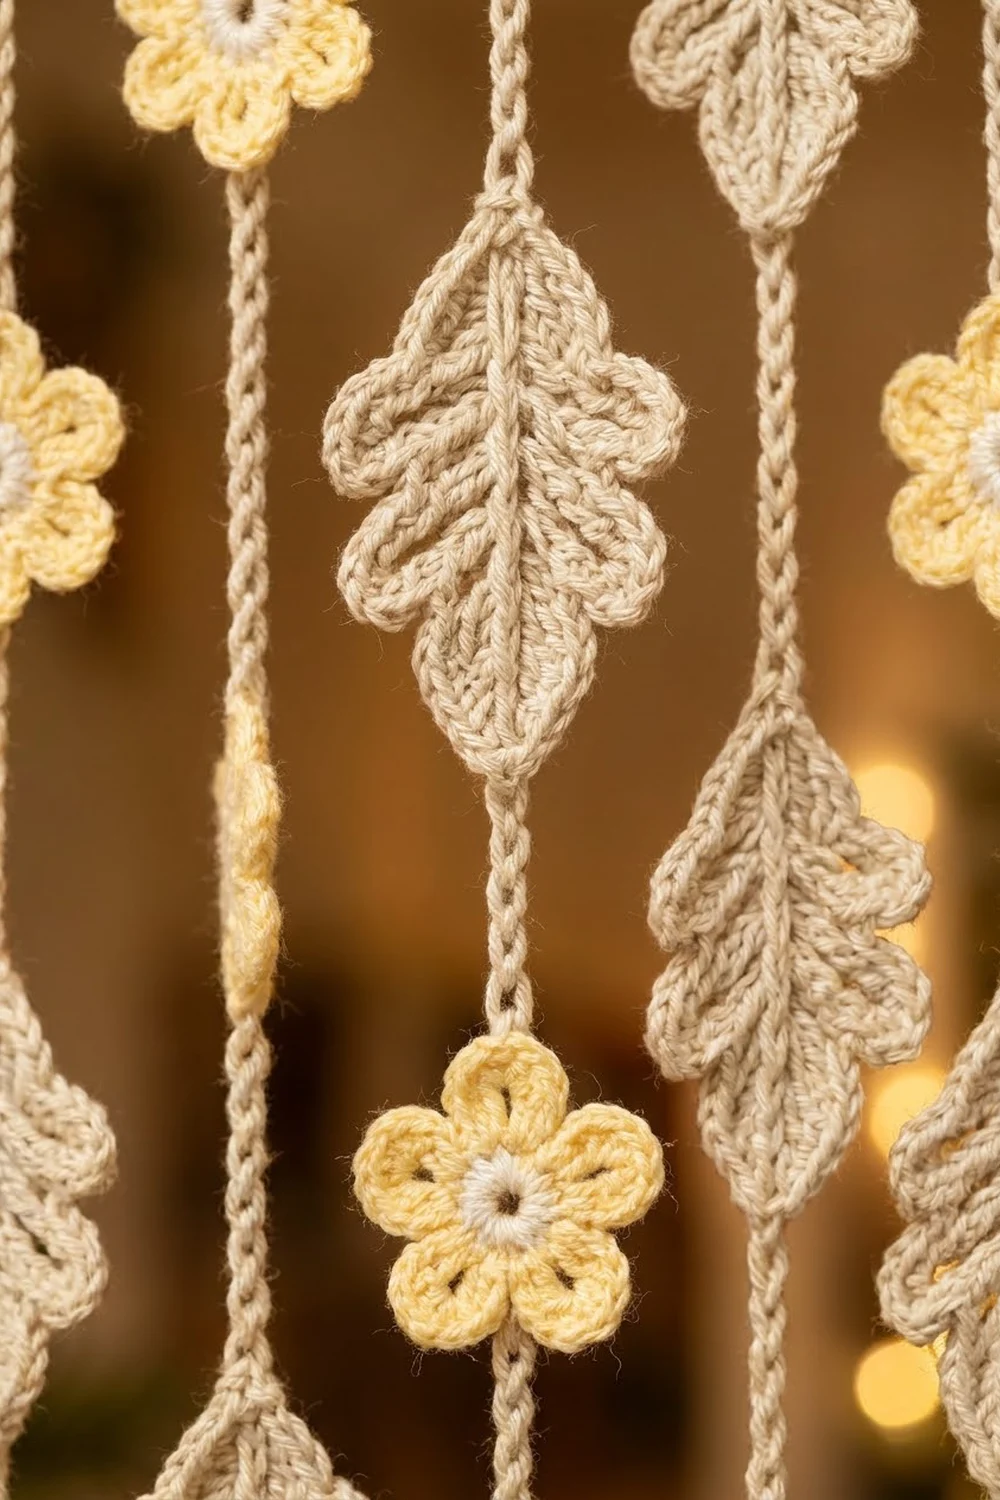
Leaf (make 50)
The leaf is worked around both sides of a foundation chain. The stem end is the top and the tip is the bottom.
Ch 13.
Rnd 1: Sc in 2nd ch from hook (tip end), hdc in next ch, dc in next 2 ch, tr in next 4 ch, dc in next 2 ch, hdc in next ch, (hdc, ch 2, hdc) in last ch (stem end). Rotate and work in the free loops on the other side of the chain: hdc in next ch, dc in next 2 ch, tr in next 4 ch, dc in next 2 ch, hdc in next ch, sc in next ch. Ch 2, sl st in first sc.
(24 sts: 12 per side; 2 ch-2 sps, one at the stem and one at the tip)
Rnd 2 (lobed edge): Ch 1, sc in same st as join. Sc in next 11 sts, working a picot after the 3rd, 6th and 9th sc of this side. (Sc, ch 2, sc) in stem ch-2 sp. Sc in next 12 sts, working a picot after the 3rd, 6th and 9th sc. (Sc, ch 2, sc) in tip ch-2 sp. Sl st in first sc. Fasten off.
(28 sc: 12 per side + 2 at stem + 2 at tip; 6 picots; 2 ch-2 sps)
The three picots on each side create the lobed outline. The ch-2 sps at stem and tip are the joining points for the strand.
Veins: With RS facing, join yarn at the tip and surface sl st up the center line, following the foundation chain, for 12 sts to the stem. Fasten off. With a 24 in (61.0 cm) length of yarn, add 3 side veins per side. Each side vein is about 1/2 in (1.3 cm) long and angles from the center vein toward a picot. Work them in surface sl st or backstitch. Weave in all ends on the wrong side.
Checkpoint: 3 in (7.6 cm) x 2 in (5.1 cm).
Flower (make 50)
Each flower has four petals and a raised center.
Rnd 1: Make a magic ring. Ch 1, work 8 sc in ring, sl st in first sc. Pull ring closed.
(8 sc)
Rnd 2: Ch 1, sc in first st, ch 3, skip next st. Sc in next st, ch 3, skip next st; repeat from * 2 more times. Sl st in first sc.
(4 sc, 4 ch-3 sps)*
Rnd 3 (petals): (Sc, hdc, 2 dc, tr, 2 dc, hdc, sc) in next ch-3 sp, sl st in next sc; repeat from * 3 more times. Fasten off.
(4 petals of 9 sts each = 36 petal sts + 4 sl sts)*
The tr at the center of each petal forms the petal tip. The sl sts pinch each petal apart and give the flower its dimensional shape.
Center detail: With a tail, work 8 surface sl sts around the inner edge of Rnd 1 to make a raised ring. For a pearly finish, you can sew a 6 mm bead in the middle instead.
Checkpoint: 2 in (5.1 cm) across.
Make All Pieces
Cream: 50 leaves, 50 flowers, 1 header (in the Border section).
There are two strand types:
– Strand A: starts with a leaf (L F L F L F L F L F)
– Strand B: starts with a flower (F L F L F L F L F L)
Hang them alternately, A B A B, from left to right. Each grid row below is one motif level, read left to right across the 10 strands:
ROW 1:  LEAF   FLOWER LEAF   FLOWER LEAF   FLOWER LEAF   FLOWER LEAF   FLOWER
ROW 2:  FLOWER LEAF   FLOWER LEAF   FLOWER LEAF   FLOWER LEAF   FLOWER LEAF
ROW 3:  LEAF   FLOWER LEAF   FLOWER LEAF   FLOWER LEAF   FLOWER LEAF   FLOWER
ROW 4:  FLOWER LEAF   FLOWER LEAF   FLOWER LEAF   FLOWER LEAF   FLOWER LEAF
ROW 5:  LEAF   FLOWER LEAF   FLOWER LEAF   FLOWER LEAF   FLOWER LEAF   FLOWER
ROW 6:  FLOWER LEAF   FLOWER LEAF   FLOWER LEAF   FLOWER LEAF   FLOWER LEAF
ROW 7:  LEAF   FLOWER LEAF   FLOWER LEAF   FLOWER LEAF   FLOWER LEAF   FLOWER
ROW 8:  FLOWER LEAF   FLOWER LEAF   FLOWER LEAF   FLOWER LEAF   FLOWER LEAF
ROW 9:  LEAF   FLOWER LEAF   FLOWER LEAF   FLOWER LEAF   FLOWER LEAF   FLOWER
ROW 10: FLOWER LEAF   FLOWER LEAF   FLOWER LEAF   FLOWER LEAF   FLOWER LEAF
Because leaves are taller than flowers, the motif levels shift slightly between neighboring strands. This gentle stagger is intentional.
Joining (Building the Strands)
Method: Each strand is one continuous chain. It joins to the top point of a motif, runs behind the motif, joins to its bottom point, and then continues down to the next motif.
Join points:
– Leaf: top = stem ch-2 sp, bottom = tip ch-2 sp
– Flower: top = tr tip of one petal, bottom = tr tip of the opposite petal
Chain lengths (at 4 ch per in):
– Lead chain above the first motif: 6 ch = 1 1/2 in (3.8 cm)
– Gap between motifs: 6 ch = 1 1/2 in (3.8 cm)
– Behind each leaf: 12 ch = 3 in (7.6 cm)
– Behind each flower: 8 ch = 2 in (5.1 cm)
Strand A:
1. Leaving an 8 in (20.3 cm) tail, ch 6. Sl st in the top point of a leaf.
2. Ch 12 behind the leaf, sl st in its bottom point.
3. Ch 6, sl st in the top petal of a flower.
4. Ch 8 behind the flower, sl st in its bottom petal.
5. Ch 6. Continue alternating until 10 motifs are joined.
6. Fasten off after the final bottom sl st.
Strand B: Work the same steps, but start with a flower.
Strand count check (both types): 6 lead + (5 x 12) + (5 x 8) + (9 x 6) = 6 + 60 + 40 + 54 = 160 ch. At 4 ch per in, 160 ch = 40 in (101.6 cm).
Tension advice: Keep the chains relaxed and even. The back chain must lie flat behind each motif, not pucker it. If a motif cups, loosen the back chain or add 1 ch. Tack the back chain to the motif center with your tail if you like.
Checkpoint: Hang each strand from its tail and measure it. Each should be 40 in (101.6 cm). Lengths should agree within 1/2 in (1.3 cm).
Border (Fan Header)
Border gauge: The header uses the main gauge of 16 sc = 4 in (10.2 cm), which is 4 sc per in.
Ch 122.
Row 1: Sc in 2nd ch from hook and in each ch across. Turn.
(121 sc)
Rows 2–3: Ch 1, sc in each st across. Turn.
(121 sc each row)
Checkpoint: The band measures 30 1/4 in (76.8 cm) wide.
Row 4 (shells): Ch 1, sc in first st. Skip 5 sts, 9 dc in next st, skip 5 sts, sc in next st; repeat from * 9 more times. Turn.
(This row’s own total: 10 shells x 9 dc = 90 dc, plus 11 sc = 101 sts)*
Row 5 (open fans): Ch 1, sc in first sc.
[Dc in next dc, ch 1] 4 times, (dc, ch 3, dc) in next (center) dc, [ch 1, dc in next dc] 4 times, sc in next sc; repeat from * 9 more times. Fasten off.
(Per fan: 10 dc, 8 ch-1 sps, 1 ch-3 sp. Row total: 100 dc, 80 ch-1 sps, 10 ch-3 sps, 11 sc)*
The ch-3 sp at the center of each fan is the lowest point of the scallop. Each strand hangs from one of these points.
Rod loops: With RS facing, join yarn in the first free loop of the foundation chain. Work along the top edge:
Ch 1, (sc, ch 16, sc) in first st. Sc in next 11 sts, (sc, ch 16, sc) in next st; repeat from * 9 more times. Fasten off.
(11 loops; 11 x 2 + 10 x 11 = 132 sc)*
Each ch-16 loop is 4 in (10.2 cm) of chain. That fits a rod up to 1 in (2.5 cm) in diameter.
Why the math works: Each fan uses exactly 12 sts: 1 sc + 5 skipped + 1 shell st + 5 skipped. Ten fans use 120 sts, and the final sc takes the 121st. Rod loops fall on sts 1, 13, 25 … 121, which lines them up with the valley sc between fans. Fan centers fall on sts 7, 19 … 115, so they are 12 sts = 3 in (7.6 cm) apart. Ten fans give exactly ten hanging points for ten strands, spanning 27 in (68.6 cm) from the first strand center to the last.
Attach strands: Pull each strand’s 8 in (20.3 cm) tail through a fan ch-3 sp, starting with Strand A on the left. Tie it securely to the first lead ch and weave the tail up into the fan.
Final Blocking
- Soak all motifs and the header in cool water. Press out the water in a towel.
- Pin each leaf to 3 in x 2 in (7.6 cm x 5.1 cm). Open the picots and straighten the veins.
- Pin each flower to 2 in (5.1 cm) across, shaping all four petal tips evenly.
- Pin the header to 30 1/4 in (76.8 cm) wide, opening each fan into a crisp scallop.
- Let everything dry completely.
- Hang the finished curtain. Steam lightly from a distance so the strands relax straight down to 40 in (101.6 cm).
Final Quality-Control Checklist
- 50 leaves, each with 6 picots and visible veins
- 50 flowers, each with 4 petals and a center detail
- 10 strands, each 160 ch and 40 in (101.6 cm) long
- Strands alternate A B A B from left to right
- Header has 121 sc in Rows 1–3, 10 fans and 11 rod loops
- Total size is 30 1/4 in x 42 in (76.8 cm x 106.7 cm)
- All tails woven and secured
Troubleshooting
- Leaf curls: Rnd 1 is too tight around the chain. Go up a hook size for the foundation chain only.
- Flower petals flare: Tighten the sl sts between petals.
- Strands differ in length: Recount the chains. Fix the gaps rather than the motifs.
- Header ripples: The fans are too loose. Go down 0.5 mm for Rows 4–5.
- Strands twist: Block hanging, then steam each strand lightly.
Care
Hand wash in cool water and lay flat to dry, then reshape the scallops. Keep string lights LED-only and away from direct, prolonged contact with the yarn.
Final Notes
The measurement chain is straightforward. Your gauge of 4 sc per in sets the header at 121 sc = 30 1/4 in (76.8 cm), with fan points every 3 in (7.6 cm). Each strand of 160 ch measures 40 in (101.6 cm). Add the 2 in (5.1 cm) header and you get a 42 in (106.7 cm) curtain.
Optional: for a longer drop, add matching leaf/flower pairs with 6-ch gaps to every strand. Each added pair adds 26 ch, which is 6 1/2 in (16.5 cm).
Happy crocheting!