

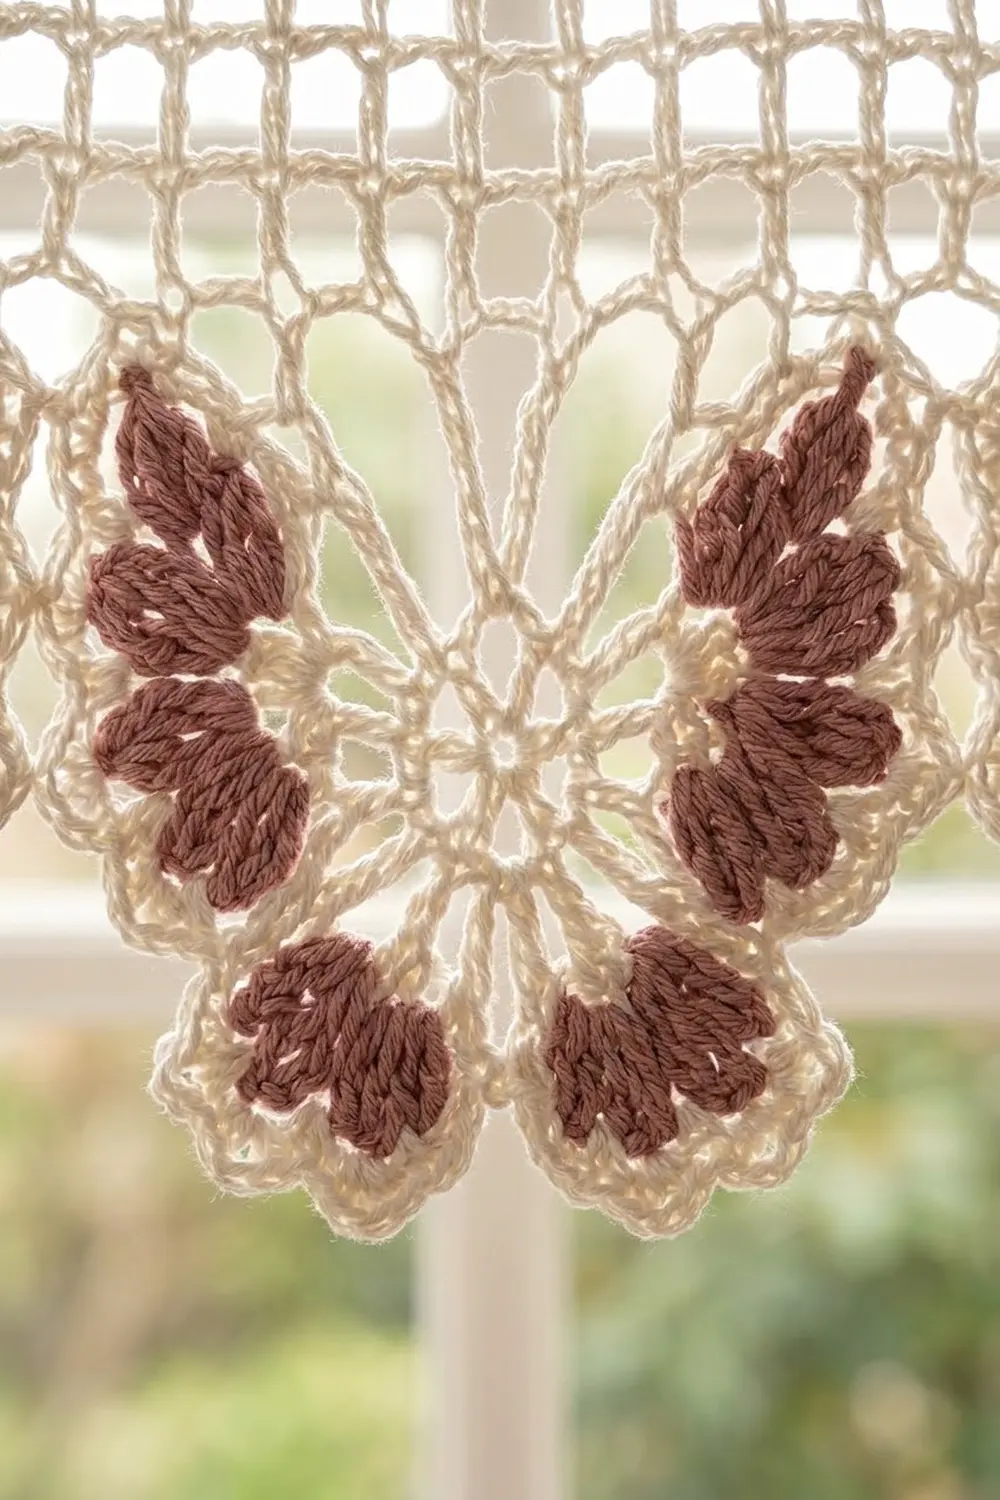
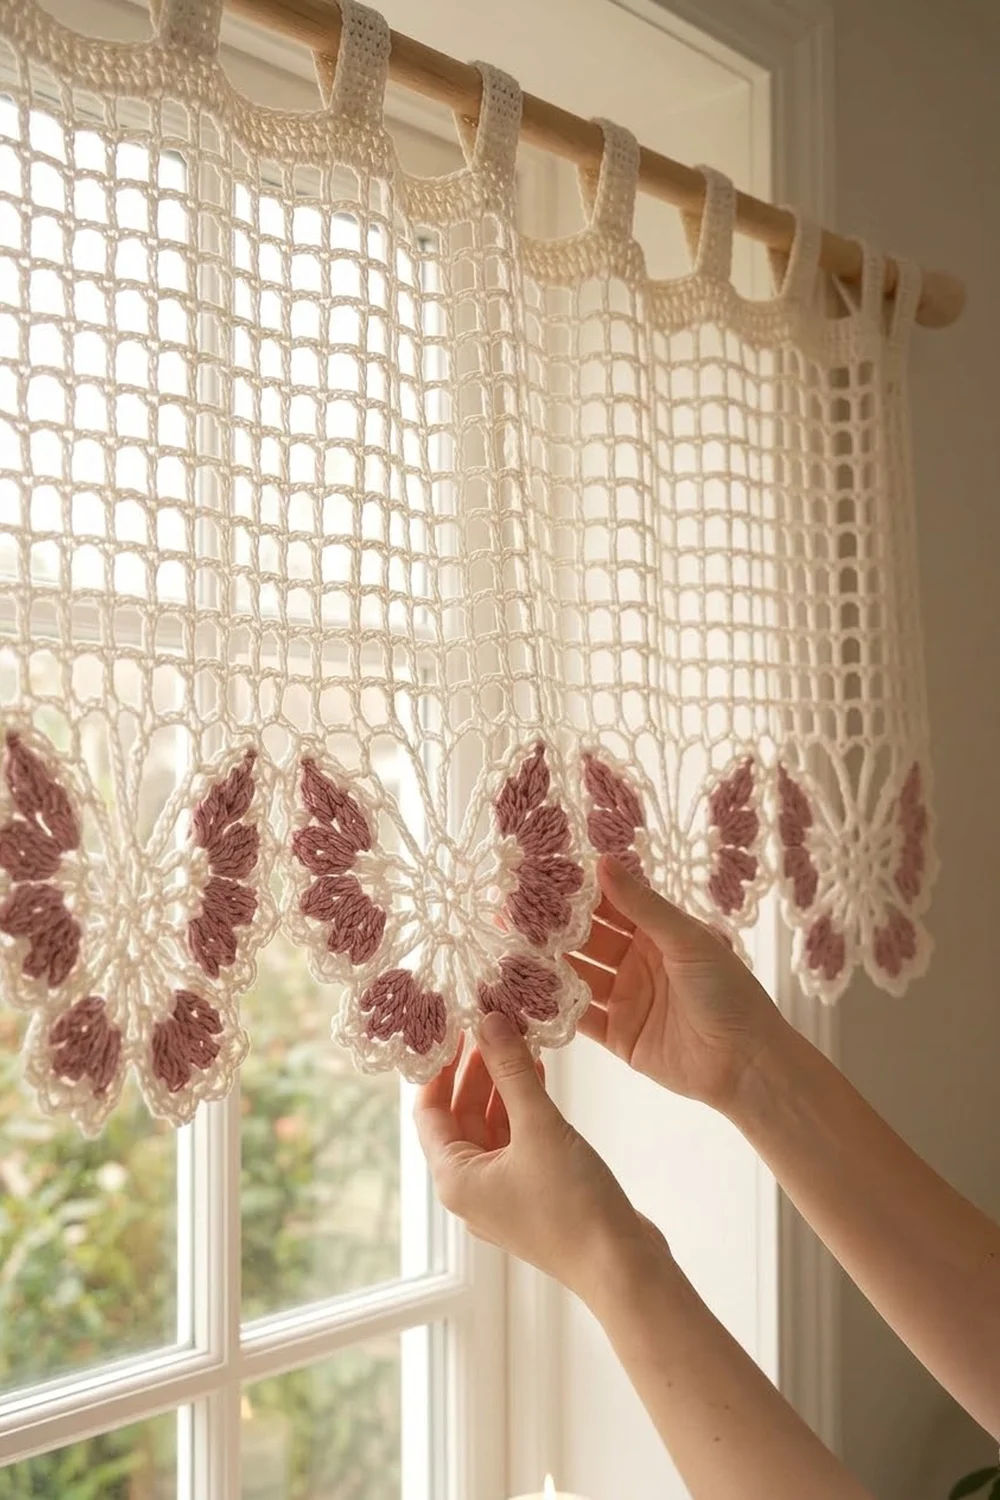
This café curtain pairs a light, airy cream filet mesh with a scalloped bottom edge of dimensional fans. Each fan holds four dusty mauve petals outlined in cream, so mauve and cream alternate all along the hem. Hung at a window, the open grid lets the light through, and the rounded petals dangle downward from the mesh base.
The look is soft cottage style: ivory body, rose-brown accents, and a hem that looks almost padded. The petals are not stuffed. They are dimensionally worked, with seven-stitch shells packed into small chain spaces so they cup forward and ruffle.
This pattern uses US crochet terms. The finished curtain measures 31 in (78.7 cm) wide by 23.5 in (59.7 cm) long, plus 2 in (5.1 cm) hanging tabs.
The curtain is one single piece. You work a solid top row and then mesh rows from top to bottom. Next you add four edging rows across the bottom to build the fans. A two-row border then goes around the sides and top, and seven tabs are worked straight off the top edge. Nothing is sewn together except the tab ends.
Finished Size and Construction
- Finished size: 31 in (78.7 cm) wide x 23.5 in (59.7 cm) long, plus 2 in (5.1 cm) tabs
- Skill level: Intermediate
- Terminology: US crochet terms
- Yarn weight: Worsted (#4) cotton
- Hook: 5.0 mm (H-8)
- Number of pieces: 1
- Layout: One flat panel. 60 mesh squares wide, 40 rows tall, with 10 fans across the bottom
- Mesh body size: 30 in (76.2 cm) wide x 20 in (50.8 cm) long
- Size before border: 30 in (76.2 cm) x 23 in (58.4 cm), including 3 in (7.6 cm) fans
- Border depth: 0.5 in (1.3 cm) on the sides and top only. The fans are not bordered.
Materials
Yarn: Use a smooth, mercerized or soft worsted cotton. Cotton holds the square mesh shape and keeps the petals crisp. Avoid fuzzy or very stretchy yarns, because the openings will blur and the curtain may sag.
- Cream / ivory (Color A): 300 g, approximately 480 m
- Dusty mauve / rose-brown (Color B): 25 g, approximately 40 m
These quantities include a margin of about 15% for your swatch and tension differences.
Tools:
- 5.0 mm (H-8) crochet hook
- Tapestry needle
- Scissors
- 4 stitch markers
- Tape measure
- Blocking mats, rust-proof pins and a spray bottle
Abbreviations (US Terms)
- ch – chain
- sl st – slip stitch
- sc – single crochet
- hdc – half double crochet
- dc – double crochet
- tr – treble crochet
- sk – skip
- sp – space
- st(s) – stitch(es)
- rep – repeat
- RS / WS – right side / wrong side
Mesh: One mesh square is a dc, then ch 1, then sk 1 st. Each mesh uses 2 stitches of width. A row of 60 meshes therefore has 1 + (60 x 2) = 121 sts.
Petal: Work (hdc, 2 dc, tr, 2 dc, hdc) all in the same ch-2 sp. That makes 7 sts.
Gauge and Checkpoints
Gauge: 16 sts (8 mesh squares) = 4 in (10.2 cm) wide, and 8 dc rows = 4 in (10.2 cm) tall. This means 4 sts per inch, with each row 0.5 in (1.3 cm) tall, so every mesh opening is square.
Test swatch: Make a small test piece before starting the curtain.
- Ch 19.
- Dc in the 4th ch from the hook and in each ch across. You now have 17 sts.
- Work 7 mesh rows as in Row 2 below, so you have 8 meshes per row.
- Block the swatch lightly and let it dry.
The swatch should measure 4 in x 4 in (10.2 cm x 10.2 cm).
If your swatch is too big, go down a hook size. If it is too small, go up a hook size. If the width matches but your rows are too short, pull up the first loop of each dc slightly taller.
Checkpoints:
- After Row 1: 30 in (76.2 cm) wide
- After Row 10: 5 in (12.7 cm) long
- After Row 20: 10 in (25.4 cm) long
- After Row 30: 15 in (38.1 cm) long
- After Row 40: 20 in (50.8 cm) long
- After Edging Row 4: 23 in (58.4 cm) long
- After the border: 31 in (78.7 cm) x 23.5 in (59.7 cm)
Mesh Body
Work with Color A throughout this section. The turning ch-3 counts as a dc in every row.
Foundation: Ch 123.
Row 1 (solid top row):
– Dc in the 4th ch from the hook and in each ch across.
– The 3 skipped chains count as the first dc.
– Count: 121 sts (120 dc + the turning chain).
Row 2 (mesh):
– Ch 3 and turn.
– Ch 1, sk next st, dc in next st. Rep from * across.
– Work the last dc in the top of the turning ch.
– Count: 121 sts (61 dc and 60 ch-1 sps, which makes 60 meshes).
Rows 3–40:
– Ch 3 and turn.
– Ch 1, sk ch-1 sp, dc in next dc. Rep from * across.
– Work the last dc in the top of the turning ch.
– Count: 121 sts (60 meshes) in every row.
Check the size: the body should measure 30 in (76.2 cm) x 20 in (50.8 cm). Count meshes every 10 rows. A row with 59 or 61 meshes is the most common reason a curtain hangs crooked.
Do not fasten off. Decide which face looks best and use it as your RS from here on.
Scalloped Fan Edging
Work all edging rows with the RS facing. At the end of each row, fasten off and rejoin at the right-hand edge. This keeps the fans facing the same way and stops colors traveling. Leave 6 in (15.2 cm) tails.
Each fan sits on 12 sc. The fans share the sc between them, so the row works out to 121 = 1 + (10 x 12).
Edging Row 1 (Color A, conversion row):
– If needed, turn so the RS faces you.
– Ch 1, sc in the first dc.
– Sc in the ch-1 sp, sc in the next dc. Rep from * across.
– Count: 121 sc. This is 61 sc worked into dc plus 60 sc worked into spaces. No stitches are added.
– Fasten off.
Edging Row 2 (Color A, fan spokes):
– With the RS facing, join in the first sc. Ch 1, sc in the same sc.
– Ch 4, sk 5 sc.
– In the next sc, work (tr, ch 2) four times, then 1 more tr.
– Ch 4, sk 5 sc, sc in the next sc.
– Rep from * 10 times in total.
– Count: 10 fans. That is 50 tr, 40 ch-2 sps, 20 ch-4 sps and 11 sc.
– Fasten off.
Edging Row 3 (Color B, petals):
– Work each fan separately.
– Join Color B with a sl st in the first tr of a fan.
– Work a Petal in the next ch-2 sp, then sl st in the next tr. Rep from * 3 more times.
– Fasten off.
– Repeat for all 10 fans.
– Count per fan: 4 Petals (28 sts) and 5 sl sts.
– Total: 40 Petals (280 sts).
The 7-stitch Petal is crowded into a 2-chain space, so it cups forward. Do not stretch it flat. That cupping is the dimensional effect.
Edging Row 4 (Color A, outline):
– With the RS facing, join in the first sc of Edging Row 2. Ch 1, sc in the same sc.
– Work 4 sc in the ch-4 sp.
– Around each of the 4 Petals: sc in the hdc, sc in each of the next 2 dc, (sc, ch 2, sc) in the tr, sc in each of the next 2 dc, sc in the hdc. Skip the mauve sl sts between Petals.
– Work 4 sc in the next ch-4 sp, then sc in the next sc.
– Rep from * 10 times in total.
– Count per fan: 41 sc and 4 ch-2 tips.
– Total: 411 sc and 40 ch-2 tips.
– Fasten off.
How the Edging Row 4 count breaks down:
| Part | Stitches |
|---|---|
| 1 sc in each of the 280 Petal sts | 280 |
| Extra sc at the 40 Petal tips | 40 |
| 4 sc in each of the 20 ch-4 sps | 80 |
| 1 sc in each of the 11 sc | 11 |
| Total | 411 |
Check the size: each fan should span 3 in (7.6 cm) across and hang 3 in (7.6 cm) deep. Ten fans x 3 in = 30 in (76.2 cm), which matches the body width.
Border
The border goes up the right side, across the top and down the left side. The bottom fans are left unbordered.
Border gauge: 4 sc per inch, the same as the body’s 4 sts per inch. The border lies flat without stretching or gathering the mesh.
Border Row 1 (RS, Color A):
1. Join with a sl st in the row end of Edging Row 1 at the right edge. This sl st is not counted.
2. Right side: Work 2 sc in each of the 40 body row ends. That makes 80 sc.
3. Top-right corner: Work 3 sc in the base of the first foundation st.
4. Top: Work 1 sc in the base of each of the next 119 sts.
5. Top-left corner: Work 3 sc in the base of the last foundation st.
6. Left side: Work 2 sc in each of the 40 row ends. That makes 80 sc.
7. Sl st in the row end of Edging Row 1.
Count: 80 + 3 + 119 + 3 + 80 = 285 sc. Turn.
Border Row 2 (WS):
– Ch 1.
– Sc in each sc, working 3 sc in the center sc of each corner group.
– Sl st in the row end of Edging Row 1, then fasten off.
– Count: 283 sc worked one per stitch + 6 sc in the 2 corner centers = 289 sc.
Per side, that is: right side 81, corner 3, top 121, corner 3, left side 81.
Why the math works:
– Each body row is a dc row 0.5 in (1.3 cm) tall. Two sc per row end gives 4 sc per inch along the 20 in (50.8 cm) sides.
– The top takes one sc per foundation st. That is 121 sc across 30 in (76.2 cm), the same 4 sts per inch as the body.
– After Border Row 2, the top again holds exactly 121 sc, ready for the tabs.
Hanging Tabs (Color A):
The tabs use the 121 top sc of Border Row 2: 7 tabs of 7 sts each, with 6 gaps of 12 sts. That works out to (7 x 7) + (6 x 12) = 49 + 72 = 121.
- With the RS facing, join in the first top sc.
- Row 1: Ch 1, sc in the same st and in each of the next 6 sts. That makes 7 sc.
- Rows 2–16: Ch 1, turn, sc in each of the 7 sc.
- Fasten off, leaving a 12 in (30.5 cm) tail.
- Skip 12 sc, join in the next sc, and repeat for the next tab.
- Make 7 tabs in total.
Each tab is 1.75 in (4.4 cm) wide and 4 in (10.2 cm) long. The gaps between tabs are 3 in (7.6 cm).
To finish the tabs, fold each one to the WS. Whipstitch its last row to the base of Border Row 1. This forms a 2 in (5.1 cm) loop.
Final Blocking
- Weave in all ends. Weave mauve tails only through mauve stitches so they stay hidden.
- Soak the curtain in cool water for 10 minutes.
- Gently press out the water without wringing it.
- Lay it flat with the RS up and pin it to 31 in (78.7 cm) x 23.5 in (59.7 cm).
- Pin along one mesh row and one mesh column. Use a straight edge to keep the openings square.
- Pin each of the 40 ch-2 tips so the fans hang at an even 3 in (7.6 cm) depth.
- Do not flatten the Petals. Pinch each one so it cups forward again.
- Leave the curtain to dry completely before you unpin it.
Final Quality-Control Checklist
- [ ] 60 mesh squares in every row, 40 rows in total
- [ ] The body measures 30 in (76.2 cm) x 20 in (50.8 cm)
- [ ] 10 fans, each with 4 mauve Petals and a cream outline
- [ ] Edging Row 4 totals 411 sc with 40 tips
- [ ] Border Row 2 totals 289 sc, with 121 on the top
- [ ] 7 tabs, evenly spaced 3 in (7.6 cm) apart
- [ ] Finished size is 31 in (78.7 cm) x 23.5 in (59.7 cm)
- [ ] All ends are woven in securely
Troubleshooting
Mesh openings are rectangles, not squares.
Adjust the height of your dc stitches, or change hook size, and re-swatch.
The curtain narrows or widens.
Count your meshes. You have most likely missed or added a turning-chain stitch at a row end.
Fans flare or overlap.
Your tr are too loose. Tighten them, or check that you skipped exactly 5 sc on each side of every fan.
Petals lie flat.
Make sure all 7 Petal sts are worked into one ch-2 sp. Reshape them while they are damp.
The border ripples.
Use exactly 2 sc per row end. If your row gauge is off, re-block the body before adding the border.
Tabs pull the top edge.
Sew each tab only to the base of Border Row 1, not through the mesh.
Care
Hand wash in cool water with a mild soap. Reshape the curtain and lay it flat to dry, pinching the Petals back into their cupped shape.
Final Notes
The whole curtain depends on one measurement chain:
- A 4 in (10.2 cm) swatch confirms your gauge.
- That gives a 121-stitch top row 30 in (76.2 cm) wide.
- Forty rows bring the body to 20 in (50.8 cm).
- Ten 12-stitch fans add 3 in (7.6 cm) of hem.
- A 0.5 in (1.3 cm) border brings the size to 31 in (78.7 cm) x 23.5 in (59.7 cm).
- Seven tabs hang it.
Check each checkpoint as you reach it, and the cream mesh and mauve fans will come out the size you planned.
Optional: For a wider window, add meshes in multiples of 6 (12 sts). Each multiple gives you one more fan. Then re-space the tabs to fit the new top count.
Happy crocheting!