

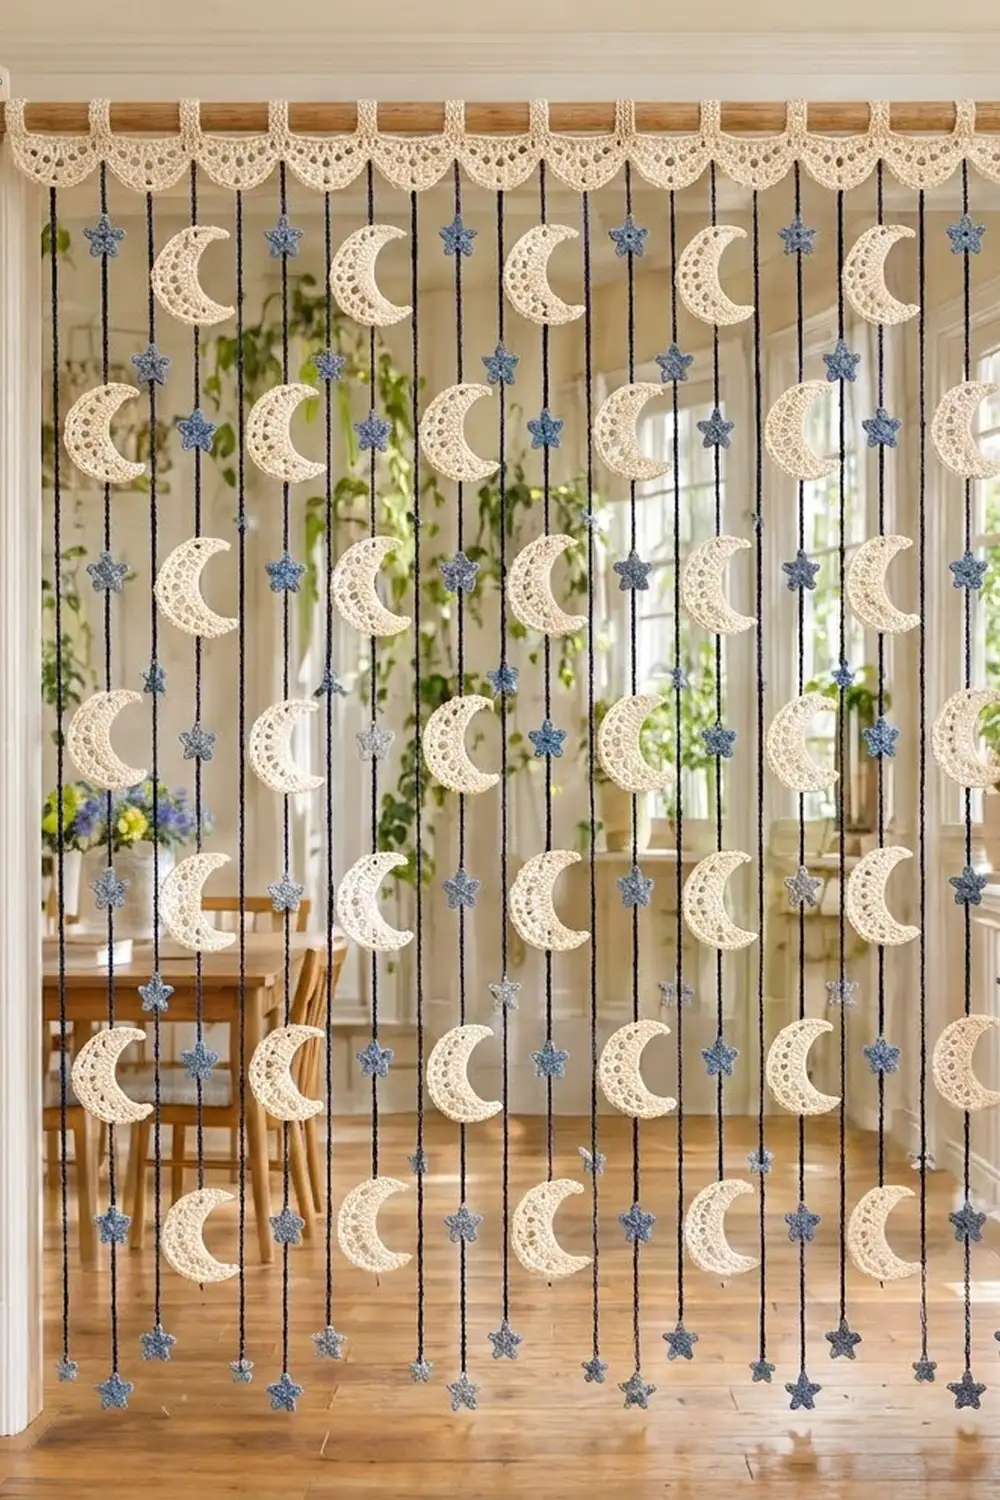
The Moonlit Path Doorway Curtain turns a plain doorway into a soft, starry screen. A lacy cream header with scalloped edges hangs from a wooden rod. Navy cords fall from it, carrying open-lattice crescent moons and small dusty-blue stars.
The palette is calm and inspired by the night sky: cream for the header and moons, navy for the cords, and dusty blue for the stars. The style is boho and suits a nursery, but it works just as well in a bedroom or reading nook.
This pattern uses US crochet terms. The finished curtain is 36.25 in (92.1 cm) wide. It hangs about 75 in (190.5 cm) from the top of the header to the lowest star.
The curtain is made in separate pieces. You crochet one header band in rows, add a scalloped border and 13 rod tabs, then make 24 cords, 42 moons and 108 stars. Last, you sew the cords to the scallops and stitch the moons and stars along the cords at measured heights.
Finished Size and Construction
- Finished size: 36.25 in (92.1 cm) wide x about 75 in (190.5 cm) long
- Skill level: Intermediate (simple stitches, lots of repetition, careful measuring)
- Terminology: US crochet terms
- Yarn weight: DK (#3) cotton
- Hook: 4.0 mm (G-6)
- Number of pieces: 1 header, 24 cords, 42 moons, 108 stars
- Layout: 24 cords in one row, alternating a moon cord and a star cord
- Piece sizes: moon 4.5 x 3 in (11.4 x 7.6 cm); star 1.75 in (4.4 cm); cord 72 in (182.9 cm)
- Header size before border: 36.25 x 1.5 in (92.1 x 3.8 cm)
- Border depth: 1.25 in (3.2 cm), for a total header depth of 2.75 in (7.0 cm), plus tabs
Materials
Choose a smooth mercerized or combed DK cotton. Cotton holds the moon shape well, does not stretch much under its own weight, and shows the lattice holes clearly. Avoid fluffy or very stretchy yarns, because the long cords will grow.
Quantities assume a DK cotton of about 115 m per 50 g ball:
- Cream (header and moons): 300 g / 690 m
- Navy (cords): 300 g / 690 m
- Dusty blue (stars): 150 g / 345 m
All quantities include a margin of about 25% for swatching, tails and gauge differences.
Tools:
- 4.0 mm (G-6) crochet hook
- Tapestry needle
- Stitch markers
- Sharp scissors
- Measuring tape
- Wooden dowel, 1 in (2.5 cm) diameter and at least 40 in (101.6 cm) long, with two brackets
- Blocking mats and rust-proof pins
- Spray bottle
Abbreviations (US Terms)
- ch: chain
- sl st: slip stitch
- sc: single crochet
- hdc: half double crochet
- dc: double crochet
- sk: skip
- sp: space
- st(s): stitch(es)
- tch: turning chain
- V-st: (dc, ch 1, dc) in the same stitch or space
Special stitch – back-bump slip stitch: Insert the hook into the bump on the back of the chain. Yarn over and pull through both the bump and the loop on the hook. Worked along a full chain, this makes a firm cord with a twisted look.
Gauge and Checkpoints
Gauge: 16 dc and 8 rows = 4 in (10.2 cm). Chain gauge: 10 ch = 2 in (5.1 cm).
Make one moon and one star before anything else. They take only minutes and show whether your gauge matches.
Checkpoints:
- Moon Row 1 (16 dc): 4 in (10.2 cm) long.
- Finished moon: 4.5 in (11.4 cm) tall, 3 in (7.6 cm) wide.
- Star after Round 1: 0.75 in (1.9 cm) across. Finished star: 1.75 in (4.4 cm) tip to tip.
- Header Row 1 (145 sts): 36.25 in (92.1 cm).
- First 50 ch of a cord: 10 in (25.4 cm).
If your pieces are too big, go down 0.5 mm in hook size. If they are too small, go up 0.5 mm. Recheck the test moon before you start the header, because the header is the longest single piece.
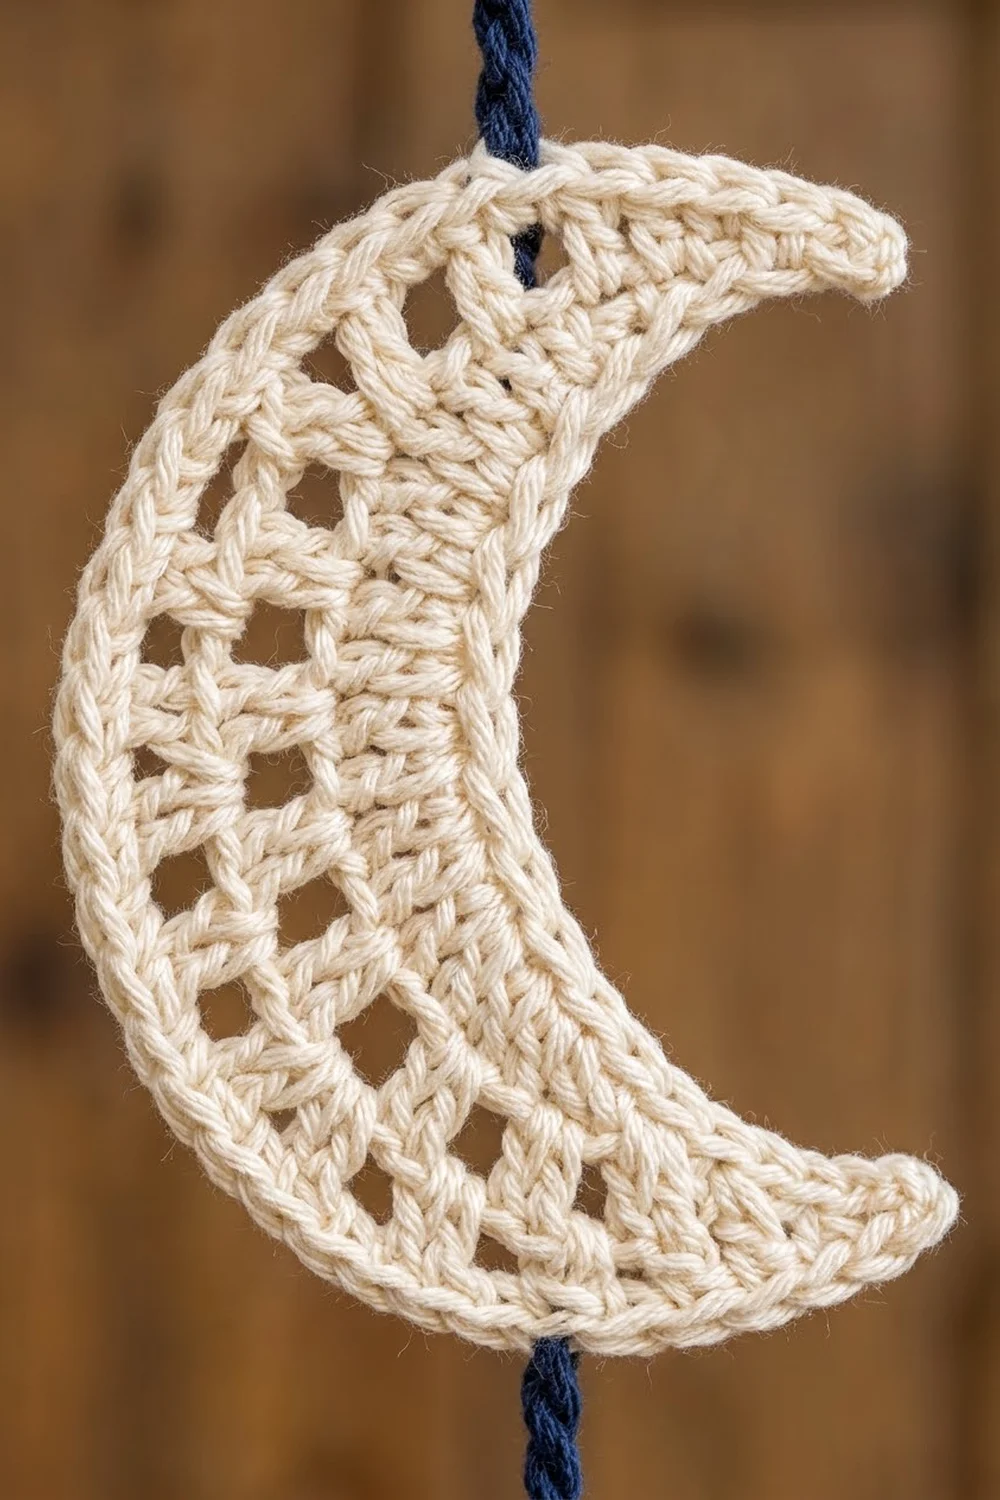
Moon (make 42, cream)
The moon is worked in 3 short rows and then edged all around. The outer rows grow with V-stitches while the inner row stays short, which forces the strip to curve into a crescent.
Row 1 (inner arc): Ch 18. Dc in 4th ch from hook and in each ch across. (16 dc; the tch counts as a dc)
Row 2 (first mesh row): Ch 1, turn. Sc in first 2 sts, hdc in next st, V-st in each of next 10 sts, hdc in next st, sc in last 2 sts. (26 sts and 10 ch-1 sps)
The 26 sts are 2 sc + 1 hdc + 20 dc + 1 hdc + 2 sc. The short sc at each end start the tapered tips.
Row 3 (second mesh row): Ch 1, turn. Sl st in first sc, sc in next sc, hdc in hdc, ch 1, V-st in ch-1 sp of next V-st; repeat from * 9 more times, ch 1, hdc in hdc, sc in next sc, sl st in last sc. (26 sts and 21 ch-1 sps)
The 21 spaces are 10 inside the V-stitches plus 11 between them. They form the radiating holes of the lattice.
Round 4 (edging):
- Ch 1, turn. Sc in each st and each ch-1 sp across Row 3. (47 sc on the outer curve)
- Working down the first tip, sc in the end of Row 2, then 2 sc in the end of Row 1.
- Working into the foundation chain, sc in the base of each of the 16 Row 1 sts. (16 sc on the inner curve)
- Mirror the first tip: 2 sc in the end of Row 1, then sc in the end of Row 2.
- Sl st to the first sc.
(69 sc: 47 + 3 + 16 + 3)
Fasten off, leaving a 12 in (30.5 cm) tail for sewing. The outer curve has nearly three times as many stitches as the inner curve, so the moon closes into a deep C shape with pointed tips.
Star (make 108, dusty blue)
Round 1: Make a magic ring. Ch 1, work 10 sc in the ring, pull the ring closed, sl st to first sc. (10 sc)
Round 2 (points): Ch 4, sc in 2nd ch from hook, hdc in next ch, dc in next ch, sk next sc of Round 1, sl st in following sc; repeat from * 4 more times. The last sl st lands in the joining st. (5 points of 3 sts each)
Fasten off, leaving an 8 in (20.3 cm) tail, and weave in the ring tail. The dc at the base of each point makes the points chunky and wide, like the stars in the photos.
Cord (make 24, navy)
Foundation: Ch 361.
Row 1: Back-bump sl st in 2nd ch from hook and in each ch across. (360 sl sts)
Fasten off, leaving an 8 in (20.3 cm) tail at the top end. The finished cord should measure 72 in (182.9 cm). If it is short, add ch and sl sts in multiples of 5 (1 in / 2.5 cm each).
Header Band (make 1, cream)
Foundation: Ch 147.
Row 1: Dc in 4th ch from hook and in each ch across. (145 sts; the tch counts as a dc) Checkpoint: 36.25 in (92.1 cm).
Row 2 (mesh): Ch 4 (counts as dc + ch 1), turn. Sk next st, dc in next st, ch 1, sk next st, dc in next st; repeat from * across. (73 dc and 72 ch-1 sps)
Row 3: Ch 3 (counts as dc), turn. Dc in each ch-1 sp and each dc across, ending with a dc in the 3rd ch of the tch. (145 dc: 73 + 72)
Checkpoint: the header now measures 36.25 x 1.5 in (92.1 x 3.8 cm). Do not fasten off. Work Border Rows 4–5 now (see Scalloped Border below), then come back and add the tabs.
Tabs (make 13): Turn the header so you can work into the foundation chain along the top edge. Counting from either edge of Row 1, the tab centers sit over sts 3, 13, 25, 37, 49, 61, 73, 85, 97, 109, 121, 133 and 143. The two end tabs sit flush with the edges.
For each tab, join cream with a sl st in the foundation ch 2 sts before the center st. For the end tabs, join in the edge st.
- Row 1: Ch 1, sc in same st and in next 4 sts. (5 sc)
- Rows 2–18: Ch 1, turn, sc in each st across. (5 sc)
Fasten off, leaving a 12 in (30.5 cm) tail. Each tab measures 1.25 x 3.6 in (3.2 x 9.1 cm). Don’t sew the tabs down yet.
Make All Pieces
Count your pieces before joining:
- Cream: 1 header with 13 tabs, 42 moons
- Navy: 24 cords
- Dusty blue: 108 stars (96 for the star cords, 12 for the moon-cord tips)
Layout grid (left to right; M = moon cord, S = star cord):
Scallop:  1     2     3     4     5     6     7     8     9    10    11    12
Cords:   M1 S  M2 S  M1 S  M2 S  M1 S  M2 S  M1 S  M2 S  M1 S  M2 S  M1 S  M2 S
All heights are measured from the top end of the cord:
- M1 (6 cords): 4 moons, with their tops at 6, 24, 42 and 60 in (15.2, 61.0, 106.7 and 152.4 cm), plus 1 star at the tip.
- M2 (6 cords): 3 moons, with their tops at 15, 33 and 51 in (38.1, 83.8 and 129.5 cm), plus 1 star at the tip.
- S (12 cords): 8 stars, centered at 9, 18, 27, 36, 45, 54, 63 and 72 in (22.9, 45.7, 68.6, 91.4, 114.3, 137.2, 160.0 and 182.9 cm).
Moons on neighboring moon cords are 9 in (22.9 cm) apart vertically, so they zigzag across the curtain as in the photos. Moons: 6 x 4 + 6 x 3 = 42. Stars: 12 x 8 + 12 x 1 = 108.
Joining
Finish the scalloped border before you attach the cords, because the cords hang from Border Row 5.
Cords to header: Each scallop has 19 sc in Border Row 5.
- Sew a moon cord behind the 4th sc of the scallop, above the 2nd dc of the fan.
- Sew a star cord behind the 16th sc, above the 6th dc of the fan.
- Overlap the top 1 in (2.5 cm) of each cord onto the wrong side of the fan. Whipstitch through the back loops only, so the stitches don’t show on the front.
This spaces the cords 1.5 in (3.8 cm) apart all the way across: each 3 in (7.6 cm) scallop carries 2 cords.
Moons to cords: Lay each moon face up with its tips pointing right, as in the photos. Run the cord behind the moon, down the center of the lattice. Using the cream tail, tack the cord to the back of the inner arc with 2 stitches and to the back of the outer edge with 2 stitches. Keep the tension firm but not tight, so the cord hangs straight.
Stars to cords: Center each star on its cord and tack it through the Round 1 stitches from the back, using the blue tail. For tip stars, tuck the cord end behind the star and sew it down securely.
Size checkpoint: Hang the curtain. Every cord should hang 71 in (180.3 cm) below the scallop it is sewn to. Shorten or lengthen any cord that is off by more than 0.5 in (1.3 cm).
Scalloped Border
Border gauge: Each 12-st repeat of Row 3 equals 3 in (7.6 cm) and becomes one scallop 1.25 in (3.2 cm) deep.
Border Row 4 (fans): Ch 1, turn. Sc in first st, sk 5 sts, (dc, ch 1) 6 times in next st, dc in same st, sk 5 sts, sc in next st; repeat from * 11 more times. (12 fans of 7 dc and 6 ch-1 sps each, plus 13 sc)
Border Row 5 (edging): Ch 1, turn. Sc in first sc, (sc in next dc, 2 sc in next ch-1 sp) 6 times, sc in last dc of fan, sc in next sc; repeat from * 11 more times. Fasten off. (241 sc: 1 + 12 x 20)
Each scallop has 19 sc (7 + 12), plus 1 sc where it meets the next scallop. The 13 sc of Row 4 sit at the scallop junctions and line up with the 13 tabs.
Why the math works: Row 3 has 145 sts, which is 12 x 12 + 1. Each repeat uses 12 sts: 1 sc, 5 skipped, 1 fan st and 5 skipped. The extra 1 st is the final sc. No stitches are added or lost at the edges, so the border keeps the header’s 36.25 in (92.1 cm) width.
Final Blocking
- Weave in all ends except the tab tails.
- Pin the header flat to 36.25 x 2.75 in (92.1 x 7.0 cm), opening each fan into an even arc.
- Pin each moon to 4.5 x 3 in (11.4 x 7.6 cm) and open the lattice holes.
- Pin the star points straight.
- Mist everything with water until damp, then let it dry completely.
- Hang each cord with a light weight at the bottom for a few hours to relax the twist.
- Fold each tab over the rod to the back of the header and sew its last row to header Row 2.
Final Quality-Control Checklist
- The header is 36.25 in (92.1 cm) wide, with 12 scallops and 13 tabs.
- All 42 moons curve into matching C shapes with their tips facing right.
- All 108 stars have 5 even points.
- The 24 cords alternate moon and star, with no two of the same type side by side.
- Moon heights alternate between M1 and M2 cords.
- Every cord hangs 71 in (180.3 cm) below the header.
- No ends show from the front.
Troubleshooting
- The moon is flat, not curved: Row 1 is too loose. Work Row 1 only with a hook one size smaller.
- The moon ruffles: Your V-stitches are too tall. Work Rows 2–3 with a smaller hook.
- Star points curl: Block the stars flat and pin each point.
- The header is too long: Start the chain again with a smaller hook. Never drop stitches, because the 145-st count must stay the same.
- Cords twist around each other: Hang a light weight on each cord and steam lightly.
- Tabs are too tight on the rod: Add 2 rows to each tab before sewing.
Care
Hand wash in cool water with mild soap, roll the curtain in a towel to remove water, and dry it flat with the cords laid straight. Between washes, dust it lightly with a soft brush.
Final Notes
The measurements build on each other. A 4 in (10.2 cm) moon Row 1 confirms your gauge. 145 sts then give a 36.25 in (92.1 cm) header. Twelve 3 in (7.6 cm) scallops carry 24 cords spaced 1.5 in (3.8 cm) apart. Each 72 in (182.9 cm) cord gives a total length of about 75 in (190.5 cm). If every checkpoint matches, the curtain will hang straight and even in your doorway.
Happy crocheting!