

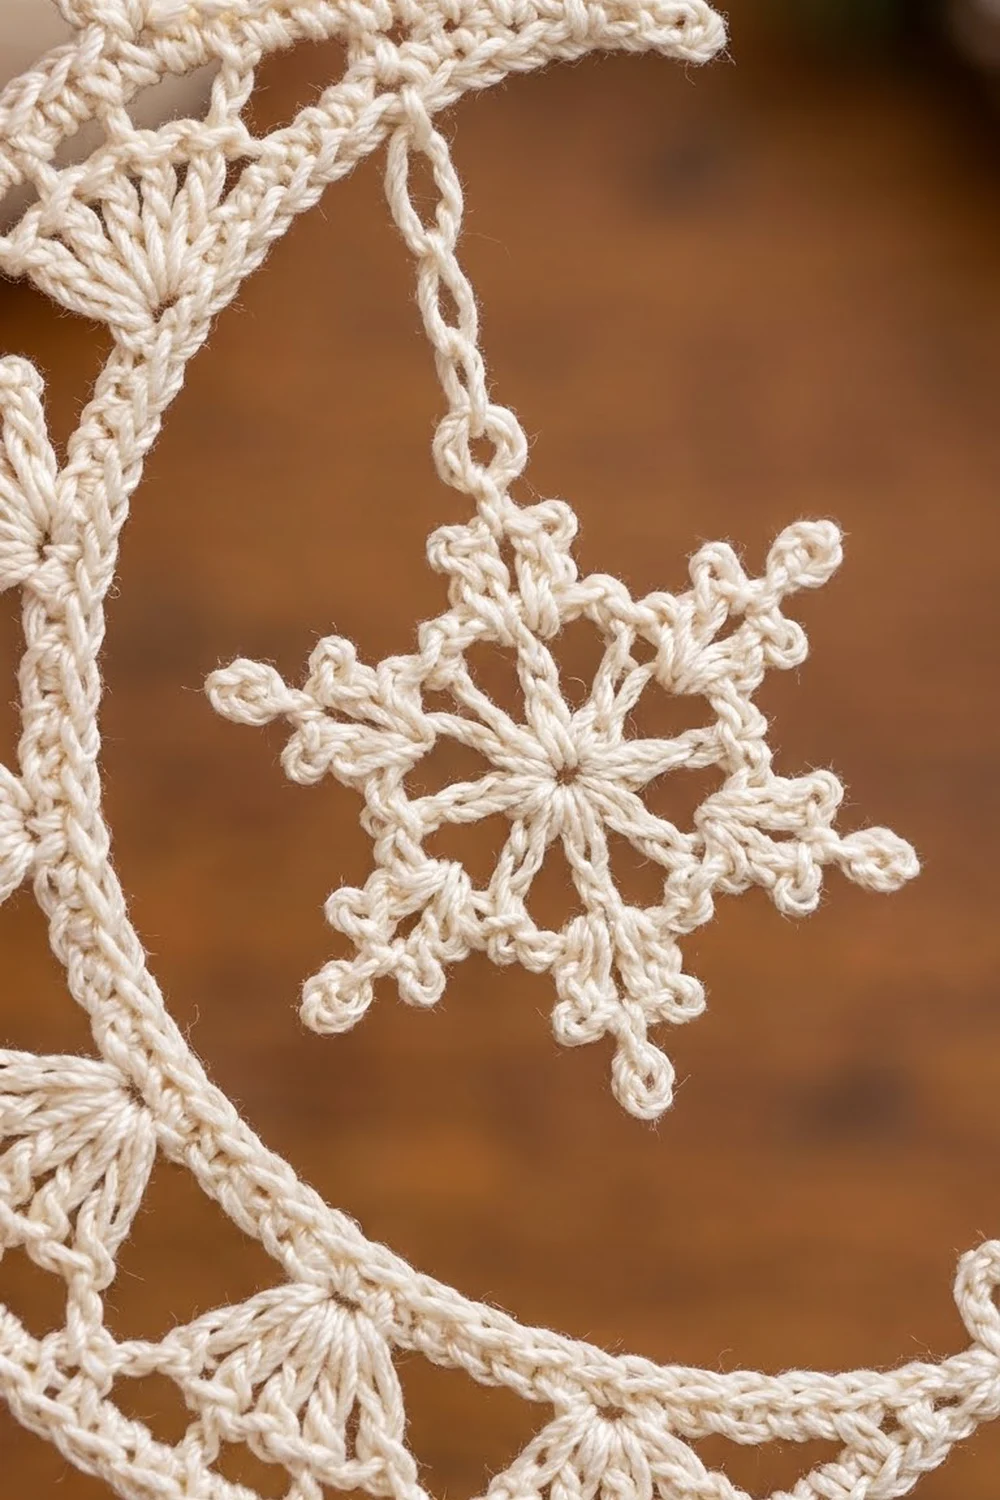
This delicate crescent moon ornament has a tiny snowflake hanging inside its curve. The outer arc is a smooth, solid line of single crochet. The inside of the moon is filled with a band of six treble fans with small triangular windows between them. A short chain under the upper horn holds the snowflake, a hanging loop sits at the top of the moon, and a little trefoil finishes the lower tip.
The ornament is worked in one color, ivory or cream size 10 crochet thread. That gives it the look of classic thread lace that suits a traditional tree, a window, or a gift tag.
All instructions use US crochet terms. The crescent measures 3.5 in (8.9 cm) tall and 2.2 in (5.6 cm) wide. The snowflake is 1.5 in (3.8 cm) across. With the hanging loop, the ornament hangs 4.3 in (10.9 cm) tall.
The crescent is worked flat in four short rows. You start with the inner arc, add the fan row, and then build the outer arc on top. The longer outer edge makes the band curve naturally. You crochet the snowflake separately in the round. A single border round then outlines the whole crescent, adds the hanging loop and trefoil, and attaches the snowflake by a chain.
Finished Size and Construction
- Finished size: crescent 3.5 in (8.9 cm) tall x 2.2 in (5.6 cm) wide; hanging height with loop 4.3 in (10.9 cm)
- Skill level: Intermediate (thread work, small stitches)
- Terminology: US
- Yarn weight: size 10 crochet thread (Lace / 0)
- Hook: 1.75 mm steel hook
- Number of pieces: 1 ornament made of 2 components (crescent + snowflake) joined by a chain
- Layout: snowflake hangs inside the crescent’s hollow from a chain under the upper horn
- Piece size: snowflake 1.5 in (3.8 cm) across
- Crescent size before border: 3.3 in (8.4 cm) tall x 2 in (5.1 cm) wide; band 0.6 in (1.5 cm) deep at its widest
- Border depth: 0.1 in (0.3 cm) on each edge
Materials
Choose a mercerized cotton thread in size 10. Mercerized cotton holds crisp stitch definition and takes starch well. Avoid fuzzy or very soft threads, because they blur the fan windows.
- Ivory/cream size 10 thread: about 4 g (approx. 22 m) per ornament
- 1.75 mm steel crochet hook
- Fine tapestry needle
- Small sharp scissors
- Fabric starch or a 1:1 mix of white glue and water
- Foam blocking board and rustproof pins
- Plastic wrap to cover the board (optional)
The quantity above includes about a 20% margin for swatching, the tails and the starching trial.
Abbreviations (US Terms)
- ch – chain
- sl st – slip stitch
- sc – single crochet
- dc – double crochet
- tr – treble crochet
- sk – skip
- sp(s) – space(s)
- st(s) – stitch(es)
- RS – right side
Special stitches
- Picot: ch 3, sl st in 3rd ch from hook.
- Fan: 7 tr in the same stitch.
- Trefoil: ch 3 (stem), [ch 4, sl st in 4th ch from hook] 3 times, sl st in each of the 3 stem ch.
Gauge and Checkpoints
Gauge: 10 sc = 1 in (2.5 cm) in size 10 thread with a 1.75 mm hook. A tr in this thread is about 0.3 in (0.8 cm) tall.
The ornament is small, so the most reliable gauge test is to make the crescent through Row 1 and measure it.
Checkpoints:
- After Row 1: the strip of 39 sc measures 3.9 in (9.9 cm) long.
- After Row 2: the fans stand about 0.3 in (0.8 cm) tall, and the strip starts to curve.
- After Row 4: the outer edge measures 6.3 in (16.0 cm) along the curve, the inner edge 3.9 in (9.9 cm). The crescent is 3.3 in (8.4 cm) tall.
- Snowflake after Round 3: 0.75 in (1.9 cm) across.
- Finished snowflake: 1.5 in (3.8 cm) across, tip to tip.
If your Row 1 is longer than 3.9 in (9.9 cm), go down to a 1.5 mm hook. If it’s shorter, try a 2.0 mm hook. Don’t change the stitch counts: the fan placement and the curve depend on them.
Crescent
The crescent is worked flat, turning at the end of each row. The turning ch-1 never counts as a stitch.
Row 1 (inner arc): Ch 40. Sc in 2nd ch from hook and in each ch across. Turn. (39 sc)
Leave a 4 in (10.2 cm) starting tail. The end where you began is Tip A, and it becomes the upper horn. The other end is Tip B, the lower horn.
Row 2 (fan row): Ch 1. Sc in each of the first 2 sc, then work the fans:
- [Sk 2 sc, fan in next sc, sk 2 sc, sc in next sc] 5 times.
- Sk 2 sc, fan in next sc, sk 2 sc, sc in each of the last 2 sc.
- Turn.
(6 fans = 42 tr, plus 9 sc = 51 sts)
Check the stitch use: 2 + (6 x 5) + 5 + 2 = 39. Each fan sits on one sc, with its point on the inner arc and its tr spreading outward. The single sc between fans stays low, which leaves a V-shaped gap between neighboring fans.
Row 3 (outer arc chain): Ch 1. Work across as follows:
- Sc in the first sc.
- Ch 2, sk next sc, then sc in each of the 7 tr of the first fan.
- [Ch 3, sk the sc between fans, sc in each of the 7 tr of the next fan] 5 times.
- Ch 2, sk next sc, sc in the last sc.
- Turn.
(44 sc + 19 ch = 63 sts)
The breakdown is 1 + 2 + 7 + (5 x (3 + 7)) + 2 + 1 = 63. Each ch-3 bridges the top of one V-gap, which closes it into the open triangular window between fans. The ch-2 at each end shapes the tapered tips.
Row 4 (outer arc): Ch 1. Sc in each sc and in each ch across. Do not turn and do not fasten off. (63 sc)
You are now at Tip A. The outer edge holds 63 sts on 39 inner sts, so the band curves into a crescent. Lay it flat and check it against the checkpoint: 3.3 in (8.4 cm) tall and 2 in (5.1 cm) wide.
Put a removable marker in the 10th sc of Row 4 counted from Tip A, which is the 54th sc counted from Tip B. That marks where the hanging loop goes.
Park your loop on a stitch marker and make the snowflake before working the border.
Snowflake
Work in joined rounds with the RS facing. Don’t turn.
Round 1: Ch 6, sl st to the first ch to form a ring. Ch 1, 12 sc in the ring. Sl st to the first sc. (12 sc)
Round 2: Ch 1, sc in the same st. Ch 3, sk 1, then [sc in next sc, ch 3, sk 1] 5 times. Sl st to the first sc. (6 sc, 6 ch-3 sps)
Round 3: Sl st into the first ch-3 sp. Ch 3 (counts as dc), then (dc, ch 2, 2 dc) in the same sp. In each of the remaining 5 ch-3 sps, work (2 dc, ch 2, 2 dc). Sl st to the top of the beginning ch-3. (24 dc, 6 ch-2 sps)
Checkpoint: the snowflake measures 0.75 in (1.9 cm) across.
Round 4 (arms): Sl st in the next dc and into the first ch-2 sp. Then work each arm and the space after it:
Arm:
- Sc in the ch-2 sp and ch 8.
- Sl st in the 4th ch from hook to make the tip ring.
- Picot.
- Sl st in each of the next 2 ch of the stem.
- Picot.
- Sl st in each of the last 2 ch of the stem.
- Sc in the same ch-2 sp.
Between arms: Ch 2, sk 2 dc, sc in the gap between the two 2-dc groups, picot, ch 2, sk 2 dc.
Work the arm and the between-arms sequence in each of the 6 ch-2 sps. Sl st to the first sc and fasten off. (6 arms, 6 tip rings, 12 arm picots, 6 small picots between arms)
Each arm is a 4-ch stem topped by a 4-ch ring tip, with a picot near the tip and another halfway down. The small picot between arms gives the six inner points. The snowflake measures 1.5 in (3.8 cm) across. Weave in the tails now, because they are hard to reach after joining.
Border (Joins the Snowflake)
Border gauge: the border is plain sc at 10 sc = 1 in (2.5 cm), worked 1 sc into each existing stitch along the long edges.
Put the crescent’s loop back on your hook. You are at Tip A, at the end of Row 4, with the RS facing. Work one round all the way around the crescent:
Tip A side: Turn the work so you are working into the row ends. Work 3 sc evenly across the 4 row-ends of Tip A. (3 sc)
Inner edge (Tip A to Tip B): Work 1 sc into each of the 39 foundation-chain loops of Row 1. (39 sc) The snowflake goes in after the 6th sc:
- After the 6th inner-edge sc, ch 8.
- With the RS of the snowflake facing you, sl st into the tip ring of any arm.
- Sl st in each of the 8 ch back up to the crescent.
- Continue with the 7th sc.
The chain is 0.6 in (1.5 cm) long and isn’t counted in the sc total.
Tip B side: Sc in the first of the 4 row-ends, then work the trefoil. Sc in the next row-end, then sc across the last 2 row-ends. (3 sc + trefoil) The trefoil stem points outward and its three rings fan out at the lower tip. Work the 3 sc evenly so the tip doesn’t flare.
Outer edge (Tip B to Tip A): Sc in each of the 63 sc of Row 4. (63 sc) At the marked 54th sc, work (sc, ch 20, sl st in the same sc) and count it as one sc. The ch-20 loop hangs 0.8 in (2.0 cm) above the crescent.
Sl st to the first border sc and fasten off, leaving a tail for weaving.
Border total: 3 + 39 + 3 + 63 = 108 sc, plus the trefoil, the snowflake chain and the hanging loop.
Why the math works: each long edge gets exactly 1 sc per existing stitch: 39 on 39 inside and 63 on 63 outside. The border therefore keeps the same 63:39 ratio that built the curve, so it neither flattens nor tightens the crescent. Across the tips, 3 sc over 4 short sc row-ends pulls them in slightly into neat points. The border adds 0.1 in (0.3 cm) to each edge. That brings the crescent from 3.3 in (8.4 cm) to 3.5 in (8.9 cm) tall and from 2 in (5.1 cm) to 2.2 in (5.6 cm) wide. The band grows from 0.6 in (1.5 cm) to 0.8 in (2.0 cm) at its widest point.
Final Blocking
Thread lace needs blocking to show the windows and the snowflake arms.
- Weave in all remaining tails along the outer arc, where they hide inside the solid sc.
- Soak the ornament in starch solution for 1 minute. Gently squeeze out the excess without wringing.
- Cover the foam board with plastic wrap and lay the crescent flat, RS up.
- Pin both tips first, then the top and bottom of the outer arc. Check that it measures 3.5 in (8.9 cm) tall and 2.2 in (5.6 cm) wide.
- Pin the outer edge of each fan so all 6 fans sit evenly. Open each triangular window by pinning through its ch-3 bridge.
- Lay the snowflake inside the hollow with its chain straight. Pin the center first, then each tip ring, spacing the six arms evenly to 1.5 in (3.8 cm) across.
- Pin each picot and the three trefoil rings open.
- Pin the hanging loop into a neat teardrop.
- Let it dry completely, usually overnight, before unpinning.
Final Quality-Control Checklist
- Row 1 has 39 sc, and Row 2 has 6 fans of 7 tr each with 9 sc.
- Rows 3 and 4 each have 63 sts. There are 5 ch-3 windows and 1 ch-2 at each end.
- Border: 3 + 39 + 3 + 63 = 108 sc.
- The crescent is 3.5 in (8.9 cm) tall and 2.2 in (5.6 cm) wide and lies flat.
- The snowflake has 6 arms, each with a tip ring and 2 picots, plus 6 small picots between arms.
- The snowflake hangs on an 8-ch chain from the 6th inner-edge sc and doesn’t touch the crescent.
- The hanging loop sits on the 10th outer sc from Tip A, and the trefoil is at Tip B.
- All tails are woven in and trimmed close.
- The ornament is stiff, dry and hangs straight.
Troubleshooting
Crescent ruffles along the outer edge: you probably added stitches in Row 4 or the border. Recount to 63.
Crescent curls into a cup: your chains are tighter than your sc. Work the ch-3 bridges in Row 3 a little looser, or chain with a hook one size up.
Fans overlap or crowd: check that you skipped exactly 2 sc on each side of every fan in Row 2.
Windows look closed: pin through each ch-3 bridge while blocking.
Snowflake cups: Round 3 is too tight. Rework it with a slightly looser tension.
Ornament hangs crooked: move the hanging loop one sc toward Tip A or Tip B until it balances.
Tips flare: work only 3 sc across the tip row-ends, never 4.
Care
Spot clean only with a damp cloth. If the ornament softens over time, re-starch and re-block it. Store it flat in tissue paper so the arms and picots don’t crush.

Final Notes
The measurement chain is short and reliable:
- 39 sc inner arc = 3.9 in (9.9 cm).
- 6 fans carry the edge out to a 63-st outer arc = 6.3 in (16.0 cm), which makes the curve.
- The 108-sc border adds 0.1 in (0.3 cm) per edge, for a 3.5 in (8.9 cm) crescent.
- The 1.5 in (3.8 cm) snowflake hangs on its 0.6 in (1.5 cm) chain inside the hollow.
- The 0.8 in (2.0 cm) loop on top brings the total to 4.3 in (10.9 cm).
If Row 1 matches gauge, every later stage will fall into place. Make one, starch it, and you’ll probably want a whole sky of them for the tree.
Happy crocheting!