

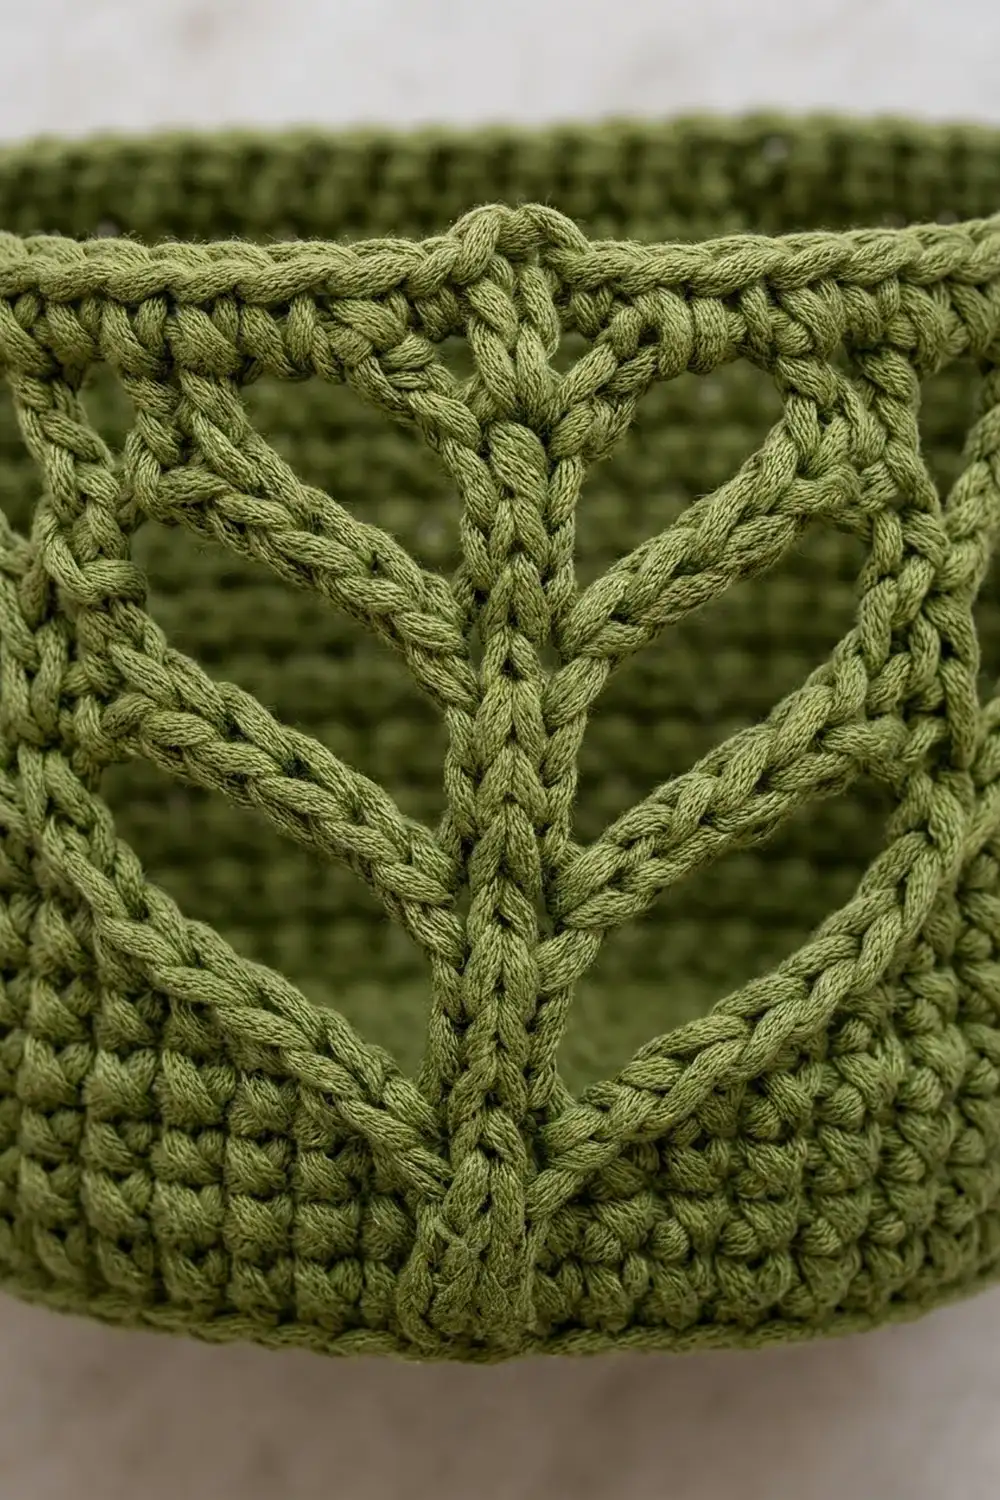
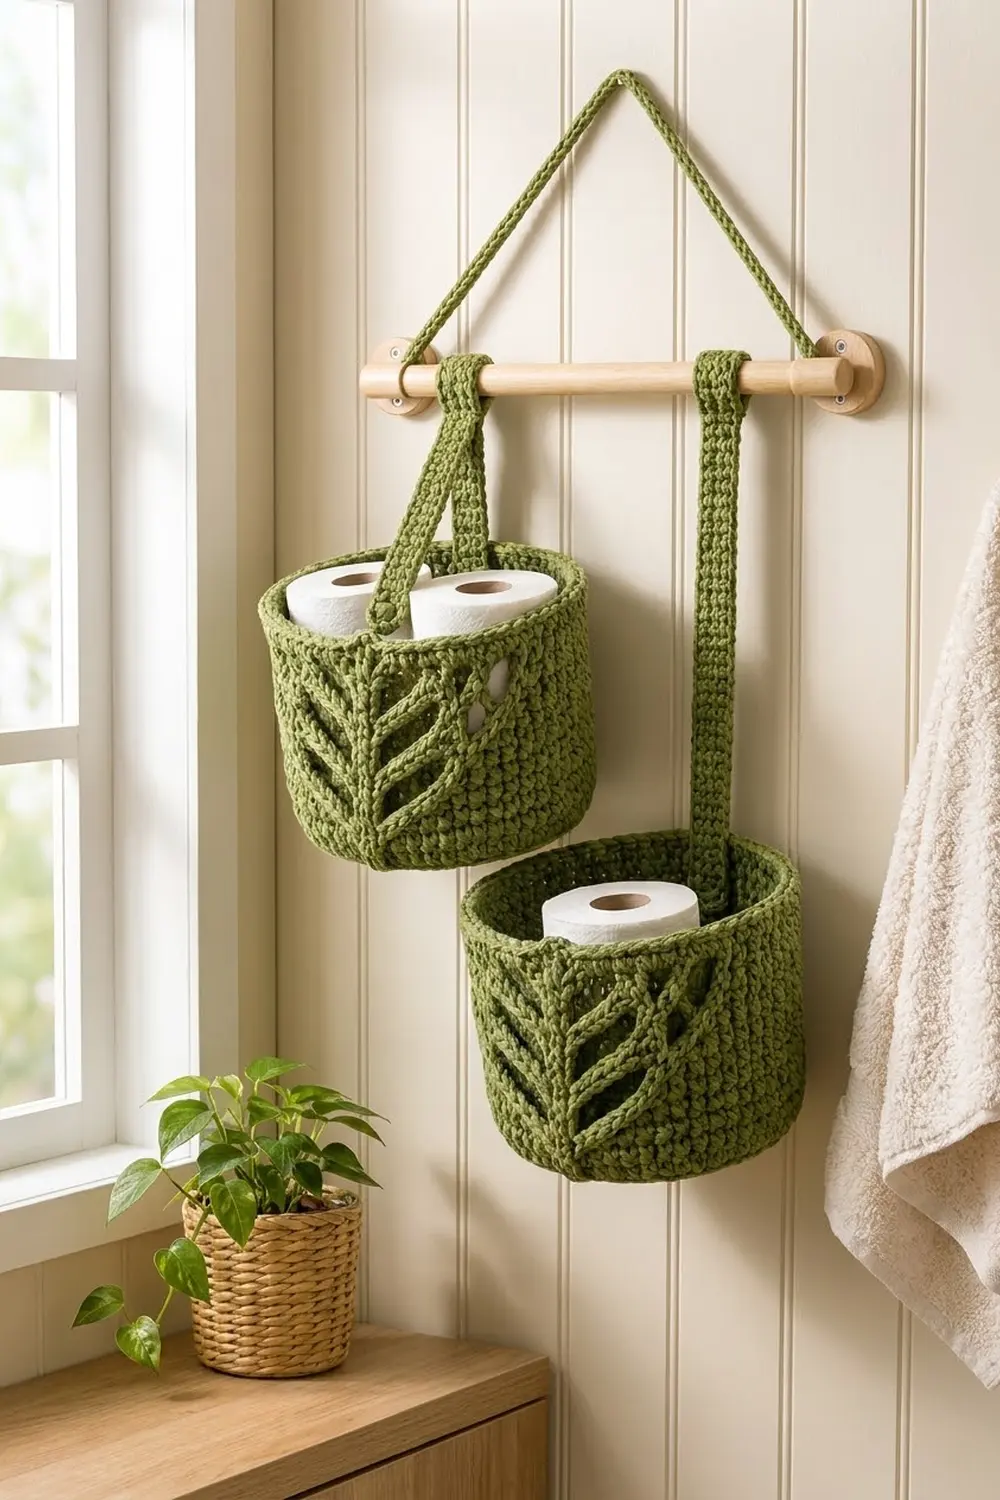
The Mossleaf Hanging Basket Duo is a pair of oval baskets in moss green. They hang at two heights from a wooden dowel, and each one has a raised leaf on the front and back. The leaf is a firm central spine with slanted openings that fan upward from it like veins. The rest of the basket is dense single crochet, so the baskets keep their shape even when full of toilet paper rolls.
The style is simple, natural and Scandinavian. The pattern uses US crochet terms throughout.
Each basket measures about 10 in (25.4 cm) long, 6 in (15.2 cm) wide and 5 in (12.7 cm) tall. Each one holds two standard toilet rolls side by side.
Construction is simple. You work an oval base in rounds, then a back-loop round that turns the edge up into the walls. Next come a solid band, the openwork leaf band and another solid band, and a reverse-single-crochet rim finishes the top. Flat strips with eyelets button onto the rims and slide onto the dowel. An optional cord lets you hang the whole set from one hook.
Finished Size and Construction
- Basket size: 10 in × 6 in × 5 in (25.4 × 15.2 × 12.7 cm)
- Skill level: Intermediate
- Terminology: US
- Yarn weight: Bulky (#5) cotton or cotton blend
- Hook: 5.5 mm (I-9)
- Number of pieces: 7 (2 baskets, 4 strips, 1 cord)
- Layout: 2 baskets hung at staggered heights on one 16 in (40.6 cm) dowel
- Base size before walls: 9.75 in × 5.75 in (24.8 × 14.6 cm)
- Wall height before rim: 4.4 in (11.2 cm)
- Rim (border) depth: about 0.3 in (0.8 cm)
Materials
Choose a firm bulky cotton or cotton-blend yarn. Cotton holds its shape better than acrylic and doesn’t stretch much under the weight of the rolls.
- Moss Green: 320 g (approx. 350 m)
- Baskets: about 110 g each
- Strips: about 30 g total
- Cord: about 15 g
These quantities include a margin of about 20% for gauge swatches and differences in tension.
Tools and hardware:
– 5.5 mm (I-9) crochet hook
– 4 locking stitch markers
– Tapestry needle
– 4 wooden buttons, 1.25 in (3.2 cm)
– Wooden dowel, 16 in (40.6 cm) long and 3/4 in (1.9 cm) thick
– 2 round wall brackets with screws and anchors (optional if you use the cord)
– Measuring tape
– Pins and a spray bottle for blocking
Abbreviations (US Terms)
- ch – chain
- sl st – slip stitch
- sc – single crochet
- dc – double crochet
- BLO – back loop only
- FPdc – front post double crochet
- rev sc – reverse single crochet (crab stitch)
- sk – skip
- sp – space
- st(s) – stitch(es)
Special stitch: rev sc. Working from left to right, insert your hook into the next stitch to the right. Yarn over, pull up a loop, yarn over and pull through both loops on the hook. This makes a rolled, corded edge.
Chain rule in the leaf band: each ch counts as 1 st, so a “ch 2, sk 2” replaces 2 sts. On the next round, if a dc falls over a ch, work it into that ch-2 sp. You work 1 dc into the space for each ch you cover.
Gauge and Checkpoints
- Single crochet: 13 sc × 14 rows = 4 in (10.2 cm)
- Double crochet: 13 dc = 4 in (10.2 cm). One round of dc is about 0.55 in (1.4 cm) tall.
Make one complete basket before you start the second one. It’s your full-size test piece.
Checkpoints:
– After Rnd 5: about 6.9 × 2.9 in (17.5 × 7.4 cm)
– After Rnd 10: 9.75 × 5.75 in (24.8 × 14.6 cm). The circumference is about 26.5 in (67.3 cm).
– After Rnd 14: the wall is 1.1 in (2.8 cm) tall
– After Rnd 18: the wall is 3.3 in (8.4 cm) tall
– After Rnd 22: the wall is 4.4 in (11.2 cm) tall
If your base is too big, go down to a 5 mm hook. If it is too small or ruffles, go up to a 6 mm hook. Don’t change the stitch counts, because the leaf layout depends on exactly 86 sts.
Basket (Make 2)
Oval Base
The base starts on a foundation chain. Each round adds 6 sts, all of them at the two curved ends (3 at each end). The 13-st straight sides stay the same.
Ch 16.
Rnd 1: 3 sc in 2nd ch from hook, sc in next 13 ch, 3 sc in last ch. Rotate the work and sc in the 13 ch on the underside. Join with sl st to first sc. (32 sts: 3 per end, 13 per side)
Ch 1 at the start of every round. It does not count as a stitch.
Rnd 2: [2 sc in each of next 3 sts, sc in next 13] twice. (44 sts)
Wait, this count needs checking against the 6-per-round rule, so here is the corrected version:
Rnd 2: [sc in next st, 2 sc in next st, sc in next st, sc in next 13] — this adds only 1 per end, which is not enough. Use the rule below instead.
Use this rule for Rnds 2–10. On each end group, spread 3 increases evenly, so each end grows by 3 sts per round and the round total grows by 6.
- Rnd 2: [(2 sc in next st) 3 times, sc in next 13] twice. (38 sts: 6 per end, 13 per side)
- Rnd 3: [(sc in next st, 2 sc in next st) 3 times, sc in next 13] twice. (44 sts: 9 per end)
- Rnd 4: [(sc in next 2 sts, 2 sc in next st) 3 times, sc in next 13] twice. (50 sts: 12 per end)
- Rnd 5: [(sc in next 3 sts, 2 sc in next st) 3 times, sc in next 13] twice. (56 sts: 15 per end)
- Rnd 6: [(sc in next 4 sts, 2 sc in next st) 3 times, sc in next 13] twice. (62 sts: 18 per end)
- Rnd 7: [(sc in next 5 sts, 2 sc in next st) 3 times, sc in next 13] twice. (68 sts: 21 per end)
- Rnd 8: [(sc in next 6 sts, 2 sc in next st) 3 times, sc in next 13] twice. (74 sts: 24 per end)
- Rnd 9: [(sc in next 7 sts, 2 sc in next st) 3 times, sc in next 13] twice. (80 sts: 27 per end)
- Rnd 10: [(sc in next 8 sts, 2 sc in next st) 3 times, sc in next 13] twice. (86 sts: 30 per end, 13 per side)
Check the total: 30 + 13 + 30 + 13 = 86. Lay the base flat and measure it against the checkpoint.
Walls
Rnd 11 (turning round): sc in BLO of each st around. (86 sts) This leaves a crisp ridge, and the wall starts to rise from here.
Rnds 12–14: sc in each st around. (86 sts) Fasten off at the end of Rnd 14.
Reposition: count 15 sts into the end group where your rounds started. That is the center of this end. Rejoin the yarn in the next st (st 16). Each wall round from here is made of 2 halves of 43 sts:
- 7 filler sts
- 29 leaf-panel sts (14 left, 1 spine, 14 right)
- 7 filler sts
Each spine sits exactly over the center (the 7th st) of a 13-st straight side.
Leaf Band (Rnds 15–18)
Ch 2 at the start of each round. It does not count as a stitch. Join with sl st to the first dc. The spine stitch is always an FPdc, worked around the stitch directly below.
Work each round as [half] twice. The half is listed in this order: filler, left side (outer edge to spine), spine, right side (spine to outer edge), filler.
Rnd 15: dc 7; dc 2, ch 2 sk 2, dc 2, ch 2 sk 2, dc 2, ch 2 sk 2, dc 2; FPdc; dc 2, ch 2 sk 2, dc 2, ch 2 sk 2, dc 2, ch 2 sk 2, dc 2; dc 7.
(60 dc, 2 FPdc, 12 ch-2 sps = 86 sts)
Rnd 16: dc 7; dc 1, ch 2 sk 2, dc 2, ch 2 sk 2, dc 2, ch 2 sk 2, dc 3; FPdc; dc 3, ch 2 sk 2, dc 2, ch 2 sk 2, dc 2, ch 2 sk 2, dc 1; dc 7.
(60 dc, 2 FPdc, 12 ch-2 sps = 86 sts)
Rnd 17: dc 7; ch 2 sk 2, dc 2, ch 2 sk 2, dc 2, ch 2 sk 2, dc 2, ch 2 sk 2; FPdc; ch 2 sk 2, dc 2, ch 2 sk 2, dc 2, ch 2 sk 2, dc 2, ch 2 sk 2; dc 7.
(52 dc, 2 FPdc, 16 ch-2 sps = 86 sts)
Rnd 18: dc 7; dc 3, ch 2 sk 2, dc 2, ch 2 sk 2, dc 2, ch 2 sk 2, dc 1; FPdc; dc 1, ch 2 sk 2, dc 2, ch 2 sk 2, dc 2, ch 2 sk 2, dc 3; dc 7.
(60 dc, 2 FPdc, 12 ch-2 sps = 86 sts)
Each side always adds up to 14. On every round, the openings move 1 st farther from the spine. This turns the solid bars between them into slanted veins that rise outward from the spine, which is what forms the chevron leaf.
Upper Wall
Rnd 19: ch 1, sc in each dc and FPdc, and 2 sc in each ch-2 sp. (86 sts)
Rnds 20–22: sc in each st around. (86 sts)
Make All Pieces
| Piece | Qty | Color | Approx. yarn |
|---|---|---|---|
| Basket | 2 | Moss Green | 110 g each |
| Short strip | 2 | Moss Green | 6 g each |
| Long strip | 2 | Moss Green | 9 g each |
| Cord | 1 | Moss Green | 15 g |
Strips
Each strip is 3 sts wide and worked in rows.
- Short strip (make 2): Ch 4. Row 1: sc in 2nd ch from hook and next 2 ch, turn. (3 sts) Rows 2–28: ch 1, sc 3, turn. The body is 8 in (20.3 cm) long.
- Long strip (make 2): work the same way to Row 49. The body is 14 in (35.6 cm) long.
Eyelets (both ends of every strip):
1. At the end of the last row, ch 10 and sl st into the first sc of that row to make a loop.
2. Work 16 sc into the loop and sl st to the last sc.
3. Join the yarn at the foundation edge and repeat.
Each eyelet is about 1.5 in (3.8 cm) across on the outside, with a hole about 1 in (2.5 cm) wide. Finished strips are about 11 in (27.9 cm) for short and 17 in (43.2 cm) for long.
Cord
- Ch 85. Sc in the 2nd ch from hook and in each ch. (84 sts)
- At each end, ch 10 and sl st back into the end of the cord to form a loop.
The cord body is about 26 in (66.0 cm) long.
Layout Grid
 [eyelet]==================== DOWEL 16 in ====================[eyelet]
      \      SS (at 4.5 in)            LL (at 11.5 in)        /
       \     |                         |                     /
        \  [BASKET A]                  |                    /
         \  (short strips)             |                   /
                                   [BASKET B]
                                   (long strips)
Joining
Method: button-on straps. Sew 2 buttons to each basket, one on the outside of the front long side and one on the back long side. Place each button on Rnd 21, directly above the spine.
Stitch-to-stitch logic:
– The spine is the 7th of the 13 straight-side sts, so each button is centered.
– Sew through the posts of Rnds 20–22, not just one round. This spreads the load across 3 rounds of sc.
Tension: sew with a strand of yarn split in half. Make 6 passes and pull them snug but not puckered. Wrap a shank under the button 3 times so the eyelet sits flat.
Assembly:
1. Button the bottom eyelet of 1 short strip to the front of Basket A, and the bottom eyelet of the other short strip to the back.
2. Do the same for Basket B with the 2 long strips.
3. Thread the top eyelets onto the dowel side by side. Put Basket A’s strips 4.5 in (11.4 cm) from the left end and Basket B’s strips 4.5 in (11.4 cm) from the right end.
4. Slip the cord loops over the dowel ends, or mount the dowel in the brackets.
Size checkpoint: the rim of Basket B should sit about 1 in (2.5 cm) below the base of Basket A.
Border (Rim)
Border gauge: 1 rev sc per sc. The rim keeps the same 13 sts per 4 in (10.2 cm) as the wall.
Rnd 23: ch 1, rev sc in each st around. Join and fasten off. (86 sts)
The sts fall into the same sections as the base:
– Center of end 1 to the start of the straight side: 15
– Straight side: 13
– Full end 2: 30
– Straight side: 13
– Back to the start: 15
The total is 15 + 13 + 30 + 13 + 15 = 86.
Why the math works: rev sc puts exactly 1 st on top of each st below. The rim adds no width and doesn’t flare or pull in. It only rolls the edge, adding about 0.3 in (0.8 cm) of height. The finished wall is about 4.75 in (12.1 cm) above the base ridge, and the overall height is 5 in (12.7 cm).
Final Blocking
- Weave in all the ends along the solid sc rounds.
- Mist the baskets lightly until they are damp but not soaked.
- Stuff each basket with a towel until the sides are straight and the oval is even.
- Gently pull each leaf band open so the vein openings sit in clean diagonals.
- Pin the strips flat and straight, and press the eyelets into round shapes.
- Let everything dry completely, for about 24 hours.
Final Quality-Control Checklist
- [ ] Base measures 9.75 × 5.75 in (24.8 × 14.6 cm)
- [ ] Every wall round has 86 sts
- [ ] Spines are centered on both long sides
- [ ] Openings move outward on every band round
- [ ] Both baskets are 5 in (12.7 cm) tall
- [ ] Buttons are sewn through 3 rounds
- [ ] Strip pairs are the same length
- [ ] Dowel slides easily through all top eyelets
Troubleshooting
- Base cups or ruffles: check that each round adds exactly 6 sts. If the count is right, change your hook size.
- Walls flare outward: your tension loosened after Rnd 11. Go down half a hook size for the walls.
- Leaf looks off-center: you rejoined in the wrong place. Recount 15 sts from the start of the round.
- Openings look uneven: work exactly 1 dc per ch you cover.
- Basket tilts: the strip lengths don’t match. Add or remove a row so both strips in the pair are the same.
- Eyelet is too tight for the dowel: rework it with ch 11 and 18 sc.
Care
Hand wash in cool water and reshape while damp. Dry flat with each basket stuffed so the walls stay upright.
Final Notes
The measurement chain is:
1. Your gauge of 13 sts per 4 in (10.2 cm) gives a base of 9.75 × 5.75 in (24.8 × 14.6 cm) with 86 sts.
2. Those 86 sts stay the same all the way up through the walls, the leaf band and the rim.
3. The walls reach 5 in (12.7 cm) high.
4. Short and long strips set the two hanging heights on a 16 in (40.6 cm) dowel.
If you check each link in that chain, both baskets will match.
Happy crocheting!