

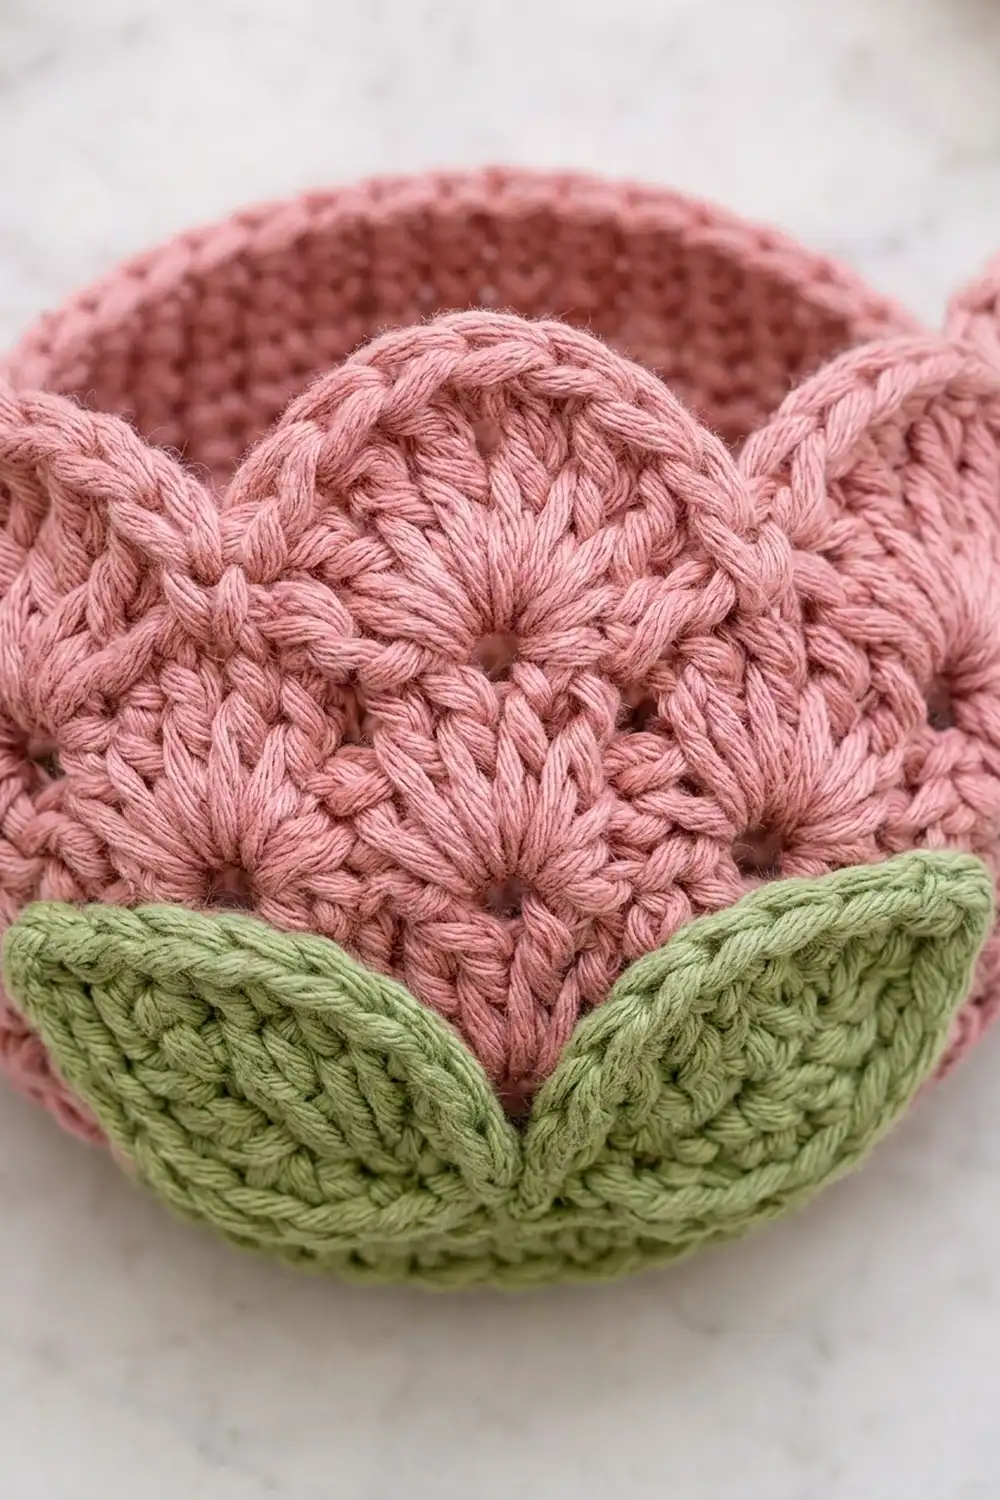
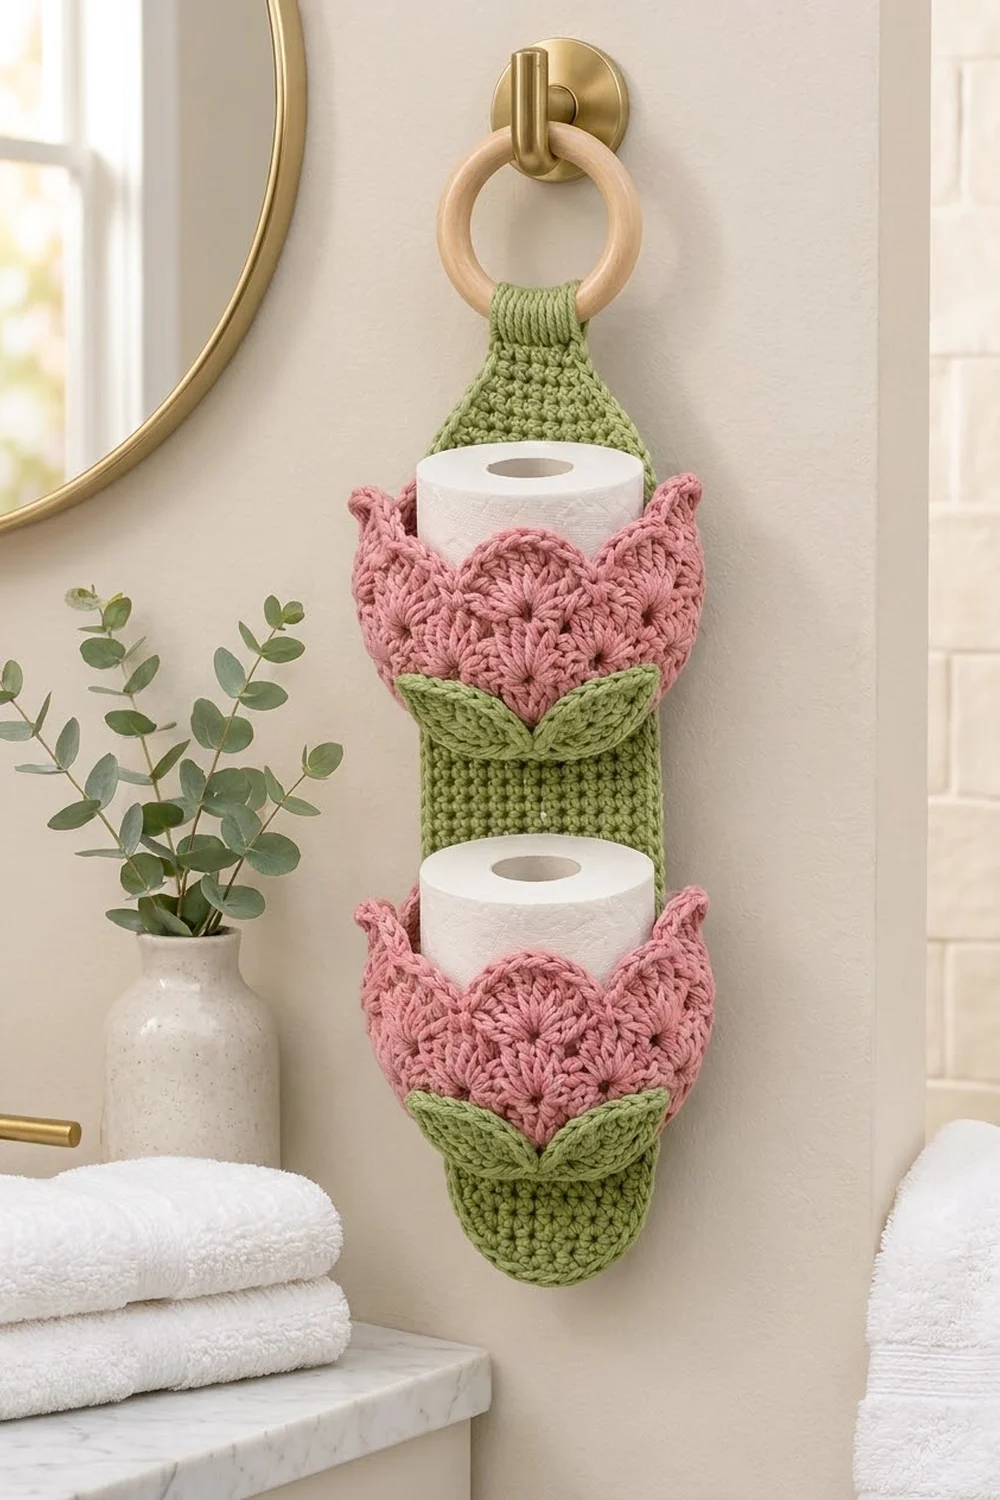
This hanging holder stores two spare toilet rolls in tulip-shaped baskets. A sage-green backing strip hangs from a wooden ring, and two dusty-pink cups are sewn on top of it, one above the other. Each cup has layered shell scallops on the outside, a crown of pointed petal tips and a pair of green leaves at the front.
The style is soft and cottage-like. Firm single crochet gives the cups structure, and the shell tiers add texture. Cotton yarn keeps the fabric sturdy and easy to wash.
This pattern uses US crochet terms. The finished strip measures 4.5 in (11.4 cm) wide and 22.5 in (57.2 cm) long laid flat. Once the tab is folded over the ring, it hangs about 20.5 in (52.1 cm) long. Each cup is 5.5 in (14.0 cm) across.
You’ll work the backing strip in rows and add a two-round border. Each cup starts as a flat circle and continues up in rounds, and the shell tiers are worked into front loops left free along the way. The leaves are worked separately. To finish, sew the leaves to the cups, the cups to the strip, and the strip’s tab around the ring.
Finished Size and Construction
- Finished strip size: 4.5 x 22.5 in (11.4 x 57.2 cm) flat; about 20.5 in (52.1 cm) hanging, plus the ring
- Skill level: Intermediate
- Terminology: US
- Yarn weight: Worsted (#4) cotton
- Hook: 5.0 mm (H-8)
- Number of pieces: 7 (1 backing strip, 2 cups, 4 leaves), plus 1 wooden ring
- Layout: 2 cups stacked vertically on the strip
- Piece sizes: strip 4 x 22 in (10.2 x 55.9 cm); cup base 5.5 in (14.0 cm) across with 3.75 in (9.5 cm) walls; leaf 2.25 x 1.1 in (5.7 x 2.8 cm)
- Strip size before border: 4 x 22 in (10.2 x 55.9 cm)
- Border depth: 0.25 in (0.6 cm) on each edge
Materials
Use a smooth worsted-weight cotton or cotton blend with about 170 m per 100 g. Cotton holds the cup shape well and can be washed often.
- Dusty pink: 250 g (425 m), for the cups
- Sage green: 120 g (204 m), for the strip, border and leaves
Tools:
– 5.0 mm (H-8) crochet hook
– Wooden ring, 2.75 in (7.0 cm) outer diameter
– 4 stitch markers
– Tapestry needle
– Rust-proof pins
– Tape measure
– Scissors
These quantities include a margin of about 15% for your gauge swatch and tension differences.
Abbreviations (US Terms)
- ch – chain
- sl st – slip stitch
- sc – single crochet
- hdc – half double crochet
- dc – double crochet
- tr – treble crochet
- sc2tog – single crochet 2 together
- MR – magic ring
- BLO / FLO – back loop only / front loop only
- st(s) – stitch(es)
- rep – repeat
Special stitches:
– Shell: 7 dc in the same stitch.
– Petal: (2 dc, tr, ch 3, sl st in 3rd ch from hook, tr, 2 dc) in the same stitch. The ch-3 picot forms the pointed tip.
Gauge and Checkpoints
Gauge: 14 sc and 16 rows = 4 in (10.2 cm) in sc worked in rows.
Make one cup before anything else. It is the most size-sensitive piece, because a standard roll needs about 4.5 in (11.4 cm) of space inside.
Checkpoints:
– Cup after Rnd 5 (30 sts): about 2.75 in (7.0 cm) across.
– Cup after Rnd 10 (60 sts): 5.5 in (14.0 cm) across.
– Cup walls after Rnd 25: 3.75 in (9.5 cm) tall.
– Strip after Row 5: 4 in (10.2 cm) wide.
– Strip after Row 64: 16 in (40.6 cm) long.
– Strip after Row 88: 22 in (55.9 cm) long.
If your pieces are too big, go down 0.5 mm in hook size. If they’re too small, go up 0.5 mm. A cup that is too small won’t hold a roll, so fix the gauge rather than adding rounds.
Backing Strip (Make 1, Green)
Ch 1 at the start of each row doesn’t count as a stitch.
Ch 7.
Row 1: Sc in 2nd ch from hook and in each ch across, turn. (6 sts)
Row 2: Ch 1, 2 sc in first st, sc in next 4 sts, 2 sc in last st, turn. (8 sts)
Row 3: Ch 1, 2 sc in first st, sc in next 6 sts, 2 sc in last st, turn. (10 sts)
Row 4: Ch 1, 2 sc in first st, sc in next 8 sts, 2 sc in last st, turn. (12 sts)
Row 5: Ch 1, 2 sc in first st, sc in next 10 sts, 2 sc in last st, turn. (14 sts)
Rows 1–5 form the rounded bottom end. The strip now measures 4 in (10.2 cm) wide.
Rows 6–64: Ch 1, sc in each st across, turn. (14 sts per row, 59 rows)
Row 65: Ch 1, sc2tog, sc in next 10 sts, sc2tog, turn. (12 sts)
Row 66: Ch 1, sc in each st across, turn. (12 sts)
Row 67: Ch 1, sc2tog, sc in next 8 sts, sc2tog, turn. (10 sts)
Row 68: Ch 1, sc across, turn. (10 sts)
Row 69: Ch 1, sc2tog, sc in next 6 sts, sc2tog, turn. (8 sts)
Row 70: Ch 1, sc across, turn. (8 sts)
Row 71: Ch 1, sc2tog, sc in next 4 sts, sc2tog, turn. (6 sts)
Row 72: Ch 1, sc across, turn. (6 sts)
The strip is now 18 in (45.7 cm) long.
Rows 73–88: Ch 1, sc across, turn. (6 sts per row, 16 rows)
These 16 rows form the hanging tab, which is 1.7 in (4.3 cm) wide and 4 in (10.2 cm) long. Don’t fasten off; continue straight into the border.
Cups (Make 2, Pink)
Work in continuous rounds. Move a marker up to the first st of each round as you go.
Base:
Rnd 1: 6 sc in MR. (6 sts)
Rnd 2: 2 sc in each st. (12 sts)
Rnd 3: Sc, 2 sc in next; rep 6 times. (18 sts)
Rnd 4: Sc in next 2, 2 sc in next; rep 6 times. (24 sts)
Rnd 5: Sc in next 3, 2 sc in next; rep 6 times. (30 sts)
Check: about 2.75 in (7.0 cm) across.
Rnds 6–10: Keep increasing 6 sts per round, working 1 more sc between increases each round. Rnd 6 has 36 sts, Rnd 7 has 42, Rnd 8 has 48, Rnd 9 has 54 and Rnd 10 has 60.
Check: the base is 5.5 in (14.0 cm) across.
Walls:
Rnd 11: Sc in BLO of each st. (60 sts) This forms a crisp edge where the base turns up into the wall.
Rnds 12–15: Sc in each st. (60 sts)
Rnd 16: Sc in BLO of each st. (60 sts) This leaves the front loops of Rnd 15 free for Tier 1.
Rnds 17–20: Sc in each st. (60 sts)
Rnd 21: Sc in BLO of each st. (60 sts) This leaves the front loops of Rnd 20 free for Tier 2.
Rnds 22–25: Sc in each st. (60 sts)
Check: the walls are 3.75 in (9.5 cm) tall.
Rnd 26 (Petal Crown): Work through both loops of Rnd 25. Sc in next st, skip 2 sts, Petal in next st, skip 2 sts; rep 10 times, then sl st to the first sc. (10 petals and 10 sc: 70 sts plus 10 picots)
Each repeat uses 6 sts, and 10 x 6 = 60, so the crown uses every Rnd 25 stitch exactly. The picot tips stand about 0.75 in (1.9 cm) above the rim. Fasten off.
Tier 1 (lower scallops): Turn the cup upside down. Join pink with a sc in the free front loop of Rnd 15 directly below the centre of any crown petal. Skip 2 front loops, Shell in next front loop, skip 2 front loops, sc in next front loop; rep around. On the last repeat, finish with “skip 2” and sl st to the first sc instead of working the final sc. (10 shells and 10 sc: 80 sts)
That makes 10 repeats of 6 front loops each, covering all 60. Fasten off. The fans hang down over Rnds 11–14.
Tier 2 (upper scallops): Join pink with a sc in the free front loop of Rnd 20 directly above the centre of a Tier 1 shell. Work the same as Tier 1. (10 shells and 10 sc: 80 sts) Fasten off.
Placing the sc above a shell centre offsets Tier 2 by half a repeat, so its shells sit between the shells of Tier 1, like overlapping scales. Weave in all ends.
Leaves (Make 4, Green)
Ch 9.
Rnd 1: Work along one side of the chain: sc in 2nd ch from hook, hdc in next ch, dc in next 3 ch, hdc in next ch, sc in next ch. In the last ch, work (sc, ch 2, sc) for the tip. Rotate and work along the other side of the chain: sc in next ch, hdc in next ch, dc in next 3 ch, hdc in next ch, sc in next ch. Sl st to the first sc. (16 sts plus the ch-2 tip)
Fasten off, leaving an 8 in (20.3 cm) tail for sewing. Each leaf measures 2.25 x 1.1 in (5.7 x 2.8 cm).
Make All Pieces
- Green: 1 backing strip and 4 leaves
- Pink: 2 cups
Layout (front view, top to bottom):
      [ ring ]
      [ tab  ]
     /  taper  \
   [ UPPER CUP ]   strip rows 36–50
   [ green gap ]
   [ LOWER CUP ]   strip rows 7–21
    \ rounded /
Joining
Leaves first: Pin two leaves to the lower front of each cup. Their bases should touch at the centre, just above the base edge from Rnd 11, with the tips angled up and out in a V over Tier 1. Whipstitch around each leaf’s outer edge. Keep the stitches small so the leaves stay flat.
Cups to strip: Lay the strip right side up. On each cup, mark the 12 back stitches of Rnd 25 and the 12 back stitches of Rnd 11. These are the sts that sit directly opposite the leaves.
- Lower cup: Pin the Rnd 11 back edge straight across strip Row 7. Pin the Rnd 25 back edge straight across Row 21. The 15 wall rounds match 15 strip rows, so the back wall lies flat without puckering.
- Upper cup: Pin Rnd 11 across Row 36 and Rnd 25 across Row 50.
Twelve cup sts measure about 3.4 in (8.6 cm), so they fit within the strip’s 14-st width. Whipstitch stitch to stitch: one pass through a cup st, then one pass through the strip st beneath it. Then tack the back wall to the strip with a vertical line of stitches at each side of the 12-st zone.
Tension: Snug, but not tight. If you pull too hard, the strip will narrow and the cups will tilt forward.
Size checkpoint: The gap between Row 21 and Row 36 is 3.5 in (8.9 cm). The upper cup’s crown points and lower tier take up part of that space, which leaves a clear green band between the cups.
Border
Border gauge: The same gauge as the strip: 14 sc = 4 in (10.2 cm).
Rnd 1: Continue from Row 88. Ch 1 and work around the whole strip:
– Top edge: 3 sc in first st, sc in next 4 sts, 3 sc in last st. (10 sts)
– First long side: Work 1 sc in each row end, but skip the row end of every 8th row (rows 88, 80, 72 … 8). (77 sts)
– Bottom edge: Work into the foundation ch: 3 sc in first st, sc in next 4 sts, 3 sc in last st. (10 sts)
– Second long side: Same as the first, skipping the ends of rows 8, 16 … 88. (77 sts)
Sl st to the first sc. (174 sts)
Rnd 2: Sl st loosely in each st around. (174 sts) Fasten off.
Why the math works: The strip has 88 rows, and skipping 1 row end in every 8 leaves 88 − 11 = 77 sts per side. The gauge is 14 sts to 16 rows, which is the same ratio as 7 sts to 8 rows. Seventy-seven stitches measure 22 in (55.9 cm), which matches the length of the 88 rows, so the sides won’t ruffle or pull in. Each 3-sc group turns a corner without adding fullness. Both narrow ends have 6 sts plus 4 corner extras, giving 10 sts each.
Ring: Fold the tab over the ring towards the back, so the fold sits at the middle of the tab (2 in / 5.1 cm). Whipstitch the edge of Row 88 across the back of Row 73.
Final Blocking
- Spray the strip until damp, but not soaked.
- Pin it flat at 4.5 x 22.5 in (11.4 x 57.2 cm). Keep the rounded bottom end even.
- Stuff each cup with a towel shaped like a roll, about 4.5 in (11.4 cm) across.
- Mist the cups and open out the shell fans with your fingers.
- Pinch each petal tip into a point.
- Let everything dry completely, about 24 hours.
Final Quality-Control Checklist
- [ ] Strip measures 4.5 in (11.4 cm) wide and its edges are straight.
- [ ] Border has 174 sts and lies flat.
- [ ] Each cup has 10 petals, 10 shells in Tier 1 and 10 shells in Tier 2.
- [ ] Tier 2 shells sit between the Tier 1 shells.
- [ ] Leaves are centred on each cup and form a symmetrical V.
- [ ] Cups sit level and parallel to each other.
- [ ] A roll slides into each cup easily.
- [ ] Tab is sewn securely and all ends are woven in.
Troubleshooting
- Base cups or ruffles: Your gauge is off. Recheck it, or redo the base with 6 increases per round spaced evenly.
- Roll won’t fit: The cup is too small. Rework it with a larger hook rather than adding stitches, because the shell repeat needs exactly 60 sts.
- Shells flare too much: Work 6 dc per Shell instead of 7, and keep the fans relaxed when blocking.
- Cup leans forward: Add more tacking stitches between the Rnd 11 and Rnd 25 seams.
- Strip edge waves: You missed some skipped row ends. Count 77 sts per side.
- Tab twists: Make sure the fold sits squarely before you sew it.
Care
Hand wash in cool water, or machine wash on a gentle cycle inside a laundry bag. Reshape the cups while damp and dry flat or stuffed.
Final Notes
Everything depends on gauge, so the measurements build on each other. At 14 sc per 4 in (10.2 cm), the 60-st base measures 5.5 in (14.0 cm) and 15 wall rounds reach 3.75 in (9.5 cm). The 14-st strip is 4 in (10.2 cm) wide and its 88 rows reach 22 in (55.9 cm). The border adds 0.25 in (0.6 cm) on each edge, for 4.5 x 22.5 in (11.4 x 57.2 cm). Folding the tab over the ring brings the hanging length to about 20.5 in (52.1 cm). Check these numbers as you go, and the holder will hang straight with room for two rolls.
Happy crocheting!