

This lace curtain is made of peach nautilus shells laid out in a grid. Each shell has a turquoise spiral and a scalloped turquoise edge, and the shells are linked by an open mesh of chain loops. When light comes through the window, the solid shells and the open net make a strong pattern of shapes.
The colors are soft peach and turquoise, and the result looks coastal without feeling heavy. All instructions use US crochet terms.
One panel measures 44 x 80 in (111.8 x 203.2 cm) after the border. The photo shows two panels on one rod, so make two panels for a pair.
How it’s built: Each shell is worked as a continuous spiral in peach. The stitches get taller as you go around, then the end steps back down. You then add a turquoise surface spiral, a turquoise scalloped edge and a turquoise round of chain loops. The last round, in peach, turns the round motif into a 6 in (15.2 cm) square block and joins it to the blocks around it as you go. A three-round turquoise border finishes the panel.
Finished Size and Construction
- Finished panel: 44 x 80 in (111.8 x 203.2 cm)
- Skill level: Intermediate
- Terminology: US
- Yarn weight: Sport (#2) cotton
- Hook: 3.5 mm (E/4)
- Number of pieces: 91 blocks per panel
- Layout: 7 blocks wide x 13 blocks tall
- Block size: 6 in (15.2 cm) square, measured on the mesh
- Shell size: about 5 in (12.7 cm) across
- Size before border: 42 x 78 in (106.7 x 198.1 cm)
- Border depth: 1 in (2.5 cm) on every side
Materials
Yarn: Use mercerized or combed sport-weight cotton, about 150 m per 50 g. Cotton keeps the lace crisp, gives clear stitch definition and holds its shape well in a hanging curtain. Avoid fuzzy yarns, because they blur the open spaces.
Amounts for one panel:
- Peach (Color A): 650 g / 1,950 m
- Turquoise (Color B): 600 g / 1,800 m
For a pair of panels, double these amounts. Both quantities include roughly a 15% margin for gauge differences and a test block.
Tools:
- 3.5 mm (E/4) crochet hook
- Tapestry needle
- Stitch markers (at least 4)
- Scissors
- Rust-proof blocking pins and foam mats
- Measuring tape
- Spray bottle
Abbreviations (US Terms)
- ch – chain
- sl st – slip stitch
- sc – single crochet
- hdc – half double crochet
- dc – double crochet
- tr – treble crochet (yarn over 2 times)
- dtr – double treble crochet (yarn over 3 times)
- sp(s) – space(s)
- st(s) – stitch(es)
- JAYG – join-as-you-go
Surface slip stitch: Hold the yarn behind the work. Insert the hook from front to back between stitches, pull up a loop, then pull it through the loop already on the hook. This makes a chain-like line on the right side.
Shell join (Rnd 8): On a loop that is being joined, work the first half of the chains. Then sl st into the center chain of the matching loop on the neighboring block, and work the second half of the chains.
Gauge and Checkpoints
Base gauge: 5 sc = 1 in (2.5 cm), and 10 sc = 2 in (5.1 cm).
Before making 91 blocks, work one complete test block through Rnd 8 and pin it out. Check it at each stage:
- After Rnd 2: about 2 in (5.1 cm) across
- After Rnd 4: about 4.5 in (11.4 cm) at the widest point
- After Rnd 6: about 5 in (12.7 cm) across
- After Rnd 8, blocked: 6 x 6 in (15.2 x 15.2 cm), with each side loop spanning about 1 in (2.5 cm)
If the block is too big, go down 0.5 mm in hook size. If it is too small, go up 0.5 mm. If only the mesh is off, pull the chains tighter or looser, but keep the stitch counts the same.
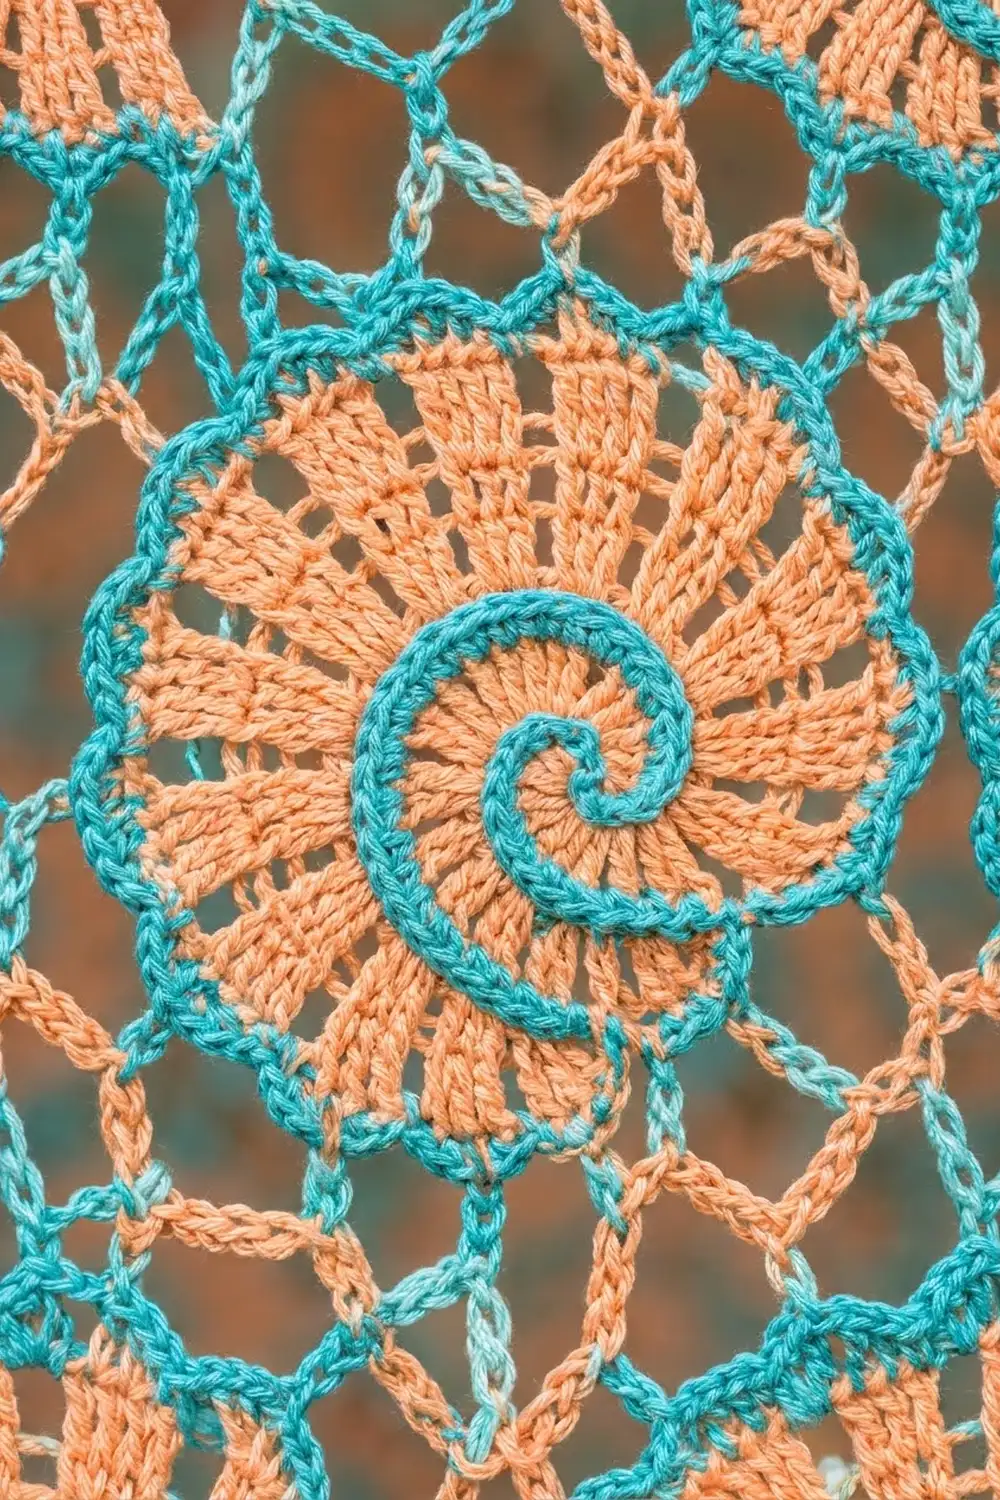
Nautilus Shell Motif
Rounds 1–4 are worked in a continuous spiral. Do not join or turn. Put a marker in the first stitch of each round to keep your place.
Rnd 1 (Color A): Make a magic ring. Ch 1, then work 2 sc, 2 hdc, 4 dc and 4 tr into the ring. Pull the ring closed. (12 sts)
Rnd 2: Keep spiraling into the stitches of Rnd 1:
- 2 sc in each of the next 2 sc (4 sc)
- 2 hdc in each of the next 2 hdc (4 hdc)
- 2 dc in each of the next 4 dc (8 dc)
- [dc, ch 1, dc] in each of the next 4 tr (8 dc, 4 ch-1 sps)
(24 sts + 4 ch-1 sps)
Rnd 3:
- Sc in each of the next 4 sc (4 sc)
- 2 hdc in each of the next 4 hdc (8 hdc)
- [dc, ch 1] in each of the next 8 dc (8 dc, 8 ch-1 sps)
- [tr, ch 2] in each of the next 8 dc, skipping the ch-1 sps (8 tr, 8 ch-2 sps)
(28 sts + 16 sps)
Rnd 4 (outer whorl):
- Sc in each of the next 4 sc (4 sc)
- [dc, ch 1] in each of the next 8 hdc (8 dc, 8 ch-1 sps)
- [tr, ch 1] in each of the next 8 dc, skipping the ch-1 sps (8 tr, 8 ch-1 sps)
- [dtr, ch 2] in each of the next 8 tr, skipping the ch-2 sps (8 dtr, 8 ch-2 sps)
(28 sts + 24 sps)
These stacked tall stitches with gaps between them make the radiating ribs.
Taper: Work into the first 4 sc of Rnd 4: tr in the next sc, dc in the next, hdc in the next, sc in the next. Sl st into the next dc to finish the spiral smoothly. Fasten off. (4 taper sts)
Surface spiral (Color B): If you want the bold line shown in the sample, hold the yarn doubled. With the right side facing, start at the center of the ring. Work surface slip stitches along the groove where Rnd 1 meets Rnd 2. Keep following the grooves outward: Rnd 2 to Rnd 3, then Rnd 3 to Rnd 4. Work 1 surface sl st per stitch you pass, about 64 in total. End at the taper, where the line meets the edge. Fasten off and weave in the ends on the back.
Rnd 5 (Color B): Join with sc in the first dc of Rnd 4.
- Dc section: Continue with sc in each ch-1 sp and each dc, for 16 sc in total.
- Tr section: [sc in tr, 2 sc in ch-1 sp] 8 times (24 sc)
- Dtr section: [sc in dtr, 3 sc in ch-2 sp] 8 times (32 sc)
- Taper: 2 sc in each of the 4 taper sts (8 sc). Skip the sl st.
Sl st to the first sc. (80 sc = 16 + 24 + 32 + 8)
Rnd 6 (scallops): Ch 1. [Sc in the next sc, skip 1, 5 dc in the next sc, skip 1] 20 times. Sl st to the first sc. (20 sc + 100 dc = 120 sts; 20 scallops)
Rnd 7 (first mesh round):
- Sl st in the next 3 dc to reach the center (3rd) dc of the first scallop.
- Ch 1, sc in the same st.
- [Ch 6, sc in the 3rd dc of the next scallop] 19 times.
- Ch 6, sl st to the first sc.
(20 sc, 20 ch-6 loops) Fasten off.
Make All Pieces
Work all 91 shells through Rnd 7 first. That way, joining is just one round per block. For each panel:
- Color A: 91 shell bodies (Rnds 1–4) and 91 frame rounds (Rnd 8)
- Color B: 91 surface spirals, 91 edgings (Rnds 5–6) and 91 loop rounds (Rnd 7)
The layout is 7 columns x 13 rows. Each B is one block:
Row 1:  B B B B B B B   (top, rod edge)
Row 2:  B B B B B B B
Row 3:  B B B B B B B
 ...    (13 rows total)
Row 13: B B B B B B B   (bottom hem)
To keep the look consistent, turn every shell the same way, with the taper at the lower left.
Joining (Rnd 8, Join-As-You-Go)
Rnd 8 on the first block (Color A):
- Join with sc in any ch-6 loop.
- Ch 9, sc in the same loop. This is the corner.
- [Ch 6, sc in the next loop] 4 times, ch 6*, then (sc, ch 9, sc) in the next loop.
- Repeat from * 2 more times, then work from * to ** once more.
- Sl st to the first sc.
(4 ch-9 corner loops + 20 ch-6 side loops; 24 sc)
Each side has 5 ch-6 loops between its corners. This uses all 20 loops of Rnd 7: 4 corners + 16 single-sc loops.
Per-side count, defined: Each block side has 6 anchors: its leading corner loop + 5 side loops. The trailing corner of a side is counted as the leading corner of the next side, so no corner is counted twice.
Joining the next blocks: Work Rnd 8 as above. Along each edge that touches a finished block, change the loops like this:
- Side loops: Ch 3, sl st into the 4th ch of the matching ch-6 loop, ch 3.
- Corner loops: Ch 4, sl st into the 5th ch of the neighbor’s ch-9 loop, ch 4.
Where four blocks meet, sl st into the existing corner join so that all four corners share one point. The joins replace the center chain, so no stitches are added at any seam.
Tension: Keep the joining sl sts loose. If you pull them tight, the mesh puckers and the 6 in (15.2 cm) grid shrinks.
Size checkpoint: After you finish the first full row of 7 blocks, lay it flat. It should measure 42 in (106.7 cm) wide. The finished joined panel should measure 42 x 78 in (106.7 x 198.1 cm).
Border
Border gauge: 5 sc = 1 in (2.5 cm). Each border ch-5 loop holds 5 sc and spans 1 in (2.5 cm).
Anchors per edge:
- Top and bottom: 7 blocks x 6 anchors = 42
- Each long side: 13 x 6 = 78
At a seam, the two joined corner loops count as one anchor. Work your sc around the join point and catch both loops.
Rnd 1 (Color B):
- Join in a panel corner loop with (sc, ch 7, sc), then ch 5.
- [Sc in the next anchor, ch 5] to the next panel corner. Work (sc, ch 7, sc) in the corner loop, then ch 5. Repeat around and sl st to join.
Per side: 42 ch-5 loops on the top and bottom edges, and 78 on each long side, plus 4 ch-7 corners. (240 ch-5 loops; 244 sc)
Rnd 2: 5 sc in each ch-5 loop and 9 sc in each ch-7 corner loop. Sl st to join.
- Top and bottom: 42 x 5 = 210 sc
- Each long side: 78 x 5 = 390 sc
- Corners: 9 sc each
(Total: 420 + 780 + 36 = 1,236 sc)
Rnd 3: Ch 1. Sc in each sc, working 3 sc in the center (5th) sc of each corner group. (210 / 390 sc per side + 11 per corner = 1,244 sc) Fasten off.
Why the math works: Each block side is 6 in (15.2 cm) and has 6 anchors, so each anchor is 1 in (2.5 cm) of edge. One ch-5 loop holding 5 sc at 5 sc per inch also covers exactly 1 in (2.5 cm). The border therefore lies flat and adds 1 in (2.5 cm) on each side: 42 + 2 = 44 in (111.8 cm) wide and 78 + 2 = 80 in (203.2 cm) long.
Final Blocking
- Weave in all ends along solid stitches, not through the chain mesh.
- Soak the panel in cool water with a little wool wash for 15 minutes.
- Press out the water. Do not wring. Roll the panel in towels.
- Lay it on mats. Pin the corners first so the panel is 44 x 80 in (111.8 x 203.2 cm).
- Pin each 6 in (15.2 cm) block grid line using a measuring tape.
- Open each shell’s scallops and ribs gently with your fingers.
- Mist lightly and let it dry completely, at least 24 hours.
Final Quality-Control Checklist
- [ ] All 91 shells face the same way.
- [ ] Each shell has 20 scallops and a continuous turquoise spiral.
- [ ] Every block measures 6 in (15.2 cm) square.
- [ ] There are no missed joins and no loose corner points.
- [ ] The border counts are 210 / 390 sc per side plus 11 per corner.
- [ ] The panel is 44 x 80 in (111.8 x 203.2 cm) and its edges are straight.
- [ ] All ends are secure and hidden.
Troubleshooting
- The shell cups instead of lying flat: Your dtr stitches are too short, or your chains are too tight. Loosen the ch-2 spaces in Rnd 4.
- Rnd 5 ruffles: Use 2 sc in the ch-2 spaces of the dtr section instead of 3, then add 1 sc to each of 8 taper stitches so you still have 80.
- The surface spiral puckers: Use a hook one size larger for the surface slip stitches.
- The mesh sags at the corners: Make sure all four corners are joined into one point.
- The border waves: Check that you have 5 sc per loop. If it still waves, go down 0.5 mm in hook size for the border only.
- The panel is too long: Block it again with the length pinned exactly. Cotton relaxes when wet.
Care
Hand wash cool and lay flat to dry, re-pinning to size if needed. Keep the curtain away from harsh direct sun to slow fading of the peach.
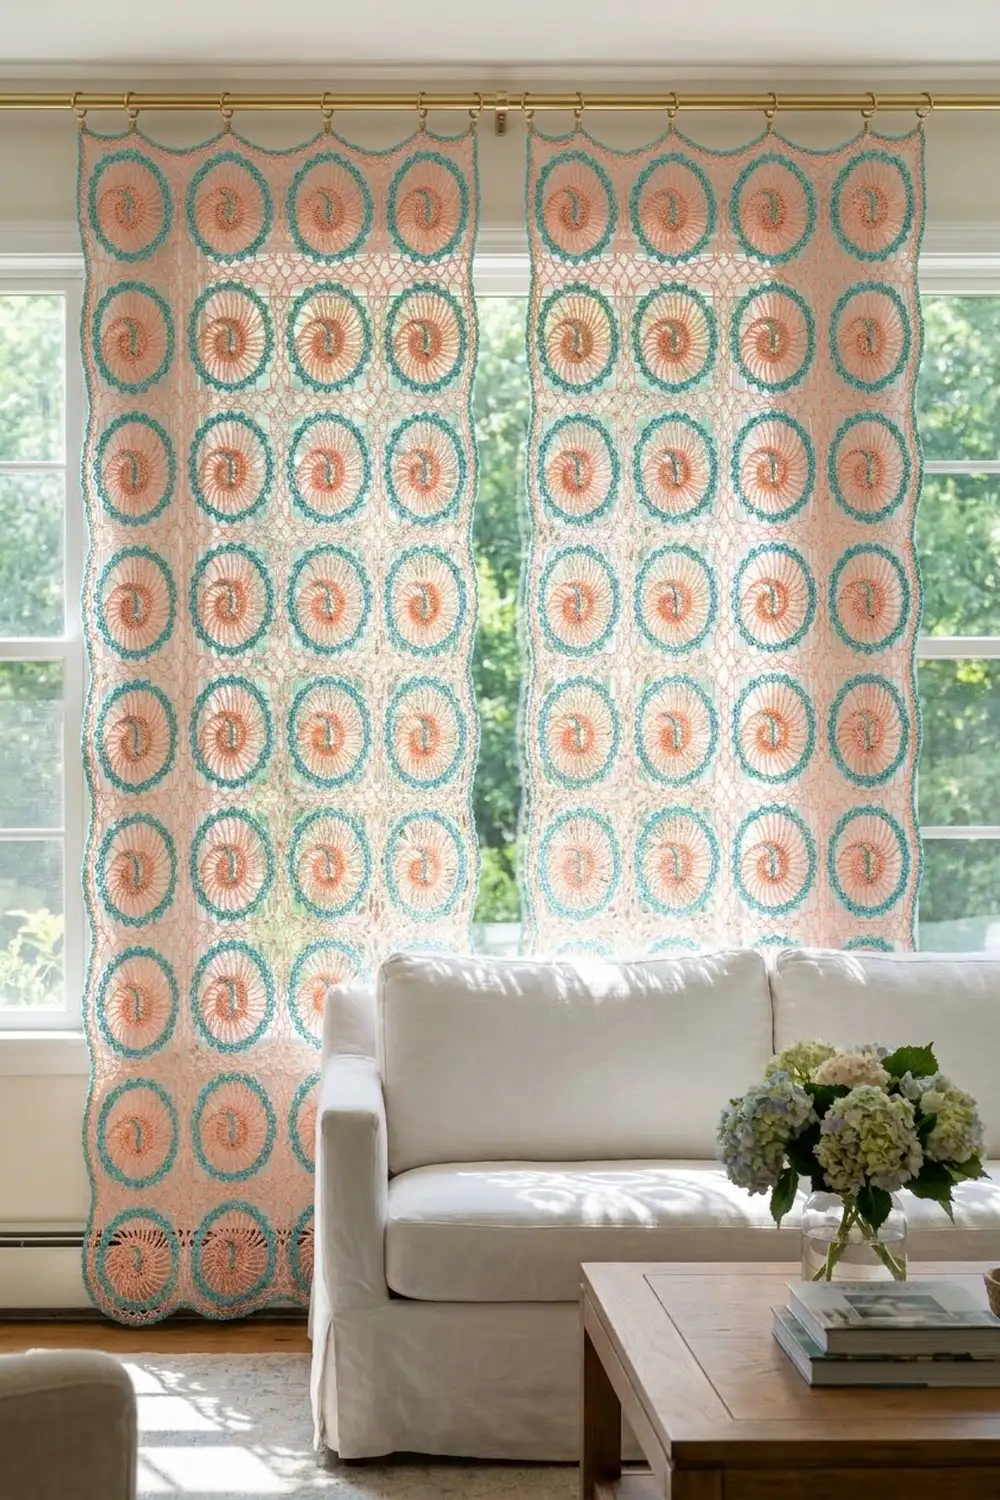
Final Notes
Here is the measurement chain from start to finish:
- 5 sc = 1 in (2.5 cm)
- Shell = 5 in (12.7 cm)
- Block = 6 in (15.2 cm), with 6 anchors per side
- Joined panel = 42 x 78 in (106.7 x 198.1 cm)
- Bordered panel = 44 x 80 in (111.8 x 203.2 cm)
If each stage hits its checkpoint, the next one will too. Make a second panel for a matching pair.
Happy crocheting!