

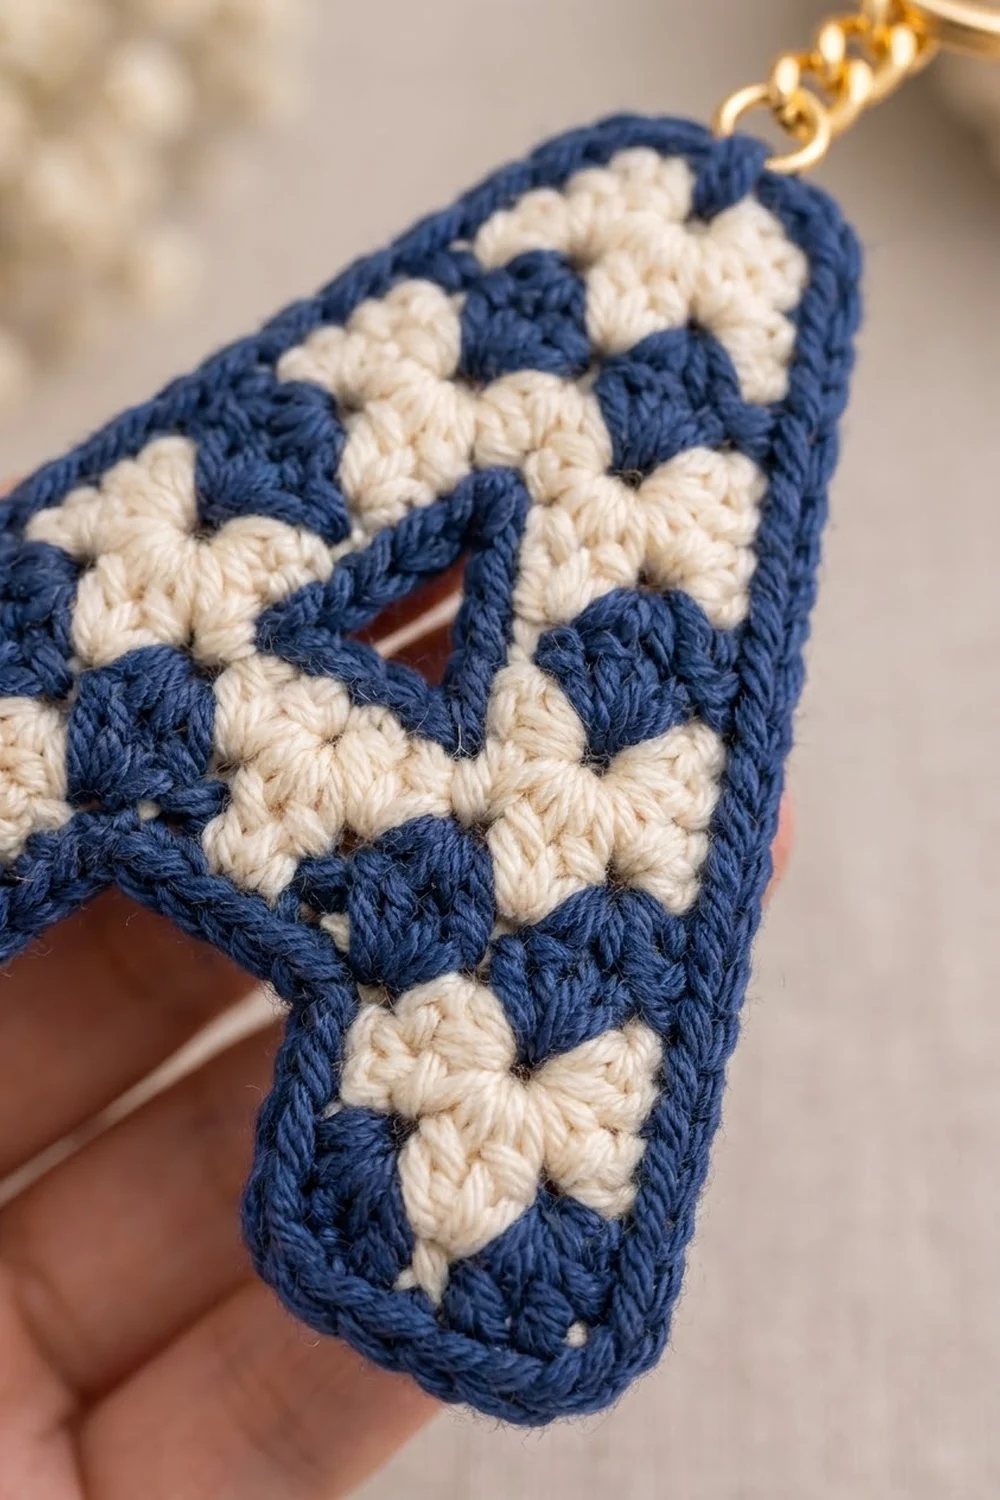
This little letter A keychain is a small, quick project. Cream and navy fans alternate row by row, giving a crisp nautical look. A navy border frames the whole letter so it reads clearly from across the room, whether it’s clipped to a tote bag or hanging from your keys.
The design is worked in two colors: a soft cream and a deep navy. The shell stitch adds texture, and the gold hardware makes it look polished and giftable. It makes a lovely personalized present or a quick market-stall make.
This pattern uses US crochet terms. The finished charm measures 3 5/8 in (9.2 cm) wide by 4.1 in (10.4 cm) tall, not including hardware.
You work it flat in rows from the bottom up. First you make the two legs separately. Then one row joins them with a chain bridge to form the crossbar. Above that, the letter narrows in steps, and two rows leave a small triangular opening. Last, a navy single-crochet border runs around the outside, a navy sc ring outlines the hole, and the hardware goes on.
Finished Size and Construction
- Finished size: 3 5/8 in (9.2 cm) wide x 4.1 in (10.4 cm) tall
- Skill level: Easy-intermediate
- Terminology: US crochet terms
- Yarn weight: Fingering / super fine (#1) cotton
- Hook: 2.25 mm (B-1)
- Number of pieces: 1 (single flat piece)
- Layout: One standalone letter A, no joining
- Piece size before border: 3 1/8 in (7.9 cm) wide x 3.6 in (9.1 cm) tall
- Border depth: 2 rounds of sc, 1/4 in (0.6 cm) on each side
Materials
Yarn: Use a smooth, mercerized fingering-weight cotton. It shows the fans clearly and holds its shape on a keychain. Avoid fuzzy or very splitty yarn, because the shells will look blurry.
- Cream (Color A): 5 g, about 17 m
- Navy (Color B): 6 g, about 20 m
These quantities include a margin for your gauge swatch and weaving in ends.
Tools:
– 2.25 mm (B-1) crochet hook
– Tapestry needle
– Scissors
– 4 locking stitch markers
– 1 gold jump ring, 8 mm
– 1 gold split keyring, 1 in (2.5 cm), with a short chain about 1 in (2.5 cm) long, or a lobster clasp for bags
– 2 pairs of flat-nose pliers
– Blocking mat and rust-proof pins
– Optional: fabric stiffener spray
Abbreviations (US Terms)
- ch – chain
- sc – single crochet
- dc – double crochet
- sc2tog – single crochet 2 together
- sl st – slip stitch
- sp – space
- st(s) – stitch(es)
- t-ch – turning chain
Special stitch:
– Shell (S): 5 dc in the same stitch or space.
How to count: A ch-3 at the start of a row counts as 1 dc. A ch-1 does not count as a stitch.
Pattern rows:
– P row: sc, then [S, sc] repeated. A P row with k shells has 6k + 1 sts.
– Q row: 3 dc, then [sc, S] repeated, then sc, 3 dc. It also has 6k + 1 sts.
Gauge and Checkpoints
Gauge: 25 sts = 3 1/8 in (7.9 cm) wide in shell pattern, and 10 rows = 3 in (7.6 cm) tall. Each row is about 0.3 in (0.8 cm) tall.
Because this is a single piece, make the first leg (Rows 1–3) as your test piece. Measure before you continue.
Checkpoints:
– After Row 1 of one leg: 7 sts = 7/8 in (2.2 cm) wide.
– After Row 3: each leg is 0.9 in (2.3 cm) tall.
– After Row 5: 3 1/8 in (7.9 cm) wide and 1.5 in (3.8 cm) tall.
– After Row 8: Row 8 is 2 3/8 in (6.0 cm) wide, and the piece is 2.4 in (6.1 cm) tall.
– After Row 12: the top fan is 7/8 in (2.2 cm) wide, and the piece is 3.6 in (9.1 cm) tall.
If your piece is too big by more than 1/8 in (0.3 cm), go down to a 2.0 mm hook. If it’s too small, go up to a 2.5 mm hook. Shells that look gappy usually mean the hook is too large. Shells that cup or ruffle usually mean the hook is too small.
Pattern
Colors: Work odd rows in cream and even rows in navy. Change color in the last yarn-over of the final stitch of each row. Each color comes back to the same side every 2 rows, so carry the unused yarn loosely up the side edge. The border will hide it.
Leg 1 (make 1)
Row 1 (cream): Ch 8. Sc in 2nd ch from hook, skip 2 ch, S in next ch, skip 2 ch, sc in last ch. Turn. (7 sts: 1 shell, 2 sc)
Row 2 (navy): Ch 3, 2 dc in first sc, sc in center dc of shell, 3 dc in last sc. Turn. (7 sts)
Row 3 (cream): Ch 1, sc in first dc, S in next sc, sc in top of t-ch. (7 sts) Fasten off both colors.
Leg 2 (make 1)
Work Rows 1–3 exactly as for Leg 1. Fasten off.
Place both legs right side up with the Row 3 tops level. Leave about 1 3/8 in (3.5 cm) of space between their inner edges.
Body
Row 4 (navy, joining row): Join navy in the first sc of Leg 1 at its outer edge. Ch 3, 2 dc in same sc, sc in center dc of shell, S in last sc of Leg 1. Ch 7. On Leg 2, S in first sc, sc in center dc of shell, 3 dc in last sc. Turn.
Count: 3 + 1 + 5 + 7 ch + 5 + 1 + 3 = 25 sts.
The ch-7 takes the place of the middle “sc, S, sc” of a 4-shell Q row. That keeps the width at 25 sts and forms the top of the gap between the legs.
Row 5 (cream):
1. Ch 1, sc in first dc, S in next sc, sc in center dc of next shell.
2. S in 1st ch, sc in 4th ch, S in 7th ch.
3. Sc in center dc of next shell, S in next sc, sc in top of t-ch. Turn.
Count: 25 sts (4 shells, 5 sc). This completes the crossbar.
Row 6 (navy, step in and open the hole):
1. Ch 1, skip first sc and 2 dc. Sc in center dc of first shell, S in next sc, sc in center dc of next shell.
2. Ch 5, then skip the next 2 dc, sc and 2 dc.
3. Sc in center dc of next shell, S in next sc, sc in center dc of last shell. Turn, leaving the last 2 dc and sc unworked.
Count: 1 + 5 + 1 + 5 ch + 1 + 5 + 1 = 19 sts. The width drops by 3 sts on each side, and the ch-5 forms the base of the triangular hole.
Row 7 (cream, narrow the hole):
1. Ch 3, 2 dc in first sc, sc in center dc of shell, 4 dc in next sc.
2. Ch 3, skip ch-5 sp.
3. 4 dc in next sc, sc in center dc of shell, 3 dc in last sc. Turn.
Count: 3 + 1 + 4 + 3 ch + 4 + 1 + 3 = 19 sts. The opening narrows from 5 chains to 3, which forms the triangle’s slanted sides.
Row 8 (navy, close the hole):
1. Ch 1, sc in first dc, S in next sc.
2. Skip 1 dc, sc in next dc, skip 2 dc. S in ch-3 sp.
3. Skip 2 dc, sc in next dc, skip 1 dc. S in next sc, sc in top of t-ch. Turn.
Count: 19 sts (3 shells, 4 sc). The shell worked into the ch-3 sp closes the top point of the triangle.
Row 9 (cream, step in): Ch 1, skip first sc and 2 dc. Sc in center dc of first shell, [S in next sc, sc in center dc of next shell] twice. Turn, leaving 3 sts unworked. (13 sts)
Row 10 (navy): Ch 3, 2 dc in first sc, sc in center dc of shell, S in next sc, sc in center dc of shell, 3 dc in last sc. Turn. (13 sts)
Row 11 (cream): Ch 1, sc in first dc, [S in next sc, sc in center dc of next shell] once, S in next sc, sc in top of t-ch. Turn. (13 sts)
Row 12 (navy, step in, top fan): Ch 1, skip first sc and 2 dc. Sc in center dc of first shell, S in next sc, sc in center dc of next shell. (7 sts) Fasten off.
This single shell forms the rounded top of the letter. The piece should now be 3 1/8 in (7.9 cm) wide at the crossbar and 3.6 in (9.1 cm) tall. Weave in all ends except the carried strands, which the border will cover.
Border
Border gauge: 8 sc = 1 in (2.5 cm), and 2 rounds of sc = 1/4 in (0.6 cm) deep.
Edge rules:
– Work 2 sc into the side of each row end.
– Work 1 sc into each unworked stitch left on a step.
– At the 6 outer corners, work 3 sc into the corner stitch: these are the 2 bottom corners of each leg and the 2 top corners of Row 12.
Round 1 (navy): With the right side facing, join navy at the bottom outer corner of Leg 1. Work around the piece as follows. Each count already includes any corner groups in that segment.
- Leg 1 bottom: 3 sc in first ch, sc in next 5 ch, 3 sc in last ch = 11 sc
- Leg 1 inner side (Rows 1–3): 6 sc
- Crossbar underside: 2 sc around the post of the end dc of the Row 4 shell, 1 sc in each of the 7 ch, 2 sc around the post of the next shell = 11 sc
- Leg 2 inner side (Rows 1–3): 6 sc
- Leg 2 bottom: 3 + 5 + 3 = 11 sc
- Right side:
- Rows 1–5: 10 sc
- Row 5 step: 3 sc
- Rows 6–8: 6 sc
- Row 8 step: 3 sc
- Rows 9–11: 6 sc
- Row 11 step: 3 sc
- Row 12: 2 sc
- Total: 33 sc
- Top: 3 sc in first st, sc in next 5 sts, 3 sc in last st = 11 sc
- Left side: the same as the right side in reverse = 33 sc
Sl st to the first sc. Total: 11 + 6 + 11 + 6 + 11 + 33 + 11 + 33 = 122 sc.
Round 2 (navy): Ch 1, sc in each st around. In the center sc of each of the 6 corner groups, work 3 sc instead of 1. Sl st to the first sc.
Per segment:
– Leg bottoms: 15 sc each
– Top: 15 sc
– Each outer side: 33 sc
– Each inner leg side: 6 sc
– Crossbar underside: 11 sc
Total: 122 + 12 = 134 sc. Fasten off and weave in the end.
Hole outline (navy): Join navy in the ch-5 sp of Row 6. Work 6 sc in the ch-5 sp, then 4 sc up the left side around the 4-dc post toward the ch-3 sp. Work 4 sc down the right side. Sl st to the first sc. (14 sc) This makes the crisp navy triangle. The finished opening is about 3/8 in (1.0 cm) wide.
Why the math works: Each row is 0.3 in (0.8 cm) tall. Strict gauge would call for 2.4 sc per row, so 2 sc per row eases the stepped sides slightly. That stops them from flaring and lets the border round off the steps. Each step gets exactly 3 sc for its 3 unworked stitches. The corner groups add 2 sts per corner in Round 2, which is exactly what a convex corner needs to lie flat. Two rounds add 1/4 in (0.6 cm) per side, so:
– Width: 3 1/8 in (7.9 cm) becomes 3 5/8 in (9.2 cm).
– Height: 3.6 in (9.1 cm) becomes 4.1 in (10.4 cm).
Final Blocking
- Mist the piece lightly with water, or soak it briefly and roll it in a towel.
- Lay it right side up on a blocking mat.
- Pin the 4 leg-bottom corners first, keeping the legs straight and parallel.
- Pin the top of the fan so the height is 4.1 in (10.4 cm).
- Pin the crossbar edges out to 3 5/8 in (9.2 cm) wide.
- Use a pin or the hook handle to shape the hole into a neat triangle.
- Smooth each shell with your fingertips so the fans sit flat and even.
- Optional: spray lightly with fabric stiffener for a firm keychain.
- Let it dry completely before removing the pins.
- Open the jump ring with two pliers. Thread it through the center 2 sts at the top of Round 2, add the keyring chain, and close it tightly.
Final Quality-Control Checklist
- Width is 3 5/8 in (9.2 cm) and height is 4.1 in (10.4 cm), within 1/8 in (0.3 cm).
- The colors strictly alternate by row: cream on odd rows and navy on even rows.
- Both legs are the same height and the same width, 7/8 in (2.2 cm) before the border.
- The triangle hole is centered and fully outlined in navy.
- Border Round 2 has 134 sts, and all 6 corners lie flat.
- No carried strands show through the border.
- The jump ring is fully closed with no gap.
Troubleshooting
- Edges ripple: You have too many border stitches. Recheck that each row end has exactly 2 sc.
- Corners curl: You missed a 3-sc corner group. Rip back to that corner and add it.
- The hole closes up or looks lopsided: Check the Row 7 dc counts (4 dc on each side) and the skips in Row 8 (1 and 2 on the left, 2 and 1 on the right).
- The legs splay apart: The Row 4 ch-7 is too loose. Rework it with a firmer tension.
- The piece is wider than 25 sts at the crossbar: The shells may be crowding. Count each shell as exactly 5 dc.
- Carried yarn shows: Tug it gently so it lies flat before you work the border.
Care
Hand wash in cool water with mild soap, press out the water in a towel, and reshape it while damp. Lay it flat to dry. If you used stiffener, reapply it after washing.

Final Notes
Everything comes back to one measurement chain:
– The 7-stitch legs measure 7/8 in (2.2 cm) wide.
– They join into a 25-stitch crossbar 3 1/8 in (7.9 cm) wide.
– The letter steps in to 19, then 13, then 7 stitches over 12 rows, for a height of 3.6 in (9.1 cm).
– Two border rounds add 1/4 in (0.6 cm) per side, for a finished charm 3 5/8 in (9.2 cm) wide by 4.1 in (10.4 cm) tall.
Check gauge on your first leg and count each row. Your navy and cream monogram will come out crisp and ready to clip on.
Happy crocheting!