

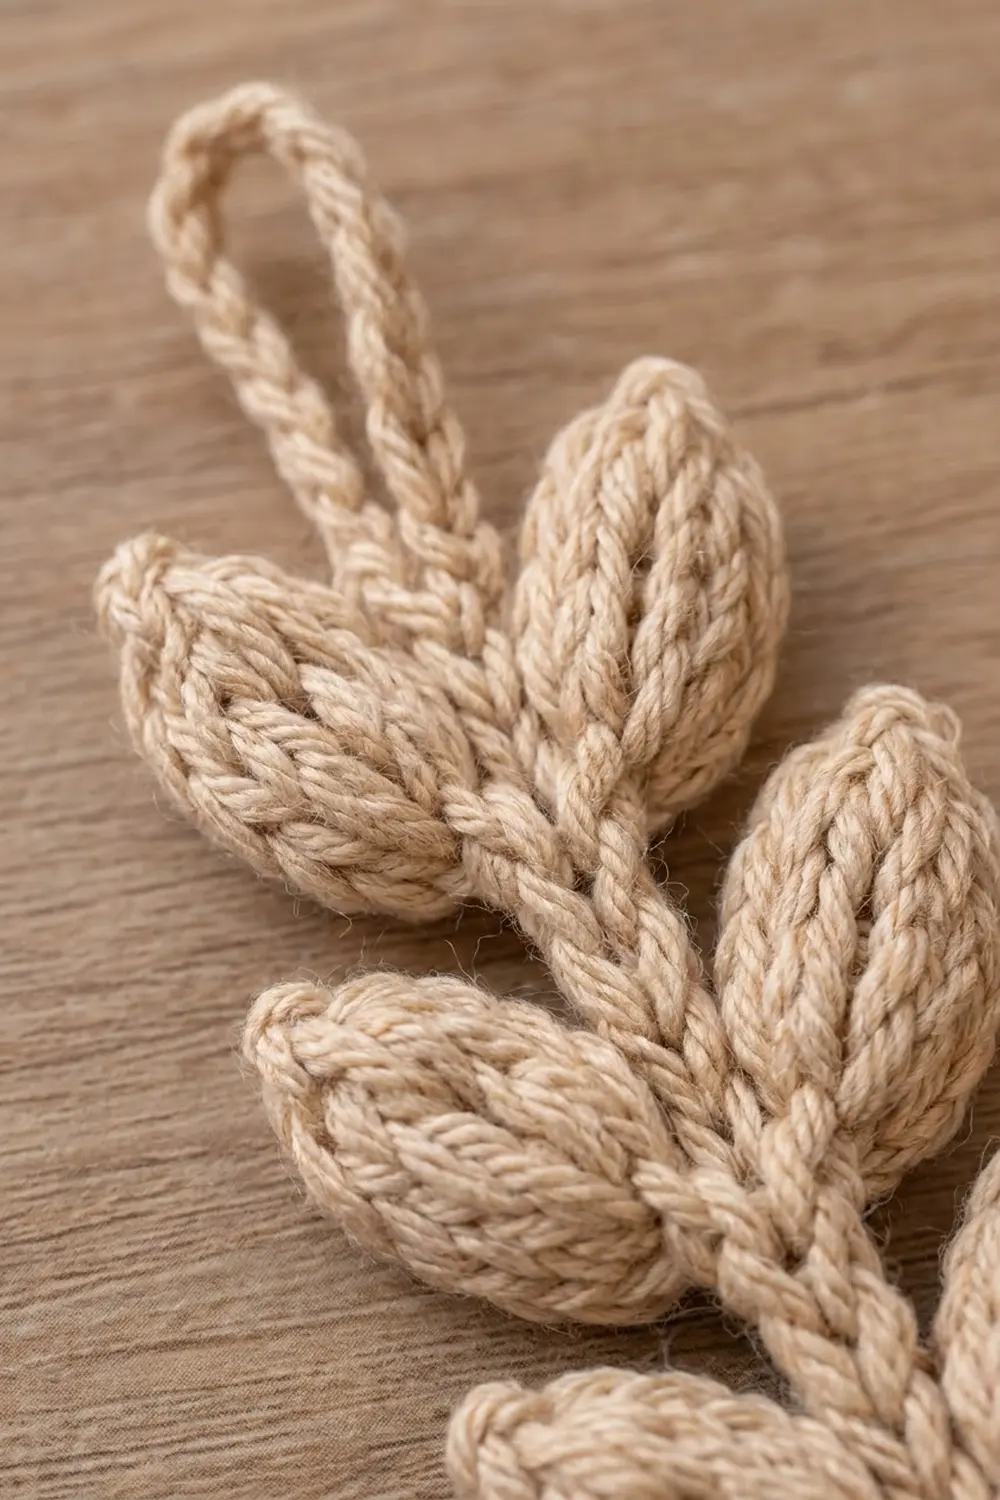
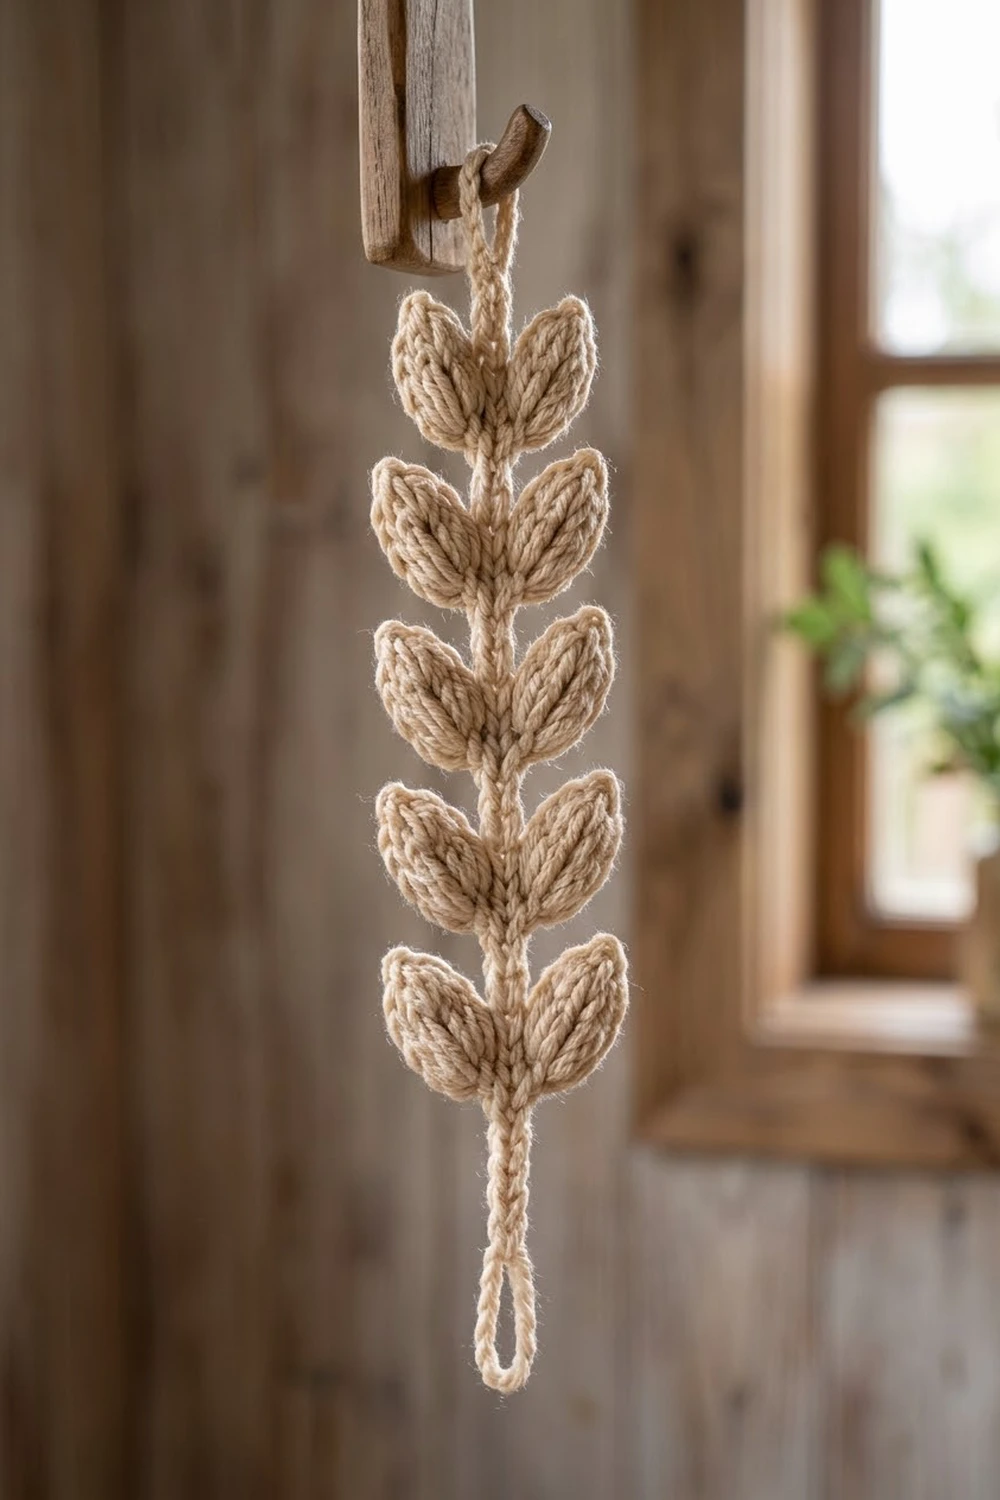
The Oat Sprig Leaf Strip is a small, textured crochet sprig that looks like a stalk of grain. A braided chain stem runs up the center, and seven pairs of plump, pointed leaves angle upward along it. A small loop at the top lets you hang it, tie it onto a gift, or stitch it on as an appliqué.
The sample uses one color, a warm natural oatmeal beige. A single neutral shade keeps the focus on the texture, so you see the rounded leaves, the center ridges and the braided stem. It suits farmhouse, cottage and calm neutral decor.
This pattern uses US crochet terms. The finished strip is 8.75 in (22.2 cm) long, including the hanging loop, and 2.5 in (6.4 cm) wide at its widest point.
Construction is simple and stays in one piece from start to finish. You chain the stem from the bottom up and make each leaf as you go: chain out, work around that chain, and anchor the leaf back to the stem. After the top loop, you slip stitch back down the stem to give it the raised, braided spine. There are no seams and no separate pieces.
Finished Size and Construction
- Finished size: 8.75 in (22.2 cm) long × 2.5 in (6.4 cm) wide
- Skill level: Easy / advanced beginner
- Terminology: US crochet terms
- Yarn weight: Worsted (#4)
- Hook: 5.0 mm (US H-8)
- Number of pieces: 1
- Layout: One vertical strip: bottom stem, 7 leaf pairs, top stem, hanging loop
- Piece size: 8.75 in × 2.5 in (22.2 cm × 6.4 cm)
- Size before border (spine row): 8.75 in (22.2 cm) long, slightly loose and twisty
- Border depth: 0 in (0 cm) of added width. The slip-stitch spine adds thickness and firmness, not width.
Materials
Yarn advice: Choose a smooth, plied worsted-weight cotton or cotton blend. Cotton shows stitches clearly and holds the leaf points well after blocking. Very fuzzy or loosely spun yarn will blur the center ridges.
- Natural oatmeal beige (only color): 15 g, about 30 m (33 yd)
Tools:
- 5.0 mm (US H-8) crochet hook
- Tapestry needle
- Scissors
- 1 locking stitch marker
- Rust-proof pins
- Blocking mat or folded towel
- Spray bottle with clean water
- Ruler or tape measure
The yarn amount includes a margin for one test leaf, tails, and small differences in tension. The strip itself uses about 20 m (22 yd).
Abbreviations (US Terms)
- ch – chain
- sl st – slip stitch
- sc – single crochet
- hdc – half double crochet
- dc – double crochet
- st(s) – stitch(es)
- sk – skip
- RS – right side
Special stitches:
- Surface slip stitch (surface sl st): Hold the yarn behind the work. Insert the hook from front to back through the fabric at the marked spot, pull up a loop, and draw it through the loop on your hook. Each surface sl st makes one small V on the front of the work.
- Back bump: The small horizontal bar on the back of a chain stitch. Working into back bumps leaves the front Vs of the chain on show, which gives the braided look.
Gauge and Checkpoints
Test one leaf first. Ch 9, then work the Leaf instructions below on the last 8 ch. (The extra ch stands in for a stem.) Pin it flat without stretching and measure it.
- Leaf gauge: One leaf measures 1.75 in (4.4 cm) from base to tip and 0.875 in (2.2 cm) across at its widest point.
- Stem gauge: 4 stem ch = 1 in (2.5 cm), measured after the spine row.
Checkpoints during the work:
- After the bottom stem (8 ch): 2 in (5.1 cm), unstretched.
- After Pair 3: 14 stem ch from the bottom, so the stem measures 3.5 in (8.9 cm) up to Pair 3.
- After Pair 7: 26 stem ch, so the stem measures 6.5 in (16.5 cm) up to Pair 7.
- After the top stem: 30 stem ch in total, so the stem measures 7.5 in (19.1 cm).
- After the spine row and blocking: 8.75 in (22.2 cm) long overall × 2.5 in (6.4 cm) wide.
If your leaf is too big (longer than 1.875 in / 4.8 cm), go down to a 4.5 mm hook. If it is too small (shorter than 1.625 in / 4.1 cm), go up to a 5.5 mm hook. Do not change the stitch counts. The leaf shape depends on the sc–hdc–dc–dc–hdc–sc sequence.
Pattern
Leaf (used 14 times)
You always start a leaf with the hook on the stem stitch the leaf grows from.
- Leaf chain: Ch 8. The first ch from the hook is the tip end of the leaf, and the last ch is next to the stem.
- Side A: Sk the first ch from the hook (the tip ch). Sl st in next ch, sc in next ch, hdc in next ch, dc in next 2 ch, hdc in next ch, sc in last ch (next to the stem). (7 sts)
- Base turn: Ch 1. Rotate the leaf so you can work along the unused loops on the other side of the leaf chain.
- Side B: Sc in the same last ch, hdc in next ch, dc in next 2 ch, hdc in next ch, sc in next ch, sl st in next ch. You now reach the ch that holds Side A’s sl st. (7 sts)
- Tip: Ch 2, sl st in the skipped tip ch. This forms the pointed tip.
- Center ridge: Work 6 surface sl st down the center line of the leaf, between Side A and Side B, from the tip to the base. Insert the hook into the leaf chain each time. This makes the shallow center ridge.
- Anchor: Sl st into the stem ch the leaf grew from.
Leaf stitch count: 7 sts (Side A) + 1 ch (base) + 7 sts (Side B) = 15. Then add the ch-2 tip, 6 surface sl st and 1 anchor sl st.
The dc stitches sit at the widest part of each side, which gives the oval shape. The sc and sl st at each end taper the leaf into a point at the tip and a narrow base at the stem.
Bottom Stem
Leave an 8 in (20.3 cm) tail.
Stem: Ch 8. Place the marker in the 1st ch so you can find the bottom of the stem later.
Stem count: 8 ch, 2 in (5.1 cm).
Leaf Pairs
Pair 1:
- Left leaf: Work one Leaf, anchoring it into ch 8 of the stem.
- Right leaf: Work one Leaf off the same stem ch. Pull the left leaf to the left so the new leaf sits on the right side, then anchor it into the same stem ch.
Count: 8 stem ch, 2 leaves.
Pairs 2–7:
- Stem: Ch 3.
- Leaves: Work a left leaf and a right leaf off the last stem ch, exactly as in Pair 1.
Repeat Pairs 2–7 for a total of 7 pairs.
Stem counts after each pair:
- Pair 2: 11 stem ch, 4 leaves
- Pair 3: 14 stem ch, 6 leaves, 3.5 in (8.9 cm)
- Pair 4: 17 stem ch, 8 leaves
- Pair 5: 20 stem ch, 10 leaves
- Pair 6: 23 stem ch, 12 leaves
- Pair 7: 26 stem ch, 14 leaves, 6.5 in (16.5 cm)
Each ch-3 gap is 0.75 in (1.9 cm). The leaves angle upward and overlap the gap a little, so the pairs sit close together, as in the sample.
Tip for keeping leaves on the correct side: Before each right leaf, flip the left leaf to the left and hold it with your thumb. Every pair should mirror the one below it.
Top Stem and Hanging Loop
- Top stem: Ch 4. (30 stem ch in total, 7.5 in / 19.1 cm)
- Loop: Ch 10, then sl st in the 30th stem ch (the last top stem ch) to close the loop.
The 10-ch loop folds in half and stands about 1.25 in (3.2 cm) above the stem. So the total length is 7.5 in + 1.25 in = 8.75 in (22.2 cm).
Border: Braided Spine Finish
This strip does not get a border round worked around the outside. Each leaf already has a finished outline from Sides A and B. The finishing “border” is one slip-stitch row worked down the stem. It turns the plain chain into the raised, braided spine you see in the photo.
Border gauge: 4 sl st = 1 in (2.5 cm), matching the stem chain.
Spine row: With the loop just closed, turn the strip over so you face the back of the stem. Sl st into the back bump of each stem ch from the top down: the 30th ch, then the 29th, and so on down to the marked 1st ch. (30 sl st)
Count by section:
- Top stem: 4 sl st
- Six ch-3 gaps between the pairs: 6 × 3 = 18 sl st
- Bottom stem: 8 sl st
Total: 4 + 18 + 8 = 30 sl st.
At each leaf pair, work the sl st into the back bump of the stem ch only. Do not go into the leaf anchors. Fasten off with a 6 in (15.2 cm) tail.
Why the math works: The spine row places exactly 1 sl st in each of the 30 stem ch and adds none. So the stem stays 30 × 0.25 in = 7.5 in (19.1 cm). The row stacks a second line of Vs beside the chain’s own Vs, which reads as a two-strand braid. It also firms up the stem so the strip hangs straight. No width is added, so the strip stays 2.5 in (6.4 cm) wide.
Final Blocking
- Weave in ends. Run the bottom tail up through the back of the bottom stem for 1 in (2.5 cm) and back down. Run the top tail through the back of the loop join. Do not trim yet.
- Mist. Spray the strip until it is damp, not dripping.
- Pin the stem. Lay the strip right side up. Pin the bottom tip, the loop and the base of Pair 4 so the stem is perfectly straight and measures 7.5 in (19.1 cm) from the bottom tip to the loop join.
- Shape the leaves. Angle each leaf upward at about 35 degrees from the stem. Pin each tip so the strip measures 2.5 in (6.4 cm) across at Pair 4. Make sure each left leaf mirrors its right partner.
- Puff the leaves. Pinch each leaf gently along its center ridge so the sides round up slightly.
- Dry. Leave it to dry completely, about 6–8 hours.
- Trim. Unpin, check the measurements, then trim the tails close.
Final Quality-Control Checklist
- 7 leaf pairs, 14 leaves in total
- Each leaf: 7 sts on Side A, 1 base ch, 7 sts on Side B, a ch-2 pointed tip, and a visible center ridge
- Each leaf is 1.75 in × 0.875 in (4.4 cm × 2.2 cm)
- The bottom stem below Pair 1 is 2 in (5.1 cm)
- The gaps between pairs are even, at 0.75 in (1.9 cm)
- The spine row has 30 sl st and sits flat
- The hanging loop closes neatly at the 30th stem ch
- The strip is 8.75 in (22.2 cm) long × 2.5 in (6.4 cm) wide
- All ends are secured on the back and invisible from the front
Troubleshooting
- Leaves curl or cup: Your tension on Side B is tighter than on Side A. Relax your grip and block with firmer pins.
- Leaf tips are rounded, not pointed: You probably missed the skipped tip ch. Rework the ch-2 tip and make sure the sl st goes into that tip ch.
- Center ridge disappears: Pull up the surface sl st loops slightly taller, and keep them exactly between the two sides.
- Stem twists into a spiral: You worked the spine row into the front loops instead of the back bumps. Rip it out and redo it in the back bumps.
- Strip too long: Your chain stitches are loose. Use a smaller hook for the stem chains only.
- Leaves crowd and overlap heavily: Check that each gap has 3 ch, not 2.
- Pairs not mirrored: You made a right leaf before the left one. Keep the left-then-right order for every pair.
Care
Hand wash in cool water with mild soap, press out the water in a towel, and lay flat to dry. If needed, re-pin the leaf angles while the strip is damp.
Final Notes
The measurement chain is short and predictable:
- Each leaf is 1.75 in × 0.875 in (4.4 cm × 2.2 cm).
- The 8-ch bottom stem is 2 in (5.1 cm).
- The six 3-ch gaps add 4.5 in (11.4 cm), bringing the stem to 6.5 in (16.5 cm) at Pair 7.
- The 4-ch top stem brings it to 7.5 in (19.1 cm).
- The 10-ch loop adds 1.25 in (3.2 cm), for a total length of 8.75 in (22.2 cm).
- The spine row adds 30 sl st, one per stem ch, so the length stays the same while the stem gets its braided look.
- Blocked leaves at about 35 degrees give the 2.5 in (6.4 cm) width.
Check your test leaf, count your stem chains, and the strip will come out the right size. Happy crocheting!