

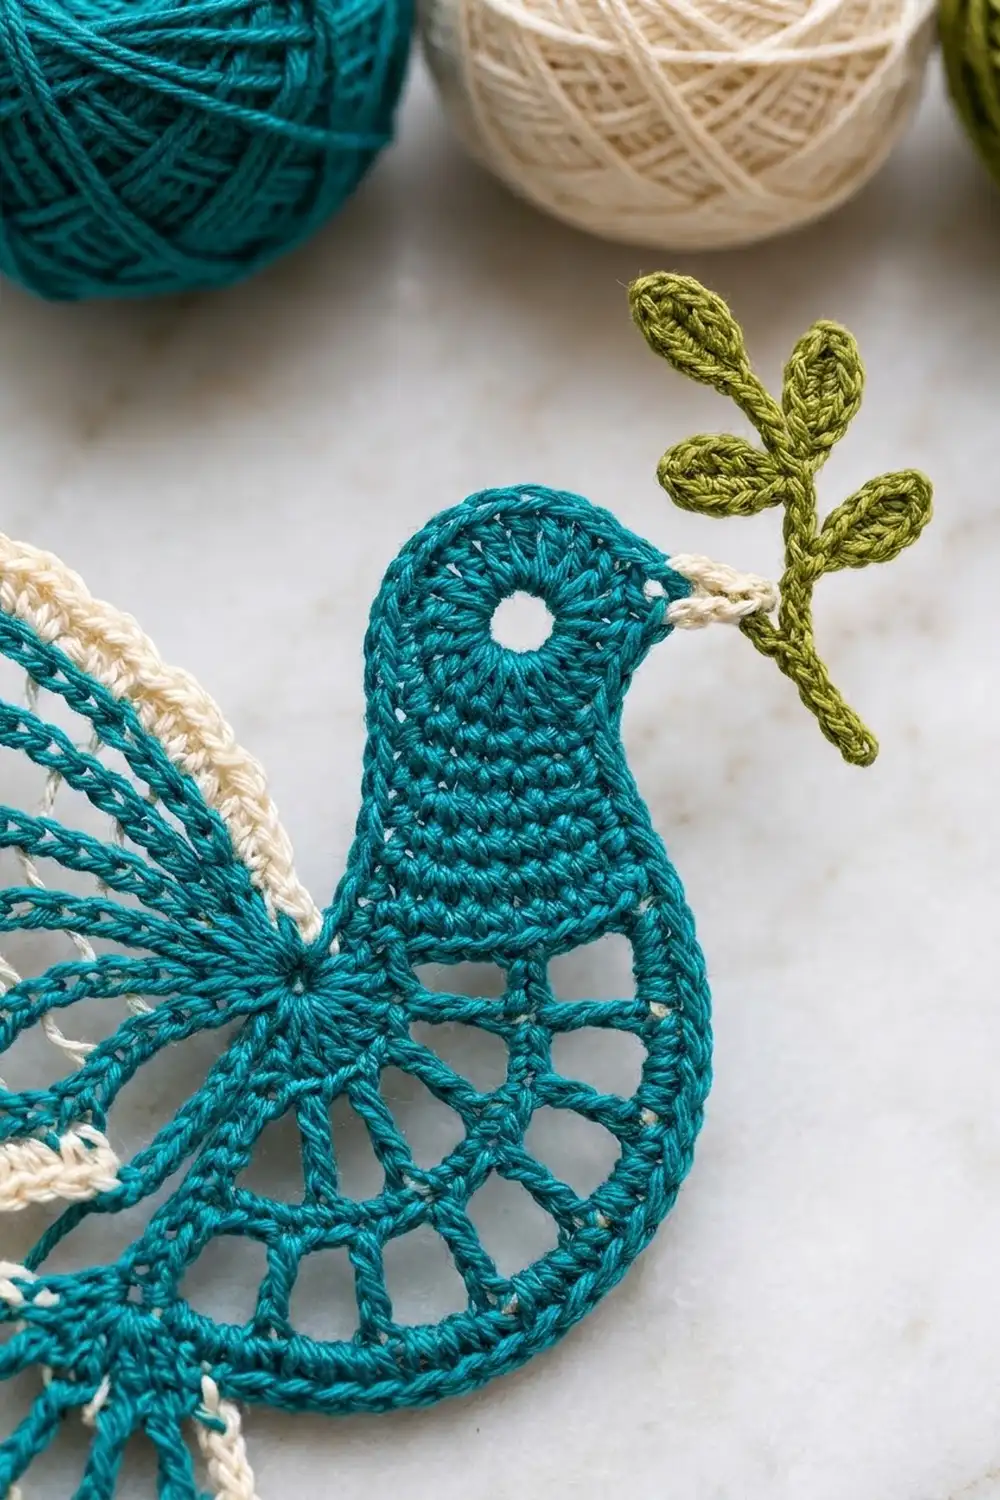
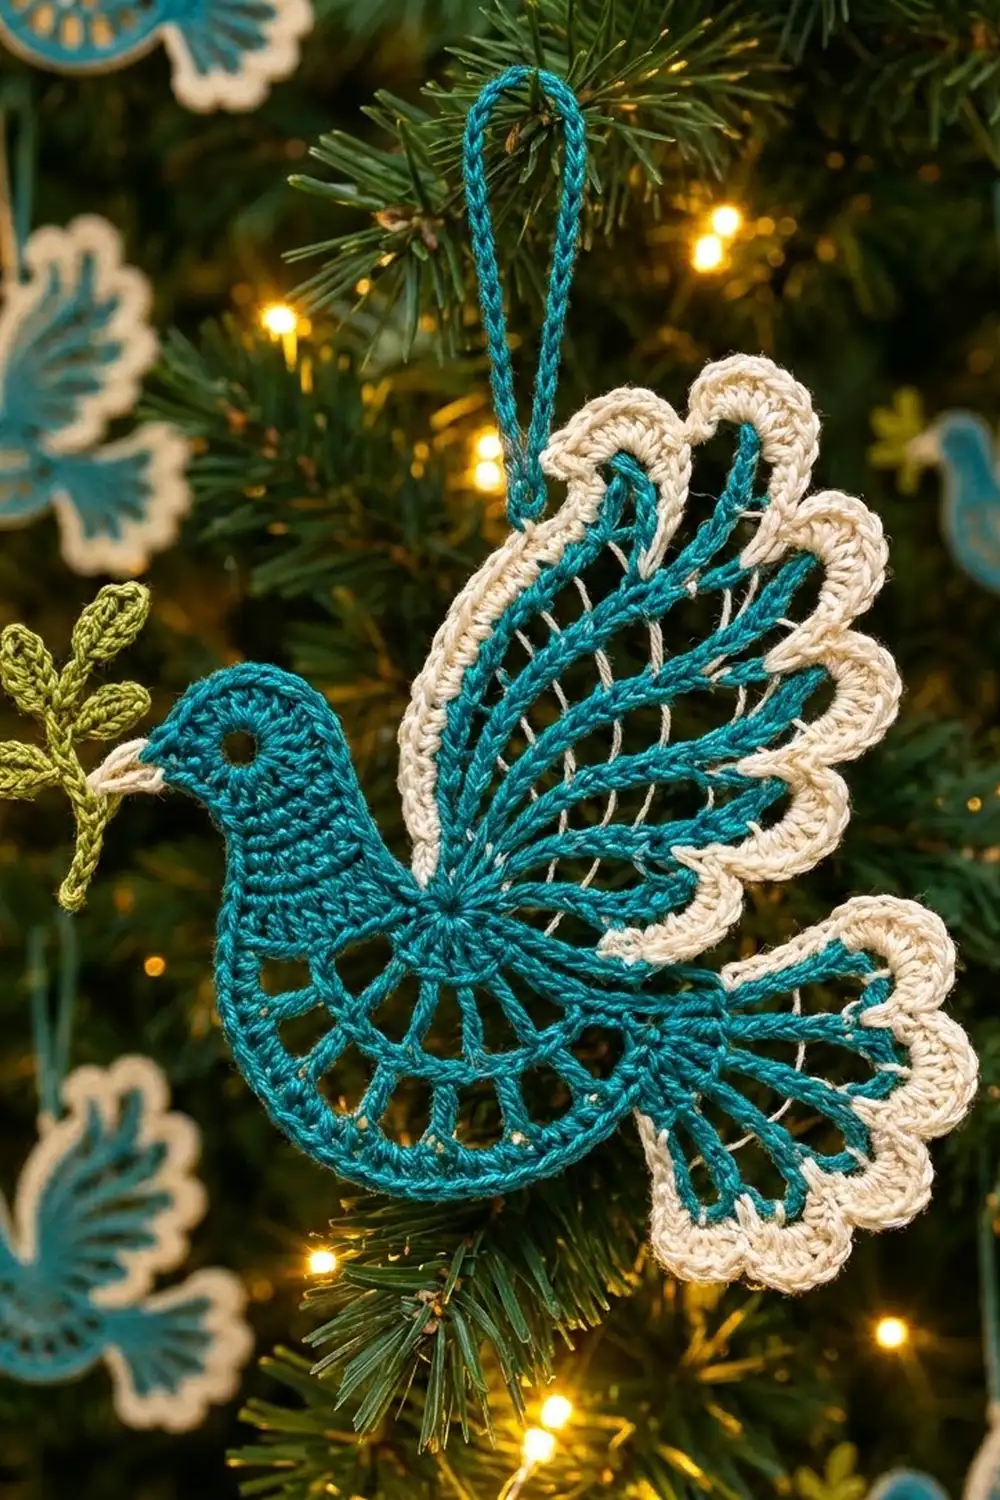
This little dove is a lacy hanging ornament with a solid teal head, an openwork belly, a tall fanned wing, and a fanned tail. The wing and tail have cream scalloped edges, and the dove carries a small green olive sprig in its beak. It looks like a folk-art dove in thread: graphic and light, and it catches the glow of tree lights through its open windows.
The palette is deep teal for the body and the ribs of the wing and tail, warm cream for the scallops, and olive green for the sprig. This pattern uses US crochet terms throughout.
The finished ornament measures about 6 in (15.2 cm) wide and 5 in (12.7 cm) tall, not counting the hanging loop. The loop adds about 2 in (5.1 cm).
You’ll make four small parts and sew them together into one ornament: the body (a half-moon openwork belly with the back and head worked on top), the wing, the tail, and the olive sprig. A chain hanging loop finishes it off.
Finished Size and Construction
- Finished size: 6 in (15.2 cm) wide x 5 in (12.7 cm) tall, plus a 2 in (5.1 cm) loop
- Skill level: Intermediate
- Terminology: US crochet terms
- Yarn weight: Sport weight (#2 fine) mercerized cotton
- Hook: 2.5 mm
- Number of pieces: 4 parts (body, wing, tail, sprig) plus 1 hanging loop, joined into a single ornament
- Layout: the wing rises from the center of the body and angles up and back, the tail tucks behind the back end of the body, and the sprig sits in the beak
- Piece sizes after edging: body 4 in (10.2 cm) wide x 3.5 in (8.9 cm) tall; wing 2.5 in (6.4 cm) long; tail 1.75 in (4.4 cm) long
- Size before edging: wing 2 in (5.1 cm) long, tail 1.25 in (3.2 cm) long
- Edging (border) depth: about 0.5 in (1.3 cm) of cream on the wing and tail; the body gets 1 round of teal sc
Materials
Use a smooth, mercerized cotton in sport weight. The sheen shows off the ribs, and cotton holds a crisp shape after blocking. Avoid fuzzy or very stretchy yarn, because the open windows will blur and sag.
- Teal: 15 g / about 46 m (body, wing and tail ribs, hanging loop)
- Cream: 6 g / about 19 m (scallop edging on the wing and tail)
- Olive green: 3 g / about 9 m (sprig)
These quantities include a margin for your gauge swatch and for weaving in ends.
Tools: 2.5 mm hook, tapestry needle, scissors, 4 stitch markers, rust-proof pins, a blocking mat or folded towel, and a spray bottle. Spray starch is optional.
Abbreviations (US Terms)
- ch – chain
- sl st – slip stitch
- sc – single crochet
- hdc – half double crochet
- dc – double crochet
- tr – treble crochet (yo twice)
- dtr – double treble crochet (yo 3 times)
- sc2tog – single crochet 2 together
- sk – skip
- sp(s) – space(s)
- st(s) – stitch(es)
- RS – right side
Special stitch: Shell – work the stated number of dc into one stitch (7 dc on the tail, 9 dc on the wing).
Gauge and Checkpoints
Gauge: 22 dc and 11 dc rows = 4 in (10.2 cm). That works out to about 0.18 in (0.5 cm) per dc and 0.36 in (0.9 cm) per dc row.
Make the tail first as your test piece. It’s the smallest part, and it’s built the same way as the wing: a magic ring that fans out into ribs.
Checkpoints:
- Tail after Row 3: 1.25 in (3.2 cm) from the ring to the edge
- Belly after Row 5: straight edge 3.25 in (8.3 cm) long
- Wing after Row 4: 2 in (5.1 cm) from the ring to the edge
- Finished body: 4 in (10.2 cm) wide
Too big? Go down to a 2.25 mm hook. Too small or stiff? Go up to a 2.75 mm hook. If your belly cups, your stitches are tighter than gauge. If it ruffles, they’re looser.
Body
The body has three parts: a half-moon belly worked in rows from a magic ring, a back and head worked into the straight edge, and a teal edging round with the beak.
Belly (Half-Moon)
With teal:
Row 1: Make a magic ring. Ch 3 (counts as dc), 8 dc in ring. Pull the ring closed. Turn. (9 dc)
Row 2: Ch 3 (counts as dc), dc in same st, 2 dc in each of next 7 sts, dc in top of turning ch. Turn. (17 dc)
Row 3 (window row): Ch 6 (counts as tr + ch 2), sk next dc, tr in next dc, ch 2, sk next dc; repeat from * 7 times, tr in top of turning ch. Turn. (9 tr, 8 ch-2 sps)*
The 9 tr are the spokes and the 8 ch-2 sps are the tall windows.
Row 4: Ch 1, sc in first tr, [2 sc in next ch-2 sp, sc in next tr] 8 times. Turn. (25 sc)
Row 5: Ch 1, sc in first st, [sc in next 5 sts, 2 sc in next st] 4 times. Do not fasten off. (29 sc)
Checkpoint: The belly lies flat as a half circle with a straight edge of 3.25 in (8.3 cm).
Back and Head
Rotate so the straight edge is on top. You’ll work into the row ends. Place a marker on the end where you finished. This is the tail end, and the other end is the head end.
Row 1 (RS): Ch 1. Working into the row ends of the straight edge, work 1 sc in each sc row end, 3 sc in each tr row end, and 2 sc in each dc row end. That’s 9 sc on each side of the ring. Turn. (18 sc)
Row 2 (from head end): Ch 3 (counts as dc), dc in next 13 sts, hdc in next 2 sts, sc2tog over last 2 sts. Turn. (17 sts)
Row 3 (from tail end): Sl st in first 3 sts, ch 1, sc in next 2 sts, hdc in next 4 sts, dc in next 8 sts. Turn. (14 sts, not counting sl sts)
Row 4 (head only): Ch 3 (counts as dc), dc in next 5 sts, hdc in next st, sc in next st. Leave the remaining 6 sts unworked. Turn. (8 sts)
Row 5: Ch 1, sc in first st, hdc in next st, dc in next 2 sts, ch 2, sk next st (this is the eye), dc in next 2 sts, (dc, hdc) in last st. Turn. (8 sts, 1 ch-2 sp)
Row 6: Ch 1, sc2tog over first 2 sts, sc in next 2 sts, 2 sc in ch-2 sp, sc in next 2 sts, sc2tog over last 2 sts. Fasten off. (8 sc)
The skipped stitch in Row 5 leaves a round eyelet for the eye. The (dc, hdc) at the end of Row 5 rounds out the forehead.
Body Edging and Beak
Join teal at the head-end corner of the belly. Work 1 round:
- 29 sc across Row 5 of the belly (1 in each st)
- 3 sc into the tail tip
- 30 sc evenly along the back and over the head to the front of the face
- Beak: ch 4, sl st in 2nd ch from hook, sc in next 2 ch
- 8 sc down the front of the head to the belly
Sl st to the first sc to join, then fasten off. (70 sc + beak)
You can use 28 to 32 sc along the back and head if that’s what keeps the edge flat. The other counts are fixed.
Checkpoint: The body measures 4 in (10.2 cm) wide x 3.5 in (8.9 cm) tall.
Wing
With teal:
Row 1: Make a magic ring. Ch 4 (counts as tr), [ch 1, tr] 5 times in ring. Pull the ring closed. Turn. (6 tr, 5 ch-1 sps)
Row 2: Ch 4 (counts as tr), [ch 2, tr in next tr] 5 times. Turn. (6 tr, 5 ch-2 sps)
Row 3: Ch 5 (counts as dtr), [ch 3, dtr in next tr] 5 times. Turn. (6 dtr, 5 ch-3 sps)
Row 4: Ch 1, sc in first dtr, [5 sc in next ch-3 sp, sc in next dtr] 5 times. Fasten off. (31 sc)
The tr and dtr stack up into 6 long teal ribs, which give the wing its feathered look. Checkpoint: the wing is 2 in (5.1 cm) long from the ring to the edge.
Tail
With teal:
Row 1: Make a magic ring. Ch 4 (counts as tr), [ch 1, tr] 5 times in ring. Pull the ring closed. Turn. (6 tr, 5 ch-1 sps)
Row 2: Ch 4 (counts as tr), [ch 3, tr in next tr] 5 times. Turn. (6 tr, 5 ch-3 sps)
Row 3: Ch 1, sc in first tr, [5 sc in next ch-3 sp, sc in next tr] 5 times. Fasten off. (31 sc)
Checkpoint: the tail is 1.25 in (3.2 cm) long from the ring to the edge.
Olive Sprig
With green:
- Stem and top leaf: Ch 13 for the stem, then ch 6 more. Sl st in 2nd ch from hook, sc in next ch, hdc in next ch, sc in next ch, sl st in next ch. (top leaf, 5 sts)
- Leaf pairs: Sl st in next 3 stem ch, [ch 6, sl st in 2nd ch from hook, sc in next ch, hdc in next ch, sc in next ch, sl st in next ch] twice; repeat from * 2 more times. (6 side leaves)*
- Finish: Sl st in the remaining 4 stem ch. Fasten off and leave an 8 in (20.3 cm) tail.
That gives 7 leaves in total. Nudge the leaves of each pair to opposite sides of the stem.
Make All Pieces
Here’s what you need before assembly:
- Teal: 1 body, 1 wing, 1 tail, 1 hanging loop
- Cream: edging on the wing and the tail
- Green: 1 sprig
Layout (front view):
              [ LOOP ]
             [  WING  ]
   [SPRIG][HEAD][BACK][TAIL]
          [   BELLY   ]
Hanging loop: With teal, ch 30, then sl st in the back bump of each ch across. (30 sl sts, about 4.25 in / 10.8 cm) Fasten off and leave a 6 in (15.2 cm) tail.
Border (Cream Scallop Edging)
The edging uses the same gauge as the rest of the piece. Each finished scallop is about 0.6 in (1.5 cm) wide on the tail and 0.75 in (1.9 cm) wide on the wing.
Tail Edging
Row 4: With the RS facing, join cream in the first sc. Ch 1, sc in same st, sk 2 sts, 7 dc in next st, sk 2 sts, sc in next st; repeat from * 4 more times. Turn. (6 sc + 5 shells of 7 dc = 41 sts)*
Row 5: Ch 1, sl st in first sc, [sc in next dc, ch 1] 6 times, sc in next dc, sl st in next sc; repeat from * 4 more times. Fasten off. (35 sc, 30 ch-1 sps, 6 sl sts)*
Wing Edging
Row 5: With the RS facing, join cream in the first sc. Ch 1, sc in same st, sk 2 sts, 9 dc in next st, sk 2 sts, sc in next st; repeat from * 4 more times. Turn. (6 sc + 5 shells of 9 dc = 51 sts)*
Row 6: Ch 1, sl st in first sc, [sc in next dc, ch 1] 8 times, sc in next dc, sl st in next sc; repeat from * 4 more times. Fasten off. (45 sc, 40 ch-1 sps, 6 sl sts)*
Why the Math Works
Each teal edge has 31 sc: 1 sc on the first rib, then 5 sections of (5 sc in the space + 1 sc on the next rib). Each shell repeat uses 6 sts (sk 2, shell, sk 2, sc), so 1 + 5 x 6 = 31. That places one shell in the middle of every window and one sc on every rib, so each feather gets one scallop. The edging adds about 0.5 in (1.3 cm), which brings the tail to 1.75 in (4.4 cm) and the wing to 2.5 in (6.4 cm).
Joining
Block the pieces lightly before you join them (see the next section) so the edges sit where you expect.
- Tail: Tuck the tail ring behind the back end of the body so that 0.5 in (1.3 cm) overlaps and the fan spreads out past the tail tip. With teal, whipstitch the tail’s Row 1 to the back of the body edging, stitch for stitch.
- Wing: Place the wing ring on the RS directly above the belly’s magic ring, so the wing ribs continue the line of the belly spokes. Angle the wing up and back toward the tail. Sew around the ring and up the first 0.5 in (1.3 cm) of the two outer ribs.
- Sprig: Slide the bottom of the stem under the beak and sew through the beak and stem 3 times.
- Loop: Fold the loop in half and sew both ends to the back of the wing base.
Keep your sewing stitches snug but not tight. Pulling hard will pucker the solid head. Weave every end into a solid area.
Size checkpoint: The assembled dove measures 6 in (15.2 cm) wide x 5 in (12.7 cm) tall.
Final Blocking
- Mist the ornament until it’s evenly damp, or dip it and press out the water in a towel.
- Pin it face up. Put the belly straight edge level and the body at 4 in (10.2 cm) wide.
- Spread the wing ribs into an even fan and pin the tip of each rib.
- Pin each cream scallop open, with one pin at the center of every shell.
- Fan the tail the same way and shape the sprig leaves.
- Spray lightly with starch if you want a stiffer ornament.
- Let it dry completely before you unpin it, usually 6 to 8 hours.
Final Quality-Control Checklist
- The belly has 8 even windows and 9 straight spokes.
- The eye eyelet is open and round.
- The wing has 6 ribs and 5 cream scallops, and the tail has 6 ribs and 5 scallops.
- Each shell is centered over a window.
- The body edging lies flat with no ripples.
- The beak is pointed and the sprig is secure.
- The loop is centered so the dove hangs level.
- The finished size is 6 in x 5 in (15.2 cm x 12.7 cm).
- All ends are woven in and invisible from the front.
Troubleshooting
- Belly cups: Your Row 5 is tight. Add 1 more 2-sc increase, or go up a hook size.
- Belly ruffles: Replace the 2 sc in one or two ch-2 spaces with 1 sc each.
- Windows look uneven: Pull up every tr to the same height and keep the ch-2s loose.
- Wing curls: Block it harder, then starch it.
- Scallops flip forward: Work the cream rows with the RS facing, as written.
- Dove tilts when hanging: Move the loop toward the heavier end.
- Eye closed up: Check that you skipped a stitch in Row 5 instead of just chaining.
Care
Hand wash in cool water with a mild soap, then press it dry in a towel. Reshape and pin it flat to dry, and re-starch if needed.
Final Notes
The sizes build on each other. If you match 22 dc to 4 in (10.2 cm), the belly’s straight edge comes out at 3.25 in (8.3 cm) and the body at 4 in (10.2 cm). The wing grows from 2 in (5.1 cm) to 2.5 in (6.4 cm) with its edging, and the tail grows from 1.25 in (3.2 cm) to 1.75 in (4.4 cm). Assembled, the dove is 6 in (15.2 cm) wide x 5 in (12.7 cm) tall, with a 2 in (5.1 cm) loop. If you check each stage as you go, the parts will fit together.
Happy crocheting!