

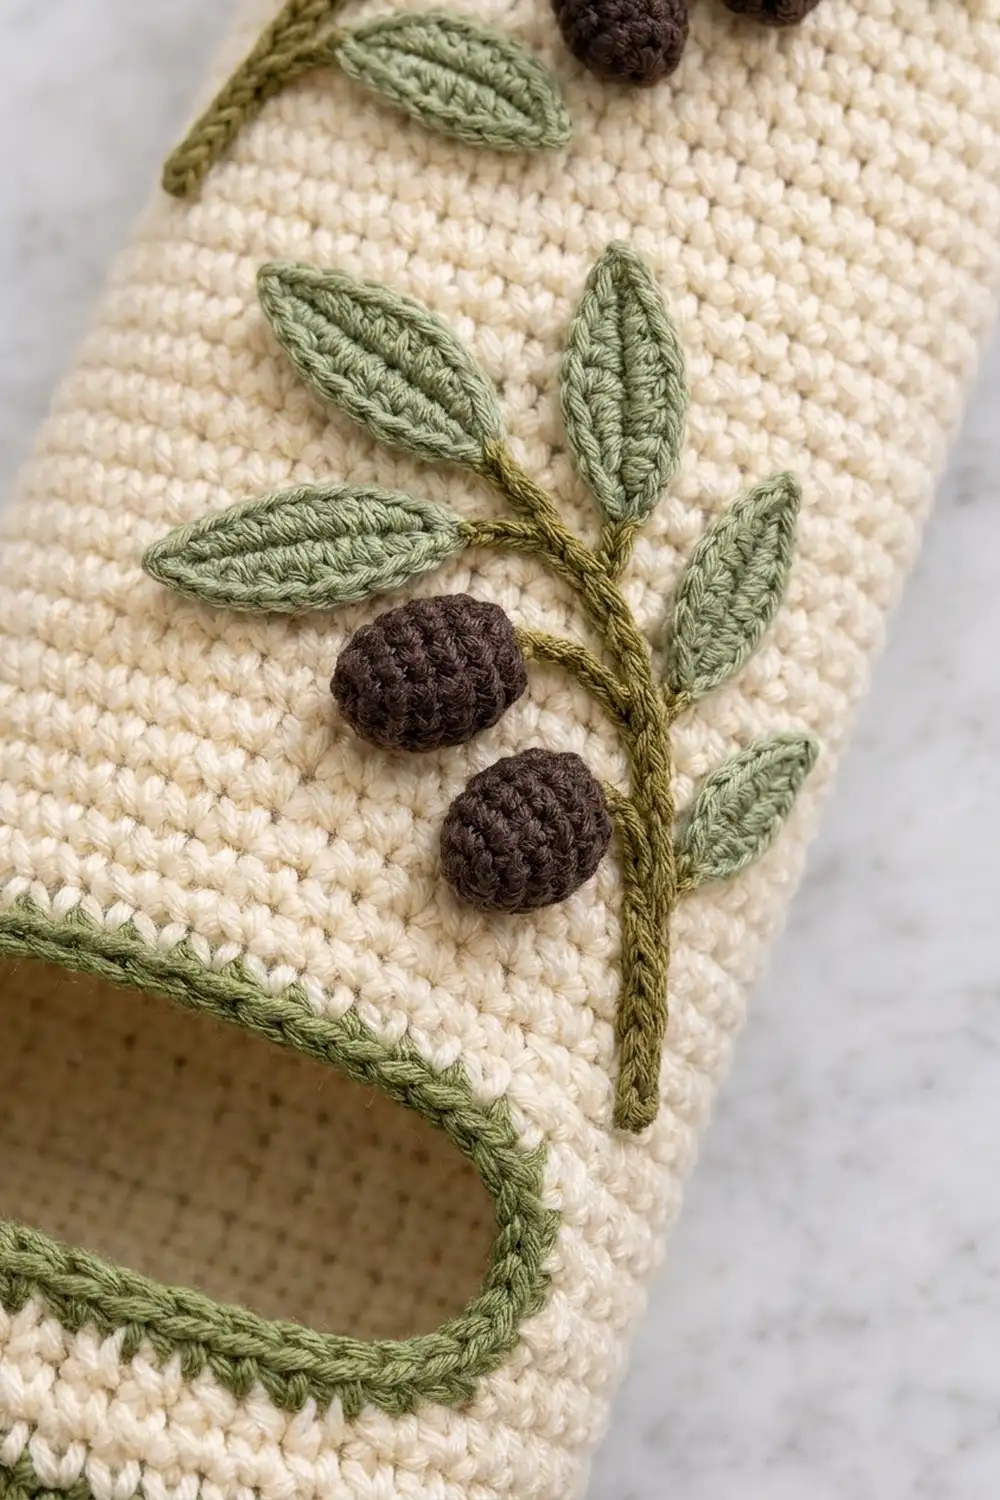
This olive-branch bag holder keeps your plastic grocery bags in one tidy place. You push the bags in through the top and pull them out one at a time through the slot near the bottom. The body is a solid cream tube with olive-green bands at the base and rim. Two sewn-on olive branches with sage leaves and dark-brown olives give it a calm Mediterranean kitchen look.
The palette uses four colors. Cream is for the body. Olive green is for the base, bands, slot edging, stems, tab and ring. Sage green is for the leaves, and dark brown is for the olives. All instructions use US crochet terms.
Laid flat, the holder measures 6 in (15.2 cm) wide and 15.6 in (39.6 cm) tall. Including the tab and ring, it hangs about 20 in (50.8 cm) long.
You start at the bottom with a flat olive-green circle. A back-loop round turns the wall upward, and you work in rounds to the top. The slot is made with a few turned rows and a chain bridge. The top band and slot edging come next, followed by the tab and covered ring. Finally, you sew on the leaves, olives and stems.
Finished Size and Construction
- Finished size (flat): 6 in (15.2 cm) wide × 15.6 in (39.6 cm) tall
- Circumference: 12 in (30.5 cm)
- Overall hanging length: about 20 in (50.8 cm)
- Skill level: Intermediate (adventurous beginners can make it)
- Terminology: US
- Yarn weight: #4 worsted, cotton
- Hook: 5.0 mm (H-8)
- Number of pieces: 1 main body, plus 1 tab, 1 covered ring, 2 stems, 10 leaves and 6 olives
- Layout: one tube, with the slot centered on the front and the branches above the slot
- Base diameter: 3.8 in (9.7 cm)
- Size before border: 6 in (15.2 cm) × 14.7 in (37.3 cm)
- Border depth: top band 0.9 in (2.3 cm); slot edging 2 rounds
Materials
Use a smooth worsted-weight cotton or cotton blend. Cotton keeps its shape when the holder is full of bags, and it washes well. Avoid splitty or fuzzy yarns, because tightly worked single crochet shows every stitch.
- Cream (body): 100 g / 170 m
- Olive green (base, bands, slot edging, tab, ring, stems): 50 g / 85 m
- Sage green (leaves): 15 g / 25 m
- Dark brown (olives): 10 g / 17 m
These quantities include a margin of about 15 percent, so you have spare yarn for a gauge check and sewing tails.
Tools:
– 5.0 mm (H-8) crochet hook
– One wooden or plastic ring, 3 in (7.6 cm) outer diameter
– Stitch markers (at least 4)
– Tapestry needle
– Scissors
– Measuring tape
– Pins and a blocking mat
Abbreviations (US Terms)
- ch – chain
- sl st – slip stitch
- sc – single crochet
- hdc – half double crochet
- dc – double crochet
- BLO – back loop only
- st(s) – stitch(es)
- rnd(s) – round(s)
- RS / WS – right side / wrong side
Special technique – back-bump slip stitch: Turn the chain over and work into the small bump on the back of each chain. This gives a neat, rounded stem.
Gauge and Checkpoints
Gauge: 16 sc and 18 rnds = 4 in (10.2 cm) in sc worked in the round.
Make the base first and treat it as your test piece. It tells you quickly whether your gauge is right.
- After Rnd 8: the base is 3.8 in (9.7 cm) across.
- After Rnd 19: the wall is 2.4 in (6.1 cm) tall, measured from the BLO ridge.
- After Rnd 28: flattened, the tube is 6 in (15.2 cm) wide.
- After Rnd 74: the tube is 14.7 in (37.3 cm) tall.
- After the top band: the tube is 15.6 in (39.6 cm) tall.
If the base is too big, change to a hook 0.5 mm smaller. If it is too small or cups upward, change to a hook 0.5 mm larger. Change only the hook, not the stitch counts, so every later number stays correct.
Main Body
Work in joined rounds: join each rnd with a sl st to the first sc, then ch 1. The ch 1 does not count as a stitch. Keep the RS facing out unless the pattern tells you to turn.
Base (olive green)
Rnd 1: Make a magic ring and work 6 sc into it. Join. (6 sts)
Rnd 2: 2 sc in each st. (12 sts)
Rnd 3: Sc 1, 2 sc in next; repeat 6 times. (18 sts)
Rnd 4: Sc 2, 2 sc in next; repeat 6 times. (24 sts)
Rnd 5: Sc 3, 2 sc in next; repeat 6 times. (30 sts)
Rnd 6: Sc 4, 2 sc in next; repeat 6 times. (36 sts)
Rnd 7: Sc 5, 2 sc in next; repeat 6 times. (42 sts)
Rnd 8: Sc 6, 2 sc in next; repeat 6 times. (48 sts)
Checkpoint: the circle lies flat and measures 3.8 in (9.7 cm) across.
Bottom band (olive green)
Rnd 9: Sc in the BLO of each st. (48 sts) This makes a ridge, and the wall starts to rise from it.
Rnds 10–12: Sc in each st. (48 sts)
Change to cream on the final sl st of Rnd 12. Fasten off the olive green.
Lower body (cream)
Rnds 13–19: Sc in each st. (48 sts)
Fasten off the cream after Rnd 19. Flatten the tube with the round’s join on the left fold. Stitches 1–24 are now the front and stitches 25–48 are the back. The slot will sit over stitches 6–19, which leaves 5 sts on each side of it on the front.
Dispensing slot (cream, worked in rows)
Row 20 (RS): Join the cream in st 20. Ch 1, then sc in sts 20–48 and sc in sts 1–5. (34 sts) Turn. Leave sts 6–19 unworked.
Rows 21–26: Ch 1, sc in each st across. (34 sts) Turn at the end of each row except Row 26.
Row 26 is a RS row and ends at st 5.
Rnd 27 (bridge): Ch 14, then sc in each of the 34 sts. Join with a sl st to the first ch. (34 sc + 14 ch = 48 sts)
Rnd 28: Ch 1, sc in each ch and each sc. (48 sts)
Move your beginning-of-round marker to the first stitch of Rnd 28. The opening is 14 sts (3.5 in / 8.9 cm) wide and 7 rows (1.6 in / 4.1 cm) tall.
Upper body (cream)
Rnds 29–74: Sc in each st. (48 sts)
Checkpoint: the tube is 14.7 in (37.3 cm) tall from the BLO ridge and 6 in (15.2 cm) wide when flat. Change to olive green on the last sl st, then work the top band (see Border) before you add the tab.
Hanging Tab and Ring
Covered ring (olive green)
Attach the yarn to the ring with a slipknot. Work sc tightly around the ring until it is fully covered, about 60 sc. Push the stitches together as you go so the ring doesn’t show through. Join with a sl st and fasten off, leaving a 6 in (15.2 cm) tail. Turn the stitch edges to the outside of the ring.
Tab (olive green)
Work the tab after the top band is finished. Flatten the holder with the slot centered on the front. Find the 6 sts at the center back of the last band round.
Row 1: Join the olive green in the first of these 6 sts. Ch 1, sc in each of the 6 sts. (6 sts) Turn.
Rows 2–14: Ch 1, sc 6. Turn.
The tab is 1.5 in (3.8 cm) wide and 3.1 in (7.9 cm) long. Pass it through the ring and fold it toward the inside of the holder. Sew the last row to the back of Row 4. About 1.5 in (3.8 cm) of tab shows above the rim.
Appliqués
Leaves (sage green, make 10)
Ch 7.
Rnd 1: Starting in the 2nd ch from hook, work sl st, sc, hdc, dc, hdc, sc (6 sts). Ch 2 for the tip. Then, working along the other side of the chain, work sc, hdc, dc, hdc, sc, sl st (6 sts). Join with a sl st to the first sl st. (12 sts + ch-2 tip)
Each leaf is about 1.5 in (3.8 cm) long and 0.6 in (1.5 cm) wide. With a single ply of olive green, backstitch a center vein from the base of the leaf to its tip.
Olives (dark brown, make 6)
Ch 4.
Rnd 1: Sc in the 2nd ch from hook, hdc in next, 4 hdc in last ch. Working along the other side, hdc in next, 3 sc in last ch. Join. (10 sts)
Each olive is about 0.75 in (1.9 cm) × 0.5 in (1.3 cm). Leave a long tail for sewing. The hdc side bulges a little, which gives the olive its textured look.
Stems (olive green, make 2)
Ch 21. Starting in the 2nd ch from hook, sl st in the back bump of each ch. (20 sl sts) Each stem is about 5 in (12.7 cm) long.
Assembly of branches
Lay the holder flat with the slot centered on the front.
- Upper branch: Angle the stem from upper left to lower right, between Rnds 56 and 72.
- Lower branch: Angle it the same way, between Rnds 34 and 50.
On each branch, sew 1 leaf at the tip and 2 alternating pairs of leaves along the stem. Then sew a cluster of 3 olives just below the middle of the stem. Use the yarn tails and sew through the cream fabric only, so the stitches don’t show inside.
Border: Top Band and Slot Edging
Border gauge: the same as the body, 16 sc and 18 rnds = 4 in (10.2 cm), in olive green.
Top band
Rnds 75–78 (B1–B4): Sc in each st. (48 sts)
That is 24 sts on the front and 24 sts on the back when the holder is flat. Fasten off and weave in the end.
Why the math works: the band has no increases or decreases. It keeps the body’s 48 sts, so it stays at the same 6 in (15.2 cm) flat width. At 18 rnds per 4 in (10.2 cm), four rounds add 0.9 in (2.3 cm), so the tube grows from 14.7 in (37.3 cm) to 15.6 in (39.6 cm).
Slot edging
Rnd 1: With the RS facing, join the olive green at the bottom right corner of the slot. Work around the opening as follows:
– Bottom edge: 1 sc in each free loop of Rnd 19 (14 sts)
– Each side: 1 sc in each row end (7 sts per side)
– Top edge: 1 sc in the free loop of each bridge chain (14 sts)
– Each corner: 1 extra sc
Join. (14 + 14 + 7 + 7 + 4 corner sts = 46 sts)
Rnd 2: Sl st loosely in each st. (46 sts) Fasten off.
Why the math works: each straight edge gets exactly one stitch per stitch or row. The 4 corner stitches round the corners without making them ruffle. The finished opening is about 3 in (7.6 cm) × 1.1 in (2.8 cm).
Final Blocking
- Weave in all ends on the WS. Leave the appliqué tails sewn in place.
- Spray the holder lightly with water until it is damp.
- Slide a rolled towel inside to fill the tube.
- Flatten it to 6 in (15.2 cm) wide and 15.6 in (39.6 cm) tall, then pin it.
- Shape the slot into a straight-edged oval with rounded corners.
- Press each leaf flat and pin its tip into a point.
- Let it dry completely before you hang it.
Final Quality-Control Checklist
- The base lies flat and measures 3.8 in (9.7 cm).
- The body has 48 sts in every round from Rnd 9 to Rnd 78.
- The slot is centered on the front and sits 2.4 in (6.1 cm) above the base ridge.
- The slot edging has 46 sts and lies flat.
- The tab is centered on the back and sewn securely.
- The ring doesn’t show through the covering stitches.
- Both branches slant the same way, with 5 leaves and 3 olives each.
- All ends are secured inside.
Troubleshooting
- The base cups upward: your tension is too tight. Go up 0.5 mm in hook size.
- The base ruffles: your tension is too loose, or a count is off. Check each round against 6, 12, 18, 24, 30, 36, 42, 48.
- The tube leans or spirals: joined sc often does this. Block it straight, and always join into the first sc.
- The slot gapes or ruffles: check that Rnd 1 of the edging has 46 sts. If it still ruffles, leave out the corner extras.
- The slot is too tight for bags: leave 2 more sts unworked in Row 20, so each row has 32 sts. Then work Rnd 27 with ch 16. The round total stays at 48.
- The tab stretches: sew a second line of stitches across the fold.
Care
Hand wash in cool water with mild soap. Roll the holder in a towel to press out the water, then lay it flat to dry in shape.

Final Notes
Each measurement builds on the one before it. The 3.8 in (9.7 cm) base gives you 48 sts, and those 48 sts give a 6 in (15.2 cm) flat width. Seventy wall rounds give 15.6 in (39.6 cm) of height, including the 0.9 in (2.3 cm) top band. If your base matches the gauge, every later checkpoint should fall into place. Hang the holder, fill it with bags, and enjoy your olive grove.
Happy crocheting!