

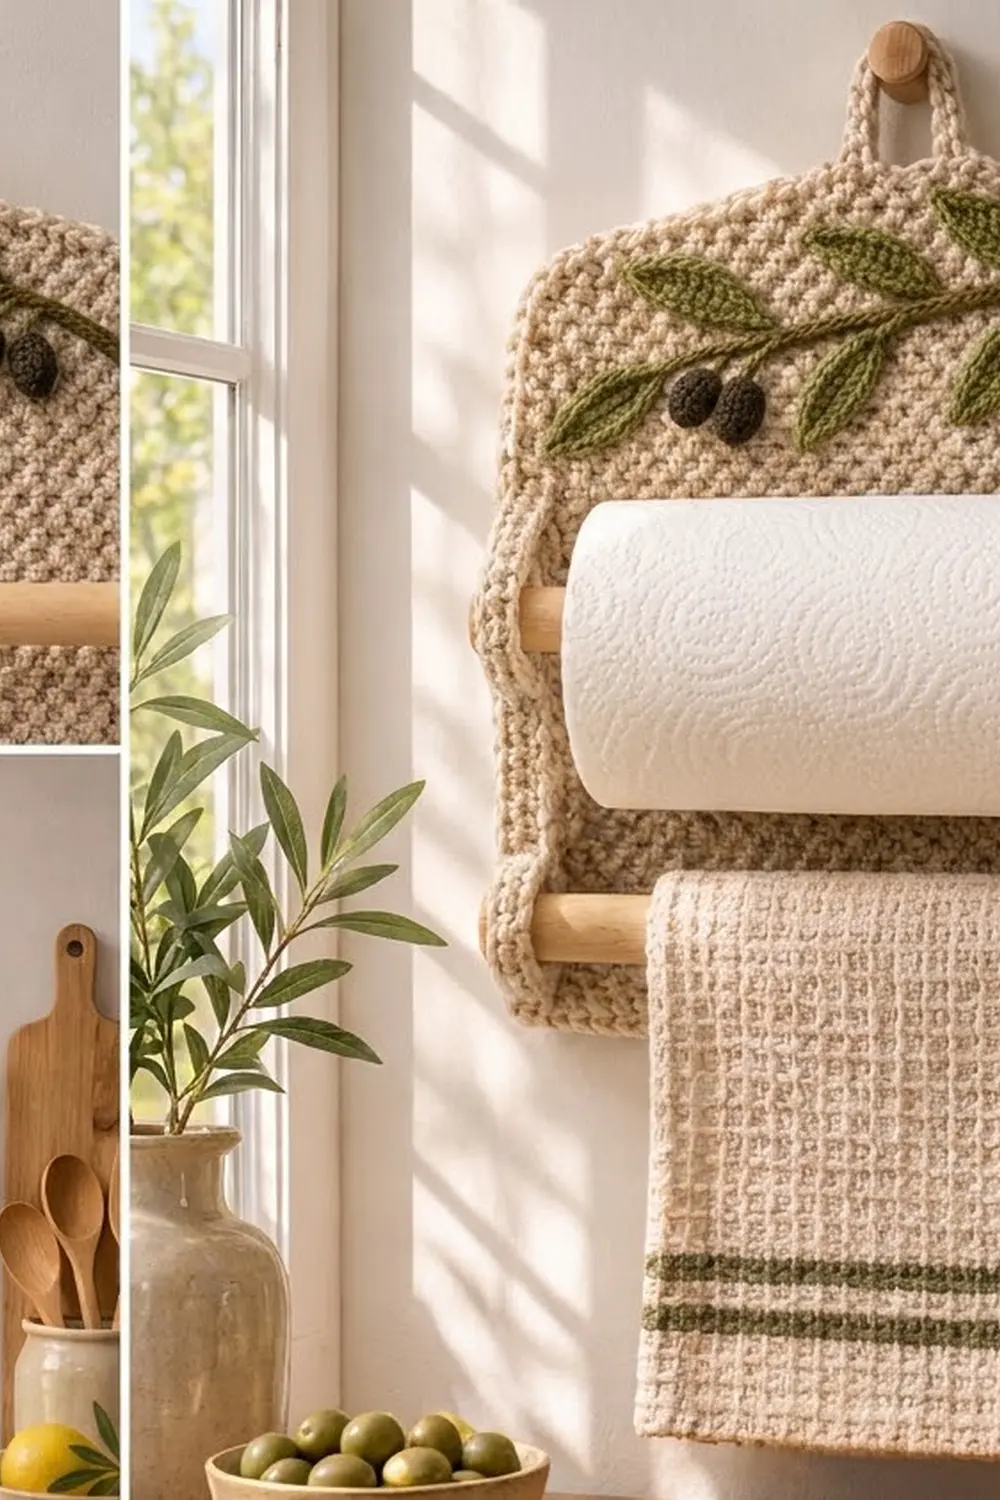
This crochet paper towel holder is one textured panel that hangs on the wall. An olive branch runs across the top, and two wooden dowels slide through small loops at the sides. The upper dowel holds a paper towel roll and the lower one holds a tea towel.
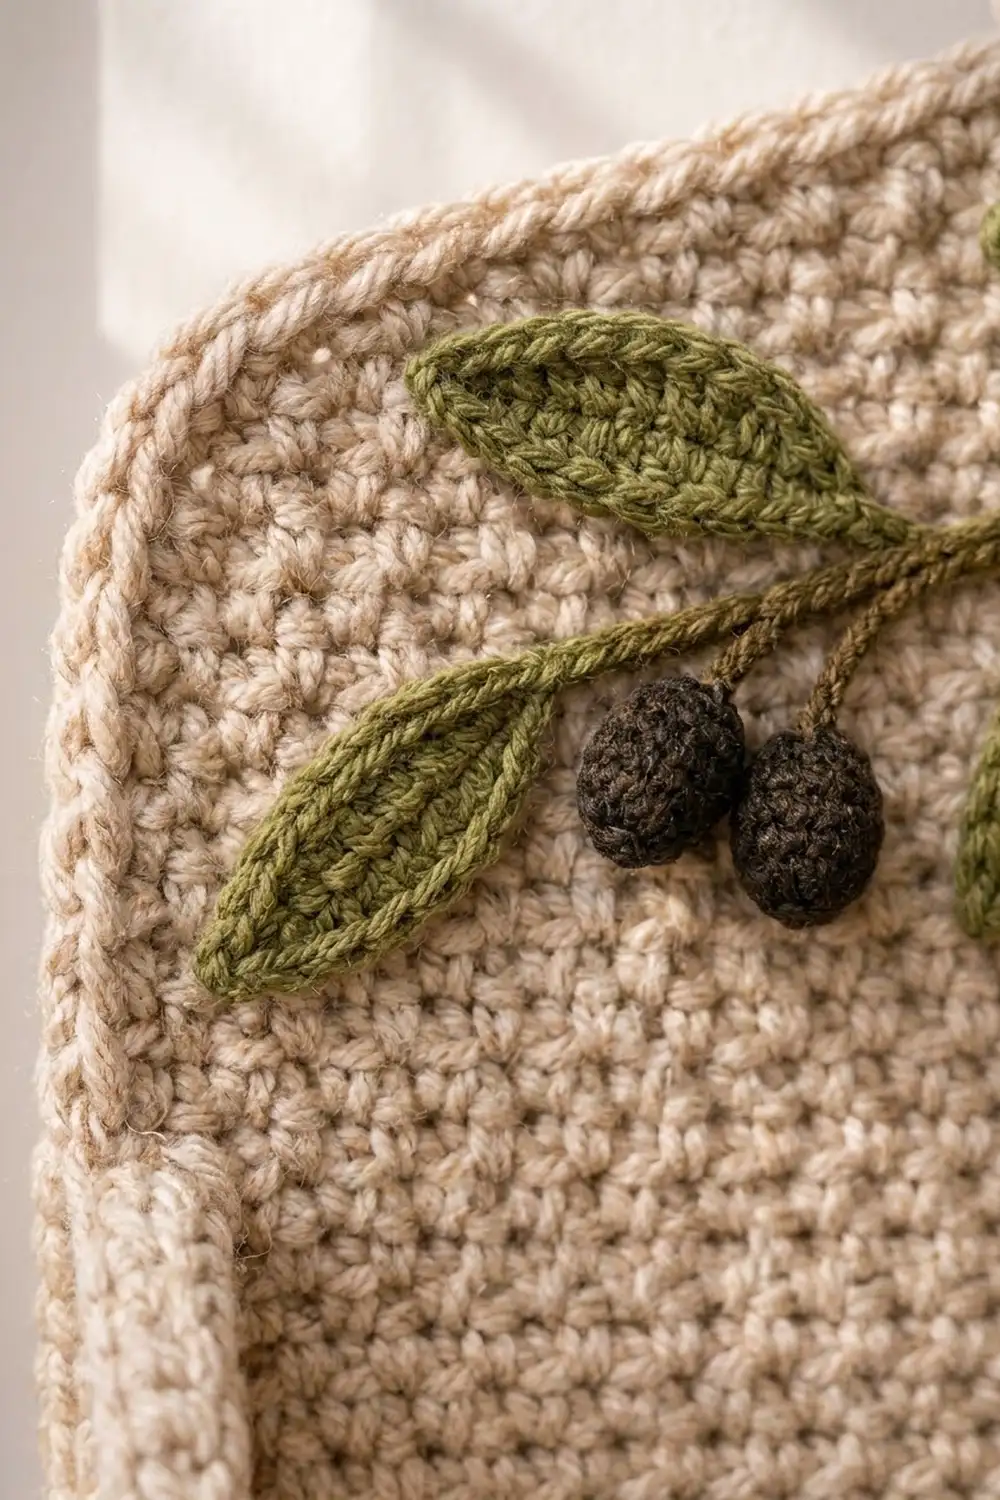
The panel is oatmeal beige moss stitch, which gives it a fine, pebbly texture. The branch is olive green, and the four small olives are a dark olive brown-black. The look is calm and handmade and suits a farmhouse or Mediterranean kitchen.
This pattern uses US crochet terms. The finished panel measures 14.75 in wide x 16 in tall (37.5 cm x 40.6 cm). The hanging tab adds 1.75 in (4.4 cm), so the overall height is 17.75 in (45.1 cm).
How it’s made:
1. Work the panel from the bottom up in moss stitch.
2. Shape the top corners with decreases.
3. Add a single crochet round, then the hanging tab, then a crab stitch edge.
4. Make the stem, leaves, olives and dowel loops, and sew them on.
Finished Size and Construction
- Finished size: 14.75 in x 16 in (37.5 cm x 40.6 cm); 17.75 in (45.1 cm) tall including the tab
- Skill level: Intermediate
- Terminology: US
- Yarn weight: Worsted (#4) cotton or cotton blend
- Hooks: 5.0 mm (H-8) for the panel; 4.0 mm (G-6) for the appliqués
- Number of pieces: 1 main panel, plus sewn-on appliqués (1 stem, 2 twigs, 7 leaves, 4 olives) and 4 dowel loops
- Layout: One single panel (no motifs to join)
- Panel size before border: 13.75 in x 15 in (34.9 cm x 38.1 cm)
- Border depth: 0.5 in (1.3 cm) per side, over 2 rounds
Materials
Choose a smooth worsted cotton or cotton blend of about 170 m per 100 g. Cotton keeps the panel firm so it won’t stretch under the weight of the roll. Avoid fuzzy yarns, because they hide the moss texture.
- Oatmeal beige (main): 180 g, about 306 m
- Olive green (leaves and stem): 25 g, about 43 m
- Dark olive brown-black (olives): 10 g, about 17 m
These quantities include a margin of about 15% for swatching and tails.
Tools:
– 5.0 mm (H-8) and 4.0 mm (G-6) hooks
– 2 wooden dowels, 5/8 in (1.6 cm) diameter x 16 in (40.6 cm) long
– Tapestry needle
– At least 6 stitch markers
– Small amount of fiberfill
– Pins and a tape measure
– A wall peg or hook
Abbreviations (US Terms)
- ch – chain
- sl st – slip stitch
- sc – single crochet
- hdc – half double crochet
- dc – double crochet
- sc2tog – single crochet 2 together
- sk – skip
- sp – space
- st(s) – stitch(es)
- RS – right side
Moss stitch: Rows of single crochet alternating with ch-1 spaces. An sc always goes into a ch-1 sp, and a ch 1 always sits above an sc. Each sc and each ch-1 counts as 1 st.
Crab stitch (reverse sc): With the RS facing, work single crochet in the opposite direction, left to right for right-handers. This makes a twisted, corded edge.
Back-bump sl st: A slip stitch worked into the bump on the back of a chain. It makes a firm, round cord.
Gauge and Checkpoints
Gauge: 16 sts and 16 rows = 4 in (10.2 cm) in moss stitch on the 5.0 mm hook. That is 4 sts and 4 rows per 1 in (2.5 cm).
Make a test swatch first. Ch 22 and work the Main Panel rows on 21 sts. On this swatch, Row 2 has 10 repeats and Row 3 has 9. Work 20 rows. The swatch should measure 5.25 in x 5 in (13.3 cm x 12.7 cm). Measure the center 4 in (10.2 cm).
- More than 16 sts per 4 in (fabric too small): Go up one hook size.
- Fewer than 16 sts per 4 in (fabric too big): Go down one hook size.
- Stitches match but rows don’t: Keep the hook. Add or remove straight rows before Row 57, in multiples of 2.
Checkpoints:
– Row 1: 13.75 in (34.9 cm) wide
– Row 20: 5 in (12.7 cm) tall
– Row 40: 10 in (25.4 cm) tall
– Row 56: 14 in (35.6 cm) tall
– Row 60: 15 in (38.1 cm) tall; the top edge is 11.75 in (29.8 cm) wide
– After Border Round 1: 14.25 in x 15.5 in (36.2 cm x 39.4 cm)
– After Border Round 2: 14.75 in x 16 in (37.5 cm x 40.6 cm)
Main Panel
Use beige yarn and the 5.0 mm hook.
Foundation: Ch 56.
Row 1 (RS): Sc in 2nd ch from hook and in each ch across, turn. (55 sc)
Row 2: Ch 1 (this does not count as a stitch). Sc in first sc, ch 1, sk next st, sc in next st; rep from * across, turn. (28 sc + 27 ch-1 sps = 55 sts)*
Row 3: Ch 1, sc in first sc, sc in next ch-1 sp, ch 1, sk next sc, sc in next ch-1 sp; rep from * 25 more times (26 repeats in total), sc in last sc, turn. (29 sc + 26 ch-1 sps = 55 sts)*
Rows 4–56: Alternate Rows 2 and 3, ending with a Row 2. (55 sts in every row)
Check: 13.75 in x 14 in (34.9 cm x 35.6 cm).
Shaping the Top Corners
Each decrease row removes 1 st at each end. Work an sc2tog over the first 2 sts and treat it as the edge sc. Across the rest of the row, keep the moss pattern as established: sc into each ch-1 sp and ch 1 over each sc. If an sc would land on an sc next to the edge, ch 1 and skip that stitch instead.
Row 57: Ch 1, sc2tog, work in pattern to last 2 sts, sc2tog, turn. (53 sts)
Row 58: Work as Row 57. (51 sts)
Row 59: Work as Row 57. (49 sts)
Row 60: Work as Row 57. (47 sts)
Do not fasten off. Each top corner is now stepped in by 1 in (2.5 cm) across and 1 in (2.5 cm) down. The border will round off these corners.
Border Round 1 and Hanging Tab
Border gauge: 4 sc per 1 in (2.5 cm) along every edge. This matches both the stitch gauge and the row gauge.
Round 1 (sc): Turn so the RS faces you and ch 1. Work around the panel in this order:
- First side: Work 6 sc over the 4 bevel row ends (2 sc in the 1st and 3rd row ends, 1 sc in the 2nd and 4th). Then work 1 sc in each of the 56 straight row ends.
- Bottom: Work 3 sc in the first foundation ch, 1 sc in each of the next 53 chs, and 3 sc in the last ch.
- Second side: Work 1 sc in each of the 56 row ends, then 6 sc over the bevel.
- Top: Work 1 sc in each of the 47 sts.
Sl st to the first sc.
Stitch counts:
– Bottom, including both 3-sc corner groups: 55 + 4 = 59
– Each side (row ends only, no corners): 56
– Each bevel: 6
– Top: 47
– Total: 59 + 56 + 56 + 6 + 6 + 47 = 230 sc. The corner groups are counted once, in the bottom total.
Why the math works: 56 rows at 4 rows per inch is 14 in, and 56 sc at 4 sc per inch is also 14 in, so the sides lie flat. Each bevel is about 1.4 in (3.6 cm) long on the diagonal, and 6 sc covers that without cupping.
Pull up a long loop, remove the hook, and hold this loop for Round 2.
Hanging tab: On the top edge, skip the first 19 sts and join a new strand of beige in the 20th st.
- Row 1: Ch 1, sc in same st and next 8 sts, turn. (9 sc)
- Rows 2–4: Ch 1, sc in each st, turn. (9 sc)
- Row 5: Ch 1, sc in next 2 sts, ch 5, sk 5, sc in last 2 sts, turn. (4 sc + ch-5 sp)
- Row 6: Ch 1, sc in next 2 sts, 5 sc in ch-5 sp, sc in last 2 sts, turn. (9 sc)
- Row 7: Ch 1, sc in each st. (9 sc)
Fasten off. The tab measures 2.25 in (5.7 cm) wide x 1.75 in (4.4 cm) tall, with a 1.25 in (3.2 cm) opening. The top edge now reads 19 + 9 (tab base) + 19 = 47 sts.
Border Round 2 (Crab Stitch)
Put the held loop back on your hook and ch 1.
- Sides, bevels and bottom: 1 crab st in each st.
- Top edge: 19 crab sts, then 7 up the tab’s row ends, 9 across the top of the tab, 7 down the other side, and 19 to finish. Skip the 9 sts under the tab base; the tab covers them.
Total: 230 – 9 + 7 + 9 + 7 = 244 sts.
Sl st to the first st and fasten off. Crab stitch rounds the corners by itself, so no corner increases are needed.
Check: 14.75 in x 16 in (37.5 cm x 40.6 cm).
Olive Branch Appliqués
Use the 4.0 mm hook. Leave a 12 in (30.5 cm) tail on every piece for sewing.
Stem (make 1, green): Ch 56. Sl st in the back bump of the 2nd ch from hook and of each ch across. (55 sl sts) The cord measures about 12 in (30.5 cm).
Twigs (make 2, green): Ch 7. Sl st in the back bump of the 2nd ch from hook and of each ch across. (6 sl sts) Each twig is about 1.25 in (3.2 cm) long.
Leaves (make 7, green): Ch 10. Work 1 round around the chain:
- First side: Starting in the 2nd ch from hook, sc, hdc, dc in each of the next 4 chs, hdc, sc.
- Tip: Work (sc, ch 2, sc) in the last ch.
- Second side: Working along the other side of the chain, sc, hdc, dc in each of the next 4 chs, hdc, sc.
- Stem point: Ch 2, sl st to the first sc.
(18 sts + 2 ch-2 points)
The foundation chain forms the center ridge. Each leaf is pointed at both ends and measures 2.25 in x 0.8 in (5.7 cm x 2.0 cm).
Olives (make 4, dark):
- Round 1: 6 sc in a magic ring. (6)
- Round 2: 2 sc in each st. (12)
- Rounds 3–4: Sc in each st. (12)
- Stuff the olive lightly.
- Round 5: Sc2tog 6 times. (6)
Close the opening. Each olive measures 0.75 in x 0.6 in (1.9 cm x 1.5 cm).
Dowel Loops
Make 4 (beige, 5.0 mm hook): Ch 5.
- Row 1: Sc in 2nd ch from hook and in each ch across. (4 sc)
- Rows 2–12: Ch 1, sc in each st, turn. (4 sc)
Each strip measures 1 in x 3 in (2.5 cm x 7.6 cm). Leave a long tail.
Assembly
- Mark the loop heights. Place markers on both side edges 2.5 in (6.4 cm) and 8 in (20.3 cm) above the bottom edge.
- Attach the loops. Fold each strip in half so the short ends meet. Lay the ends on the front of the panel, centered on a marker, with the outer long edge level with the crab-stitch edge. Whipstitch through both ends and into the moss layer only, so nothing shows on the back. Each loop stands about 1.25 in (3.2 cm) off the panel. The gap between the left and right loops is 12.75 in (32.4 cm), which fits a standard 11 in (27.9 cm) roll.
- Attach the stem. Pin it in a gentle curve with its center line about 2.5 in (6.4 cm) below the top edge and each end about 1.5 in (3.8 cm) in from the sides. Whipstitch it down along its full length.
- Attach the twigs. Angle one twig downward from the stem about one-third of the way in from the left, and the other the same distance in from the right.
- Attach the leaves. Place 4 leaves above the stem and 3 below, alternating, with the tips angled toward the ends of the branch. Tack each leaf at its stem point and tip, then add 2–3 stitches at the center so the edges lift slightly.
- Attach the olives. Sew one pair side by side at the end of each twig.
- Finish. Weave in all ends.
Final Blocking
- Mist the panel lightly. Do not soak it, because the olives are stuffed.
- Pin it face up to 14.75 in x 16 in (37.5 cm x 40.6 cm).
- Pin the tab straight up so it stands 1.75 in (4.4 cm) above the top edge.
- Measure both diagonals. They should match within 0.25 in (0.6 cm).
- Shape the leaves with your fingers. Do not pin the olives.
- Let the panel dry completely before unpinning.
Final Quality-Control Checklist
- [ ] The panel measures 14.75 in x 16 in (37.5 cm x 40.6 cm).
- [ ] Border Round 1 has 230 sts and Round 2 has 244 sts.
- [ ] The tab is centered, with 19 sts on each side.
- [ ] The loops sit at matching heights on both sides.
- [ ] Both dowels sit level and turn freely.
- [ ] Every leaf is secured at its point and tip.
- [ ] No tails show on the back.
Troubleshooting
- Wavy sides: You have too many border stitches. Work exactly 1 sc per row end.
- Sides pulling in: Your rows are taller than 4 per inch. Add 1 sc every 8 row ends, and add the same number on both sides.
- Stitches stacking into columns instead of alternating: You worked sc into sc. In moss stitch, the sc always goes into the ch-1 sp.
- Pointy top corners: Work 7 sc over each bevel instead of 6.
- Panel sags under the roll: Use a smaller hook or a firmer cotton, and sew the loops through the panel itself rather than just the border.
- Curling leaves: Steam them lightly and pin them flat to dry.
Care
Remove the dowels first. Hand wash in cool water, roll the panel in a towel to press out the water, and dry it flat pinned to its original measurements.
Final Notes
Everything follows from the gauge. At 16 sts and 16 rows per 4 in (10.2 cm), 55 sts x 60 rows makes a panel of 13.75 in x 15 in (34.9 cm x 38.1 cm). Two border rounds bring it to 14.75 in x 16 in (37.5 cm x 40.6 cm), with a 1.75 in (4.4 cm) tab on top. If you hit each checkpoint along the way, the loops, roll and branch will all fit as planned.
Happy crocheting!