

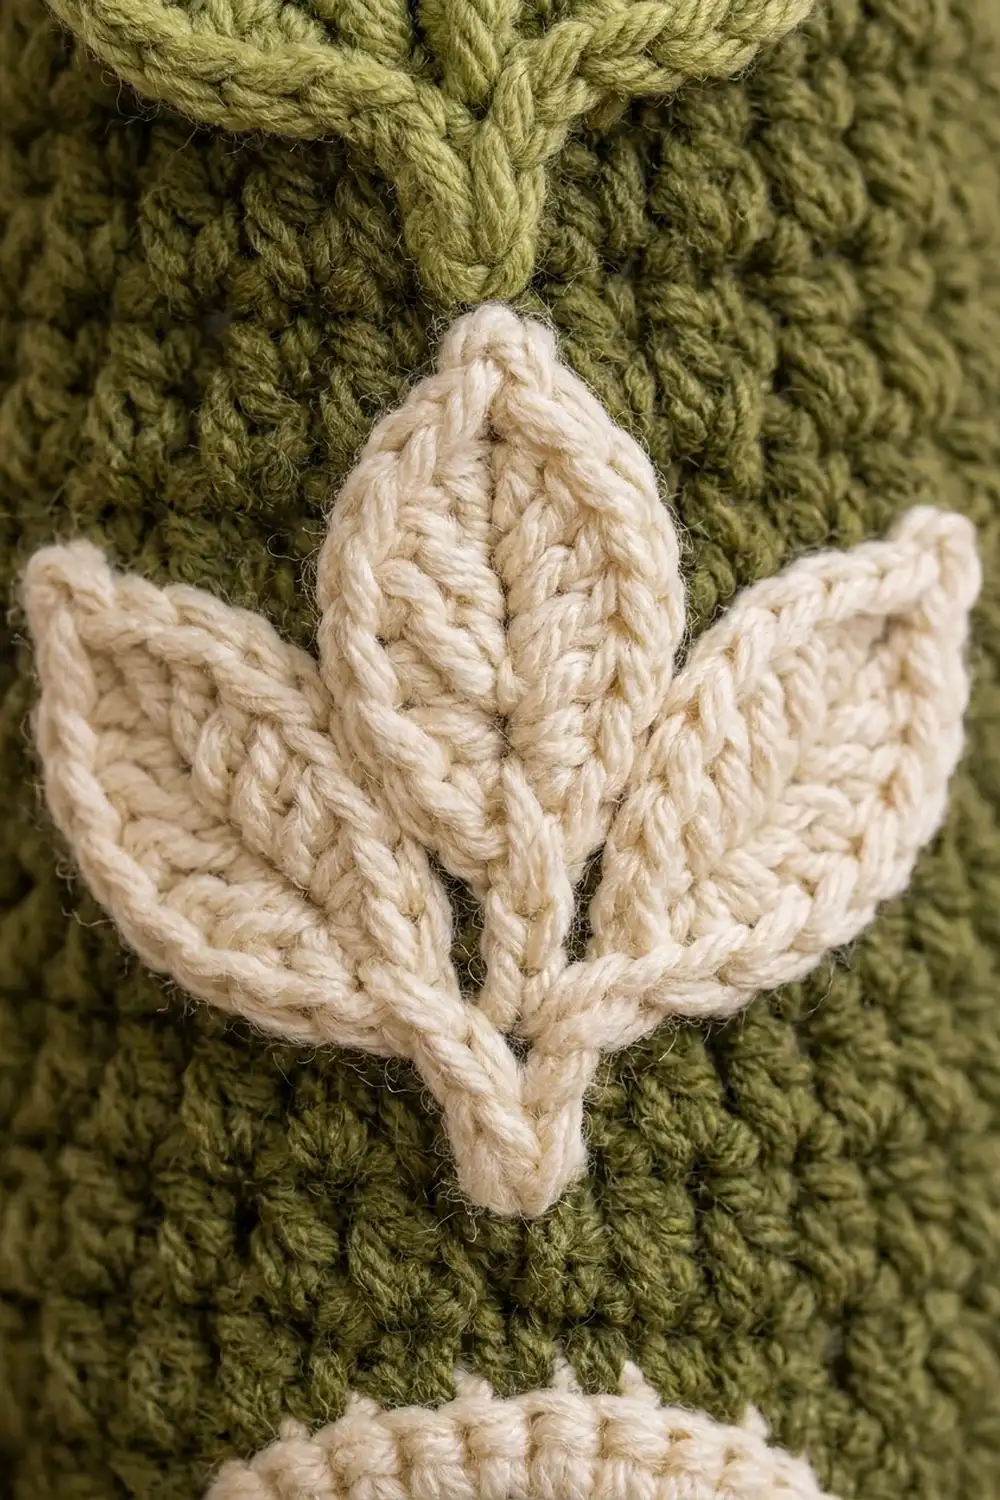
The Olive Sprig Plastic Bag Holder is a long crocheted tube that hangs from a hook and keeps grocery bags tidy. You stuff bags in through the top and pull them out one at a time through a round opening at the bottom. Down the front are three small leaf fans, each made of three pointed leaves, and a raised center vein runs up each leaf.
The body is olive green single crochet with a soft, nubby texture. The top rim and the bottom opening are edged in a corded cream border. The top and bottom leaf fans are cream and the middle one is sage green, so the colors alternate down the front. A green hanging loop sits at the center back of the top rim.
This pattern uses US crochet terms. The finished holder measures 5 in (12.7 cm) wide when flat and 16.5 in (41.9 cm) long along the side. The hanging loop adds about 1.75 in (4.4 cm).
You work the body bottom-up in joined rounds. It starts from a chain ring that becomes the dispensing opening, increases over three rounds into a shallow base, and then runs straight up as a tube. You make the three leaf fans separately and sew them on before adding the cream rims and the hanging loop. Nothing is seamed except the appliqués.
Finished Size and Construction
- Finished size: 5 in (12.7 cm) wide flat × 16.5 in (41.9 cm) long, plus a 1.75 in (4.4 cm) loop
- Skill level: Advanced beginner
- Terminology: US
- Yarn weight: Worsted (#4)
- Hooks: 4.5 mm (US 7) for the body, 4.0 mm (US G-6) for the appliqués
- Number of pieces: 1 body plus 3 sewn-on leaf appliqués. There is no joining of panels.
- Layout: 3 leaf fans stacked in a single column down the center front
- Piece size: each leaf fan is 3 in (7.6 cm) wide × 2.25 in (5.7 cm) tall
- Size before border: 5 in × 16 in (12.7 × 40.6 cm)
- Border depth: the top rim adds 0.5 in (1.3 cm). The bottom rim edges the opening and adds no length.
Materials
Choose a smooth worsted-weight yarn in cotton or a cotton blend. Cotton holds its shape when the holder is full and gives clear stitch definition on the leaves. The amounts below assume about 182 m (199 yd) per 100 g.
- Olive green (body and loop): 160 g, 290 m
- Cream (rims and 2 leaf fans): 25 g, 46 m
- Sage green (1 leaf fan): 10 g, 18 m
All quantities include a margin of roughly 10–15%.
Tools:
- 4.5 mm (US 7) hook
- 4.0 mm (US G-6) hook
- 2 stitch markers
- Tapestry needle
- Scissors
- Rustproof pins
- Tape measure
Abbreviations (US Terms)
- ch: chain
- sl st: slip stitch
- sc: single crochet
- hdc: half double crochet
- dc: double crochet
- inc: 2 sc in the same stitch
- st(s): stitch(es)
- rnd(s): round(s)
- RS: right side
- rev sc: reverse single crochet
Reverse single crochet (rev sc): Work from left to right (right-handed). Insert the hook into the next stitch to the right, yarn over and pull up a loop, then yarn over and pull through both loops. This makes the corded cream rim.
Surface slip stitch: With the yarn held behind the work, insert the hook from front to back through the fabric, pull up a loop, and draw it through the loop on your hook. This makes the raised leaf veins.
Gauge and Checkpoints
Body gauge: 16 sc × 18 rnds = 4 in (10.2 cm) in joined rounds with the 4.5 mm hook.
Test first: Make one leaf fan and work Rnds 1–12 of the body. Check them before you commit to the full tube. Rnd 12 should measure 2.7 in (6.9 cm) from the opening edge, and the center leaf should be 2.25 in (5.7 cm) long.
Checkpoints:
- After Rnd 3: the base lies as a ring about 3.2 in (8.1 cm) across, with an opening about 1.9 in (4.8 cm) across.
- After Rnd 18: the tube is 5 in (12.7 cm) wide flat and 4 in (10.2 cm) long, measured along the side from the opening edge.
- After Rnd 45: 10 in (25.4 cm) long.
- After Rnd 72: 16 in (40.6 cm) long.
- Finished: 16.5 in (41.9 cm) long with the top rim.
If your piece is too big (wider than 5.25 in / 13.3 cm flat), change to a 4.0 mm hook. If it is too small (narrower than 4.75 in / 12.1 cm flat), change to a 5.0 mm hook. Don’t change the stitch count, because both rims rely on the 40-stitch circumference. If only the length is off, add or remove even rounds between Rnds 4 and 72.
Body
Use olive green and the 4.5 mm hook. Every round begins with ch 1 (this does not count as a stitch) and ends with a sl st to the first sc. Turning chains are not used.
Foundation: Ch 24 and join with a sl st to the first ch to form a ring. Make sure the chain isn’t twisted.
Rnd 1: Ch 1, then sc in each ch around, working into the top loops only so the bottom loops stay free for the opening rim. Join. (24 sts)
Rnd 2: Ch 1, then (sc in next 2 sts, inc) 8 times. Join. (32 sts)
Rnd 3: Ch 1, then (sc in next 3 sts, inc) 8 times. Join. (40 sts)
These three rounds make the shallow base. As soon as you stop increasing, the edge turns upward to become the tube wall, which gives the holder its rounded lower end.
Rnds 4–72: Ch 1, then sc in each st around. Join. (40 sts in each round, 69 rounds)
On Rnd 4, place a marker in the first sc. Flatten the tube so that this stitch sits at the left fold. Stitches 1–20 form the front and stitches 21–40 form the back. The joins drift slightly as you work, so re-flatten every 10 rounds and keep the join seam on the left fold.
Fasten off after Rnd 72. Don’t add the rims yet.
Leaf Fan Appliqués
Make 2 in cream (top and bottom) and 1 in sage green (middle). Use the 4.0 mm hook. Each fan is one continuous piece made of three leaves that share a base point.
Leaf A (left):
- Ch 8.
- Side 1: Sl st in the 2nd ch from the hook (this is the tip). Then sc in the next ch, hdc in the next ch, dc in the next 2 ch, hdc in the next ch, and sc in the last ch. (7 sts)
- Ch 1 at the base and rotate the work.
- Side 2: Working into the unused loops of the same chain, sc in the first ch, hdc in the next ch, dc in the next 2 ch, hdc in the next ch, sc in the next ch, and sl st in the tip ch. (7 sts)
- Tip: Ch 2 and sl st into the same tip ch to make a point.
- Vein: The side facing you is the RS. Work 6 surface sl sts down the center line toward the base, then sl st into the base ch-1.
Leaf A total: 14 sts plus the tip ch-2.
Leaf B (center):
- Ch 10.
- Side 1: Sl st in the 2nd ch from the hook. Then sc in the next ch, hdc in the next ch, dc in the next 3 ch, hdc in the next ch, and sc in the last 2 ch. (9 sts)
- Ch 1 and rotate the work.
- Side 2: Sc in the next 2 ch, hdc in the next ch, dc in the next 3 ch, hdc in the next ch, sc in the next ch, and sl st in the tip ch. (9 sts)
- Tip: Ch 2 and sl st into the same ch.
- Vein: Work 8 surface sl sts down the center, then sl st into the base ch-1.
Leaf B total: 18 sts plus the tip ch-2.
Leaf C (right): Work exactly as Leaf A. (14 sts plus the tip ch-2)
Gather: Sl st into the base ch-1 of Leaf A to pull all three bases together. Fasten off and leave a 12 in (30.5 cm) tail for sewing.
Fan total: 46 edge sts. Leaf A is about 1.75 in (4.4 cm) long and Leaf B is about 2.25 in (5.7 cm) long.
Attach the Appliqués
Sew the fans on now, while both ends of the tube are open and you can reach inside.
- Flatten the tube with the marker at the left fold. The center front runs between stitches 10 and 11.
- Fan each motif so the center leaf points straight up and the side leaves angle out at about 45°. The motif should then measure 3 in (7.6 cm) wide, leaving 1 in (2.5 cm) of body on each side.
- Pin the motifs, measuring down from the top edge of Rnd 72:
- Motif 1 (cream): center tip at 1.25 in (3.2 cm), base at 3.5 in (8.9 cm)
- Motif 2 (sage): tip at 5.5 in (14.0 cm), base at 7.75 in (19.7 cm)
- Motif 3 (cream): tip at 9.75 in (24.8 cm), base at 12 in (30.5 cm)
This leaves a 2 in (5.1 cm) gap between motifs and 4 in (10.2 cm) below Motif 3 down to the opening edge, for a total of 12 + 4 = 16 in (40.6 cm).
4. With one hand inside the tube so you only catch the front wall, whipstitch around the outer edge of each leaf. Make about one stitch for every two edge stitches. Pull just snug, so the fabric doesn’t pucker.
Border
Border gauge: The rims use the same 4 sts per inch as the body. A 40-stitch round equals the 10 in (25.4 cm) circumference, and a 24-stitch round equals the 6 in (15.2 cm) circumference of the opening.
Top rim (cream, 4.5 mm hook):
Rnd 73: Join cream with a sl st in st 1. Ch 1, then sc in each st around. Join. (40 sts: 20 front, 20 back)
Rnd 74: Ch 1, then rev sc in each st around. Join. (40 sts: 20 front, 20 back) Fasten off.
Bottom opening rim (cream, 4.5 mm hook):
Rnd 1: Join cream in the unused loop of the foundation ch at the join seam. Ch 1, then sc in each of the 24 unused foundation loops. Join. (24 sts)
Rnd 2: Ch 1, then rev sc in each st around. Join. (24 sts) Fasten off.
Why the math works: Each rim is worked one stitch into each existing stitch. That keeps the rim the same length as the edge it sits on: 40 matches 40 at the top, and 24 matches 24 at the opening. With no extra stitches the rim won’t flare, and with none missing it won’t pull in. Reverse single crochet is naturally firm, so it rolls into a neat cord without tightening the opening.
Hanging loop (olive green):
- Count the back stitches 21–40 of Rnd 73. Insert the hook under both loops of st 28, just below the corded edge, and join green with a sl st.
- Ch 16, skip sts 29–32, and sl st into st 33. The skipped stitches center the loop between sts 30 and 31.
- Ch 1, then work 22 sc over the ch-16 loop, enclosing the chain. Sl st into st 28 and fasten off.
The loop rises about 1.75 in (4.4 cm) above the rim.
Final Blocking
- Weave in all ends along stitches of their own color.
- Mist the holder lightly with water until it is damp but not wet.
- Roll a towel and slide it inside the tube to hold it at 5 in (12.7 cm) wide.
- Pin it flat to 16.5 in (41.9 cm) long, with the opening rim shaped into a round circle.
- Press each leaf flat with your fingers and coax the tips into points. Don’t press the veins, so they stay raised.
- Let it dry completely before you remove the towel.
Final Quality-Control Checklist
- [ ] The body has 40 sts in every round from Rnd 3 through Rnd 74.
- [ ] Both opening rims have 24 sts.
- [ ] The tube is 5 in (12.7 cm) wide flat and 16.5 in (41.9 cm) long.
- [ ] The opening is about 1.9 in (4.8 cm) across and lies round.
- [ ] The fans run cream, sage, cream from top to bottom, centered and evenly spaced.
- [ ] Each leaf has a pointed tip and a visible raised vein.
- [ ] Sewing caught only the front wall, so the tube opens freely.
- [ ] The loop is centered on the back and firmly anchored.
- [ ] All ends are woven in securely.
Troubleshooting
The base ruffles. Your tension is loose. Go down to a 4.0 mm hook for Rnds 1–3 only.
The tube twists into a spiral. This is normal drift from joined rounds. Block it straight with the towel insert, and keep marking st 1 at the fold as you go.
The opening is too tight for bags. Rework the foundation as ch 28 and work Rnd 1 as 28 sc. Work Rnd 2 as (sc 6, inc) 4 times (32 sts), then work Rnd 3 as written (40 sts). The opening becomes 7 in (17.8 cm) around, and rim Rnds 1 and 2 become 28 sts each.
The leaves curl. Your chain was too tight. Chain with a 4.5 mm hook and work the stitches with the 4.0 mm hook.
The rev sc rim flares. Your rim tension is loose. Rework it with a 4.0 mm hook.
The appliqués pucker the body. The stitches are pulled too tight. Remove them and resew with looser stitches.
Care
Hand wash in cool water with mild soap, press out the water in a towel, and dry flat over a rolled towel to keep the tube shape. Don’t wring or tumble dry.
Final Notes
The whole holder is built on one measurement chain. A 24-stitch ring makes an opening 6 in (15.2 cm) around. Three increase rounds bring it to 40 sts, which is 10 in (25.4 cm) around and 5 in (12.7 cm) wide flat. Seventy-two rounds at 4.5 rounds per inch give 16 in (40.6 cm). Two cream rim rounds add 0.5 in (1.3 cm), for a finished length of 16.5 in (41.9 cm). The three 3 in (7.6 cm) leaf fans fit on the front with 2 in (5.1 cm) between them. If your gauge matches at the checkpoints, everything else follows.
For a lighter version, work the body in cream and the leaves in olive and sage. All stitch counts stay the same.
Happy crocheting!