

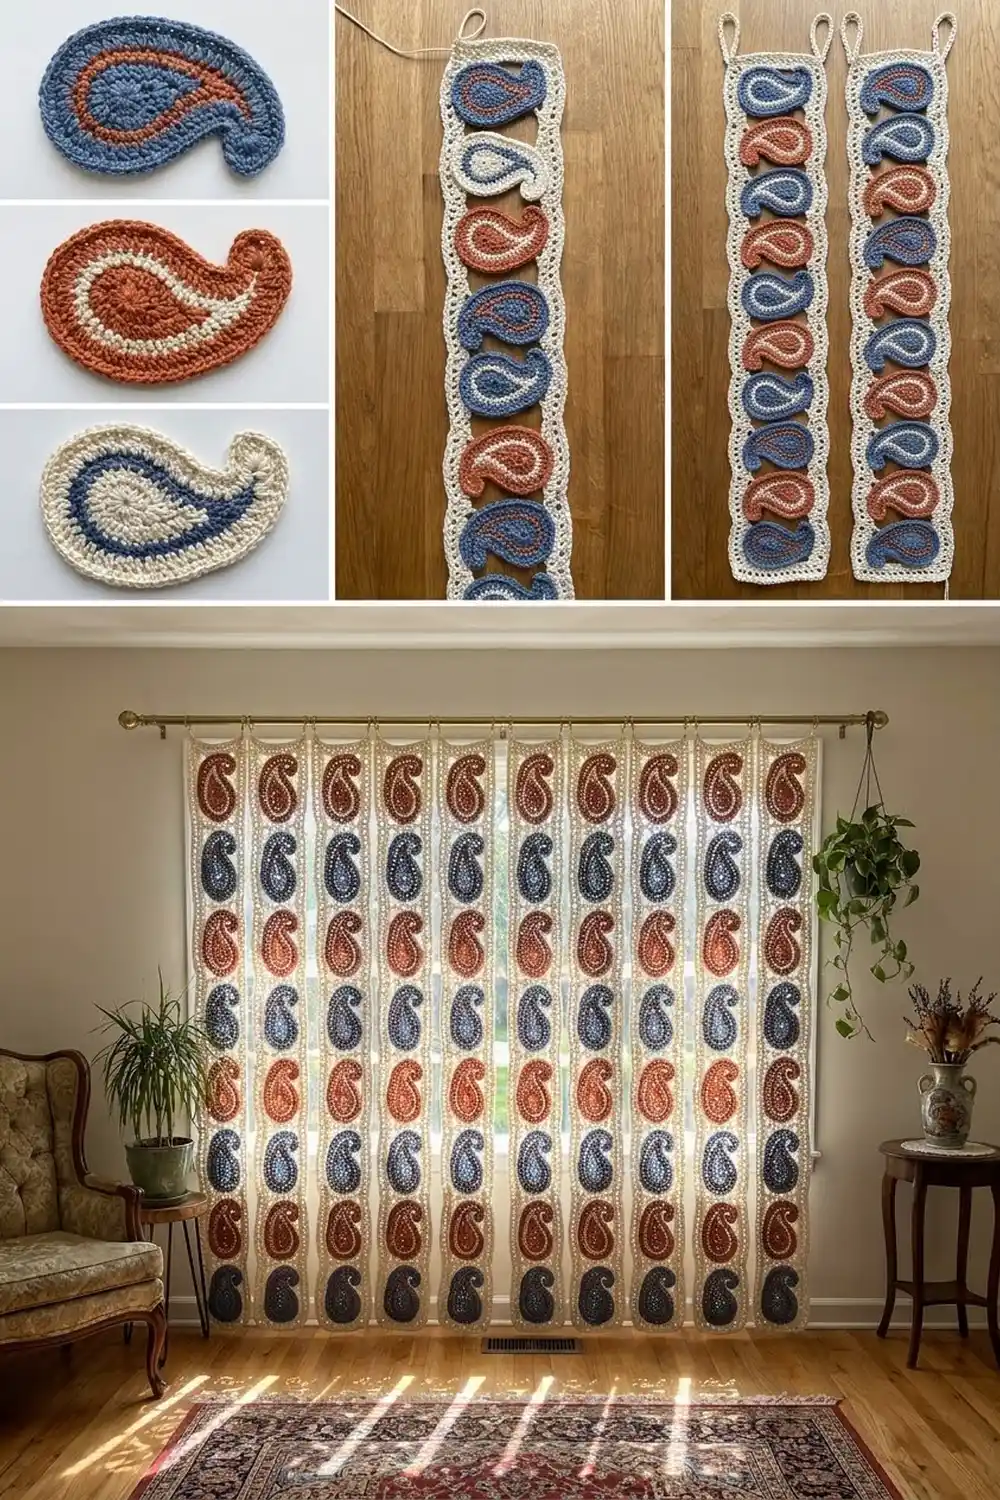
This curtain is made of hanging strips of crocheted paisleys. Each motif has a small fan of orange shells, a wider band of blue shells, and a tall blue plume that sweeps up and curls over the top. A cream outline and fine cream spokes hold the colors together, so the strips look like lace when light comes through them.
The palette is denim blue, terracotta orange and cream. The style is a mix of folk embroidery and vintage lace. It suits a doorway, a window, or a room divider.
All terms are US crochet terms. One motif measures 3 in × 3.5 in (7.6 cm × 8.9 cm). One framed strip measures 3.2 in × 56 in (8.1 cm × 142.2 cm), plus a hanging loop of about 1.2 in (3.0 cm). Ten strips hung about 0.8 in (2.0 cm) apart cover roughly 39.2 in (99.6 cm) of rod.
Here is the construction in short. You crochet each paisley as a separate piece, in rows, and edge it in cream. You then link 14 motifs into a column through their cream stems. Last, you work a chain-rail frame around each column, which also makes the hanging loop.
Finished Size and Construction
- Finished curtain: 10 strips, each 3.2 in × 56 in (8.1 cm × 142.2 cm) plus loop
- Skill level: Intermediate
- Terminology: US
- Yarn weight: DK (#3) cotton
- Hook: 3.5 mm (E-4)
- Number of pieces: 140 motifs (14 per strip × 10 strips)
- Layout: 10 columns × 14 motifs
- Motif size: 3 in × 3.5 in (7.6 cm × 8.9 cm)
- Motif repeat including stem link: 4 in (10.2 cm)
- Strip size before border: 3 in × 56 in (7.6 cm × 142.2 cm)
- Border (rail) depth: 0.1 in (0.3 cm) per side
Materials
Use a smooth mercerized or combed DK cotton of about 2.3 m per gram (about 115 m per 50 g). Cotton keeps the scallops crisp and doesn’t sag much when it hangs.
- Denim blue: 400 g (920 m)
- Cream: 450 g (1,035 m)
- Terracotta orange: 110 g (253 m)
All quantities include a margin of roughly 10–15%.
Tools
- 3.5 mm (E-4) hook
- Tapestry needle
- Rust-proof pins and a blocking board
- Spray bottle
- Ruler or tape measure
- Stitch markers
Abbreviations (US Terms)
- ch: chain
- sl st: slip stitch
- sc: single crochet
- hdc: half double crochet
- dc: double crochet
- tr: treble crochet
- sp: space
- st(s): stitch(es)
- RS: right side
Special stitch: shell. A shell is 5 dc worked in the same stitch.
Free loop: the single loop left on the underside of a foundation chain after you’ve worked into it.
Gauge and Checkpoints
Make one complete test motif before you start production. Everything else depends on it.
- Chain gauge: 5 ch = 1 in (2.5 cm), so 20 ch = 4 in (10.2 cm).
- After Row 3: the fan measures 2.4 in (6.1 cm) across its widest point.
- After Row 6: the motif measures 2.6 in × 3.1 in (6.6 cm × 7.9 cm).
- After edging: the motif measures 3 in × 3.5 in (7.6 cm × 8.9 cm).
If your motif comes out too big, go down half a hook size. If it comes out too small, go up half a hook size. The chain gauge matters most, because the rails are counted against it. If your chains are off but the motif is right, use a separate hook just for the chains.

Motif (make 140)
Row 1 – Spokes (cream)
Leave a 6 in (15.2 cm) tail. Ch 4 and sl st in the first ch to form a ring.
Ch 6 (counts as tr + ch 2). Work [tr in ring, ch 2] 5 times, then tr in ring.
Count: 7 tr and 6 ch-2 sps in a half-circle about 1.6 in (4.1 cm) across. Fasten off.
Row 2 – Orange shells (orange)
With RS facing, join orange in the first ch-2 sp. Ch 3 (counts as dc) and work 3 dc in the same sp. Work 4 dc in each of the next 5 ch-2 sps.
Count: 24 dc (6 groups of 4). Fasten off.
Row 3 – Blue shells (blue)
With RS facing, join blue in the first dc. Ch 1.
Work sc in the next dc, skip 1 dc, shell in the next dc, skip 1 dc 5 times. Then sc in the next dc, skip 1 dc, shell in the next dc, and sc in the last dc.
Count: 37 sts (6 shells and 7 sc). For reference, the sc are sts 1, 7, 13, 19, 25, 31 and 37.
Checkpoint: the fan should be 2.4 in (6.1 cm) wide. Don’t fasten off.
Row 4 – Plume foundation (blue)
Ch 24. The chain rises from the right end of the fan and arcs up and over to the left. The free end of the chain becomes the curl tip.
Row 5 – Crescent (blue)
Turn. Starting in the 2nd ch from the hook, work:
- sc in the next 4 ch
- hdc in the next 4 ch
- dc in the next 7 ch
- tr in the next 8 ch
Count: 23 sts, short at the tip and tall at the base, which gives the crescent its taper.
Row 6 – Plume scallops and curl (blue)
Ch 1 and turn. Sc in the first tr. Work [skip 1 st, shell in the next st, skip 1 st, sc in the next st] 5 times. Then hdc in the next st and sc in the last st.
Count: 33 sts (5 shells, 6 sc, 1 hdc, 1 sc).
Curl: Ch 6 and sl st in the sc just made to form a ring. Work 10 sc in the ring and sl st to the first of those sc.
Count: 10 sc in the curl. Fasten off.
Checkpoint: 2.6 in × 3.1 in (6.6 cm × 7.9 cm).
Row 7 – Inner spokes (cream)
These chains bridge the gap between the top of the fan and the underside of the plume. Count foundation chains from the curl tip.
Join cream with a sl st in sc 19 of Row 3. Then work:
- Ch 4, sl st in the free loop of foundation ch 10.
- Ch 4, sl st in sc 25 of Row 3.
- Ch 4, sl st in the free loop of foundation ch 14.
- Ch 4, sl st in sc 31 of Row 3.
Count: 4 spokes of 4 ch each. Fasten off.
Round 8 – Edging (cream)
With RS facing, join cream at the base of the Row 1 ring.
- Left side of fan: work 4 sc evenly up the row ends of Rows 1–3.
- Left part of Row 3: sc in sts 1–13, working 3 sc instead of 1 in the center dc of each of the 2 shells. That’s 15 sc.
- Bridge: ch 8 and sl st in the base of the curl.
- Curl: work [sc in the next sc, 2 sc in the next sc] 5 times. That’s 15 sc.
- Plume outer edge, from tip to base: sc in the sc and the hdc. Then, for each of the 5 shells, work sc in the sc before it, sc in each of the next 2 dc, 3 sc in the center dc, and sc in each of the next 2 dc. Finish with sc in the last sc. That’s 2 + (5 × 8) + 1 = 43 sc.
- Right side: work 4 sc evenly down the base ends of Rows 6 and 5, then 4 sc evenly down the right row ends of Rows 3–1.
- Stem: sl st in the first sc, then ch 3 for the stem.
Count: 85 sc, 8 ch in the bridge, and a 3-ch stem. Fasten off, leaving a 6 in (15.2 cm) tail.
Two points on the edging are used later:
- Top point: the center sc of the 3-sc group on plume shell 3.
- Right join point: the center sc of the 3-sc group on plume shell 5, the shell nearest the base.
Final motif checkpoint: 3 in × 3.5 in (7.6 cm × 8.9 cm).
Make All Pieces
Make all 140 motifs before you assemble anything. For one strip of 14 motifs you’ll use about 37 g blue, 9 g orange and 28 g cream for the motifs, plus about 11 g cream for the rails. Weave in all tails except the stem tails, which you’ll need for joining.
Layout (M = motif; each column is one strip, top row is motif 1):
Row 1:  M M M M M M M M M M
Row 2:  M M M M M M M M M M
Row 3:  M M M M M M M M M M
 ...    (identical rows)
Row 13: M M M M M M M M M M
Row 14: M M M M M M M M M M
        10 strips × 14 motifs = 140 motifs
Joining
Lay 14 motifs in a column, all facing the same way, with the curls to the upper left.
Method: each motif’s 3-ch stem connects to the top point of the motif below it. Thread the stem tail onto a needle and sew the last chain to that top point (the center sc of the 3-sc group on plume shell 3). Pass through it twice and secure the tail.
Stitch-to-stitch logic: you make one connection per gap: the stem’s last ch to the top point of the motif below. That gives 13 connections per strip. The stem of motif 14 stays free and becomes the bottom tip of the strip.
Tension: each link should measure 0.5 in (1.3 cm). If you pull it tighter, the motifs overlap. If you leave it looser, the column grows and the rails won’t line up.
Checkpoint: the column should measure 56 in (142.2 cm) from the top of motif 1 to the tip of motif 14’s stem. That’s 14 repeats × 4 in (10.2 cm).
Border (Chain Rails)
Border gauge: 5 ch = 1 in (2.5 cm). Each rail is counted per motif as 1 segment of [ch 10, sl st join, ch 10], which is 20 ch, or 4 in (10.2 cm).
Round 1 – Rails and loop
- Bottom drop loop: join cream in the last ch of motif 14’s stem. Ch 4 and sl st in the same ch.
- Left rail (going up): work 14 segments of [ch 10, sl st in the middle (4th) ch of the motif’s 8-ch bridge, ch 10], from motif 14 up to motif 1. Count: 14 × 20 = 280 ch and 14 joins.
- Top: ch 9 to reach the center. For the hanging loop, ch 14 and sl st in the first of those 14 ch. Ch 9 to the top-right corner. Count: 9 + 14 + 9 = 32 ch.
- Right rail (going down): work 14 segments of [ch 10, sl st in the right join point, ch 10], from motif 1 down to motif 14. Count: 280 ch and 14 joins.
- Sl st in the base of the drop loop.
Round 1 total: 596 ch and 28 joins.
Round 2 – Firming
- Work 6 sc in the drop loop.
- Sl st in the back bump of each rail ch up the left side, skipping the join sl sts. Count: 280 sl st.
- At the top: sl st in each of 9 ch, work 20 sc in the hanging loop, then sl st in each of 9 ch.
- Sl st in the back bump of each rail ch down the right side. Count: 280 sl st.
- Sl st in the first sc. Fasten off.
Why the math works
The rails run in the same 4 in (10.2 cm) repeat as the motifs:
- Each motif is 3.5 in (8.9 cm) and each link is 0.5 in (1.3 cm), so one repeat is 4 in (10.2 cm).
- At 5 ch per inch, 20 ch is also 4 in (10.2 cm).
- The 10 ch below the first join and the 10 ch above the last join each cover 2 in (5.1 cm), which is half a repeat at each end.
So each rail is 14 × 20 = 280 ch, or 56 in (142.2 cm), exactly the length of the column. Each rail adds 0.1 in (0.3 cm) on its side, which turns the 3 in (7.6 cm) motifs into a 3.2 in (8.1 cm) strip. The sl st round stops the chains from stretching under the strip’s weight.
Final Blocking
- Pin one strip flat on the board, motif by motif, with the curls pointing up and to the left.
- Open each shell into a rounded scallop and pin the tip of each curl.
- Straighten both rails so the joins sit every 4 in (10.2 cm) and the strip is 3.2 in (8.1 cm) wide.
- Mist with water until damp but not soaked.
- Let it dry completely before you unpin it.
- Repeat for all 10 strips.
Final Quality-Control Checklist
- Each motif measures 3 in × 3.5 in (7.6 cm × 8.9 cm).
- Every motif has 4 inner spokes and 85 edging sc.
- Each link measures 0.5 in (1.3 cm).
- Each rail has 280 ch and 14 joins, and the joins are 4 in (10.2 cm) apart.
- Each strip is 56 in (142.2 cm) plus its loop.
- All strips are the same length to within 0.2 in (0.5 cm).
- All tails are woven in and nothing is twisted.
Troubleshooting
- The plume flops forward: your Row 5 tr are too loose. Use a smaller hook for Rows 4–6.
- The fan cups: your Row 2 dc are too tight. Relax your tension or go up half a hook size for that row.
- The curl won’t sit flat: check that you worked 15 edging sc around it, not 10.
- The rails ripple: you’re chaining too loosely. Re-check 20 ch = 4 in (10.2 cm).
- The strip twists when hung: steam-block it again and make sure all the joins are on the same face.
Care
Hand wash cool with mild soap and press out the water in a towel. Reshape the strips and dry them flat. Don’t hang them while they’re wet.
Final Notes
The measurement chain runs like this:
- The fan measures 2.4 in (6.1 cm), the edged motif 3 in × 3.5 in (7.6 cm × 8.9 cm), and the repeat 4 in (10.2 cm).
- Fourteen repeats make 56 in (142.2 cm), and the rails match that at 280 ch per side.
- Rails and loop bring each strip to 3.2 in × 57.2 in (8.1 cm × 145.3 cm), loop included.
Check each link in that chain, and all ten strips will hang straight and the same length.
Happy crocheting!