

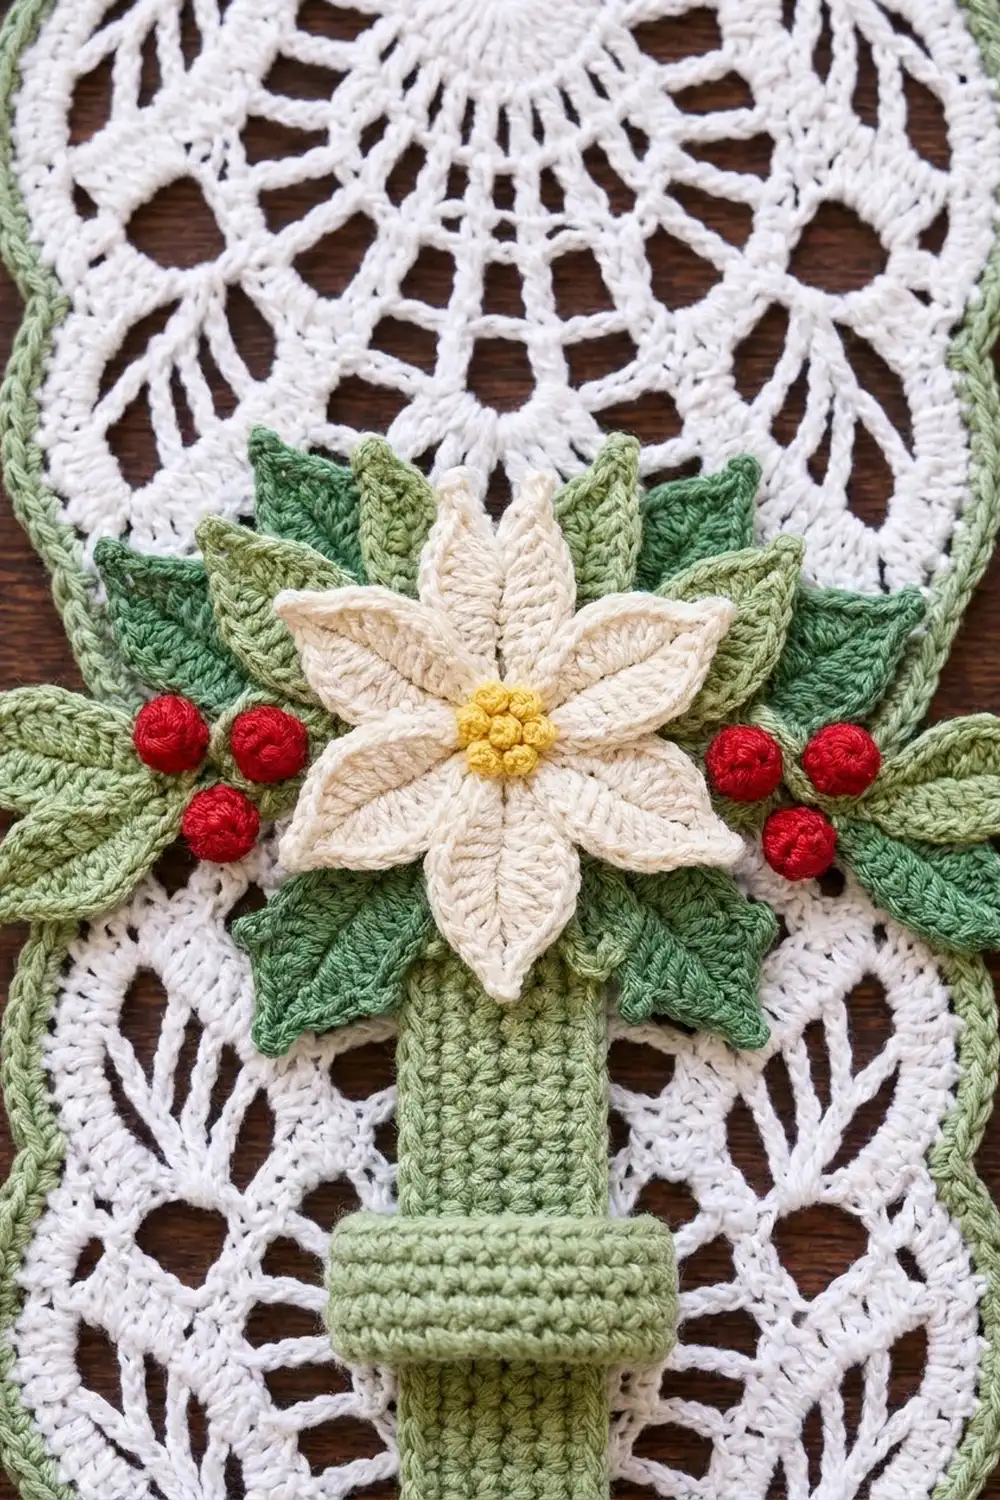
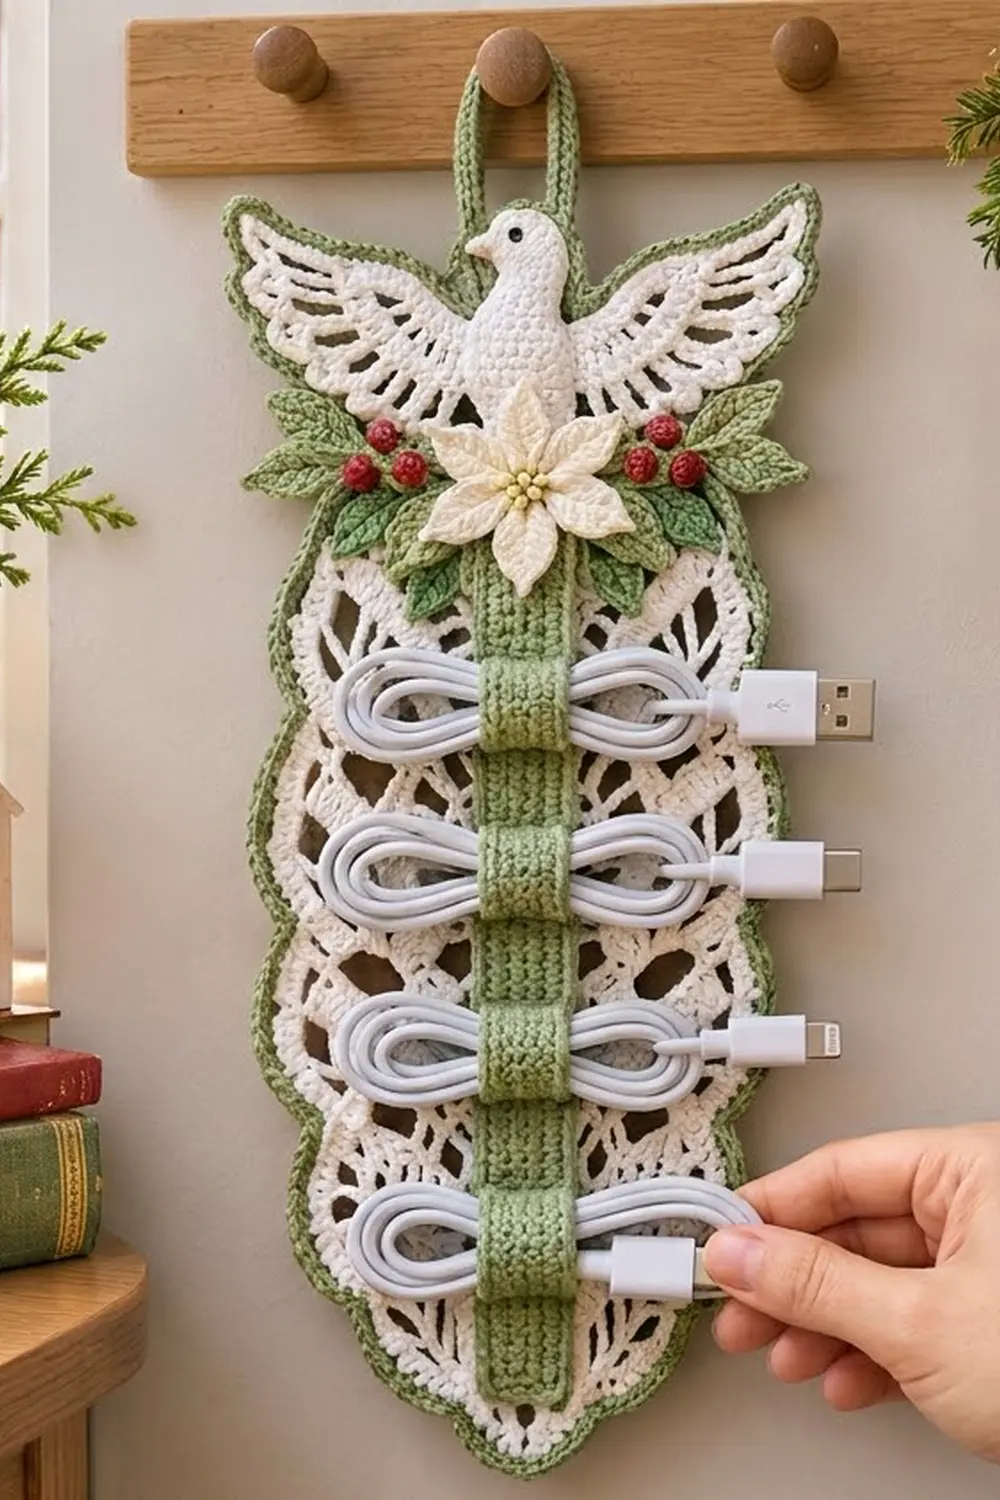
This holiday cable organizer is white lace in a pointed oval shape, topped by a pair of lace dove wings. A padded white dove sits between the wings above a cream poinsettia, with green holly leaves and red berries on both sides. A sage-green strap with four wrapped bands runs down the middle and holds phone chargers neatly in place.
The colors are white, sage green, medium leaf green, cream, red and a touch of yellow. The style is vintage Christmas doily, with a practical job.
This pattern uses US crochet terms. The finished organizer is 6 7/8 in (17.5 cm) wide across the body, 8 3/8 in (21.3 cm) across the wings and 14 1/4 in (36.2 cm) tall. To the top of the hanging loop it measures 15 in (38.1 cm).
You crochet the lace panel from the bottom tip upward in rows and split it into two wings at the top. Next comes a three-round border with the hanging loop. After that you make the strap, bands and appliqués separately and sew them on.
Finished Size and Construction
- Finished size: 6 7/8 in (17.5 cm) body width × 14 1/4 in (36.2 cm) tall; wingspan 8 3/8 in (21.3 cm)
- Skill level: Intermediate
- Terminology: US
- Yarn weight: Size 3 crochet thread (light fingering, 100% mercerized cotton)
- Hook: 2.75 mm (C-2) for the panel, border and strap; 2.25 mm (B-1) for the appliqués
- Number of pieces: 1 lace panel, 1 strap, 4 bands, 1 dove (body + head), 2 poinsettia layers, 6 leaves, 6 berries
- Layout: All appliqués centered on the panel, strap running down the middle
- Panel size before border: 6 1/8 in (15.6 cm) body × 13 1/2 in (34.3 cm) tall; wingspan 7 5/8 in (19.4 cm)
- Border depth: 3/8 in (1.0 cm)
Materials
Use mercerized cotton thread so the lace blocks crisply and the bands keep their shape. The quantities below assume 50 g = 137 m. All amounts include a margin of roughly 15%.
- White: 65 g (178 m) for the lace panel and dove
- Sage Green: 40 g (110 m) for the border, hanging loop, strap and bands
- Leaf Green: 10 g (27 m) for the holly leaves
- Cream: 10 g (27 m) for the poinsettia
- Red: 5 g (14 m) for the berries
- Yellow: 2 m for the poinsettia center
- Black: 0.5 m for the dove’s eye
Tools: 2.75 mm and 2.25 mm hooks, tapestry needle, sewing needle, stitch markers, a pinch of fiberfill, rust-proof pins, blocking mat, spray starch and a ruler.
Abbreviations (US Terms)
- ch – chain
- sl st – slip stitch
- sc – single crochet
- hdc – half double crochet
- dc – double crochet
- tr – treble crochet
- sc2tog / sc3tog – single crochet 2 / 3 together
- rev sc – reverse single crochet (crab stitch)
- sk – skip
- st(s) – stitch(es)
- sp – space
Special stitches
– Fan: (dc, ch 1) 4 times, then dc, all in the same st. This makes 9 sts.
– Half fan: (dc, ch 1, dc, ch 1, dc) in the same st. This makes 5 sts. When it starts a row, ch 4 counts as the first dc and ch 1.
– Picot: ch 3, sl st in 3rd ch from hook.
Counting rule: In the lace panel, every chain counts as a stitch. A ch-1 is 1 st, a fan is 9 sts and the beginning ch-4 is 2 sts (dc + ch 1).
Gauge and Checkpoints
Gauge (blocked): 8 sts and 4 rows = 1 in (2.5 cm) in the panel pattern; 8 sc and 8 rows = 1 in (2.5 cm) in sc.
Work Rows 1–11 of the panel as your test piece. Pin it out flat and measure:
- After Row 11: 49 sts wide = 6 1/8 in (15.6 cm); 11 rows tall = 2 3/4 in (7.0 cm)
- After Row 47: 11 3/4 in (29.8 cm) tall
- After Row 54: 13 1/2 in (34.3 cm) tall; wingspan 7 5/8 in (19.4 cm)
- After the border: 6 7/8 in × 14 1/4 in (17.5 cm × 36.2 cm)
If Row 11 measures more than 1/4 in (0.6 cm) too wide, go down one hook size. If it is too narrow, go up one size. Frog and restart rather than forcing it in blocking, because the strap length depends on the panel height.
Lace Panel
Use White and the 2.75 mm hook.
Bottom Point
Row 1: Ch 5 (the first 4 ch count as dc + ch 1). In the 5th ch from hook work (dc, ch 1) 3 times, then dc. Turn. (9 sts)
Row 2 (increase row): Ch 4 (counts as dc + ch 1), dc in first st. Ch 1, sk next st, dc in next st; repeat from * to the last 2 sts. Ch 1, sk next st, then work (dc, ch 1, dc) in the last st. Turn. (13 sts)
Rows 3–11: Repeat Row 2. Each row adds 4 sts.
Row 3: 17 · Row 4: 21 · Row 5: 25 · Row 6: 29 · Row 7: 33 · Row 8: 37 · Row 9: 41 · Row 10: 45 · Row 11: 49 sts
Lace Body
The body uses a 4-row repeat: Row A, Row B, Row C, Row B. Every row has 49 sts.
Row A (fan row): Ch 1, sc in first st. Ch 1, sk 5 sts, fan in next st, ch 1, sk 5 sts, sc in next st; repeat from * 3 more times. Turn. (49 sts: 5 sc, 4 fans, 8 ch-1)
Row B (mesh row): Ch 4 (counts as dc + ch 1), sk next st. Dc in next st, ch 1, sk next st; repeat from * to the last st, then dc in the last st. Turn. (49 sts: 25 dc, 24 ch-1)
Row C (offset fan row): Work a half fan in the first st. Ch 1, sk 5 sts, sc in next st. Ch 1, sk 5 sts, fan in next st, ch 1, sk 5 sts, sc in next st; repeat from * 2 more times. Ch 1, sk 5 sts, half fan in the last st. Turn. (49 sts: 2 half fans, 3 fans, 4 sc, 8 ch-1)
Row D: Work as Row B. (49 sts)
Rows 12–47: Work Rows A, B, C, D nine times in total. Row 47 is a mesh row.
On every fan row, the fans and sc land on the dc of the mesh row below, so the fans stack in a staggered brick pattern.
Wings
Each wing is worked over 23 sts. Sts 22–28 of Row 47 stay unworked and form the center V.
Increase at row start: Ch 4, dc in first st (+2). Decrease at row start: Sl st in the next ch-sp and the next dc, then ch 4 (−2). Decrease at row end: Stop with a dc in the 3rd-from-last st (−2).
First wing: Row 47 ended at this wing’s outer edge. Even rows start at the outer edge.
- Row 48: Increase at start, work mesh, decrease at end. (23 sts)
- Row 49: Decrease at start, work mesh to the outer edge. (21 sts)
- Row 50: Increase at start, decrease at end. (21 sts)
- Row 51: Decrease at start. (19 sts)
- Row 52: Increase at start, decrease at end. (19 sts)
- Row 53: Decrease at start. (17 sts)
- Row 54 (feather row): Ch 1, sc in first dc. Ch 5, sk ch-sp, sc in next dc; repeat from * 7 more times. (9 sc, 8 ch-5 loops) Fasten off.
Second wing: Join White in the last st of Row 47, at the other outer edge, and work Rows 48–54 the same way. Each wing moves 6 sts (3/4 in / 1.9 cm) outward. That gives a wingspan of 61 sts, or 7 5/8 in (19.4 cm).
Make All Pieces
Use the 2.25 mm hook for the appliqués and the 2.75 mm hook for the strap and bands.
Strap (Sage Green): Ch 11.
– Row 1: Sc in 2nd ch from hook and in each ch across. (10 sc)
– Rows 2–72: Ch 1, turn, sc across. (10 sc)
The strap measures 1 1/4 in × 9 in (3.2 cm × 22.9 cm).
Bands (make 4, Sage Green): Ch 6. Work 5 sc per row for 36 rows. Each band measures 5/8 in × 4 1/2 in (1.6 cm × 11.4 cm). Sew the short ends together to make a ring.
Dove body (White):
– Rnd 1: 6 sc in a magic ring. (6)
– Rnd 2: 2 sc in each st. (12)
– Rnd 3: (Sc, 2 sc in next) 6 times. (18)
– Rnds 4–7: Sc in each st. (18)
– Rnd 8: (Sc, sc2tog) 6 times. (12) Stuff lightly.
– Rnd 9: Sc2tog 6 times. (6) Close the opening.
Dove head (White):
– Rnd 1: 6 sc in a magic ring. (6)
– Rnd 2: 2 sc in each st. (12)
– Rnds 3–4: Sc in each st. (12)
– Rnd 5: Sc2tog 6 times. (6) Stuff and close.
Sew the head to one end of the body at a slight angle and embroider a Black French-knot eye. The finished dove is about 1 1/4 in (3.2 cm) tall.
Poinsettia back layer (Cream):
– Rnd 1: 10 sc in a magic ring, then join. (10)
– Rnd 2: Ch 10. Starting in the 2nd ch from hook, work sl st, sc, hdc, 2 dc, 2 tr, dc, hdc. Sk 1 sc, sl st in the next sc; repeat from * 4 more times. (5 petals)
The back layer is about 2 1/2 in (6.4 cm) across.
Poinsettia front layer (Cream):
– Rnd 1: As for the back layer. (10)
– Rnd 2: Ch 7. Starting in the 2nd ch from hook, work sl st, sc, hdc, 2 dc, hdc. Sk 1 sc, sl st in the next sc; repeat from * 4 more times. (5 petals)
The front layer is about 1 3/4 in (4.4 cm) across.
Holly leaf (make 6, Leaf Green): Ch 11. Work along the chain starting in the 2nd ch from hook: sc, hdc, dc, (dc, picot), dc, (dc, picot), dc, hdc, sc, then 3 sc in the last ch. Work back along the other side of the chain: sc, hdc, dc, (dc, picot), dc, (dc, picot), dc, hdc, sc. Finish with a picot at the tip and sl st to the first sc. (21 sts + 5 picots) Each leaf is about 1 1/2 in (3.8 cm) long.
Berry (make 6, Red):
– Rnd 1: 6 sc in a magic ring. (6)
– Rnd 2: Sc2tog 3 times. (3)
Tuck the tails inside as stuffing. Each berry is about 3/8 in (1.0 cm) across.
Layout (front view):
              [ loop ]
   WING  ~~~   DOVE   ~~~  WING
 leaf  leaf  [POINSETTIA]  leaf  leaf
   berries x3   leaf | leaf   berries x3
               | strap |
               [ band 1 ]
               [ band 2 ]
               [ band 3 ]
               [ band 4 ]
                  \/
Joining (Assembly)
Do the final blocking (below) before you sew anything on.
- Bands to strap: Slide all 4 band rings onto the strap. Center them at 1 1/2, 3 1/2, 5 1/2 and 7 1/2 in (3.8, 8.9, 14.0 and 19.1 cm) from the strap’s top end, with the band seams on the back.
- Strap to panel: Center the strap on the panel with its top end 3 in (7.6 cm) below the wing tops. Its bottom end will then sit 2 1/4 in (5.7 cm) above the bottom tip. Whipstitch both long edges of the strap to the panel stitch by stitch, catching one lace st for every 2 strap rows. Skip the sections where bands cross. Each band gets about 3/4 in (1.9 cm) of slack to stand away from the strap and hold a coiled cable.
- Poinsettia: Stack the front layer on the back layer with its petals between the back petals. Sew the centers together and work 6 Yellow French knots in the middle. Sew the flower over the top end of the strap.
- Dove: Sew the dove into the center V, overlapping the top edge of the poinsettia.
- Leaves and berries: Sew three leaves fanning out from each side of the flower, then add three berries on each side.
Tension: Use small, loose stitches through the back loops only so the lace doesn’t pucker. Checkpoint: After assembly the panel still measures 6 7/8 in (17.5 cm) wide and 14 1/4 in (36.2 cm) tall.
Border
Use Sage Green and the 2.75 mm hook. The border is worked at 8 sc per 1 in (2.5 cm).
Rnd 1: Join in the bottom tip and work 3 sc there. Then work up and around the panel in this order:
- First point edge: 33 sc (3 per row-end of Rows 1–11)
- First straight side: 72 sc (2 per row-end of Rows 12–47)
- First outer wing edge: 13 sc (2 per row-end of Rows 48–53, plus 1 for Row 54)
- First wing top: 41 sc (1 in each of the 9 sc and 4 in each of the 8 loops)
- First inner wing edge: 19 sc (3 per row-end of Rows 48–53, plus 1 for Row 54)
- Center V: 7 sc (1 in each of sts 22–28 of Row 47)
- Second inner wing edge: 19 sc
- Second wing top: 41 sc
- Second outer wing edge: 13 sc
- Second straight side: 72 sc
- Second point edge: 33 sc
Join. (366 sc)
Rnd 2: Ch 1. Sc in each st around, with these changes:
– 3 sc in the middle tip st
– 3 sc in the first and last sc of each wing top (4 places)
– Sc3tog over the middle 3 of the 7 center-V sts
Join. (366 + 10 − 2 = 374 sc)
Rnd 3: Ch 1, rev sc in each st around. Join. (374 sts)
Hanging loop: Join Sage Green in the center-V st. Ch 40, sl st in the same st. Work 40 sc into the loop and sl st to the base. The loop rises 2 1/2 in (6.4 cm) from the V, so the total height to the top of the loop is 15 in (38.1 cm).
Why the math works: The straight sides are 36 rows at 4 rows per inch, which is 9 in (22.9 cm). At 8 sc per inch, 9 in needs 72 sc, which is exactly 2 per row-end. The point edges and inner wing edges run on roughly 45° diagonals, so they are about 1.4 times longer than they are tall. That is why they get 3 sc per row-end. The 10 corner increases keep the convex points sharp, and the sc3tog keeps the concave V from ruffling.
Final Blocking
- Soak the bordered panel in cool water and roll it in a towel to remove excess water.
- Pin the straight sides to 9 in (22.9 cm) and the body to 6 7/8 in (17.5 cm) wide.
- Pin the bottom tip, then each wing tip so the span is 8 3/8 in (21.3 cm).
- Pin out each ch-5 feather loop and the tip of each fan.
- Mist with spray starch and leave until completely dry.
- Steam the leaves and petals flat, then shape the petal tips with your fingers.
Final Quality-Control Checklist
- Row 11 has 49 sts and every body row has 49 sts
- Each wing ends with 17 sts and 8 feather loops
- Border Rnds 2 and 3 have 374 sts each
- The panel measures 6 7/8 × 14 1/4 in (17.5 × 36.2 cm)
- The strap is centered and measures 9 in (22.9 cm)
- All 4 bands have equal slack
- No sewing is visible from the front
Troubleshooting
- Fans don’t line up: Count the sk 5 sts carefully. Fans and sc must land on dc, never on chains.
- Point edge cups: Check that you worked 3 sc per row-end, not 2.
- Border ruffles: Use a hook one size smaller for the border.
- Bands are too tight for a cable: Add 4 rows to each band.
- Dove leans forward: Tack it to the panel at the back of the body as well as underneath.
Care
Hand wash in cool water with mild soap, press out the water in a towel and dry flat, re-pinning the wings. Starch again as needed.
Final Notes
The measurements build on each other in a chain. A gauge of 8 sts and 4 rows per inch gives a 49-st point that is 6 1/8 in (15.6 cm) wide. The panel reaches 13 1/2 in (34.3 cm) after the wings. A 3/8 in (1.0 cm) border with 374 sts brings it to 6 7/8 × 14 1/4 in (17.5 × 36.2 cm). The 9 in (22.9 cm) strap then fits neatly between the poinsettia and the tip. Check each link in the chain as you go and the finished organizer will hang straight and hold every cable.
Happy crocheting!