

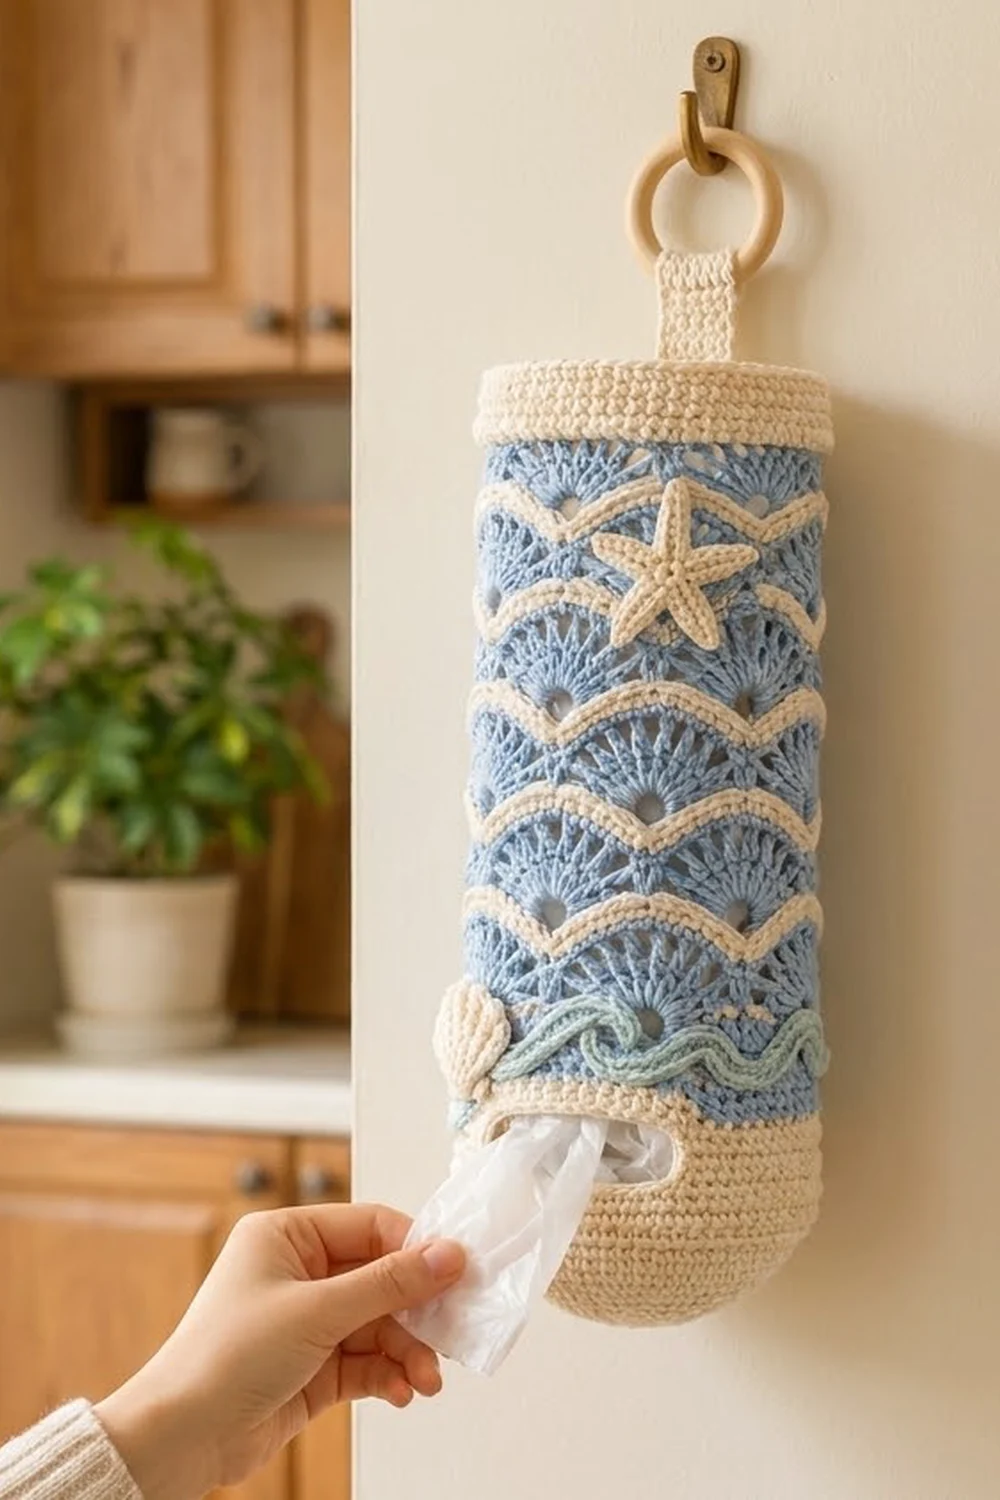
This coastal bag holder hides your grocery bags in a cheerful seaside tube. The body is light blue fan stitch with a cream stripe across the top of each fan row. Because the stripes follow the scallops, they look like gentle waves.
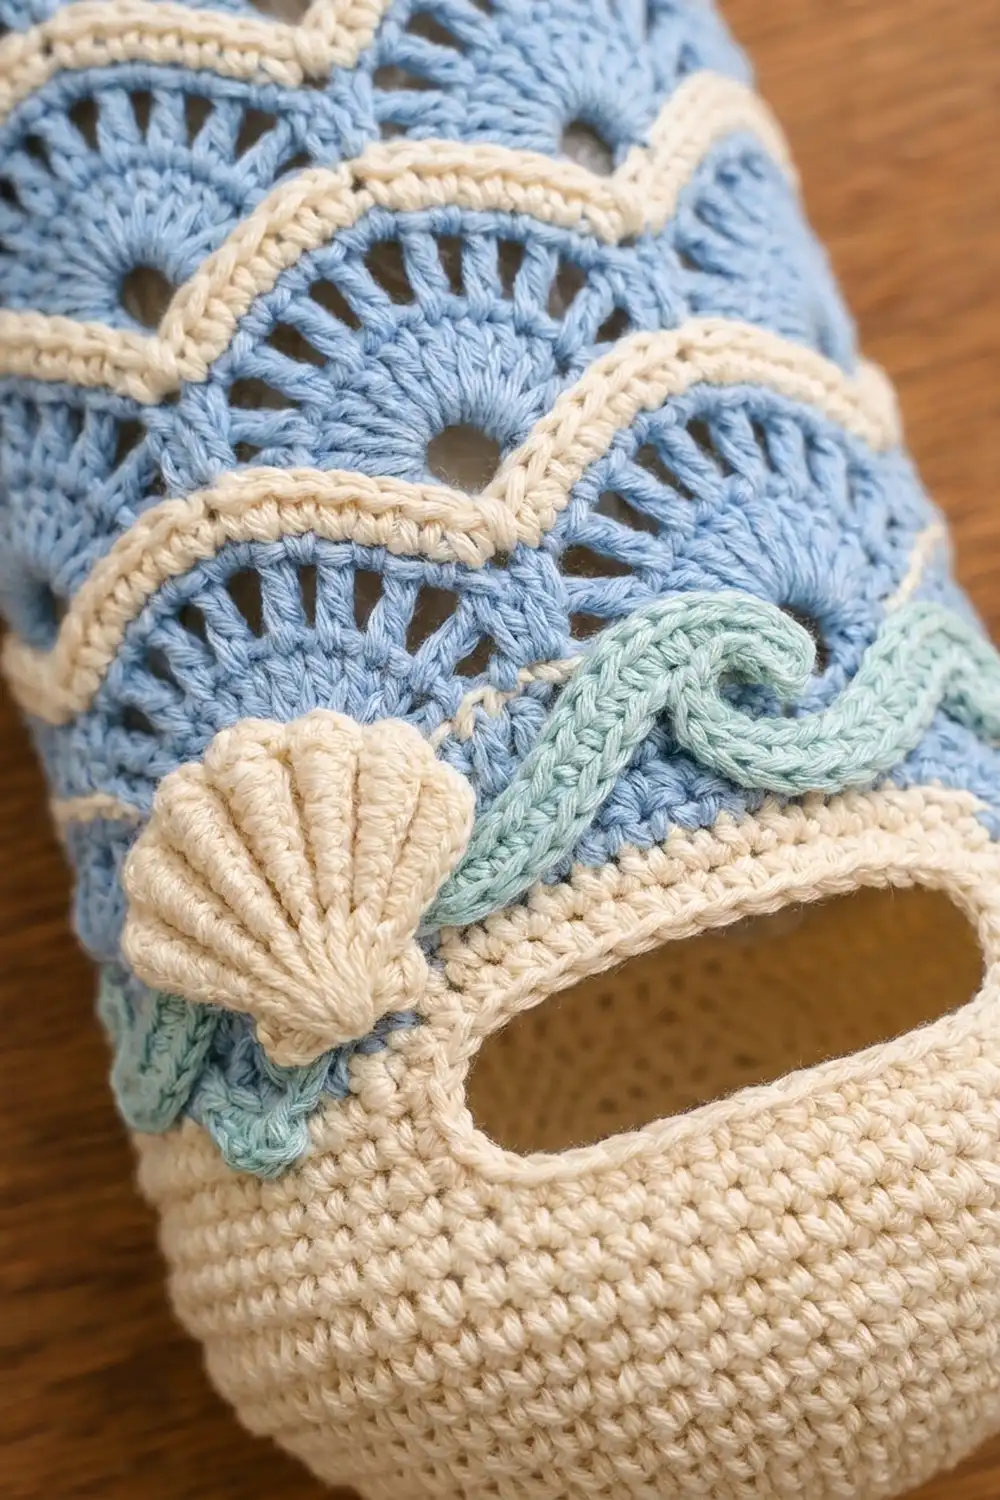
A cream top band, a cream lower band with an oval pull-out opening, and a rounded cream base frame the stripes. For the beach details, there’s a ribbed cream scallop shell, a five-armed cream starfish, and two aqua waves with curled crests. A wooden ring at the top hangs on any wall hook.
The pattern uses US crochet terms. The holder measures 6 in (15.2 cm) wide flat, which is 12 in (30.5 cm) around, and 16 in (40.6 cm) tall. With the tab and ring, it is about 19.5 in (49.5 cm) tall overall.
You crochet the fan panel flat and seam it into a tube. The top band, lower band, and base are separate pieces, and each one has 48 stitches around, so every join is stitch for stitch. A rim border, a hanging tab, and the appliqués finish it off.
Finished Size and Construction
- Finished size: 6 in (15.2 cm) wide flat x 16 in (40.6 cm) tall; 12 in (30.5 cm) around
- Skill level: Intermediate
- Terminology: US crochet terms
- Yarn weight: Worsted (#4) cotton
- Hook: 4.5 mm (US 7)
- Number of pieces: 9 crocheted pieces (fan panel, top band, lower band, base, tab, shell, starfish, 2 waves) plus 1 wooden ring
- Layout: One vertical tube; from bottom to top it is base, lower band, fan panel, then top band
- Fan panel size: 12.25 in (31.1 cm) wide x 10.25 in (26.0 cm) tall before seaming
- Size before border: 15.75 in (40.0 cm) tall
- Border depth: 0.25 in (0.6 cm)
Materials
Use a smooth worsted-weight cotton with about 100 m per 50 g. Cotton shows the fans clearly and doesn’t sag when the holder is full of bags.
- Light blue: 70 g / 140 m
- Cream: 90 g / 180 m
- Aqua: 10 g / 20 m
These quantities include a margin of about 15 percent.
Tools
- 4.5 mm (US 7) crochet hook
- Wooden ring, 2 in (5.1 cm) outer diameter
- 4 stitch markers
- Tapestry needle
- Rust-proof pins
- Scissors
- Blocking mat and spray bottle
Abbreviations (US Terms)
- ch – chain
- sl st – slip stitch
- sc – single crochet
- hdc – half double crochet
- dc – double crochet
- FPdc – front post double crochet
- sc2tog – single crochet 2 together
- BLO – back loop only
- MR – magic ring
- st(s) – stitch(es)
- sk – skip
- RS / WS – right side / wrong side
Shell: 5 dc in the same stitch.
Gauge and Checkpoints
Base gauge: 16 sc and 18 rows = 4 in (10.2 cm).
Pattern gauge: 1 shell repeat (6 sts) = 1.5 in (3.8 cm) wide; 1 three-row stripe repeat = 1.25 in (3.2 cm) tall.
Make the base first as your test piece. Its last round sets the 48-stitch size that every band has to match.
Checkpoints:
- Base after Round 8: 3.75 in (9.5 cm) across.
- Fan panel after Row 1 plus 2 repeats: 2.75 in (7.0 cm) tall, 12.25 in (31.1 cm) wide.
- Fan panel after Row 1 plus 4 repeats: 5.25 in (13.3 cm) tall.
- Lower band after Round 5: 1.1 in (2.8 cm) tall.
- Top band after Round 9: 2 in (5.1 cm) tall, 12 in (30.5 cm) around.
If your pieces are too big, go down a hook size. If they are too small, go up a hook size. Never change the stitch counts, because every join depends on them.
Base (Cream)
Join each round with a sl st to the first sc. The ch 1 at the start of a round does not count as a stitch.
- Round 1: MR, ch 1, 6 sc in ring, join. (6 sts)
- Round 2: 2 sc in each st around. (12 sts)
- Round 3: Sc in next st, 2 sc in next st; repeat 6 times. (18 sts)
- Round 4: Sc in next 2 sts, 2 sc in next st; repeat 6 times. (24 sts)
- Round 5: Sc in next 3 sts, 2 sc in next st; repeat 6 times. (30 sts)
- Round 6: Sc in next 4 sts, 2 sc in next st; repeat 6 times. (36 sts)
- Round 7: Sc in next 5 sts, 2 sc in next st; repeat 6 times. (42 sts)
- Round 8: Sc in next 6 sts, 2 sc in next st; repeat 6 times. (48 sts)
Fasten off. The base should lie flat at 3.75 in (9.5 cm) across.
Lower Band with Opening (Cream)
- Round 1: Ch 48 and join with a sl st into a ring without twisting it. Ch 1, sc in each ch, join. (48 sts)
- Rounds 2–5: Ch 1, sc in each st, join. (48 sts)
- Row 6 (RS): Ch 1, sc in the first 36 sts, turn. Leave 12 sts unworked. (36 sts)
- Rows 7–10: Ch 1, sc in each st. Turn after each row except Row 10, which ends on the RS. (36 sts)
- Round 11: Ch 12 across the gap and sl st to the first sc of Row 10. Ch 1, sc in the same st and the next 35 sts, then sc in each of the 12 ch. Join. (36 sc + 12 sc in chains = 48 sts)
- Rounds 12–16: Ch 1, sc in each st, join. (48 sts)
Fasten off. The band is about 3.5 in (8.9 cm) tall. The opening is 3 in (7.6 cm) wide and about 1.1 in (2.8 cm) tall.
Fan Panel (Light Blue and Cream)
Work in turned rows. Each repeat has 3 rows, so the colors switch sides from one repeat to the next. Cut the yarn at every color change and leave 4 in (10.2 cm) tails, which will be hidden in the side seam.
- Row 1 (cream): Ch 50. Sc in 2nd ch from hook and in each ch across, turn. (49 sts)
Stripe repeat:
- Row A (blue): Ch 1, sc in first st, sk 2, shell in next st, sk 2, sc in next st; repeat 8 times, turn. (8 shells + 9 sc = 49 sts)
- Row B (blue): Ch 3 (counts as dc), 2 dc in first sc. Sk 2 dc, sc in center dc, sk 2 dc, shell in next sc; repeat 7 times. Sk 2 dc, sc in center dc, sk 2 dc, 3 dc in last sc, turn. (3 + 42 + 4 = 49 sts)
- Row C (cream): Ch 1, sc in each st across, with the last sc in the top of the turning ch-3, turn. (49 sts)
Work Rows A–C 8 times in total. That’s 25 rows, ending with a cream row.
The Row B shells sit over the Row A sc stitches. The cream Row C follows their curved tops, which is what makes the wavy stripes. The skipped stitches leave small eyelets at the base of each fan.
The panel measures 12.25 in (31.1 cm) x 10.25 in (26.0 cm). The top and bottom edges each have 49 sts.
Seam the panel: Fold the panel RS together. Whipstitch the row-end edges together edge to edge, matching the stripes, and weave the tails into the seam. Turn it RS out. On each edge, stitches 1 and 49 now sit side by side at the seam.
Top Band (Cream)
- Round 1: Ch 48, join into a ring. Ch 1, sc in each ch, join. (48 sts)
- Rounds 2–9: Ch 1, sc in each st, join. (48 sts)
Fasten off. The band is 2 in (5.1 cm) tall and 12 in (30.5 cm) around.
Hanging Tab (Cream)
- Row 1: Ch 9, sc in 2nd ch from hook and in each ch across, turn. (8 sts)
- Rows 2–18: Ch 1, sc in each st, turn. (8 sts)
The tab measures 2 in (5.1 cm) x 4 in (10.2 cm).
Appliqués
Scallop shell (cream):
- Row 1: MR, ch 3 (counts as dc), 6 dc in ring, pull the ring closed, turn. (7 sts)
- Row 2: Ch 3, dc in same st, 2 dc in each st across, turn. (14 sts)
- Row 3: Ch 3, dc in same st. FPdc around next st, 2 dc in next st; repeat 6 times. FPdc around last st, turn. (2 + 18 + 1 = 21 sts)
- Row 4: Ch 1, sc in each st. (21 sts)
The FPdc stitches make raised ribs that fan out from the base of the shell. The shell is about 1.75 in (4.4 cm) wide.
Starfish (cream):
- Round 1: MR, ch 1, 10 sc in ring, join. (10 sts)
- Round 2: Ch 6. Starting in the 2nd ch from hook and working back along the chain: sl st, sc, hdc, dc, dc. Sl st in each of the next 2 sc of Round 1; repeat 5 times. (5 arms)
The starfish is about 2.75 in (7.0 cm) from tip to tip.
Waves (aqua, make 2):
- Row 1: Ch 22. Sc in 2nd ch from hook and the next 13 ch, then 3 dc in each of the last 7 ch. (14 sc + 21 dc = 35 sts)
The increases twist the dc end into a curled crest. Each wave is about 3.25 in (8.3 cm) long.
Joining
Every join is a cream sc seam worked through both pieces from the RS, which forms a neat ridge.
Base to lower band: Hold the base against Round 1 of the lower band, WS together. Work 1 sc through each pair of stitches. (48 sts)
Lower band to panel: Hold Round 16 of the band against the foundation edge of the panel, with the panel seam at center back, opposite the opening. Work 1 sc through each pair. At the seam, sc2tog through panel stitches 49 and 1 together with the one band stitch opposite them. (47 + 1 = 48 sts)
Panel to top band: Hold the chain edge of the top band against the top cream row of the panel. Join it the same way, with the sc2tog at the seam. (48 sts)
The whipstitch seam already pulls stitches 1 and 49 together, so they count as one. That’s why the 49-stitch panel becomes a 48-stitch tube, and you don’t add any stitches at the seam.
Keep your seam tension the same as the fabric. A tight seam will narrow the tube at the join.
Size checkpoint: The tube should be 15.75 in (40.0 cm) tall and 12 in (30.5 cm) around at every join.
Border
Border gauge: 1 sc in each stitch and 1 sc in each sc row end, which works out to 4 sts per 1 in (2.5 cm).
Top rim (cream): Join yarn to Round 9 of the top band at the back.
- Round 1: Ch 1, sc in each st, join. (48 sts)
- Round 2: Sl st in BLO of each st, join. (48 sts)
This adds 0.25 in (0.6 cm), for a total height of 16 in (40.6 cm).
Opening edge (cream): Work 1 round of sc around the opening, then join. (34 sts)
- 12 sc along the unworked Round 5 sts
- 5 sc along the row ends on one side
- 12 sc into the underside of the Round 11 chains
- 5 sc along the row ends on the other side
Why the math works: The rim keeps the band’s 48 stitches, and 48 stitches at 4 per inch is 12 in (30.5 cm), so the rim doesn’t flare. Around the opening, 1 sc per stitch and 1 sc per row end match the fabric, so the opening keeps its 3 in (7.6 cm) x 1.1 in (2.8 cm) shape.
Tab and appliqués: Fold 1 in (2.5 cm) of the tab over the ring and sew it down. Sew the bottom 1.5 in (3.8 cm) inside the top band at center back, which leaves 1.5 in (3.8 cm) showing. On the front, sew on these pieces:
- The shell at lower left, just above the lower band
- Both waves end to end to its right, with the crests curling upward
- The starfish at upper right, below the top band
Final Blocking
- Mist the holder lightly with water.
- Slide a rolled towel inside to fill out the tube.
- Pin the cream stripes level.
- Pat the base flat into a 3.75 in (9.5 cm) circle.
- Pin the opening into an even oval.
- Check that it measures 16 in (40.6 cm) tall and 12 in (30.5 cm) around.
- Let it dry completely before you remove the pins.
Final Quality-Control Checklist
- The base lies flat at 3.75 in (9.5 cm).
- All three joins have 48 sts and no puckers.
- The stripes are level all the way around.
- The opening is 3 in (7.6 cm) wide with a smooth edge.
- The rim has 48 sts and doesn’t flare.
- The tab is secure and the ring hangs straight.
- The appliqués are flat and every tail is woven in.
Troubleshooting
- Panel too wide: Go down a hook size for Rows A and B only.
- Stripes slant at the seam: Re-seam the panel, matching each cream row.
- Join puckers: Redo the seam more loosely.
- Base cups: Recount your stitches. Round 8 must have 48.
- Starfish curls: Steam it and pin each arm flat before sewing it on.
Care
Hand wash in cool water and lay flat to dry. Remove the wooden ring before washing.
Final Notes
The measurement chain is short: 16 sc = 4 in (10.2 cm), and 48 sts = 12 in (30.5 cm) around. For the height, 3.5 in (8.9 cm) + 10.25 in (26.0 cm) + 2 in (5.1 cm) + 0.25 in (0.6 cm) = 16 in (40.6 cm). If you check your gauge on the base and keep every join at 48 stitches, the holder will hang straight and even.
Happy crocheting!