

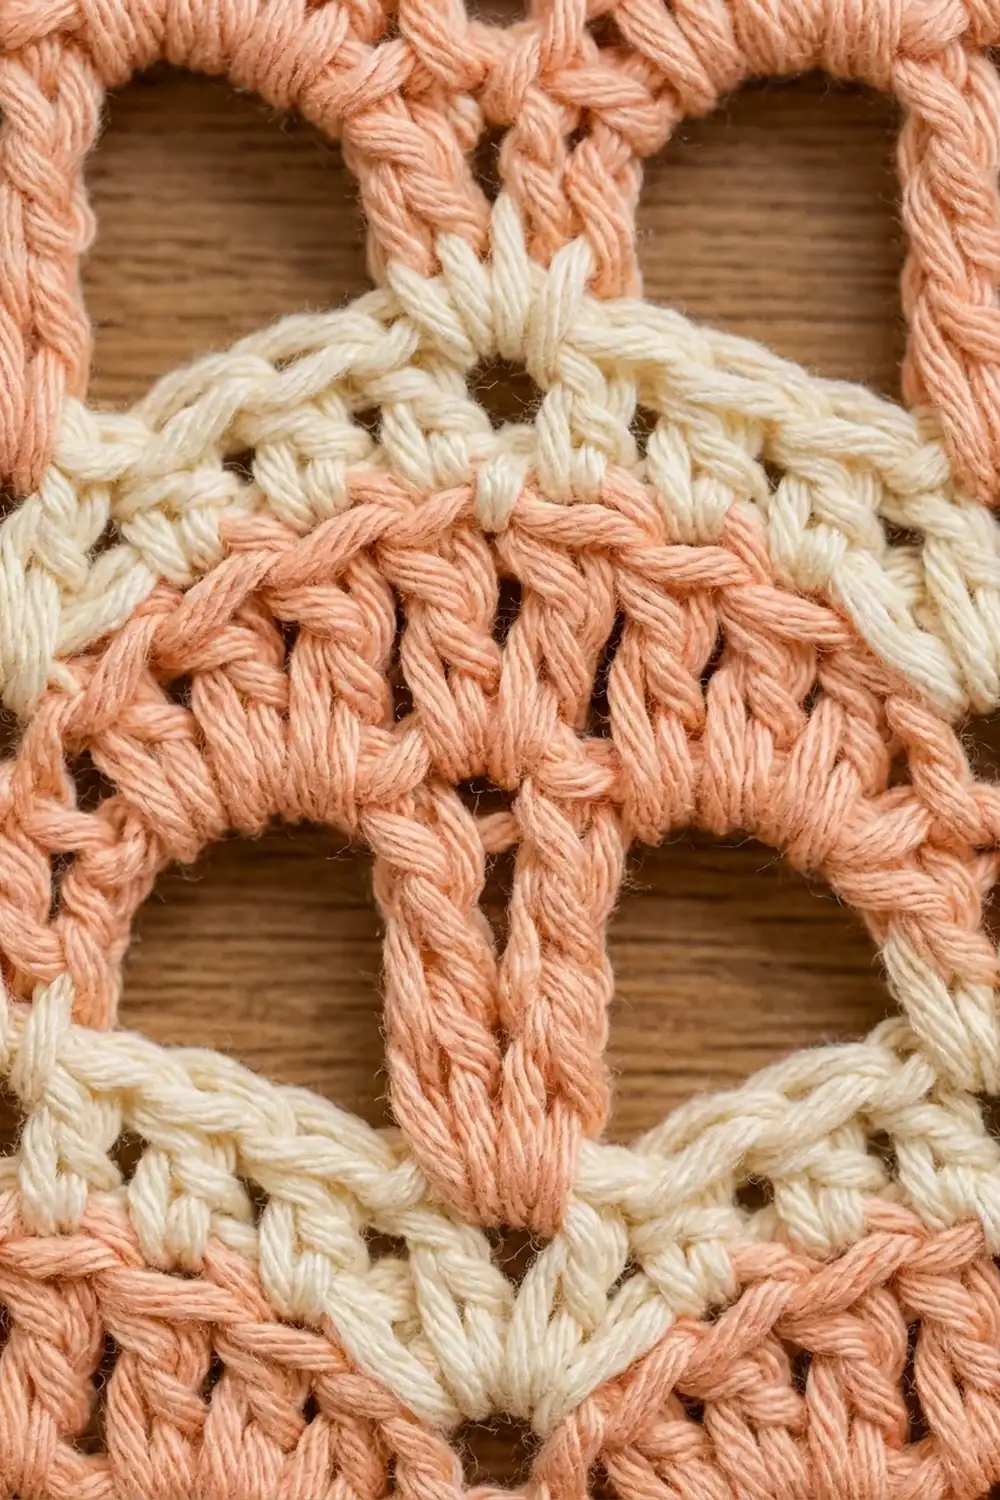
The Peach Arcade Lace Panel is a single rectangular piece built from rows of open “windows” capped by rounded scallop arches. It looks like a row of tiny garden arcades stacked on top of one another. The soft peach arches are outlined in warm cream, which gives the lace a gentle striped rhythm.
The style is airy and a little vintage. It works well as a sampler panel, a wall hanging, a book or shelf accent, or simply a beautifully finished swatch that shows off the stitch. The top edge ends in three scallops, with the middle one rising to a small pointed peak.
This pattern uses US crochet terms. The finished panel measures 6.75 in (17.1 cm) wide by 11 in (27.9 cm) tall at the center peak.
Construction is simple. You crochet one flat piece in rows from the bottom up: a cream foundation row, six repeat bands of window, arch and cream rows, then one final window row and a scalloped top row. To finish, a one-row cream edging goes down one side, across the bottom and up the other side.
Finished Size and Construction
- Finished size: 6.75 in × 11 in (17.1 cm × 27.9 cm) at the center peak; 10.5 in (26.7 cm) tall at the side edges
- Skill level: Easy / advanced beginner
- Terminology: US crochet terms
- Yarn weight: Worsted (#4), cotton or cotton blend
- Hook: 5.0 mm (US H-8)
- Number of pieces: 1
- Layout: One rectangular panel worked flat in rows, bottom to top
- Stitch multiple: 8 + 1 (3 arch repeats across)
- Panel size before edging: 6.25 in × 10.75 in (15.9 cm × 27.3 cm) at the center peak
- Edging depth: 0.25 in (0.6 cm) on the sides and bottom; the top scallops are left unedged
Materials
Yarn: Choose a smooth worsted-weight cotton or cotton blend, about 50 g / 85 m per ball. Cotton gives crisp arches and clean windows. Acrylic also works, but the arches will be softer.
- Color A, Peach: 25 g (about 43 m)
- Color B, Cream: 15 g (about 26 m)
These quantities include a margin of about 20% for the gauge swatch and weaving in ends.
Tools:
– 5.0 mm (US H-8) crochet hook
– Tapestry needle
– Scissors
– Measuring tape or ruler
– Rust-proof pins and a blocking mat or folded towel
– Spray bottle with clean water
Abbreviations (US Terms)
- ch – chain
- sc – single crochet
- hdc – half double crochet
- dc – double crochet
- tr – treble crochet (yarn over twice, insert hook, pull up a loop, [yarn over, pull through 2 loops] 3 times)
- sk – skip
- sp(s) – space(s)
- st(s) – stitch(es)
- RS – right side
- rep – repeat
Special stitch – Arch: Worked over two neighboring ch-3 spaces and the tr between them: 3 dc in the first ch-3 sp, 1 dc in the center tr, 3 dc in the next ch-3 sp. One Arch = 7 dc.
Notes:
– The turning ch-4 at the start of a window row counts as 1 tr.
– The ch-1 at the start of sc rows does not count as a stitch.
– Row 1 is a RS row. All odd rows are RS rows.
– To change color, work the last yarn over of the final stitch in the new color. If the new color isn’t waiting at that edge, fasten off and join it fresh. Leave 6 in (15.2 cm) tails; the edging will hide them.
Gauge and Checkpoints
Pattern gauge: 25 sts = 6.25 in (15.9 cm) across; one 3-row band = 1.5 in (3.8 cm) tall.
That works out to 4 sc per inch (2.5 cm) in the cream rows.
Test one piece first. With Color B, ch 18. Work Row 1 (17 sc), then one band (Rows 2–4) as written below. The repeats fit because 17 = 2 × 8 + 1. Block the swatch lightly and measure:
- Width: 4.25 in (10.8 cm)
- Height: 1.75 in (4.4 cm)
If your swatch is too big, go down to a 4.5 mm hook. If it is too small, go up to a 5.5 mm hook. If only the height is off, check your treble crochet. Tall, loose tr stitches stretch the windows, while tight ones squash them.
Checkpoints on the main panel:
– After Row 1: 6.25 in (15.9 cm) wide
– After Row 4 (Band 1): 1.75 in (4.4 cm) tall
– After Row 10 (Band 3): 4.75 in (12.1 cm) tall
– After Row 19 (Band 6): 9.25 in (23.5 cm) tall
– After Row 21: 10.75 in (27.3 cm) at the center peak
– After the edging: 6.75 in × 11 in (17.1 cm × 27.9 cm)
Main Pattern: The Panel
Foundation
Row 1 (RS, Color B, cream): Ch 26. Sc in the 2nd ch from the hook and in each ch across. Change to Color A in the last st and turn. (25 sc)
The panel should now measure 6.25 in (15.9 cm) wide.
Repeat Band (Rows 2–4)
Each band adds 1.5 in (3.8 cm) of height.
Row 2 (Window Row, Color A, peach): Ch 4 (counts as tr). Ch 3, sk 3 sts, tr in the next st; rep from * across, ending with a tr in the last st. Turn.
(7 tr + 6 ch-3 sps = 25 sts)*
The tr stitches land on sts 1, 5, 9, 13, 17, 21 and 25. That leaves six open windows separated by straight vertical posts.
Row 3 (Arch Row, Color A, peach): Ch 1. Sc in the first tr. Work 1 Arch over the next 2 ch-3 sps and the tr between them (3 dc in sp, dc in tr, 3 dc in sp), then sc in the next tr; rep from * 2 more times. The final sc goes into the top of the turning ch-4. Change to Color B in the last st and turn.
(3 Arches of 7 dc + 4 sc = 25 sts)*
Each Arch rises over two windows, and its center dc sits right on top of a post. The sc stitches pull the valleys down between the arches, which creates the rounded scallop shape.
Row 4 (Outline Row, Color B, cream): Ch 1. Sc in each st across. Change to Color A in the last st and turn. (25 sc)
This thin cream row traces the tops of the arches and gives the next window row a firm base.
Checkpoint: After Row 4 the panel is 1.75 in (4.4 cm) tall and still 6.25 in (15.9 cm) wide.
Build the Body
Rows 5–19: Repeat Rows 2–4 five more times, for six bands in total.
Row numbering for the bands:
– Band 2: Rows 5–7
– Band 3: Rows 8–10
– Band 4: Rows 11–13
– Band 5: Rows 14–16
– Band 6: Rows 17–19
At the end of Row 19 (cream, 25 sc), change to Color A.
When you start each new window row, the posts on sts 5, 13 and 21 sit above the Arch centers, and the posts on sts 1, 9, 17 and 25 sit above the valleys. This keeps the arches stacked in neat columns.
Checkpoint: After Row 19 the panel measures 9.25 in (23.5 cm) tall.
Top Edge
Row 20 (Window Row, Color A): Work as Row 2. Turn. (7 tr + 6 ch-3 sps = 25 sts)
Row 21 (Scallop Top, Color A, RS): Ch 1. Sc in the first tr. Then work three scallops:
- Side Scallop: In the next sp work (hdc, 2 dc). In the next tr work (dc, ch 1, dc). In the next sp work (2 dc, hdc). Sc in the next tr.
- Center Scallop: In the next sp work (dc, 2 tr). In the next tr work (tr, ch 3, tr). In the next sp work (2 tr, dc). Sc in the next tr.
- Side Scallop: Repeat the Side Scallop. The final sc goes into the top of the turning ch-4.
(4 sc + 3 scallops of 8 sts = 28 sts, plus 2 ch-1 sps and 1 ch-3 sp)
Fasten off.
The hdc-to-dc build makes the side scallops gently rounded. The center scallop’s trebles and ch-3 tip lift it higher, which gives the pointed peak.
Checkpoint: 10.75 in (27.3 cm) tall at the center peak and 10.25 in (26.0 cm) tall at the side edges.
Edging
The edging is one row of cream single crochet that wraps three sides: down one side, across the bottom and up the other side. It is worked as a single row, not a closed round. The top scallops stay free so they keep their shape.
Edging gauge: 4 sc per inch (2.5 cm), the same as the cream rows.
Row-end rule for the sides:
– 1 sc in each sc row end
– 2 sc in each dc-height row end (the Arch rows start with ch 1 + sc, but the side of the row is dc-tall)
– 3 sc in each tr row end
Edging Row (Color B): With RS facing, join Color B with a sc in the row end of Row 21 at the top right corner.
- Right side: Working down the edge, put 3 sc in the Row 20 row end. Then, for each of the six bands from the top down, work 1 sc in the cream row end, 2 sc in the Arch row end and 3 sc in the Window row end. Finish with 1 sc in the Row 1 row end. (41 sc)
- Bottom corner: Ch 1 and rotate the work.
- Bottom edge: Work 1 sc in the free loop of each of the 25 foundation chains (the chains that hold the Row 1 sc). (25 sc)
- Bottom corner: Ch 1 and rotate the work.
- Left side: Work up the edge, mirroring the right side: 1 sc in Row 1, then 3-2-1 sc per band (6 per band, 36 total), 3 sc in Row 20 and 1 sc in Row 21. (41 sc)
Fasten off.
Total: 41 + 25 + 41 = 107 sc, plus 2 ch-1 corner spaces. The side counts above do not include the corner chains. The corners are the two ch-1s only.
Why the math works:
– Each side edge is 10.25 in (26.0 cm) long. At 4 sc per inch that calls for 41 sc. The row-end rule gives exactly 1 + 3 + (6 × 6) + 1 = 41.
– The bottom edge uses one sc per foundation stitch (25 sc across 6.25 in / 15.9 cm), which matches the gauge exactly. The edge will neither ruffle nor cinch in.
– The ch-1 corners let the edging turn 90° without bunching. One edging sc adds 0.25 in (0.6 cm) on each side and along the bottom, so the finished panel is 6.75 in × 11 in (17.1 cm × 27.9 cm).
Weave in all ends along the edging, through stitches of the matching color.
Final Blocking
- Lightly mist the panel until it is evenly damp but not dripping. You can also soak it briefly and roll it in a towel.
- Lay it RS up on a blocking mat or folded towel.
- Pin the bottom edge straight at 6.75 in (17.1 cm) wide.
- Pin each side edge straight, measuring 10.5 in (26.7 cm) from the bottom corner to the base of each side scallop.
- Pin the center peak at 11 in (27.9 cm) from the bottom edge. Pin each side scallop at its highest point so all three scallops curve evenly.
- Use your fingers to open each window into a clean rectangle and round each arch.
- Let it dry completely before you unpin it.
Final Quality-Control Checklist
- Row 1 and every outline row have exactly 25 sc.
- Every window row has 7 tr and 6 ch-3 spaces.
- Every Arch row has 3 Arches of 7 dc and 4 valley sc.
- All Arches line up in vertical columns, with posts centered under the Arch peaks.
- Six full bands sit between the foundation and the top window row.
- The center scallop rises clearly above the two side scallops.
- The edging has 41 sc on each side and 25 sc along the bottom, with ch-1 corners.
- The finished panel measures 6.75 in × 11 in (17.1 cm × 27.9 cm).
- All ends are woven securely into stitches of the matching color.
Troubleshooting
Windows look slanted or uneven. You may be skipping the wrong number of stitches. Count 3 skipped sts between posts every time, and place the last tr in the last st, not in the turning ch.
Arches are flat. Make sure the valley sc goes into the tr above the previous valley, not into a ch-3 space. Also check that you worked 3 full dc into each space.
Panel is narrowing. You are probably missing the final sc into the turning ch-4 on Arch rows. Recount to 25 sts after every row.
Side edges ripple after edging. You used too many sc per row end. Unpick and follow the 1-2-3 rule exactly.
Side edges pull in. You used too few sc per row end, or your edging tension is tight. Try going up 0.5 mm in hook size for the edging only.
Center peak isn’t pointed. Work the ch-3 tip snugly and pin it to a sharp point during blocking.
Care
Hand wash in cool water with a mild detergent, gently press out the water in a towel, and dry flat, reshaping the arches as it dries. Avoid wringing, since that can distort the windows.

Final Notes
The whole design comes down to one measurement chain:
– 25 sts = 6.25 in (15.9 cm) across.
– Each band = 1.5 in (3.8 cm), and six bands bring the panel to 9.25 in (23.5 cm).
– The top window and scallop rows take it to 10.75 in (27.3 cm) at the peak.
– The edging (41 + 25 + 41 sc) finishes it at 6.75 in × 11 in (17.1 cm × 27.9 cm).
If your swatch matches and you recount after each row, everything else falls into place.
Happy crocheting!