

The Marigold Puff Flower Hexagon is a single, textured motif in one warm mustard-yellow shade. A plump six-petal puff flower sits in the center and a lacy ring of clusters surrounds it. Two solid rounds hold the shape, and a crab-stitch edge finishes it with a rope-like ridge.
The look is cozy and slightly vintage, with a lot of surface texture. Because it is all one color, the puff petals and the open lace stand out through light and shadow alone.
This pattern uses US crochet terms. After blocking, the motif measures 8 in (20.3 cm) from point to point and about 6.9 in (17.5 cm) from flat side to flat side.
You work it in the round from the center out. The rounds are:
– a single-crochet ring
– six puff petals
– a corner set-up round
– a cluster lace round
– two solid double-crochet rounds
– a two-round border of single crochet and reverse single crochet
You never turn the work.
Finished Size and Construction
- Finished size: 8 in (20.3 cm) point to point; about 6.9 in (17.5 cm) flat side to flat side
- Skill level: Intermediate (puff stitches, clusters, reverse single crochet)
- Terminology: US crochet terms
- Yarn weight: DK / light worsted (#3)
- Hook: 4.0 mm (US G-6)
- Number of pieces: 1 hexagon motif
- Layout: Single motif, worked in the round
- Piece size before border (after Round 6): 7.25 in (18.4 cm) point to point
- Border depth: 0.375 in (1.0 cm) on every side (Rounds 7–8)
- Side length when finished: 4 in (10.2 cm)
Materials
Yarn: Choose a smooth DK cotton or cotton blend with good stitch definition. Fuzzy or very splitty yarns hide the puff petals and blur the lace round. A matte cotton blend gives the soft, rounded petals seen here.
- Mustard yellow: 20 g, about 50 m (55 yd)
This quantity includes a margin of about 25 percent, so you can make a gauge test and still finish the motif from one ball.
Tools:
- 4.0 mm (US G-6) crochet hook
- Tapestry needle
- Scissors
- Stitch marker
- Rust-proof pins and a blocking mat
- Spray bottle with cool water
- Ruler or tape measure
Abbreviations (US Terms)
- ch – chain
- sl st – slip stitch
- sc – single crochet
- dc – double crochet
- rev sc – reverse single crochet (crab stitch)
- sp(s) – space(s)
- st(s) – stitch(es)
- yo – yarn over
- rep – repeat
- beg – beginning
Special stitches:
- Puff stitch (puff): (Yo, insert hook in st, yo, pull up a loop to about 0.75 in / 1.9 cm tall) 5 times. Yo and pull through all 11 loops on the hook, then ch 1 tightly to close. The closing ch 1 is the “top” of the puff.
- Beginning cluster (beg cl): Ch 2, (yo, insert hook in sp, pull up a loop, yo, pull through 2 loops) 2 times, yo and pull through all 3 loops.
- Cluster (cl): (Yo, insert hook in sp, pull up a loop, yo, pull through 2 loops) 3 times, yo and pull through all 4 loops.
- Reverse single crochet (rev sc): Work from left to right (right to left if you crochet left-handed). Insert hook in the next st to the right, pull up a loop, yo and pull through both loops.
Gauge and Checkpoints
Gauge matters here because the corners must lie flat and the border needs to sit neatly. Make one test motif through Round 2 and measure it before going further.
- Edge gauge: 5 sc = 1 in (2.5 cm) along a straight side
- After Round 1: center hole about 0.25 in (0.6 cm) across
- After Round 2: 3 in (7.6 cm) across, petal tip to petal tip
- After Round 4: 5.25 in (13.3 cm) point to point
- After Round 5: 6.25 in (15.9 cm) point to point
- After Round 6: 7.25 in (18.4 cm) point to point
- After Round 8: 8 in (20.3 cm) point to point
Being off by up to 0.25 in (0.6 cm) at any checkpoint is fine; blocking will even it out.
If your motif is too big: go down one hook size to 3.5 mm (US E-4). Also check that your puff loops are no taller than 0.75 in (1.9 cm).
If your motif is too small: go up one hook size to 4.5 mm (US 7). If only the center is small, pull the puff loops up a little taller.
If the motif cups: your corners are too tight, so loosen your ch-2 corners. If it ruffles: you are probably working the solid rounds too loosely, so go down half a hook size.
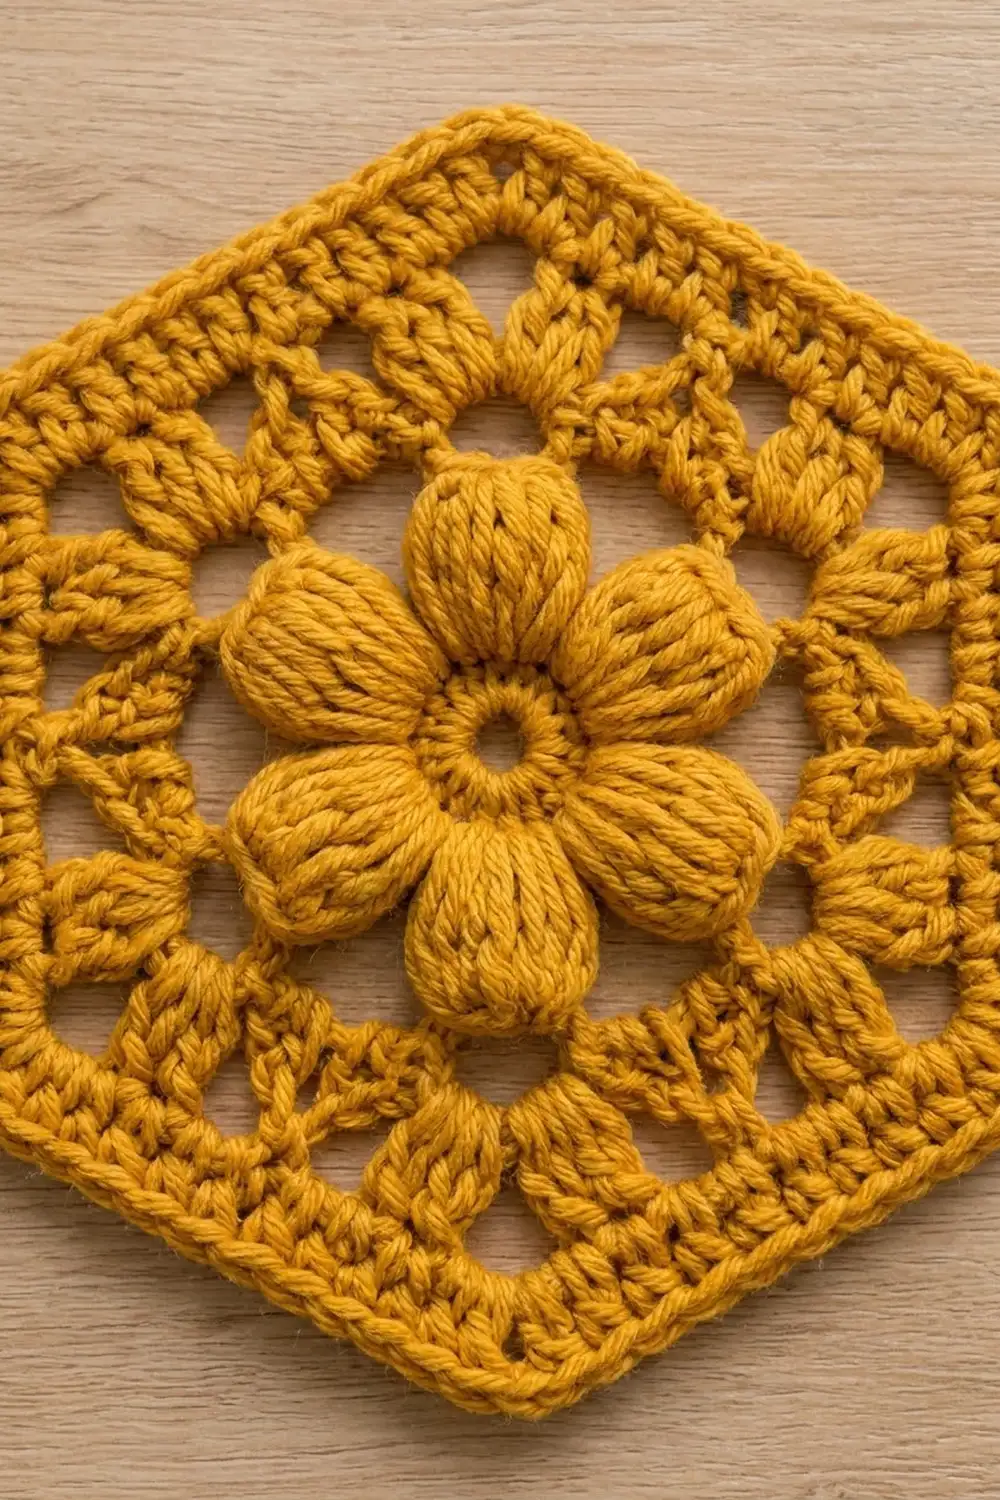
Pattern
Join every round with a sl st to the top of the first stitch of the round. Do not turn. The beg ch 3 counts as 1 dc throughout.
Round 1 (center ring): Make a magic ring. Ch 1 (does not count), 12 sc in ring. Pull the tail gently, leaving a center hole about 0.25 in (0.6 cm) across. Join with sl st to first sc. (12 sc)
The open hole and the slightly raised ring of sc make the small circle at the heart of the flower.
Round 2 (puff petals): Ch 2 (does not count), puff in same st as join, ch 3, skip next sc, puff in next sc, ch 3, skip next sc; rep from * 4 more times. Join with sl st to the top of first puff. (6 puffs, 6 ch-3 sps)
Each puff becomes one rounded petal. Push the puffs toward the right side with your fingers so they dome outward.
Round 3 (corner set-up): Ch 3, (dc, ch 2, 2 dc) in top of same puff, ch 1, dc in next ch-3 sp, ch 1, (2 dc, ch 2, 2 dc) in top of next puff; rep from * 4 more times, then rep from * to ** once more. Join to top of beg ch-3. (30 dc: 24 in corner groups + 6 mid-side dc; 6 ch-2 corner sps; 12 ch-1 sps)
Each corner sits on top of a puff, so each petal points toward a corner of the hexagon.
Round 4 (cluster lace): Sl st in next dc and into the corner ch-2 sp. (Beg cl, ch 3, cl) in same corner sp, ch 2, cl in next ch-1 sp, ch 2, cl in next ch-1 sp, ch 2, (cl, ch 3, cl) in next corner sp; rep from * 4 more times, then rep from * to ** once more. Join to top of beg cl. (24 clusters; 6 ch-3 corner sps; 18 ch-2 sps)
Each side has 1 corner cl at each end plus 2 mid-side cl, with 3 ch-2 sps between them. The ch-2 sps make the small openings in the lace ring. Checkpoint: 5.25 in (13.3 cm) point to point.
Round 5 (first solid round): Sl st into the corner ch-3 sp. Ch 3, (dc, ch 2, 2 dc) in same sp, dc in next cl, 2 dc in next ch-2 sp, dc in next cl, 2 dc in next ch-2 sp, dc in next cl, 2 dc in next ch-2 sp, dc in next cl, (2 dc, ch 2, 2 dc) in next corner sp; rep from * 4 more times, then rep from * to ** once more. Join to top of beg ch-3. (84 dc; 6 ch-2 corner sps)
Between corner groups you have 4 dc in clusters + 6 dc in ch-2 sps = 10 dc. Add the 2 dc from each corner group on that side, and each side holds 2 + 10 + 2 = 14 dc between corner ch-2 sps. Check: 14 × 6 = 84. Checkpoint: 6.25 in (15.9 cm) point to point.
Round 6 (second solid round): Sl st in next dc and into the corner ch-2 sp. Ch 3, (dc, ch 2, 2 dc) in same sp, dc in each of next 14 dc, (2 dc, ch 2, 2 dc) in next corner sp; rep from * 4 more times, then rep from * to ** once more. Join to top of beg ch-3. (108 dc; 6 ch-2 corner sps)
Each side now holds 2 + 14 + 2 = 18 dc between corner sps. Check: 18 × 6 = 108. Checkpoint: 7.25 in (18.4 cm) point to point.
Border
The border makes the firm, rope-like edge. You work it directly on the motif in two rounds, and it adds 0.375 in (1.0 cm) on every side.
Border gauge: 5 sc = 1 in (2.5 cm). A finished side is 4 in (10.2 cm) long, so it holds 20 sts between corners.
Round 7 (sc foundation): Sl st in next dc and into the corner ch-2 sp. Ch 1 (does not count), (sc, ch 1, sc) in same sp, sc in each of next 18 dc, (sc, ch 1, sc) in next corner sp; rep from * 4 more times, then rep from * to ** once more. Join to first sc. (120 sc; 6 ch-1 corner sps)
Count per side: 18 sc worked 1 per existing stitch + 2 sc added from the two corner groups = 20 sc between corner ch-1 sps. Check: 20 × 6 = 120.
Round 8 (reverse sc edge): Ch 1, do not turn. Working in the opposite direction, rev sc in each sc and 1 rev sc in each corner ch-1 sp all the way around. Join with sl st to first rev sc. Fasten off. (126 rev sc)
Count: 120 rev sc worked 1 per existing stitch + 6 rev sc added in the corner sps = 126. Each side has 20 rev sc between corners, plus 1 corner rev sc at each of the 6 points.
Why the math works: Every solid round adds exactly 4 sts per side (2 from each corner group). That matches the extra length a hexagon side gains when the motif grows by one dc in height. The sc round adds only 2 per side because sc is about half as tall as dc. The rev sc round adds only 1 stitch at each corner, which keeps the points sharp without flaring. At 5 sts per in (2.5 cm), 20 sts per side gives a 4 in (10.2 cm) side. A regular hexagon with 4 in (10.2 cm) sides measures 8 in (20.3 cm) point to point.
Weave in both tails on the wrong side. Run them through the solid rounds so they don’t show through the lace.
Final Blocking
- Soak the motif in cool water for 10 minutes, or mist it well if you prefer.
- Gently press out excess water in a towel. Do not wring.
- Lay it right side up on a blocking mat.
- Pin the six points first, with 8 in (20.3 cm) between opposite points.
- Check flat side to flat side: about 6.9 in (17.5 cm) across all three pairs of sides.
- Pin the middle of each side straight, keeping each side 4 in (10.2 cm) long.
- Use your fingertips to round up each puff petal and open each lace space.
- Let it dry completely, at least 12 hours, before unpinning.
Do not iron the puffs flat, or they lose their dome shape.
Final Quality-Control Checklist
- Center hole is small, round and about 0.25 in (0.6 cm) across.
- All 6 puff petals are the same size and point toward the 6 corners.
- The lace round shows 3 even openings per side.
- Rounds 5 and 6 are solid, with no gaps except the corner sps.
- Round 6 has 18 dc per side; Round 7 has 20 sc per side.
- The rev sc edge is even all around, with no twisted or skipped stitches.
- Motif measures 8 in (20.3 cm) point to point and lies flat.
- All tails are woven in securely and out of sight.
Troubleshooting
Puffs look thin or lopsided: Pull every loop to the same height before the final yo, and close firmly with the ch 1.
Center hole is too big: Pull the magic-ring tail tighter before weaving it in, then thread it once around the inside of Round 1.
Corners curl upward: The ch-2 corner sps are too tight. Make the corner chains a little looser, or use a hook half a size bigger just for the corner chains.
Sides wave: Recount Rounds 5 and 6. An extra dc on a side causes ripples.
Crab stitch looks flat: Insert the hook fully under both loops and keep your loop slightly relaxed so the edge twists into a ridge.
Stitch counts drift: Place a marker in the first stitch of each round and count each side separately before joining.
Care
Hand wash in cool water with mild soap and lay flat to dry, reshaping the points and petals while damp. Don’t tumble dry, because it can flatten the puffs.

Final Notes
Here is the full measurement chain:
– 3 in (7.6 cm) across the flower after Round 2
– 5.25 in (13.3 cm) after the lace round
– 7.25 in (18.4 cm) after the two solid rounds
– 8 in (20.3 cm) after the 0.375 in (1.0 cm) border
If every checkpoint is within 0.25 in (0.6 cm), your motif will block to a crisp, flat hexagon with 4 in (10.2 cm) sides.
Use it as a coaster, a decorative mat under a small vase, or a textured test piece for your favorite yarn. The stitch counts are easy to check at every stage.
Happy crocheting!