

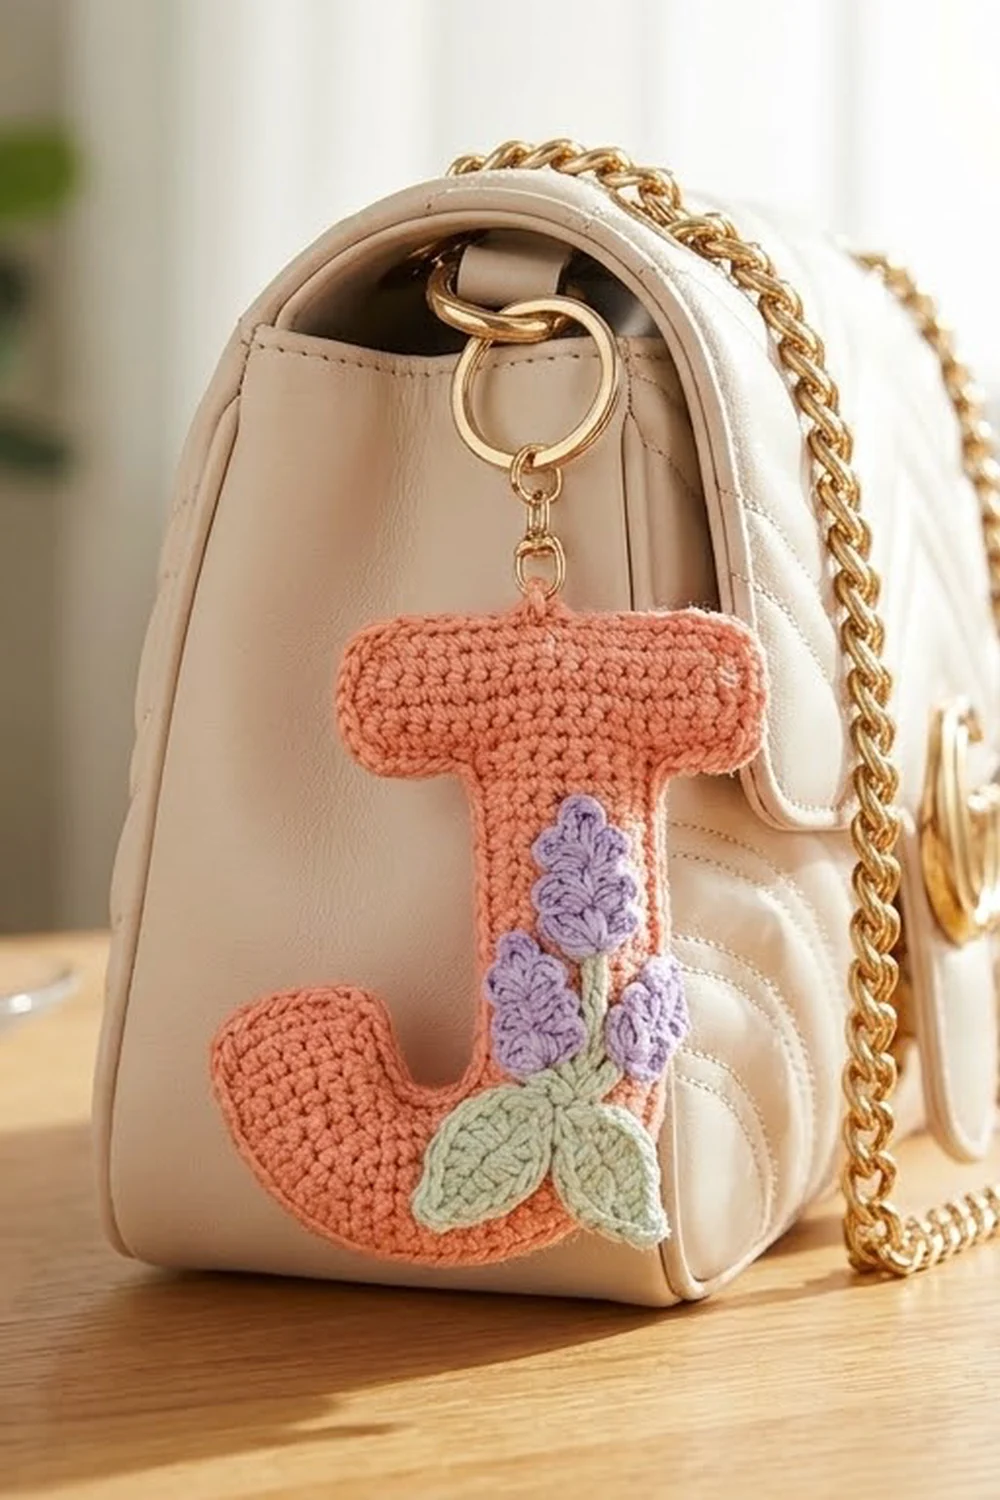
This little letter J is a quick, personal gift. It is a sturdy peach monogram trimmed with three tiny lavender flowers, each with a soft green leaf and a sunny yellow center. A gold keyring and short chain turn it into a bag charm, a keychain, or a zipper pull.
The letter is worked flat in rows of double crochet, which gives it neat vertical stitch columns and a firm, flat body. One round of single crochet around the whole outline makes the edge clean and slightly raised. The flowers and leaves are made separately and sewn on.
This pattern uses US crochet terms. The finished letter measures 3 in (7.6 cm) wide by 4 in (10.2 cm) tall, not counting the hardware.
Construction overview: You start at the bottom of the bowl, work up the stem, and add the top bar in the last row. Then you work a short two-row tip on the left of the bowl. One border round goes around everything. Finally, you sew on the appliqués and attach the keyring.
Finished Size and Construction
- Finished size: 3 in (7.6 cm) wide × 4 in (10.2 cm) tall
- Skill level: Easy / advanced beginner
- Terminology: US
- Yarn weight: DK / light worsted (#3), cotton or cotton blend
- Hook: 3.5 mm (E-4)
- Number of pieces: 1 letter, plus 3 flowers and 3 leaves sewn on as appliqués
- Layout: Single letter; no joining
- Letter size before border: 2.5 in (6.4 cm) wide × 3.5 in (8.9 cm) tall
- Border depth: 0.25 in (0.6 cm) on every edge, adding 0.5 in (1.3 cm) to each dimension
- Flower size: about 0.8 in (2.0 cm) across
- Leaf size: about 0.5 in (1.3 cm) long
Materials
Cotton gives the crispest stitch definition and holds the letter’s shape on a busy keyring. Acrylic also works, but it is softer and may need light steam blocking. Use the same brand for every color so the appliqués sit evenly on the letter.
- Peach (main color): 10 g, about 23 m
- Lavender (flowers): 3 g, about 7 m
- Pale green (leaves): 2 g, about 5 m
- Pale yellow (flower centers): 1 g, about 2 m
All quantities include a margin for your gauge swatch and for weaving in ends.
Tools:
- 3.5 mm (E-4) crochet hook
- Tapestry needle
- Scissors
- Stitch marker
- Gold split keyring, 1 in (2.5 cm), with a short chain about 1 in (2.5 cm) long
- 1 small jump ring (6 mm) and 2 pairs of flat-nose pliers
- Pins and a blocking surface
- Optional: a piece of peach felt for backing, plus fabric glue
Abbreviations (US Terms)
- ch – chain
- sl st – slip stitch
- sc – single crochet
- hdc – half double crochet
- dc – double crochet
- st(s) – stitch(es)
- RS / WS – right side / wrong side
- rep – repeat
Special stitch – foundation double crochet (fdc): Yarn over, insert your hook into the base chain of the last stitch, and pull up a loop. Chain 1; this chain becomes the base of the new stitch. Then (yarn over, pull through 2 loops) twice. Each fdc adds one stitch to the end of a row without a separate chain.
Turning chain: The ch 2 at the start of each row does not count as a stitch.
Gauge and Checkpoints
Gauge: 12 dc = 2.5 in (6.4 cm), and 8 dc rows = 3.5 in (8.9 cm). That works out to about 19 dc and 9 rows per 4 in (10.2 cm).
The letter itself is your gauge test. Measure it at each checkpoint below before moving on:
- After Row 2: width 2.1 in (5.3 cm), height 0.9 in (2.3 cm)
- After Row 7: height 3.1 in (7.9 cm), stem width 1 in (2.5 cm)
- After Row 8: width 2.5 in (6.4 cm), height 3.5 in (8.9 cm)
- After the border: 3 in (7.6 cm) × 4 in (10.2 cm)
If your letter is too big, go down to a 3.25 mm hook. If it is too small, go up to a 3.75 mm hook. If only the height is off, adjust how tall you pull your dc, not your hook. Any 1/8 in (0.3 cm) error in the stem will show clearly once the top bar is on, so check at Row 7.
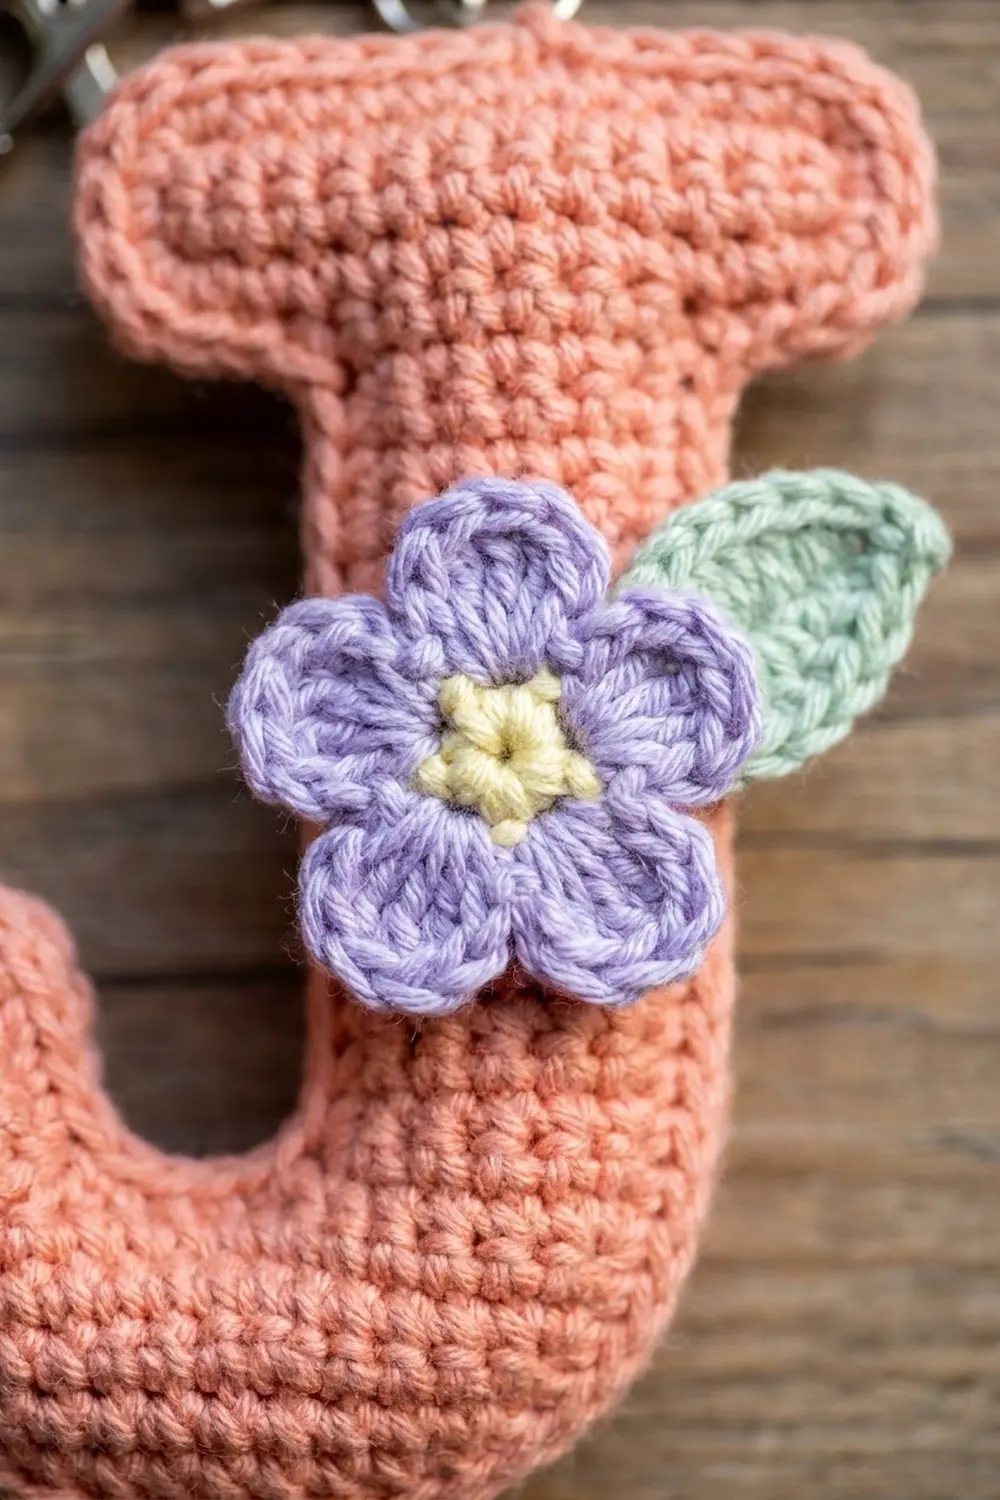
Letter J
Work with peach yarn.
Row 1 (RS): Ch 10. Dc in the 3rd ch from the hook and in each ch across. (8 dc)
Row 2: Ch 2, turn. 2 dc in the first st, dc in the next 6 sts, 2 dc in the last st. (10 dc: 8 worked one per stitch + 2 added)
These increases round off the bottom corners of the bowl.
Place a marker in the 3rd st of Row 2, counting from the left edge with the RS facing. You will work the tip from this stitch later.
Checkpoint: 2.1 in (5.3 cm) wide, 0.9 in (2.3 cm) tall.
Stem
Row 3: Ch 2, turn. Dc in the first 5 sts. Leave the remaining 5 sts unworked. (5 dc)
The stem now sits over the right half of the bowl.
Rows 4–7: Ch 2, turn. Dc in each st across. (5 dc per row)
At the end of Row 7, your hook is at the left edge of the stem.
Checkpoint: the stem is 1 in (2.5 cm) wide, and the piece is 3.1 in (7.9 cm) tall.
Top Bar
Row 8: Do not turn. Ch 5 so the chain sticks out to the left. Dc in the 3rd ch from the hook and in the next 2 ch (3 dc). Dc in each of the 5 sts of Row 7. Then work 2 fdc off the right edge. (10 dc: 3 left overhang + 5 stem + 2 right overhang)
Fasten off.
The left overhang (3 sts) is longer than the right overhang (2 sts), which gives the classic J top bar.
Checkpoint: 2.5 in (6.4 cm) wide, 3.5 in (8.9 cm) tall.
Tip
Row T1: With the RS facing, join peach with a sl st in the marked st (the 3rd st of Row 2 from the left). Ch 2. Dc in the same st and in the next 2 sts, working toward the left edge. (3 dc)
Row T2: Ch 2, turn. Dc in each st across. (3 dc)
Fasten off and weave in all ends.
Sts 4 and 5 of Row 2 stay unworked. They form the notch between the tip and the stem.
Border
Border gauge: One sc round adds 0.25 in (0.6 cm) on every edge, so each dimension grows by 0.5 in (1.3 cm).
Rules:
- Work 1 sc in each stitch top or chain base.
- Work 2 sc in the side of each dc row.
- Add extra sc at outer corners so the edge stays flat.
- Add nothing at inner corners, so the shape stays sharp.
Border Round: With the RS facing, join peach with a sc in the first st of Row 8 (the top-left corner). Work clockwise:
- Top of top bar: 2 more sc in the same st, sc in the next 8 sts, 3 sc in the last st. (14 sc)
- Right end of top bar: 2 sc in the side of Row 8. (2 sc)
- Underside of the right overhang: 2 sc in the base of the outer fdc, then 1 sc in the base of the inner fdc. (3 sc)
- Right side, down: 2 sc in the side of each of Rows 7 through 1. (14 sc)
- Bottom of bowl: Work across the free loops of the starting chain: 2 sc in the first loop, sc in the next 6, 2 sc in the last. (10 sc)
- Left side, up: 2 sc in the side of each of Rows 1, 2, T1 and T2. (8 sc)
- Top of tip: 2 sc in the first st, sc in the next st, 2 sc in the last st. (5 sc)
- Inner side of tip, down: 2 sc in the side of Row T2 and 2 sc in the side of Row T1. (4 sc)
- Notch: Sl st in each of the 2 unworked sts of Row 2. (2 sl st)
- Left side of stem, up: 2 sc in the side of each of Rows 3 through 7. (10 sc)
- Underside of the left overhang: sc in each of the first 2 chain bases, 2 sc in the last chain base. (4 sc)
- Left end of top bar: 2 sc in the side of Row 8. (2 sc)
Join with a sl st to the first sc. (76 sc + 2 sl st = 78 sts)
Fasten off and weave in the end.
Why the math works:
- A dc row is about as tall as 2 sc are wide, so 2 sc per row side keeps the long edges from ruffling or pulling in.
- A 3-sc group turns a sharp 90° corner. A 2-sc group makes a softer curve, which is why the bowl and tip get 2-sc corners.
- The sl sts in the notch keep the gap open instead of filling it with bulk.
Check: 14 + 2 + 3 + 14 + 10 + 8 + 5 + 4 + 10 + 4 + 2 = 76 sc.
Flowers (make 3)
Work with lavender yarn.
Rnd 1: Make a magic ring. Work 5 sc in the ring and pull it tight. Join with a sl st to the first sc. (5 sc)
Rnd 2: In each sc around, work (sl st, ch 2, 2 dc, ch 2, sl st). (5 petals)
Fasten off, leaving a 6 in (15.2 cm) tail for sewing.
Center: With pale yellow, make a French knot in the center: wrap the yarn twice around your needle. Bring both yellow ends to the back and tie them off.
Leaves (make 3)
Work with pale green yarn.
Ch 4. Sc in the 2nd ch from the hook, hdc in the next ch, and work 3 sc in the last ch. Then work along the other side of the chain: hdc in the next ch, sc in the last ch. Join with a sl st to the first sc. (7 sts)
Fasten off, leaving a 6 in (15.2 cm) tail for sewing.
Assembly
- Pin the appliqués to the RS of the letter:
- Top flower: on the right half of the top bar, above the stem
- Middle flower: on the lower third of the stem
- Bottom flower: on the left side of the bowl
- Tuck a leaf under the lower-left edge of each flower, angled outward.
- Sew each leaf in place first, using small stitches through its center line.
- Sew each flower with one stitch between each pair of petals, so the petals lift slightly.
- Attach the hardware. Open the jump ring with two pairs of pliers. Pass it through the border at the top center of the stem section and through the last link of the chain. Close the ring firmly.
- Optional: Glue a felt backing cut 1/16 in (0.2 cm) inside the border to stiffen the letter.
Final Blocking
- Spray the letter and the appliqués lightly with water until they are damp, not soaked.
- Pin the letter face up to 3 in (7.6 cm) × 4 in (10.2 cm).
- Pin the top bar in a straight line, and pin the stem square to it.
- Shape the bowl into a smooth curve, and lift the tip to sit upright.
- Open the notch with a pin so it stays visible.
- Press each flower’s petals flat with your fingers.
- Let everything dry completely, about 2–4 hours.
- Unpin the letter and check its measurements again.
Final Quality-Control Checklist
- [ ] Letter measures 3 in (7.6 cm) × 4 in (10.2 cm)
- [ ] Top bar overhangs 3 sts on the left and 2 sts on the right
- [ ] Stem is 5 sts wide along its whole length
- [ ] Border count is 76 sc + 2 sl st
- [ ] Bowl and tip corners are rounded; top-bar corners are square
- [ ] Notch is open and visible
- [ ] Three flowers are evenly placed, each with a leaf at the lower left
- [ ] Yellow centers are secure on the back
- [ ] Jump ring is fully closed with no gap
- [ ] All ends are woven in and invisible from the front
Troubleshooting
The stem leans to one side. You may be skipping the last stitch of a row. Count 5 dc in every stem row.
The top bar curls. Your border may be tight. Block it firmly, or redo the border with a looser tension.
The bowl edge ruffles. Use 2 sc per row side, not 3. Also check that you worked 2 sc in the bottom corners, not 3.
The notch is filled in. Make sure you worked sl sts, not sc, in the 2 notch stitches.
The flowers cup upward. Pull the magic ring a little less tight, then steam the flowers flat.
The letter flops on the keyring. Add the optional felt backing, or go down one hook size for a denser fabric.
Care
Hand wash in cool water with mild soap and lay flat to dry. Remove the keyring first so the metal does not tarnish or snag the yarn.
Final Notes
The measurement chain is simple:
- 12 dc = 2.5 in (6.4 cm) and 8 rows = 3.5 in (8.9 cm), which gives a letter 2.5 in × 3.5 in (6.4 × 8.9 cm) before the border.
- One 0.25 in (0.6 cm) border round brings it to 3 in × 4 in (7.6 × 10.2 cm).
If you check the stem at Row 7 and the full width at Row 8, the rest falls into place. Use this layout for any monogram and swap the flower colors to suit the person you’re making it for.
Happy crocheting!