

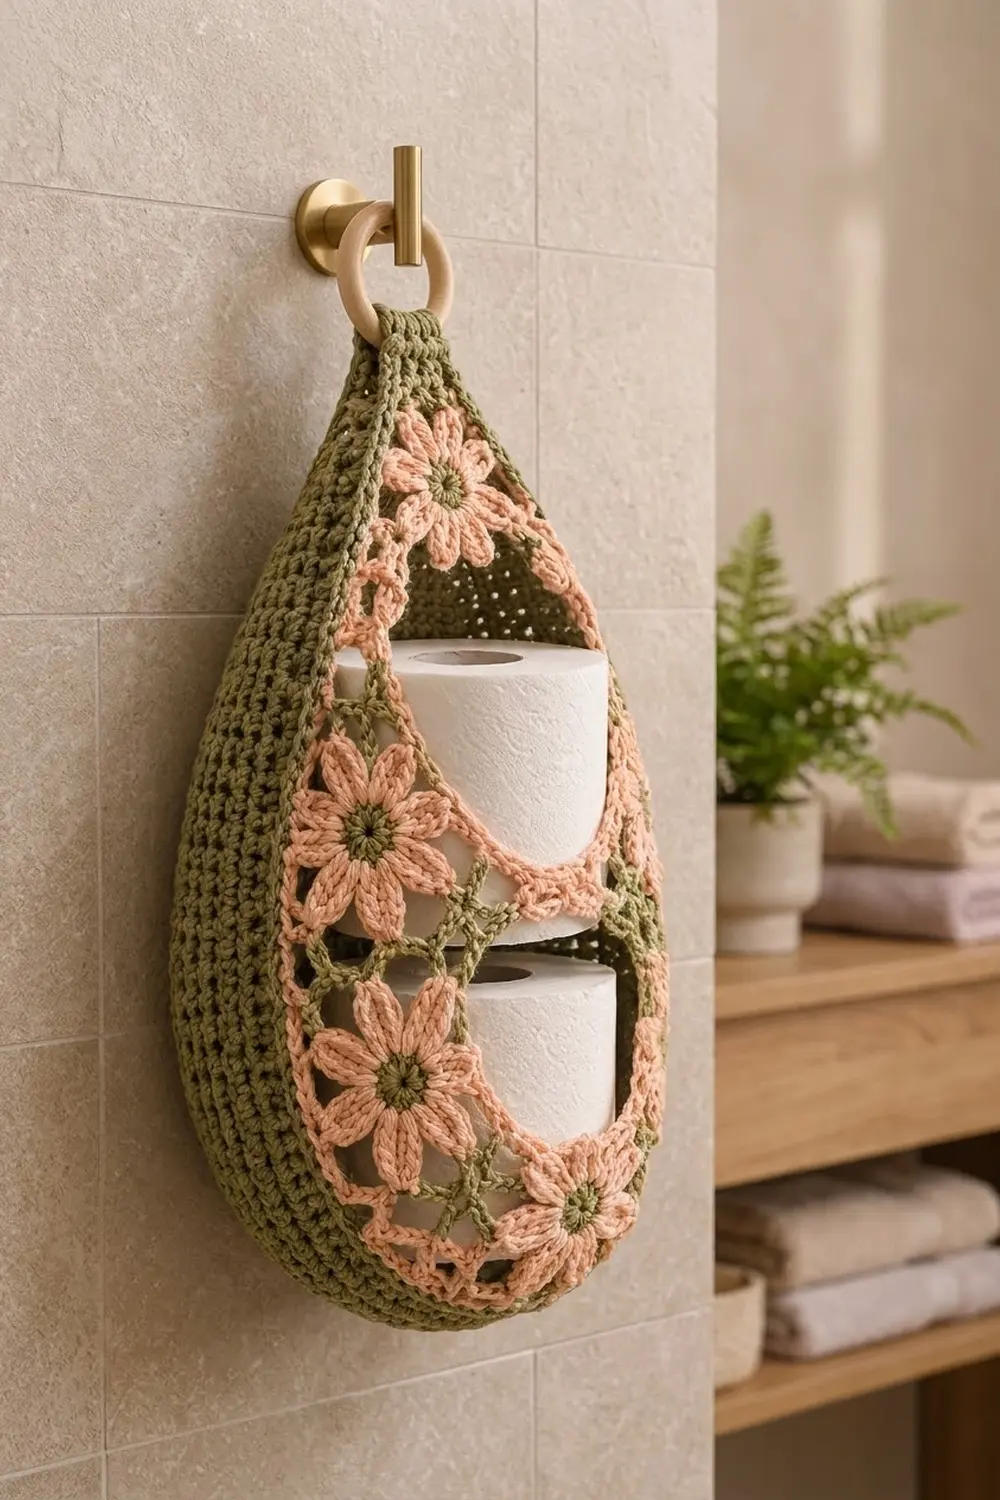
This hanging holder stores two spare rolls in a pretty, practical way. The back and walls are a solid olive green bag. The front is lacy, with peach flowers set in an olive chain lattice. Two square windows show the rolls, and a band of flowers between the windows keeps everything neat.
The colors are calm and natural: olive green for the structure, soft peach for the petals, and a wooden ring for hanging. The style is cottage-meets-modern bathroom, and the dense fabric holds its shape well.
This pattern uses US crochet terms. The finished body is 9.5 in (24.1 cm) wide, 18.5 in (47.0 cm) tall and 4 in (10.2 cm) deep. It measures about 23.5 in (59.7 cm) from the bottom to the top of the ring.
Construction overview: you crochet a flat olive back in rows, then work an edging round and 4 in (10.2 cm) walls straight up from it. Next you make 20 flower motifs, joining them as you go, and add a 2-round border. Finally you join the front to the walls with single crochet, trim the windows, and sew on the hanging tab.
Finished Size and Construction
- Finished size: 9.5 in (24.1 cm) wide × 18.5 in (47.0 cm) tall × 4 in (10.2 cm) deep
- Skill level: Intermediate
- Terminology: US
- Yarn weight: Worsted (#4) cotton
- Hook: 5 mm (H-8)
- Number of pieces: 22 (1 back with walls, 20 motifs, 1 tab)
- Layout: 4 motifs wide × 8 motifs tall, with 20 cells filled
- Motif size: 2.25 in (5.7 cm) square across the lattice
- Front size before border: 9 in (22.9 cm) × 18 in (45.7 cm)
- Border depth: about 0.25 in (0.6 cm)
Materials
Use a smooth, firm cotton or cotton blend. Cotton holds the teardrop shape and handles bathroom humidity well. Avoid very soft acrylic, because the walls will sag.
- Olive green: 180 g / 306 m (about 335 yd)
- Peach: 40 g / 68 m (about 75 yd)
- 5 mm (H-8) crochet hook
- Wooden ring, 2.75 in (7.0 cm) across
- 8 locking stitch markers
- Tapestry needle and scissors
- Blocking mats and pins
These quantities include a margin of about 15%.
Abbreviations (US Terms)
- ch: chain
- sl st: slip stitch
- sc: single crochet
- hdc: half double crochet
- dc: double crochet
- sc2tog: single crochet 2 together
- BLO: back loop only
- st(s): stitch(es)
- rnd: round
Special stitch: Petal. Ch 6. Working back down the chain, sc in the 2nd ch from the hook, then hdc, dc, hdc and sc in the next 4 ch. That is 5 sts on the chain. The ch you skipped at the start is the petal tip.
Gauge and Checkpoints
Gauge: 16 sc × 18 rows = 4 in (10.2 cm) in single crochet. 1 motif = 2.25 in (5.7 cm) square across the lattice loops.
Make one motif first and measure it from side to side across the lattice. Then work the first 10 rows of the back and check the width.
Checkpoints:
– Motif: 2.25 in (5.7 cm)
– Back, Row 10: 9 in (22.9 cm) wide
– Back, Row 81: 18 in (45.7 cm) tall
– Walls, Rnd 18: 4 in (10.2 cm) deep
– Front panel before border: 9 in × 18 in (22.9 cm × 45.7 cm)
Too big? Go down 0.5 mm in hook size. Too small? Go up 0.5 mm. Don’t change the stitch counts. The front and back must both reach exactly 200 sts.
Back Panel (Olive)
Work in rows. Ch 1 at the start of each row does not count as a stitch.
Row 1: Ch 19. Sc in the 2nd ch from the hook and in each ch across. (18 sc)
Rows 2–10: Ch 1, turn. Work 2 sc in the first st, sc in each st to the last st, then 2 sc in the last st. Row 2 has 20 sc, and each row adds 2 sts. Row 10 has 36 sc.
Checkpoint: The back is 9 in (22.9 cm) wide at Row 10.
Rows 11–71: Ch 1, turn. Sc in each st across. (36 sc in each of these 61 rows)
Rows 72–80: Ch 1, turn. Sc2tog, sc to the last 2 sts, then sc2tog. Row 72 has 34 sc, and each row loses 2 sts. Row 80 has 18 sc.
Row 81: Ch 1, turn. Sc in each st across. (18 sc)
Checkpoint: 81 rows measure 18 in (45.7 cm). The shape is an elongated octagon: 4.5 in (11.4 cm) across at the top and bottom, and 9 in (22.9 cm) across the middle.
Edging Round
Don’t turn. Work one round all the way around the panel and place a marker at each of the 8 segment boundaries.
- Top: Sc in each of the 18 sts, working 2 sc in the last st. (19)
- Slant: Work 1 sc in each of the 10 row-ends, with 2 sc in every 3rd row-end. (13)
- Side: Over the 61 row-ends, sc in each one but skip every 10th row-end. (55)
- Slant: (13)
- Bottom: Sc in each of the 18 foundation loops, working 2 sc in the last one. (19)
- Slant: (13)
- Side: (55)
- Slant: (13)
Sl st to the first sc.
Total: 19 + 13 + 55 + 13 + 19 + 13 + 55 + 13 = 200 sc
Walls
Rnd 1: Ch 1, then sc in the BLO of each st around. Sl st to the first sc. (200 sc) This round forms the turning ridge.
Rnds 2–18: Ch 1, sc in each st around, then sl st to the first sc. (200 sc each round)
Checkpoint: The walls stand 4 in (10.2 cm) tall. Move the 8 markers up to Rnd 18 and fasten off.
Flower Motifs
First Motif
Rnd 1 (olive): Make a magic ring. Ch 1, work 8 sc in the ring, then sl st to the first sc. (8 sc)
Rnd 2: Ch 1, 2 sc in each st, sl st to the first sc. (16 sc) Fasten off.
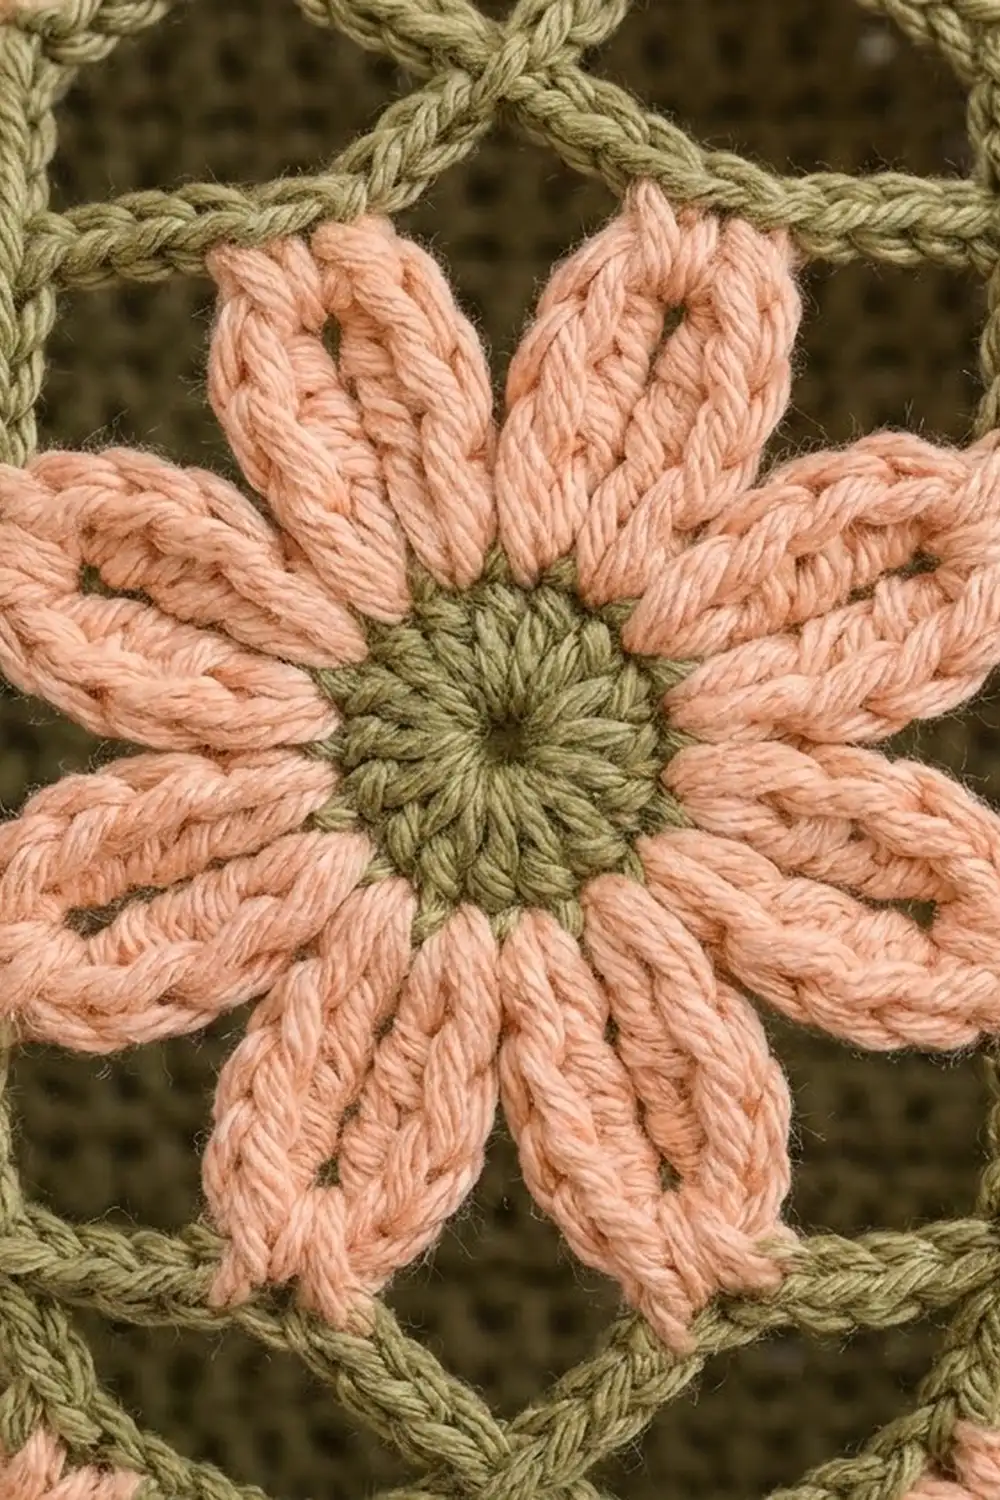
Rnd 3 (peach): Join peach with a sl st in any sc. Make 1 Petal, then sl st in each of the next 2 sc. Repeat from * 7 more times. The last sl st lands on the joining st. (8 petals) Fasten off.
Rnd 4 (olive): Join olive with a sc in any petal tip, then ch 4. Sc in the next petal tip, ch 4. Repeat from * 6 more times. Sl st to the first sc. (8 sc, 8 ch-4 loops)
Treat the tips as alternating corner tips and mid-side tips. That gives the motif 4 sides, with 2 ch-4 loops on each side.
Checkpoint: The motif measures 2.25 in (5.7 cm).
Join-As-You-Go Motifs
Work Rnds 1–3 the same as the first motif. On Rnd 4, when you reach a side that touches a finished motif, replace each ch 4 on that side with: ch 2, sl st in the matching ch-4 loop of the finished motif, ch 2.
Each shared side joins 2 loops. Don’t join the corner tips. They sit side by side and create the small X shapes in the lattice.
Make All Pieces
- Back with walls: 1, olive
- Motifs: 20, each with olive Rnds 1, 2 and 4 and peach Rnd 3
- Tab: 1, olive
Layout: X = motif, W = window, . = empty. Row 1 is at the top.
Row 1:  .  X  X  .
Row 2:  X  W  W  X
Row 3:  X  W  W  X
Row 4:  X  X  X  X
Row 5:  X  W  W  X
Row 6:  X  W  W  X
Row 7:  X  X  X  X
Row 8:  .  X  X  .
Motifs per row: 2 + 2 + 2 + 4 + 2 + 2 + 4 + 2 = 20.
Join the motifs row by row, following the grid. Each window is 4.5 in (11.4 cm) square before trimming.
Tab (Olive)
Row 1: Ch 20, then sc in the 2nd ch from the hook and in each ch across. (19 sc)
Rows 2–12: Ch 1, turn. On even rows, sc2tog at each end. On odd rows, sc across without shaping. Row 2 has 17 sc, Row 4 has 15, Row 6 has 13, Row 8 has 11, Row 10 has 9, and Row 12 has 7.
Rows 13–27: Ch 1, turn, sc across. (7 sc each row)
Checkpoint: The tab is 6 in (15.2 cm) long. Fasten off and leave a long tail.
Front Border
Border gauge: 4 sc per 1 in (2.5 cm), the same as the back.
Rnd 1 (olive): Work 8 sc on each motif side: 4 sc in each of its 2 loops. Skip the mid-side tip.
- Run ends: Where a straight run starts or ends, sc in that corner tip.
- Junctions: Where two motifs meet along a run, sc2tog across their 2 corner tips. This counts as 1 st.
- Corners: At each of the 4 cut corners, work a ch-13 bridge across the gap to the next run.
Join with a sc in the top-left corner tip of the left Row 1 motif. Then work the segments in this order:
- Top run: 2 sides with 3 vertices: 16 + 3 = 19
- Bridge: Ch 13, then sc in the top-right corner tip of the Row 2 motif in column 4
- Right run: 6 sides with 7 vertices: 48 + 7 = 55
- Bridge: Ch 13
- Bottom run: 19
- Bridge: Ch 13
- Left run: 55
- Bridge: Ch 13
Sl st to the first sc.
Total: 19 + 13 + 55 + 13 + 19 + 13 + 55 + 13 = 200 sts (148 sc + 52 ch)
Rnd 2: Ch 1, sc in each sc and each ch around. Sl st to the first sc. (200 sc)
Place 8 markers at the segment boundaries. Front segments now read 19, 13, 55, 13, 19, 13, 55, 13.
Why the math works: Each bridge spans about 3.25 in (8.3 cm), so 13 sts gives 4 per inch. Each side run is 13.5 in (34.3 cm), so 55 sts is also about 4 per inch. Both the top and bottom runs are 19 sts. These segments match the back’s edging exactly: 19 top, 13 slant, 55 side, 13 slant, and so on. Both pieces total 200 sts, so they meet stitch for stitch.
Checkpoint: The front measures 9.5 in × 18.5 in (24.1 cm × 47.0 cm).
Joining
- Place the front on top of the walls with wrong sides facing in. Match the 8 front markers to the 8 wall markers, and start at a top corner.
- Join olive and sc through both loops of the front’s Rnd 2 st and the walls’ Rnd 18 st together. Repeat all the way around. (200 sc)
- Every segment pairs 1-to-1: 19 to 19, 13 to 13, and 55 to 55. Don’t add or skip any sts.
- Keep your tension even and firm, but don’t pull. The lace front should lie flat, not cup.
Checkpoint: The body measures 9.5 in × 18.5 in × 4 in (24.1 cm × 47.0 cm × 10.2 cm).
Window Trim
Join olive anywhere inside a window. Each window edge has 8 motif sides and 8 vertices: 4 corners and 4 mid-side junctions. Work 8 sc on each side (4 sc in each loop) and sc2tog across the 2 tips at each vertex.
Count: 8 × 8 + 8 = 72 sc. Trim both windows.
Tab
- Center Row 1 of the tab on the back, so 1.5 in (3.8 cm) overlaps the top of the body, and sew it down.
- Fold the last 2 in (5.1 cm) through the wooden ring and sew it flat.
- About 2.5 in (6.4 cm) of tab shows above the body.
Final Blocking
- Lightly mist the holder until it is damp, not wet.
- Stuff it with a towel rolled to 4 in (10.2 cm) deep.
- Pin the front to 9.5 in × 18.5 in (24.1 cm × 47.0 cm).
- Pin each window to a square 4.25 in (10.8 cm) on each side.
- Open each petal and point it toward its lattice loop.
- Let it dry completely, about 24 hours, then unpin.
Final Quality-Control Checklist
- Back edging and walls have 200 sts on every round.
- Front border Rnds 1 and 2 have 200 sts each.
- All 20 motifs are present and every shared side is joined.
- Each window trim has 72 sc.
- The tab is centered, and the ring is sewn securely.
- All ends are woven in at least 1 in (2.5 cm).
- Two rolls slide in through the stretched windows.
Troubleshooting
- Front ripples: The border is too loose. Redo Rnd 1 with a hook 0.5 mm smaller.
- Walls flare: Your tension loosened. Check that every wall round has 200 sts.
- Segments don’t match during joining: Recount the edging on the back. The side counts are the usual culprit; each should be 55.
- Petals curl: Block them flat and pin each tip.
- Windows too tight for the rolls: Stretch them while blocking, or skip the window trim.
- Back panel is short: Your rows are too short. Add rows in the straight section and keep the side count at 55.
Care
Hand wash in cool water and lay the holder flat to dry, stuffed so it keeps its shape. Don’t machine dry.
Final Notes
Here is the measurement chain:
- Each motif is 2.25 in (5.7 cm).
- The 20-motif front is 9 in × 18 in (22.9 cm × 45.7 cm).
- The 2-round border brings the front to 9.5 in × 18.5 in (24.1 cm × 47.0 cm) and 200 sts.
- The back’s edging is also 200 sts, and the walls stand 4 in (10.2 cm) tall.
- The 1-to-1 joining round locks the front and walls together into a holder 9.5 in × 18.5 in × 4 in (24.1 cm × 47.0 cm × 10.2 cm).
If every checkpoint matches, the finished holder will too.
Happy crocheting!