
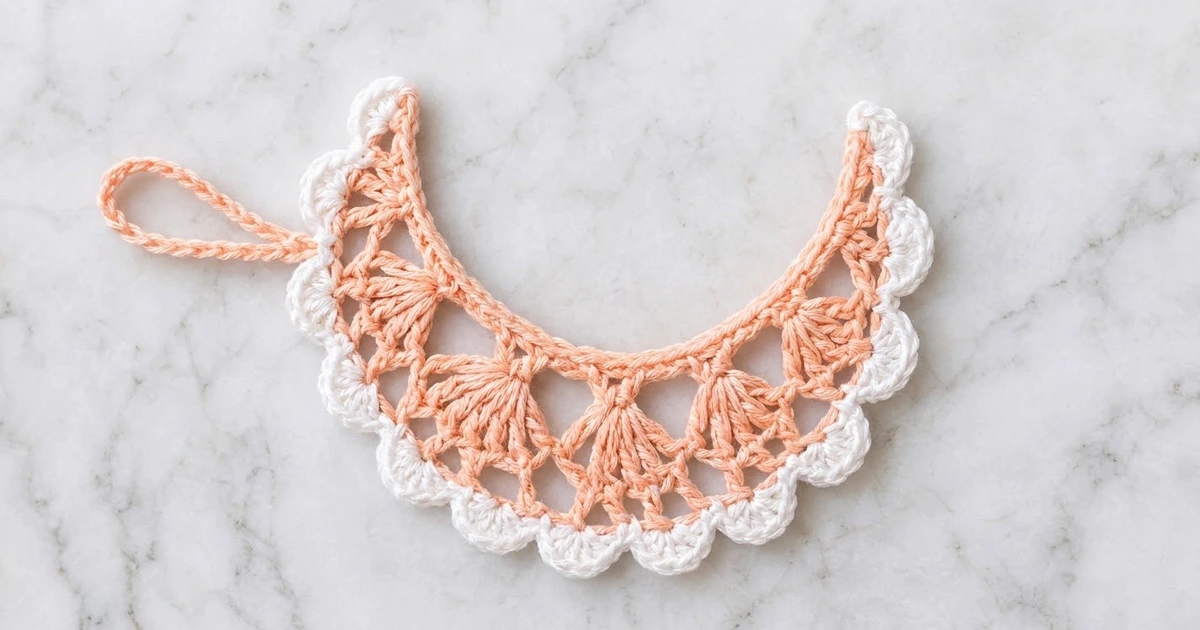
This little crescent moon is a delicate lace ornament. It has a soft peach body and a crisp white scalloped edge. Five fan shells spread out from the inner curve like rays of light, and the white scallops make the outer edge look finished and almost like lace trim.
The design uses only two colors, peach and white. That makes it gentle enough for a nursery mobile and festive enough for the Christmas tree. Make one as a gift tag topper or a whole set for garlands of tree ornaments. The pattern itself covers one ornament.
The pattern uses US crochet terms. The finished moon is about 5.5 in (14.0 cm) from tip to tip, and the band is about 2 in (5.1 cm) deep at its widest point, including the border.
You work the moon flat in five rows. You start along the inner curve, build the fan row and the shaping row, finish the peach band with single crochet, then add one row of white scallops along the outer edge. A chain loop at the top tip finishes it. The crescent shape comes from the stitch heights rather than from increases. Single crochet keeps the tips low, and treble crochet lifts the middle.
Finished Size and Construction
- Finished size: 5.5 in (14.0 cm) tip to tip; about 3 in (7.6 cm) across the curve’s bounding width
- Skill level: Easy-intermediate
- Terminology: US crochet terms
- Yarn weight: DK (3) cotton
- Hook: 3.5 mm (E-4)
- Number of pieces: 1 (single crescent, no joining)
- Layout: One flat crescent worked in rows
- Piece size before border: band depth 1.5 in (3.8 cm) at center; inner edge 6.2 in (15.7 cm) along the curve
- Border depth: 0.5 in (1.3 cm) at the scallop peaks
- Hanging loop: about 2 in (5.1 cm) long when folded
Materials
Use a smooth mercerized or combed cotton in DK weight. Cotton shows lace stitches clearly and blocks crisply, so the fans keep their shape. Acrylic will work, but the scallops will look softer and the tips may curl more.
- Color A, Peach: about 8 g / 20 m (22 yd)
- Color B, White: about 4 g / 10 m (11 yd)
These quantities include a margin of about 25% for your gauge swatch, tails, and weaving in.
Tools:
– 3.5 mm (E-4) crochet hook
– Tapestry needle
– Scissors
– Rustproof pins and a foam blocking mat
– Spray bottle with water
– Ruler or flexible tape measure
Abbreviations (US Terms)
- ch – chain
- sl st – slip stitch
- sc – single crochet
- dc – double crochet
- tr – treble crochet (yarn over twice, insert hook, pull up a loop, [yarn over, pull through 2 loops] 3 times)
- sk – skip
- st(s) – stitch(es)
- sp – space
- RS / WS – right side / wrong side
Special stitches:
– Fan: 7 dc in the same stitch.
– Scallop: 5 dc in the same stitch.
Gauge and Checkpoints
Gauge: 5 sc = 1 in (2.5 cm) in Color A with a 3.5 mm hook.
Gauge is not critical for an ornament, but it does control the curve. If your fans are much looser than the base row, the moon will ruffle. If they are much tighter, it will cup.
Make one test moon before starting a batch. Measure at each checkpoint below:
- After Row 1: the strip of 31 sc measures 6.2 in (15.7 cm) laid straight.
- After Row 2: the strip has begun to curve. Depth from the inner edge to the fan tops is about 0.7 in (1.8 cm).
- After Row 3: depth at the center is about 1.3 in (3.3 cm). The tips stay low, at roughly 0.2 in (0.5 cm).
- After Row 4: depth at the center is 1.5 in (3.8 cm), and the shape reads clearly as a crescent.
- After Row 5 (border): depth at the center is 2 in (5.1 cm), and the tip-to-tip distance is 5.5 in (14.0 cm) after blocking.
If the moon is too big: go down to a 3.25 mm (D-3) hook, or work the fans a little tighter.
If the moon is too small: go up to a 3.75 mm (F-5) hook.
If only the curve is wrong: check your fans. Tight fans flatten the crescent. Loose fans make it wave.
Pattern
Row 1: Inner Edge (Color A, Peach)
With Color A, ch 32.
Row 1 (RS): Sc in 2nd ch from hook and in each ch across, turn. (31 sc)
This row becomes the solid peach inner curve of the moon. Keep it firm and even, because every later row hangs from it.
Row 2: Fan Row
Row 2: Ch 1 (does not count as a st). Sc in first sc. Sk 2 sc, Fan (7 dc) in next sc, sk 2 sc, sc in next sc. Repeat from * 4 more times, turn. (5 fans and 6 sc = 41 sts)*
Check the placement. The sc land on stitches 1, 7, 13, 19, 25, and 31. The fans land on stitches 4, 10, 16, 22, and 28. Each repeat uses 6 base stitches, so 5 repeats + 1 starting sc = 31.
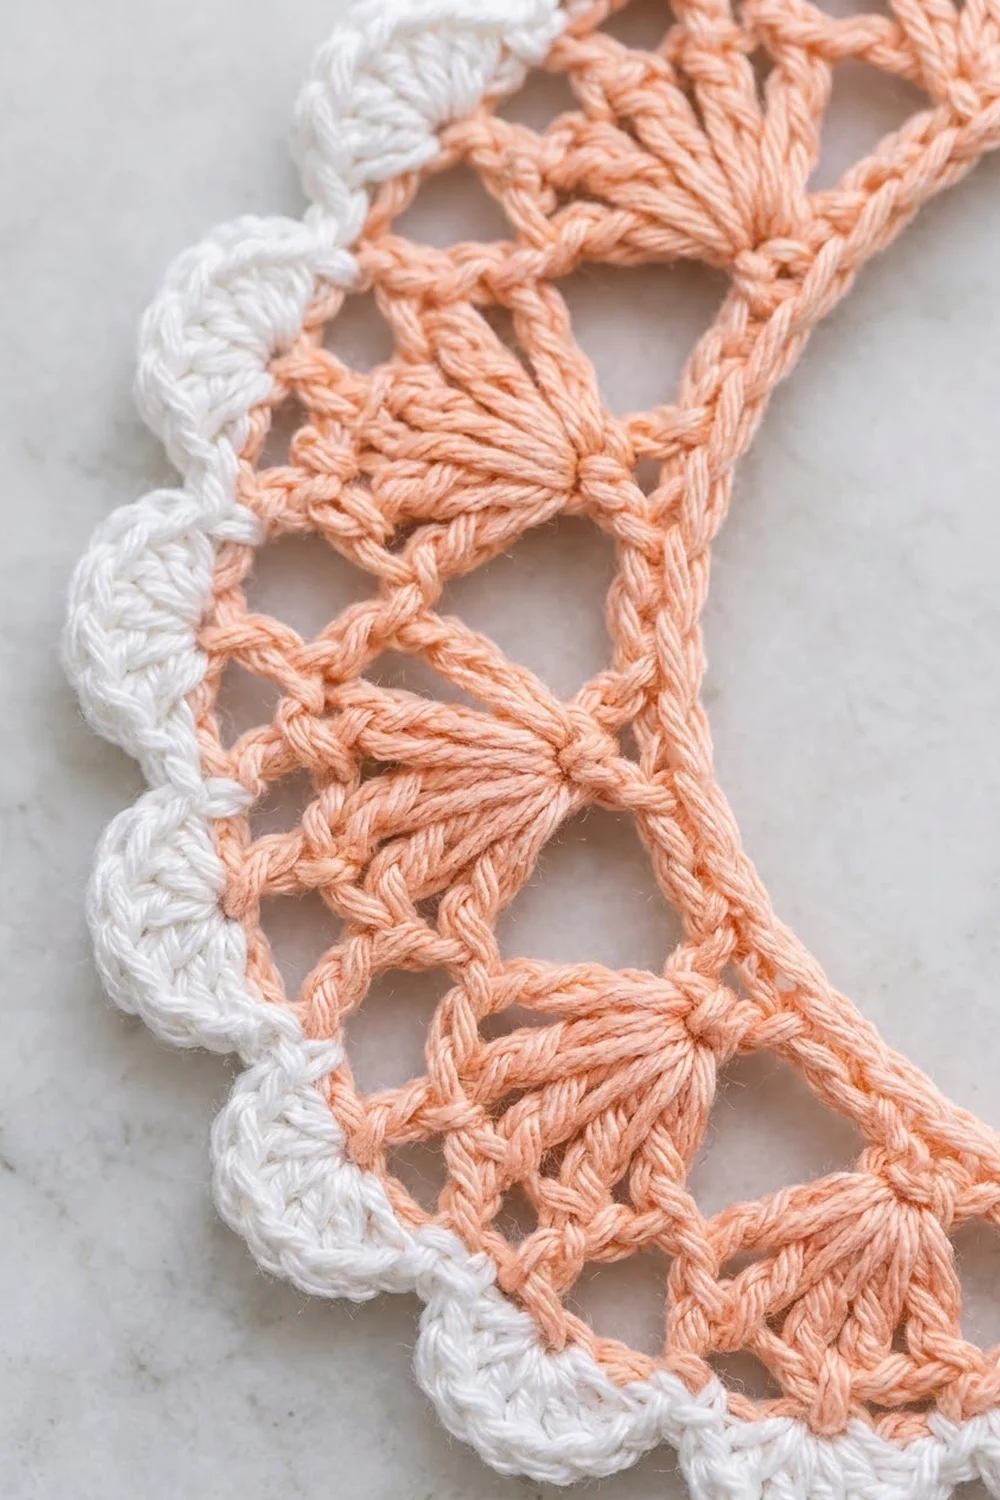
All 7 dc of each fan come from one base stitch. That makes them spread outward from the inner curve, which gives the radiating “sunburst” look. The skipped stitches leave small open triangles between the fans.
Row 3: Shaping Row
This row lifts the middle of the moon and keeps the tips low. That difference in height is what creates the crescent.
Row 3: Ch 1. Sc in first sc. *Ch 2, sk 2 dc, dc in next 3 dc (the center 3 dc of the fan), ch 2, sk 2 dc, tr in next sc. Repeat from * 3 more times. Ch 2, sk 2 dc, dc in next 3 dc, ch 2, sk 2 dc, sc in last sc, turn.
Count: 1 sc + 15 dc + 4 tr + 1 sc = 21 sts, plus 10 ch-2 sps.
The 4 tr sit on the 4 interior sc of Row 2, between the fans. They form the tall posts you see between the fan shells. The sc at each end keep both tips pointed.
Row 4: Outer Peach Band (Conversion Row)
Row 4: Ch 1. Sc in first sc. *2 sc in next ch-2 sp, sc in each st up to the next ch-2 sp. Repeat from * across, ending with sc in last sc. Do not turn. Fasten off Color A.
Count: 21 sts worked 1-per-stitch + 20 sc added in the 10 ch-2 sps (2 each) = 41 sc.
This is the solid peach band along the outer curve, and the base for the white scallops. Lay the piece flat. It should curve into a clear crescent with a 1.5 in (3.8 cm) band at the center.
Border
Border gauge: each scallop covers 4 sc of Row 4 and measures about 0.6 in (1.5 cm) wide and 0.5 in (1.3 cm) tall.
Row 5: White Scallop Edge (Color B)
With RS facing, join Color B with a sl st in the first sc of Row 4 at the lower tip.
Row 5: Ch 1. Sc in same st. *Sk 1 sc, Scallop (5 dc) in next sc, sk 1 sc, sc in next sc. Repeat from * 9 more times. Fasten off.
Count: 10 scallops (50 dc) + 11 sc = 61 sts.
Why the math works: each scallop repeat uses 4 stitches of Row 4: skip, scallop, skip, sc. Ten repeats use 40 stitches, and the first sc uses 1, so 1 + (4 × 10) = 41. That matches Row 4 exactly. The first and last sc of the border sit right at the two tips, so the white edge runs all the way into each point without a gap or an overlap.
The outer edge is a single curved “side,” so there are no corners to count twice. The inner edge stays as the plain peach sc of Row 1.
Hanging Loop (Color A)
Decide which tip will be the top. In the photos, it’s the tip where Row 4 ended and Row 5 finished.
Join Color A with a sl st in the end stitch of Row 1 at that tip. Ch 20, then sl st in the same stitch to close the loop. Fasten off.
The loop is about 2 in (5.1 cm) long when folded. For a longer drop, add ch in multiples of 4. Each 4 ch adds roughly 0.4 in (1.0 cm) of loop length, or about 0.2 in (0.5 cm) of folded drop.
Weave in all ends through the solid sc rows. Avoid the lace, where ends will show.
Final Blocking
- Wet the piece. Mist the moon until it is evenly damp, or soak it briefly in cool water and press it in a towel.
- Pin the inner curve. Pin Row 1 into a smooth arc. Keep the tips 5.5 in (14.0 cm) apart.
- Open the fans. Pin the top of each fan so the 7 dc spread evenly and the open triangles between the fans look the same size.
- Pin each scallop. Put one pin at the peak of each of the 10 scallops so they form even, rounded bumps.
- Shape the tips. Pin both tips to sharp points. Check that the white edge wraps cleanly into each tip.
- Lay the loop straight. Pin the hanging loop flat so it dries without twisting.
- Let it dry fully. Leave it pinned until completely dry, usually 6–12 hours.
- Optional stiffening. For tree ornaments, brush on a light fabric stiffener or diluted craft glue before drying. The moon will then hold its curve on the branch.
- Measure. Check for 5.5 in (14.0 cm) tip to tip and a 2 in (5.1 cm) band depth at the center.
Final Quality-Control Checklist
- Row 1 has 31 sc, and the inner curve is smooth with no puckers.
- There are exactly 5 fans, each made of 7 dc from a single base stitch.
- 4 tr posts sit between the fans, and the tips start and end with sc.
- Row 4 has 41 sc, with exactly 2 sc in each of the 10 ch-2 spaces.
- There are exactly 10 white scallops, evenly spaced and the same size.
- The white edge starts and ends at the two tips.
- The hanging loop is centered on the top tip and firmly attached.
- All ends are woven into solid rows and trimmed close.
- The finished moon measures 5.5 in (14.0 cm) tip to tip.
Troubleshooting
The moon is too straight and doesn’t curve.
Your fans are too tight compared with Row 1. Loosen the dc, or work Row 1 a little firmer.
The moon ruffles or waves.
The fans or scallops are too loose. Tighten your tension, or go down a hook size for Rows 2 and 5 only.
The stitch count is off in Row 3.
Make sure you skip exactly 2 dc on each side of the center 3 dc, and that the tr goes into the sc between fans, not into a dc.
The scallops don’t end at the tip.
Recount Row 4. It must be 41 sc. Check that every ch-2 space has exactly 2 sc.
The tips are blunt.
Make sure Rows 2–4 begin and end with sc, not taller stitches. Pin the tips firmly while blocking.
The loop twists.
Make the chain a little looser and pin it flat while blocking.
Care
Hand wash in cool water with mild soap, press out the water in a towel, and reshape it flat to dry. If you used stiffener, wipe it gently with a damp cloth instead of washing.

Final Notes
The measurement chain is simple. The 31 sc of Row 1 set the 6.2 in (15.7 cm) inner curve. Five 7-dc fans spread it outward. The shaping row brings the stitch count to 21 stitches plus 10 spaces, lifting the center while the tips stay low. The outer band converts that into 41 sc. Then 10 white scallops (1 + 4 × 10 = 41) finish the edge, for a 2 in (5.1 cm) band and a moon 5.5 in (14.0 cm) from tip to tip.
Check your counts at each row and block with care. Every moon in your set will then match.
Happy crocheting!