

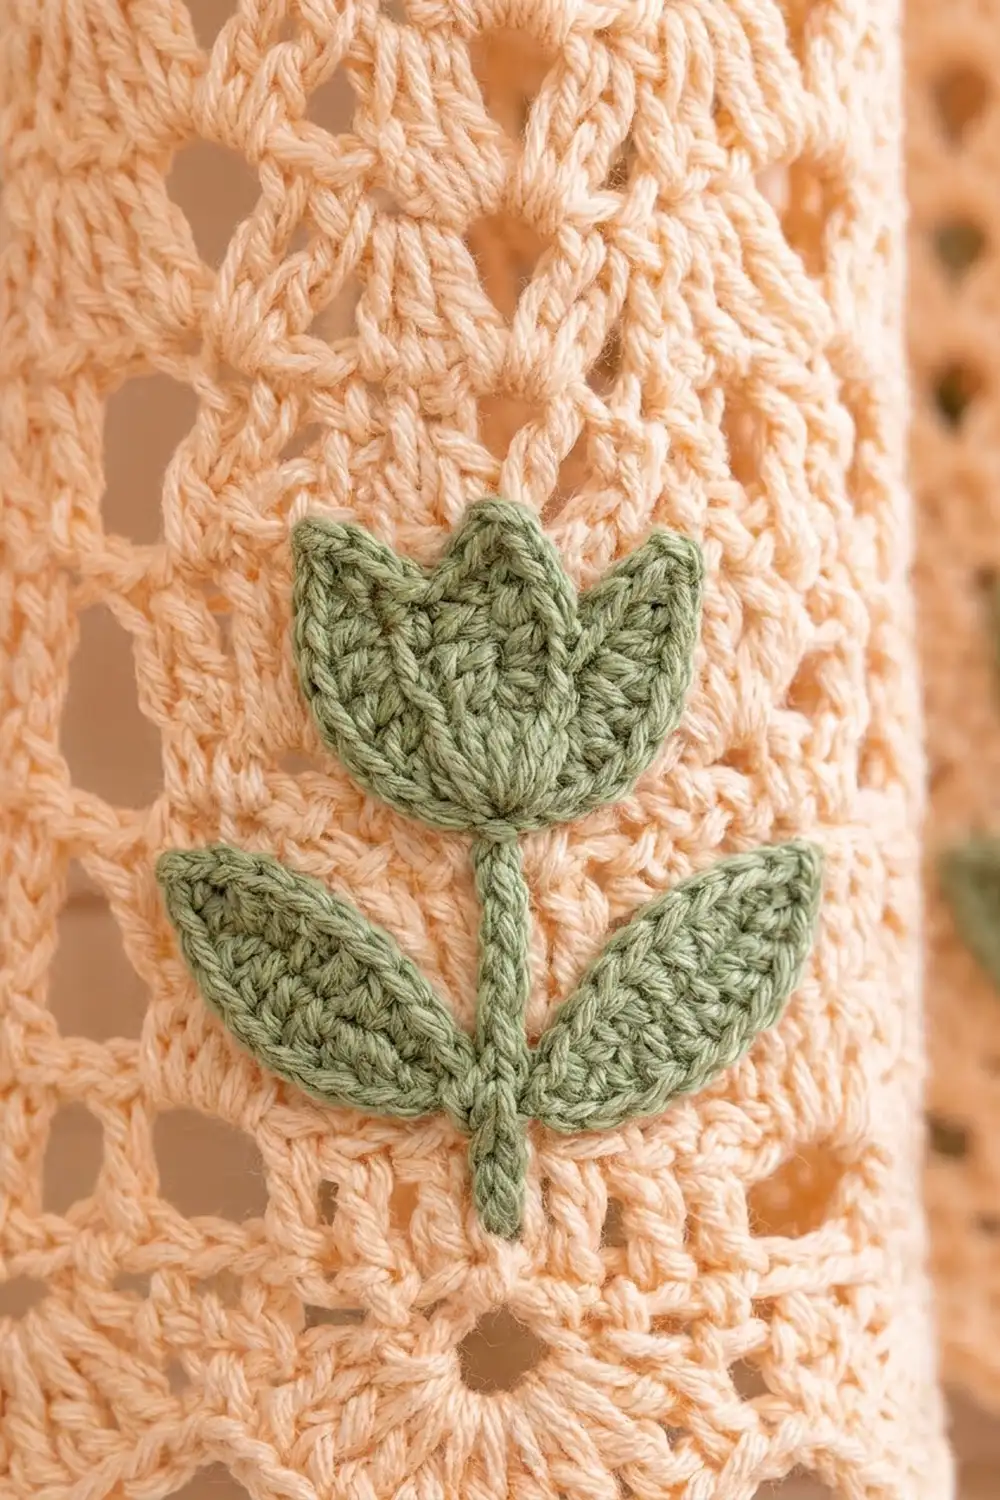
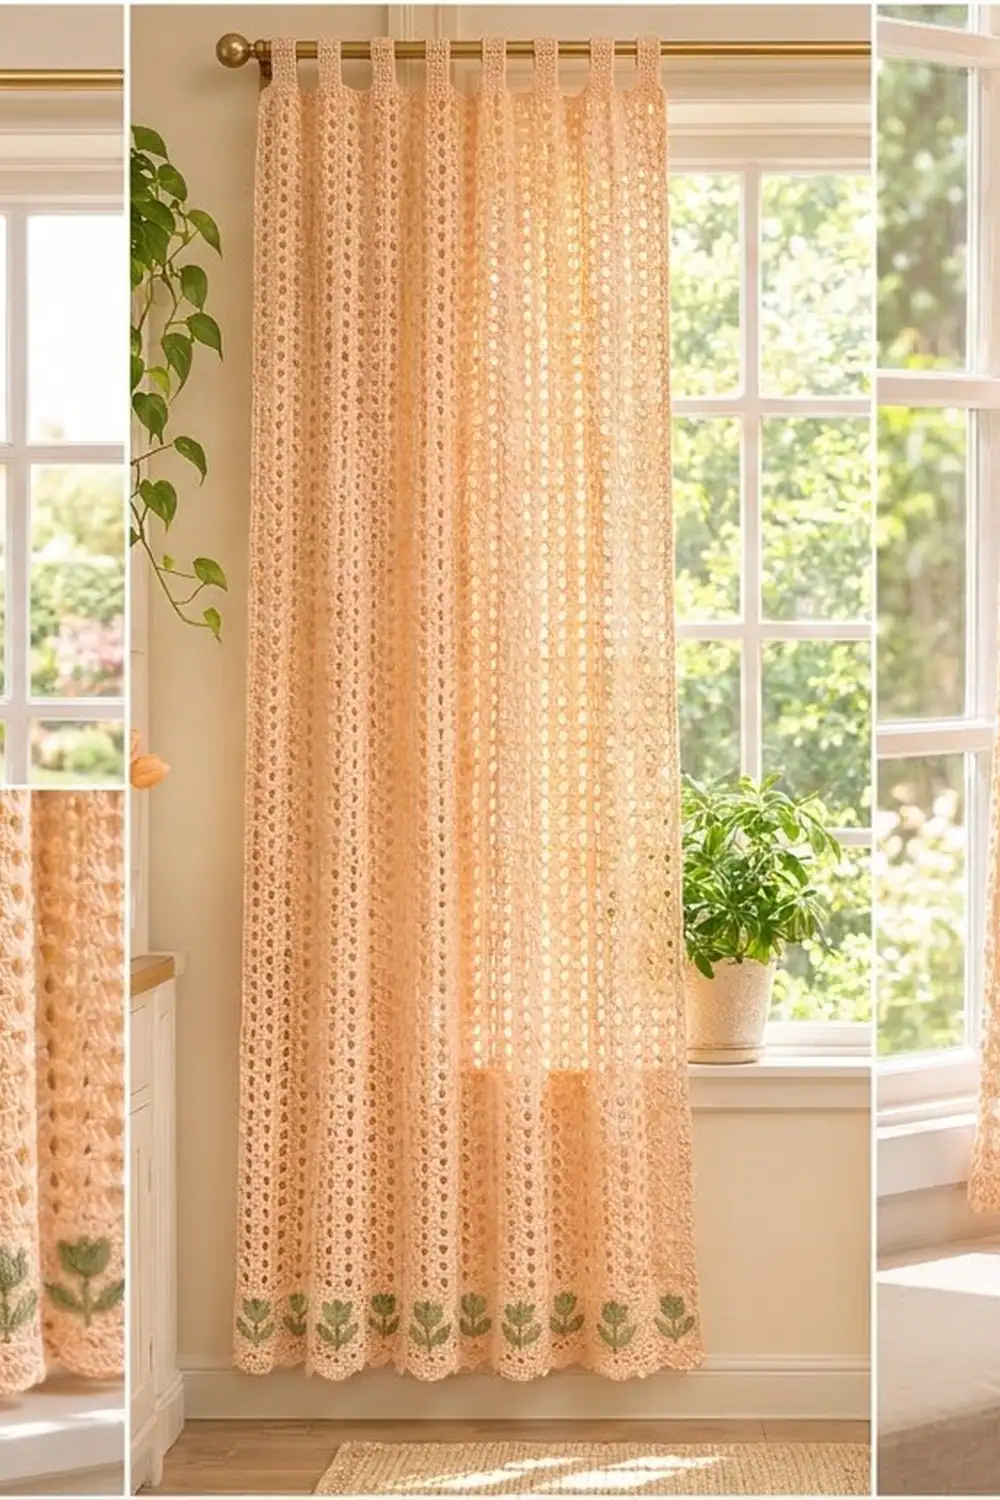
This curtain panel pairs soft peach lace with a row of small sage-green tulips just above the hem. Vertical columns of stacked shells run the full length of the panel, with little triangular openings between them that let light through. A scalloped bottom edge and simple crocheted tabs finish it.
The look is cottage kitchen: warm peach, muted green, plenty of texture. All instructions use US crochet terms.
One finished panel measures about 29 in (73.7 cm) wide and 78 in (198.1 cm) long from the scallop tips to the top edge. The tabs add a 3 in (7.6 cm) loop above that, so the hanging length is about 81 in (205.7 cm) from the top of the rod.
The panel is one piece, worked flat from the bottom up: a solid double crochet band for the tulips, a long shell-lace body, a solid header, and tabs worked directly off the header. A one-pass border adds the scallops and neat side edges. Seven small tulips are crocheted separately and sewn onto the solid band. For a pair, make two identical panels.
Finished Size and Construction
- Finished size (one panel): 29 x 78 in (73.7 x 198.1 cm), plus 3 in (7.6 cm) tab loops
- Skill level: Intermediate
- Terminology: US
- Yarn weight: Worsted (#4), cotton or cotton blend
- Hook: 5.5 mm (US I-9)
- Number of pieces: 1 panel, plus 7 tulip appliqués (each made of a cup and a stem-and-leaves piece)
- Layout: Single panel; tulips spaced evenly across the bottom band
- Panel size before border: 28.3 x 77 in (71.9 x 195.6 cm)
- Border depth: 1 in (2.5 cm) of scallops at the bottom; one sc row on each side, about 0.3 in (0.8 cm)
Materials
Pick a smooth, mercerized or matte cotton, or a cotton-acrylic blend. Cotton hangs straight and stands up to sunlight and washing. Avoid fuzzy yarns, because they blur the lace.
Yarn (one panel):
– Color A, Peach: 1,100 g, approx. 1,980 m (2,165 yd)
– Color B, Sage Green: 40 g, approx. 72 m (79 yd)
For a pair, double these amounts. All quantities include roughly a 10% margin for swatching and differences in tension.
Tools:
– 5.5 mm (US I-9) crochet hook
– Tapestry needle
– Stitch markers
– Rust-proof pins and blocking mats
– Measuring tape
– Scissors
Abbreviations (US Terms)
- ch: chain
- sl st: slip stitch
- sc: single crochet
- hdc: half double crochet
- dc: double crochet
- fdc: foundation double crochet
- sk: skip
- sp: space
- st(s): stitch(es)
- RS / WS: right side / wrong side
Special stitches:
- Fdc (foundation double crochet): Yo, insert hook in the indicated ch, yo and pull up a loop, yo and pull through 1 loop (this makes the “chain” base), [yo and pull through 2 loops] twice. For each next fdc: yo, insert hook under the 2 loops of the previous base chain, then repeat from “yo and pull up a loop.”
- Shell: (2 dc, ch 2, 2 dc) in the same st or sp.
- Point: Ch 3, sl st in 2nd ch from hook, sc in next ch.
Gauge and Checkpoints
- Solid dc: 12 sts x 8 rows = 4 x 4 in (10.2 x 10.2 cm)
- Shell lace: 2 repeats (12 sts) x 6 rows = 4 x 4 in (10.2 x 10.2 cm)
Test first. Make 25 fdc, work 7 rows of dc, then work the lace set-up row and 5 lace rows exactly as written below (4 repeats). The swatch should be about 8.3 in (21.1 cm) wide. The dc section should be 4 in (10.2 cm) tall, and the lace should add another 4 in (10.2 cm). Make one tulip as well and check that it is about 2 in (5.1 cm) wide and 3 in (7.6 cm) tall once assembled.
Checkpoints on the panel:
– After Row 1: 85 sts, 28.3 in (71.9 cm) wide
– After Row 8: 4 in (10.2 cm) tall
– After every 6 lace rows: another 4 in (10.2 cm)
– After Row 116: 76 in (193.0 cm) tall
– After Row 118: 77 in (195.6 cm) tall
If your piece is too big, go down half a hook size. If it’s too small, go up half a size. Width matters most, since it is fixed by the foundation row. If the length is a little off, you can adjust it by adding or removing lace rows in multiples of 6.
Panel
With Color A.
Row 1 (RS): Ch 3 (counts as first st), fdc in 3rd ch from hook, then make 83 more fdc. (85 sts)
Rows 2–8: Ch 3 (counts as dc throughout), turn, dc in each st across, with the last dc in the top of the turning ch. (85 sts)
This 4 in (10.2 cm) solid band is the background for the tulips.
Shell Lace Body
Row 9 (set-up, RS): Ch 3, turn, *sk 2 sts, shell in next st, sk 2 sts, dc in next st; rep from * 13 more times. (14 shells and 15 dc, counting the turning ch)
The repeat uses 6 sts, so 1 + (6 x 14) = 85 lines up exactly. The last dc lands in the turning ch.
Row 10: Ch 3, turn, *shell in ch-2 sp of next shell, dc in next dc; rep from * across, with the last dc in the top of the turning ch. (14 shells and 15 dc)
Rows 11–116: Repeat Row 10.
You now have 108 lace rows (Rows 9–116), which is 72 in (182.9 cm) of lace. Each shell stacks directly on the one below it, making the vertical columns. The single dc posts between them open up into the small triangular holes.
Header
Row 117 (conversion, RS): Ch 3, turn, *dc in each of next 2 dc, dc in ch-2 sp, dc in each of next 2 dc, dc in next dc; rep from * across, with the last dc in the top of the turning ch.
Count: 71 sts worked one per existing st (14 x 5 shell-and-post dc, plus the turning ch) + 14 extra (one in each ch-2 sp) = 85 sts.
Row 118: Ch 3, turn, dc in each st across. (85 sts)
The header is 1 in (2.5 cm) tall. Fasten off.
Tabs (make 9)
The 85 header sts divide into 9 tabs of 5 sts and 8 gaps of 5 sts: (9 x 5) + (8 x 5) = 85. Tabs start on sts 1, 11, 21, 31, 41, 51, 61, 71 and 81. Mark them before you start.
Row 1: With the RS of the panel facing, join Color A in the first st of a tab, ch 1, sc in the same st and in the next 4 sts. (5 sc)
Following rows: Ch 1, turn, sc in each st across. (5 sc)
Work until the tab measures 7 in (17.8 cm), about 25 rows. Fasten off, leaving a 12 in (30.5 cm) tail. Each tab is about 1.7 in (4.3 cm) wide, and the gaps between tabs are the same width.
Fold each tab to the WS and sew its end across the WS of the header, lining it up with its own base. Sew through Row 117 only so nothing shows on the RS. This gives a 3 in (7.6 cm) loop, which fits rods up to 1.5 in (3.8 cm) across.
Tulip Appliqués (make 7)
Each tulip has two parts: a cup and a stem with leaves. Both are worked in Color B.
Cup:
– Row 1: Ch 6, sc in 2nd ch from hook and each ch across. (5 sc)
– Row 2: Ch 1, turn, 2 sc in first st, sc in next 3 sts, 2 sc in last st. (7 sc)
– Row 3: Ch 1, turn, sc in each st. (7 sc)
– Row 4 (points): Ch 1, turn, sl st in first st, point, sl st in next 3 sts, point, sl st in next 3 sts, point. (3 points)
The points sit over sts 1, 4 and 7, which gives the 3-petal tulip outline. Fasten off, leaving a 6 in (15.2 cm) tail. The cup is about 2 in (5.1 cm) wide.
Stem and leaves:
1. Ch 8 for the stem. The hook is now at the base of the stem.
2. Leaf 1: Ch 7, sc in 2nd ch from hook, hdc in next ch, dc in next 2 ch, hdc in next ch, sl st in last ch. Sl st in the 8th stem ch. (6 sts)
3. Leaf 2: Work the same as Leaf 1.
4. Sl st in each of the remaining 7 stem ch, working up to the top.
Fasten off, leaving a 12 in (30.5 cm) tail. Each leaf is about 1.25 in (3.2 cm) long.
Attaching: Find the tulip centers on the solid band by counting along Row 4: sts 7, 19, 31, 43, 55, 67 and 79. They are 12 sts (4 in / 10.2 cm) apart, and both outer tulips are 6 sts (2 in / 5.1 cm) from the edge, so the row is symmetrical.
Band (85 sts):  |--T-----T-----T-----T-----T-----T-----T--|
Tulip at st:       7    19    31    43    55    67    79
Pin each stem upright with its base 0.5 in (1.3 cm) above Row 1, and splay the leaves out into a V. Pin the cup so it overlaps the top of the stem by 0.25 in (0.6 cm). Whipstitch around all the edges with the matching tail.
Border
Border gauge: 3 sc = 1 in (2.5 cm) along the side edges.
In the counts below, the side counts do not include corners. The two bottom corners are the first and last sc of the scallop section.
Border Row: With the RS facing, join Color A at the top of the right side edge (the row-end of Row 118).
- Side 1 (231 sc): Work 3 sc evenly across the 2 header row-ends. Then work 2 sc in each of the 108 lace row-ends (216 sc). Then work 3 sc over every 2 band row-ends, 12 sc over the 8 band rows. That gives 3 + 216 + 12 = 231 sc.
- Bottom (113 sts): Working into the base of Row 1, sc in the base of the first st (corner). *Sk 2 sts, 7 dc in next st, sk 2 sts, sc in next st; rep from * 13 more times. The last sc goes in the base of st 85 (corner). That gives 14 scallops and 15 sc: 1 + (14 x 8) = 113 sts.
- Side 2 (231 sc): Work up the left edge as for Side 1, in reverse order: 12 + 216 + 3.
That’s 575 sts in total. Fasten off.
Why the math works: Each side is 77 in (195.6 cm) tall, and 77 x 3 = 231, so the edging lies flat without flaring or pulling. Each scallop uses 6 base sts, and 1 + (6 x 14) = 85, the same as the panel’s stitch count. Each scallop sits under a shell column, because the 7 dc go into sts 4, 10, 16 and so on, the same sts that hold the shells in Row 9. The scallops add 1 in (2.5 cm) of length, bringing the panel to 78 in (198.1 cm). The side edging brings the width from 28.3 in (71.9 cm) to about 29 in (73.7 cm).
Final Blocking
- Weave in all ends along the dc posts or the solid band, never across open lace.
- Soak the panel in cool water with a little wool wash for 15 minutes. Press the water out; don’t wring it.
- Roll it in towels to remove more water.
- Lay it flat on mats, RS up, at 29 x 78 in (73.7 x 198.1 cm).
- Pin the side edges straight every 4 in (10.2 cm). Check that the shell columns run straight.
- Pin each scallop at its center dc to open the curve.
- Pat the tulips flat and press the petal points into shape.
- Leave it to dry completely. Don’t hang a wet panel, because it will stretch.
Final Quality-Control Checklist
- [ ] 85 sts across, with 14 shell columns running straight
- [ ] The panel measures 29 x 78 in (73.7 x 198.1 cm)
- [ ] 7 tulips, evenly spaced and sitting the same height on the band
- [ ] 9 tabs, evenly spaced, all the same loop size
- [ ] 14 scallops lined up under the shell columns
- [ ] The side edges lie flat with no ripples
- [ ] All ends are secure and hidden
Troubleshooting
- The columns lean: You may be working into the wrong space. Every shell goes into the ch-2 sp of the shell directly below it.
- The lace is narrower than the band: Your shells are too tight. Loosen your tension or go up a hook size for the lace only.
- The sides ripple: Too many sc. Use 3 sc over every 2 lace row-ends instead.
- The sides pull in: Too few sc. Add 1 sc every 6 rows.
- The tulips pucker the band: Sew more loosely and don’t pull the tails tight.
- The tabs are uneven: Count rows rather than measuring, so every tab has the same number.
- The panel sags over time: That’s normal for cotton. Block it again, and hang it on a sturdy rod.
Care
Hand wash in cool water, or machine wash on a gentle cycle in a mesh bag. Reshape and dry flat, and keep it away from strong direct sun for a long time to avoid fading.
Final Notes
Everything in this panel follows one chain of measurements. Gauge sets the width: 85 sts give 28.3 in (71.9 cm). The rows add 4 in (10.2 cm) of solid band, 72 in (182.9 cm) of lace and 1 in (2.5 cm) of header, for 77 in (195.6 cm). The border adds 1 in (2.5 cm) of scallops and brings the width to 29 in (73.7 cm). The tabs add a 3 in (7.6 cm) loop. If you check your measurements at each checkpoint, the finished panel will come out right.
Happy crocheting!