

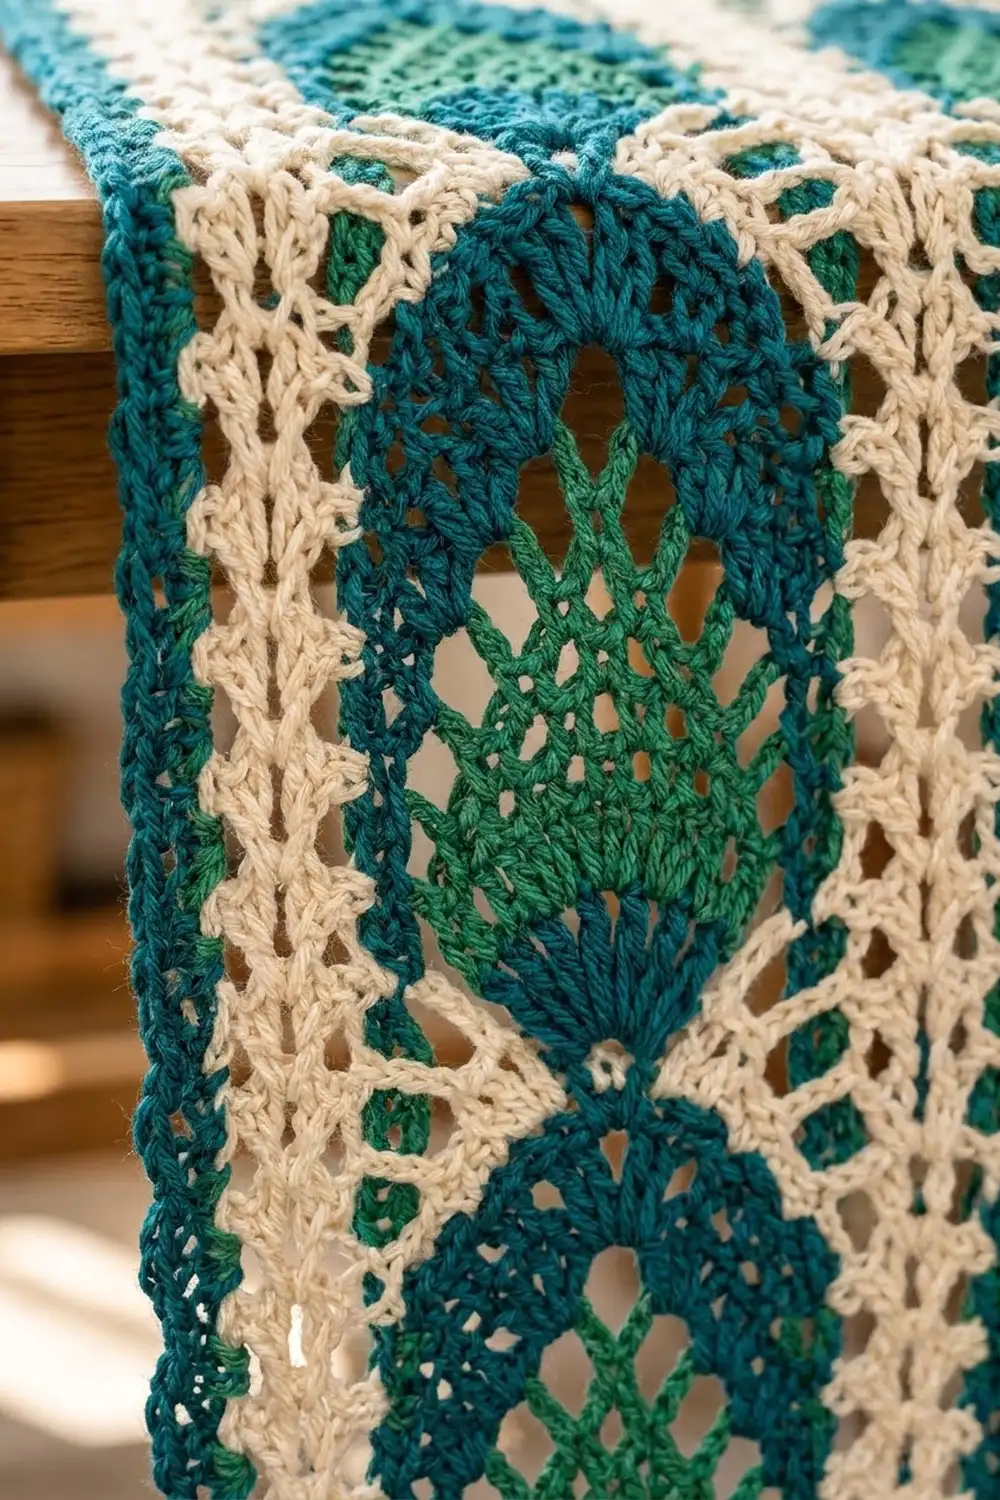
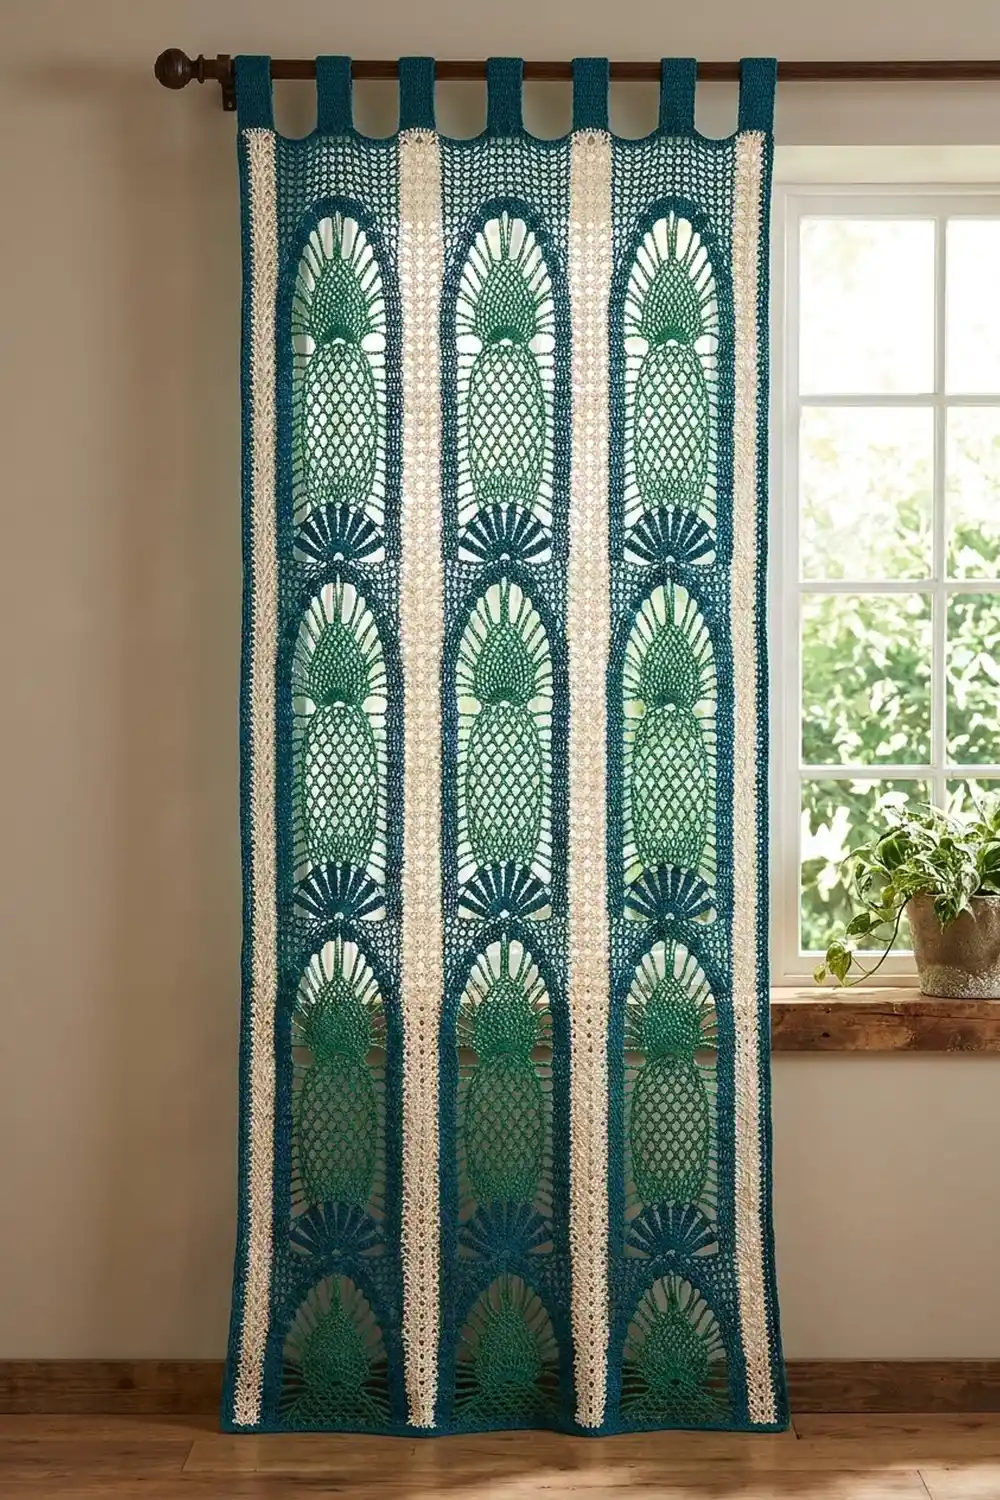
The Peacock Pineapple Lace Curtain Panel is a tall, airy curtain with a bold vertical rhythm. It has three columns of green pineapples. Each pineapple sits on a deep teal shell and is framed by teal arches. Between the pineapple columns are four narrow cream lace columns of stacked V-stitches.
The palette is deep teal, emerald green, and natural cream. In front of a sunny window the open mesh glows, and the cream columns look like delicate ribbon trim between the pineapples. A teal single crochet border frames the panel, and six teal tabs along the top slide straight onto a curtain rod.
This pattern uses US crochet terms. The finished panel measures 19.25 in (48.9 cm) wide by 74 in (188.0 cm) long, not counting the tabs. The folded tabs add about 2 in (5.1 cm) above the top edge.
You work the panel in one piece from the bottom up in rows, using intarsia (a separate bobbin for each color section). Every row has the same stitch count, so the edges stay straight. Then you add a two-round border and work the tabs directly off the top edge. The photo shows two matching panels at a window. This pattern makes one panel, so make it twice if you want a pair.
Finished Size and Construction
- Finished size: 19.25 in x 74 in (48.9 cm x 188.0 cm), without tabs
- Skill level: Experienced (intarsia in lace)
- Terminology: US
- Yarn weight: Worsted (#4) cotton or cotton blend
- Hook: 5.0 mm (H-8)
- Number of pieces: 1 (the tabs are worked onto the panel)
- Layout: one cream column and one pineapple column, repeated three times, then a final cream column (7 columns across)
- Piece size before border: 18.25 in x 73 in (46.4 cm x 185.4 cm)
- Border depth: 0.5 in (1.3 cm) on every side
- Tabs: 6 tabs, each 1.75 in (4.4 cm) wide
Materials
Choose a smooth worsted cotton, either mercerized or matte. Cotton holds the lace open, keeps its shape in sunlight, and blocks crisply. Avoid fuzzy yarns, because they blur the mesh.
- Teal (A): 550 g, about 1,045 m
- Green (B): 200 g, about 380 m
- Cream (C): 400 g, about 760 m
These amounts assume about 190 m per 100 g. They include a margin of roughly 15 percent for swatching and tails from color changes.
Tools:
- 5.0 mm (H-8) crochet hook
- 13 yarn bobbins or small butterflies of yarn
- Tapestry needle
- Locking stitch markers
- Measuring tape
- Blocking mats, rust-proof pins, and a spray bottle
Abbreviations (US Terms)
- ch – chain
- sc – single crochet
- dc – double crochet
- sk – skip
- sp – space
- st(s) – stitch(es)
- RS / WS – right side / wrong side
V-st (V-stitch): (dc, ch 1, dc) in the stitch or space given. A V-st takes up 3 stitch positions.
Shell: sk 4 sts, 9 dc in the next st, sk 4 sts. A shell takes up 9 stitch positions.
Stitch positions: each dc and each ch-1 counts as one position. Every row has 73 positions.
Gauge and Checkpoints
Gauge: 16 dc and 8 rows = 4 in (10.2 cm) in dc. That’s 4 sts and 2 rows per inch, so each dc row is 0.5 in (1.3 cm) tall.
Make a test swatch first. Ch 25. Work one cream column plus one pineapple column (22 sts) through the Setup Row and one full 8-row repeat, then block it. The swatch should measure 5.5 in (14.0 cm) wide and 4.5 in (11.4 cm) tall.
Checkpoints:
- After the Setup Row: 18.25 in (46.4 cm) wide
- After 4 repeats (33 rows): 16.5 in (41.9 cm) long
- After 9 repeats (73 rows): 36.5 in (92.7 cm) long
- After the Final Row (146 rows): 73 in (185.4 cm) long
If your work is too big, go down 0.5 mm in hook size. If it’s too small, go up 0.5 mm. If only the length is off, make sure you aren’t pulling up tall loops on your dc. Row height matters as much as width here.
Panel Pattern
Column Map
Every row’s 73 positions are split like this:
C (7) – P (15) – C (7) – P (15) – C (7) – P (15) – C (7)
Check: 4 x 7 = 28 and 3 x 15 = 45, and 28 + 45 = 73.
In each pineapple column (P), positions 1–3 and 13–15 are the teal side bands. Positions 4–12 are the center, where the shell and the green pineapple sit.
Bobbins and Color Changes
Wind one cream bobbin for each C column, for 4 in total. For each P column, wind two teal bobbins (one per side) and one green bobbin, for 9 in total.
Change colors on the last yarn-over of the final dc in the old color. Keep the unused yarns on the WS: behind the work on RS rows and in front of it on WS rows. When a color section moves over by one or more sts, bring that bobbin straight across to its new starting point.
On teal-only rows, the first teal bobbin you reach works its side band and the center. The second teal bobbin works only the last 3 sts. On the shell row, the far teal strand runs behind the skipped stitches, and the shell hides it.
Cream Column (all rows after the Setup Row)
Dc in first st, ch 1, sk next 2 sts, V-st in next st (from the second time on, work it in the ch-1 sp of the V-st below), ch 1, sk next 2 sts, dc in last st. That’s 7 positions.
The V-sts stack on top of each other to form the cream lace spine.
Foundation and Setup Row
With C, ch 76.
Setup Row (RS): Dc in 4th ch from hook (the skipped ch count as the first dc) and in the next 5 ch (7 C sts). With A, dc in next 15 ch. With C, dc in next 7 ch. Repeat from * to * 2 more times. Total: 73 dc. Turn.
For every row after this, the ch 3 at the start of the row counts as the first dc. Work the last dc of each row into the top of the turning ch.
Pineapple Column Repeat (8 rows)
Work every C column as given above. Work each P column as follows, using A unless B is named.
Side band (positions 1–3 and 13–15, every row): dc in dc, ch 1, sk next st or sp, dc in dc.
Row 1 (shell): Side band, shell (the 9 dc go into position 8), side band. 15 positions.
Row 2 (teal band): Side band, dc in each of the 9 shell dc, side band. 15 positions. Lay the B strand along the top of the shell and work over it, so that it comes out at the edge of the center where this row ends.
Row 3: Side band. With B, dc in next dc, (ch 1, sk 1, dc in next dc) 4 times. With A, side band. 3 + 9 + 3 = 15.
Row 4: Repeat Row 3. 3 + 9 + 3 = 15.
Row 5: Side band, dc in next dc (4 A). With B, dc in next ch-1 sp, (ch 1, sk next dc, dc in next ch-1 sp) 3 times (7 B). With A, dc in next dc, side band (4 A). 4 + 7 + 4 = 15.
Row 6: Side band, dc in next 2 sts (5 A). With B, dc in next ch-1 sp, (ch 1, sk next dc, dc in next ch-1 sp) 2 times (5 B). With A, dc in next 2 sts, side band (5 A). 5 + 5 + 5 = 15.
Row 7: Side band, dc in next 3 sts (6 A). With B, dc in next ch-1 sp, ch 1, sk next dc, dc in next ch-1 sp (3 B). With A, dc in next 3 sts, side band (6 A). 6 + 3 + 6 = 15.
Row 8: Side band, dc in next 4 sts (7 A). With B, dc in next ch-1 sp (1 B). With A, dc in next 4 sts, side band (7 A). 7 + 1 + 7 = 15.
Every row has 73 positions (4 x 7 for the C columns plus 3 x 15 for the P columns).
As the green mesh narrows from 9 positions to 1, teal fills in from both sides. This forms the teal arches around a pointed green pineapple. The next Row 1 shell goes into the single green dc at the tip, so each pineapple sits on its own teal fan.
On Row 1 of each new repeat, work the shell over the resting B strand so it stays hidden in the base of the fan.
Work Rows 1–8 a total of 18 times (144 rows).
Final Row
Final Row: In each C column, dc in each st and ch-1 sp (7 dc). In each P column, with A, dc in each st and ch-1 sp (15 dc). Total: 73 dc.
You now have 146 rows, and the panel measures 18.25 in x 73 in (46.4 cm x 185.4 cm). Fasten off all colors except one teal bobbin. Weave in the ends through stitches of the same color.
Border
Border gauge: 16 sc and 16 rows = 4 in (10.2 cm), or 4 sc per inch. Each sc round adds 0.25 in (0.6 cm).
Corner stitch: the middle sc of each 3-sc corner group. The side counts below include both corner stitches of that side.
Round 1: With A, join in the first st of the Final Row and ch 1. Work 3 sc in the same st, sc in next 71 sts, and 3 sc in last st. Work 2 sc in each of the 146 row ends down the side (292 sc). Along the foundation ch, work 3 sc in the first ch, sc in next 71 ch, and 3 sc in the last ch. Work 2 sc in each of the 146 row ends up the other side (292 sc). Sl st to the first sc.
- Top and bottom: 75 sts each (1 corner + 1 + 71 + 1 + 1 corner)
- Each long side: 296 sts (1 corner + 1 + 292 + 1 + 1 corner)
- Total: 738 sc (77 + 77 + 292 + 292)
Round 2: Ch 1, sc in each sc, working 3 sc in each corner st. Sl st to the first sc.
- Top and bottom: 77 sts each
- Each long side: 298 sts
- Total: 746 sc (738 + 8)
Why the math works: Along the top and bottom, 1 sc per st matches the panel’s 4 sts per inch. Each dc row is 0.5 in tall, so 2 sc per row end also gives 4 sc per inch, which matches the border gauge exactly. That means the edges won’t ruffle or pull in. The two rounds add 0.5 in (1.3 cm) on each side, bringing the panel to 19.25 in x 74 in (48.9 cm x 188.0 cm). Don’t fasten off yet.
Tabs
The top edge has 77 sts, including the corners. You’ll make 6 tabs of 7 sts each, with 7 sts between tabs: 6 x 7 + 5 x 7 = 77.
Counting from the top-left corner st, mark these sts for the tabs: 1–7, 15–21, 29–35, 43–49, 57–63, and 71–77.
Each tab: Join A in the first marked st. Ch 1, sc in the same st and the next 6 sts (7 sc), turn. Rows 2–16: Ch 1, sc in each st across (7 sc), turn. Fasten off, leaving a 12 in (30.5 cm) tail.
Each tab is 4 in (10.2 cm) long. Fold it to the back and whipstitch the last row to the back of Round 1. This makes a 2 in (5.1 cm) loop that fits a rod up to 1.25 in (3.2 cm) in diameter.
Final Blocking
- Soak the panel in cool water for 15 minutes, then press out the water without wringing.
- Roll it in towels to remove extra moisture.
- Lay it flat on the mats, RS up. If you’re short on space, block it in sections.
- Pin the long edges straight to 74 in (188.0 cm), with pins every 4 in (10.2 cm).
- Pin the width to 19.25 in (48.9 cm) at several points along the length.
- Open each green mesh with your fingers and center each shell.
- Lay the tabs flat. Let the panel dry completely before you unpin it.
Final Quality-Control Checklist
- Every row has 73 positions: 7 per C column and 15 per P column
- Each of the 3 P columns has 18 complete pineapples
- Every shell sits centered on a single green tip dc
- The V-st spines run straight in all 4 cream columns
- No carried strands show on the RS
- Round 2 of the border has 77 sts on the top and bottom and 298 on each long side
- All 6 tabs are evenly spaced and securely sewn
- The final size is 19.25 in x 74 in (48.9 cm x 188.0 cm)
Troubleshooting
Panel getting wider: You probably worked into a skipped st at the edge of a column. Count the positions in each column.
Pineapples lean sideways: The B mesh started in the wrong st. Rows 5–8 start in a ch-1 sp, not a dc.
Bobbins tangling: Turn the work clockwise at the end of one row and counterclockwise at the end of the next.
Teal showing through the green: Change colors on the last yarn-over, and carry strands only on the WS.
Wavy side edges: You’re working too many sc. Use exactly 2 sc per row end.
Tabs stretching: Crochet the tabs more tightly, or go down 0.5 mm in hook size.
Care
Hand wash in cool water, or machine wash on a gentle cycle in a mesh bag. Dry flat and re-pin the long edges if needed, because lace can stretch longer if it’s hung up damp.
Final Notes
Here’s the measurement chain. 16 dc and 8 rows make 4 in (10.2 cm). 73 sts make 18.25 in (46.4 cm), and 146 rows make 73 in (185.4 cm). The two-round border brings the panel to 19.25 in x 74 in (48.9 cm x 188.0 cm), and the tabs add a 2 in (5.1 cm) loop on top. Check your gauge at each stage, and the curtain will hang straight and true.
Happy crocheting!