

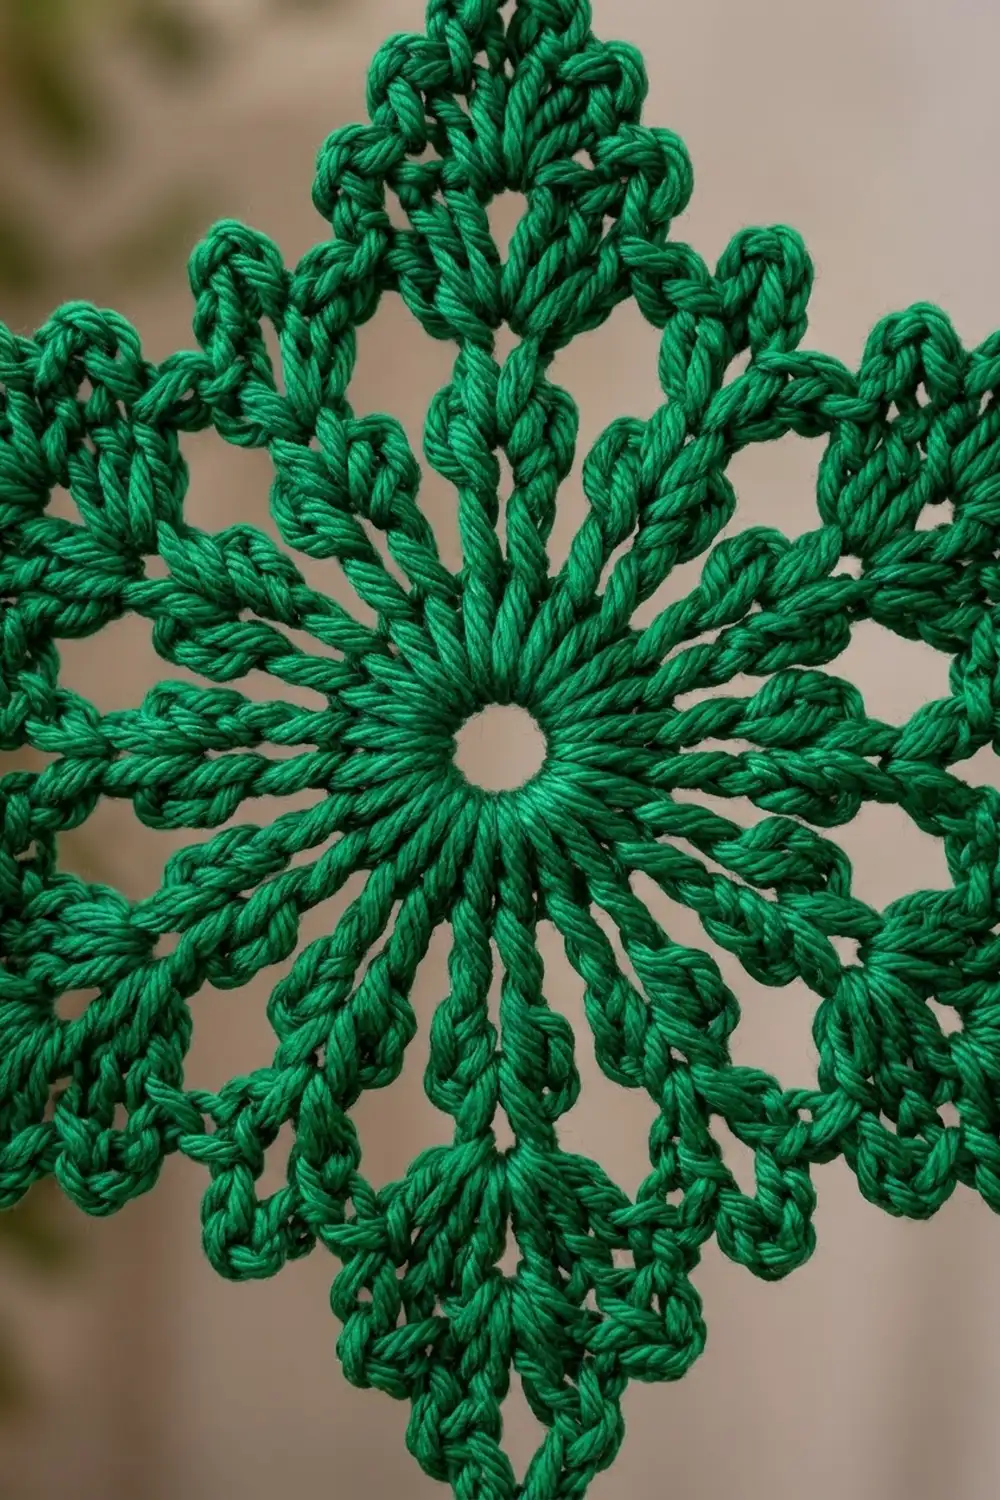
The Evergreen Frost Snowflake is a six-pointed lace motif in a rich emerald green. It has a small open center and a ring of solid double crochet. Twelve spokes come out of that ring and build into six sharp, leaf-like points. A small pointed lobe sits between each pair of points, and tiny picots run along every edge, which gives the motif a crisp, frosted outline.
The motif is worked in one color. A smooth, slightly glossy worsted-weight cotton or cotton blend shows the stitches best and helps the points hold their shape after blocking. The look is classic and a little wintry. Because the motif is green rather than white, it also works well as an evergreen ornament, an appliqué, or a table accent.
This pattern uses US crochet terms. The finished motif measures 6.5 in (16.5 cm) from point to point and about 5.5 in (14.0 cm) across from valley lobe to opposite valley lobe.
The motif is worked in the round in five rounds without turning. Round 1 is a solid ring, Round 2 makes 12 spokes, Rounds 3 and 4 shape six points and six valleys, and Round 5 is a picot edging that sharpens every point. Identical motifs appear joined into a bedspread in the photo, but this pattern covers one single motif.
Finished Size and Construction
- Finished size: 6.5 in (16.5 cm) point to point; 5.5 in (14.0 cm) valley to valley
- Skill level: Easy intermediate
- Terminology: US crochet terms
- Yarn weight: Worsted (#4)
- Hook: 4.5 mm (US 7)
- Number of pieces: 1
- Layout: Single six-pointed motif, worked in the round
- Piece size: 6.5 in (16.5 cm) point to point after blocking
- Size before border: 5.25 in (13.3 cm) point to point after Round 4
- Border depth: about 5/8 in (1.6 cm) added at each point by Round 5
Materials
Yarn: Choose a smooth worsted-weight (#4) mercerized cotton or cotton-acrylic blend. Smooth plied yarn makes the dc posts and picots stand out clearly. Fuzzy or loosely spun yarn will soften the points and hide the lace.
- Emerald green: 20 g, about 38 m (42 yd)
The motif itself uses about 15 g. The quantity above includes a margin for a gauge swatch and weaving in ends.
Tools:
- 4.5 mm (US 7) crochet hook
- Tapestry needle
- Scissors
- Stitch marker
- Blocking mat and rustproof pins
- Spray bottle
- Ruler or tape measure
Abbreviations (US Terms)
- ch – chain
- sl st – slip stitch
- sc – single crochet
- hdc – half double crochet
- dc – double crochet
- sk – skip
- sp – space
- st(s) – stitch(es)
- rep – repeat
- beg – beginning
Special stitches:
- Shell: (2 dc, ch 3, 2 dc) in the same space.
- Point shell: (3 dc, ch 3, 3 dc) in the same space.
- V-st: (dc, ch 2, dc) in the same stitch.
- Picot: ch 3, sl st in the 3rd ch from hook. A picot is not counted as a stitch.
Gauge and Checkpoints
Gauge matters here because a motif that is too loose loses its sharp points. Work Rounds 1 and 2, measure, and adjust before you go on.
Gauge: Rounds 1–2 = 3 in (7.6 cm) across, measured flat without stretching.
Checkpoints (unblocked, ±0.25 in / 0.6 cm):
- After Round 1: 1.75 in (4.4 cm) across
- After Round 2: 3 in (7.6 cm) across
- After Round 3: 4 in (10.2 cm) across, measured shell tip to shell tip
- After Round 4: 5.25 in (13.3 cm) point to point
- After Round 5: 6.5 in (16.5 cm) point to point
Too big? Go down to a 4 mm (US G-6) hook, or tighten your chain spaces slightly.
Too small or cupping? Go up to a 5 mm (US H-8) hook. If the motif cups but the size is right, loosen only your ch-3 spaces.
Ruffling? Your chains are too long, or you are working too loosely. Go down one hook size.
Pattern
Round 1 – Center Ring
Ch 6, sl st to the first ch to form a ring.
Ch 3 (counts as dc), work 23 dc in the ring, sl st to the top of the beg ch-3.
Count: 24 dc.
The ch-6 ring leaves the small open center seen in the finished piece. Pull the tail gently to close the ring a little, but keep a visible hole about 3/8 in (1.0 cm) wide.
Round 2 – Twelve Spokes
Ch 3 (counts as dc), dc in the next st, ch 3. *Dc in each of the next 2 sts, ch 3; rep from * 10 more times. Sl st to the top of the beg ch-3.
Count: 24 dc in 12 pairs; 12 ch-3 sp.
Each dc pair is one spoke. Check that the 12 spokes are evenly spaced and that the round lies flat.
Round 3 – Shells and Valleys
Sl st in the next dc and into the first ch-3 sp.
Ch 3 (counts as dc), work (dc, ch 3, 2 dc) in the same sp to make the first shell. Ch 2, sc in the next ch-3 sp, ch 2.
*Shell in the next ch-3 sp, ch 2, sc in the next ch-3 sp, ch 2; rep from * 4 more times. Sl st to the top of the beg ch-3.
Count: 6 shells (24 dc and 6 ch-3 tip sp), 6 sc, 12 ch-2 sp.
The shells mark the six future points. The sc stitches mark the six valleys.
Round 4 – Building the Points
Sl st in the next dc and into the ch-3 tip sp.
Ch 3 (counts as dc), work (2 dc, ch 3, 3 dc) in the same sp to make the first point shell. Ch 1, sk the next 2 dc and the ch-2 sp, V-st in the next sc, ch 1, sk the ch-2 sp and the next 2 dc.
*Point shell in the next ch-3 tip sp, ch 1, V-st in the next sc, ch 1; rep from * 4 more times. Sl st to the top of the beg ch-3.
Count: 6 point shells (36 dc and 6 ch-3 tip sp), 6 V-sts (12 dc and 6 ch-2 sp), 12 ch-1 sp. Total: 48 dc.
The motif now has six clear points with a small V in each valley. Measure: it should be 5.25 in (13.3 cm) point to point.
Border
Round 5 is the edging. It sharpens each point, turns each V into a small pointed lobe, and adds the picot notches along the sides.
Border gauge: One sc per dc along the sides of each point. If the sides wave, go down a hook size for this round only. If they pull and the points curl, go up a hook size.
Round 5 – Picot Edging
Ch 1, then work the following sequence 6 times, once for each point. Start in the same st as the joining sl st, which is the top of the beg ch-3.
Side up: Sc in each of the next 2 dc, picot, sc in the next dc.
Tip: In the ch-3 tip sp, work (sc, hdc, dc, picot, dc, hdc, sc).
Side down: Sc in each of the next 2 dc, picot, sc in the next dc.
Valley: Sc in the ch-1 sp. Sk the first dc of the V-st and work (hdc, dc, picot, dc, hdc) in the V-st ch-2 sp. Sk the second dc of the V-st and sc in the next ch-1 sp.
After the 6th repeat, sl st to the first sc. Fasten off.
Count per point section: 10 sc, 4 hdc, 4 dc (18 sts) and 4 picots.
Round total: 60 sc, 24 hdc, 24 dc (108 sts) and 24 picots.
Why the Math Works
Each point section of Round 4 has 3 dc, a ch-3 tip sp, 3 dc, a ch-1 sp, a V-st with its ch-2 sp, and a ch-1 sp.
- Sides: Round 5 works one sc into each of those 6 dc, 3 per side. A 1:1 ratio adds no extra stitches, so the sides stay straight and firm.
- Tips: All the growth is at the tip, where 6 stitches and a picot go into a single ch-3 sp. This crowding makes the point fan outward to a sharp peak.
- Valleys: The V-st dc are skipped, and 4 stitches plus a picot go into the ch-2 sp. This makes a smaller pointed lobe that sits lower than the main points, matching the silhouette in the photo.
- Totals: 6 sc on the sides + 2 sc at the tip + 2 sc in the ch-1 sp = 10 sc. Add 2 hdc and 2 dc at the tip and 2 hdc and 2 dc in the valley, and you get 18 stitches per section. Six sections × 18 = 108 stitches.
The edging adds about 5/8 in (1.6 cm) at each point. That takes the motif from 5.25 in (13.3 cm) to 6.5 in (16.5 cm).
Final Blocking
- Weave in both ends along the backs of the dc posts. Do not trim them yet.
- Soak the motif in cool water for 10 minutes, then press out the water in a towel. Do not wring it.
- On a blocking mat, draw or mark a circle 6.5 in (16.5 cm) across. Mark six evenly spaced points on it, 60 degrees apart.
- Pin each tip picot on one of the six marks.
- Pin each valley lobe picot so that opposite lobes are 5.5 in (14.0 cm) apart.
- Pin the side picots lightly so they stand out from the edge.
- Check that the center hole is round and the spokes are straight.
- Let it dry completely, at least 12 hours.
- Unpin and trim the woven ends close.
Final Quality-Control Checklist
- Point to point measures 6.5 in (16.5 cm) and valley to valley measures 5.5 in (14.0 cm)
- All six points are equal in length and sharply peaked
- Six valley lobes, each smaller than the main points
- 24 picots in total: 4 per point section
- The center hole is open and round
- 12 spokes, evenly spaced
- The motif lies flat with no cupping or ruffling
- No visible tails on the front
Troubleshooting
The motif cups after Round 3: Your ch-2 and ch-3 spaces are too short. Loosen them slightly or go up half a hook size.
The motif ruffles after Round 4: Your chains are too long. Tighten them, or rework Round 4 one hook size down.
The points look rounded: Make sure the tip of Round 5 is worked entirely in the ch-3 sp, and block with firm pins at each tip picot.
The valley lobes are as large as the points: Check that you skipped both V-st dc and that you worked only (hdc, dc, picot, dc, hdc) in the ch-2 sp.
Your stitch count is off: Count Round 4 by point shells. You should have 6 point shells and 6 V-sts. Fix any miscount before you start the edging.
The center hole closed up: Next time, start with ch 7 instead of ch 6, or avoid pulling the tail tight.
Care
Hand wash in cool water with mild soap and press out the water in a towel. Dry flat, pinned to shape if needed, to keep the points crisp.

Final Notes
The measurement chain is simple. Round 1 is 1.75 in (4.4 cm), Round 2 is 3 in (7.6 cm), and Round 3 is 4 in (10.2 cm). Round 4 is 5.25 in (13.3 cm) point to point. The picot edging takes the motif to 6.5 in (16.5 cm) point to point and 5.5 in (14.0 cm) valley to valley. If each checkpoint matches, the finished snowflake will lie flat with six sharp points, six small valley lobes, and an open center ring.
Happy crocheting!