

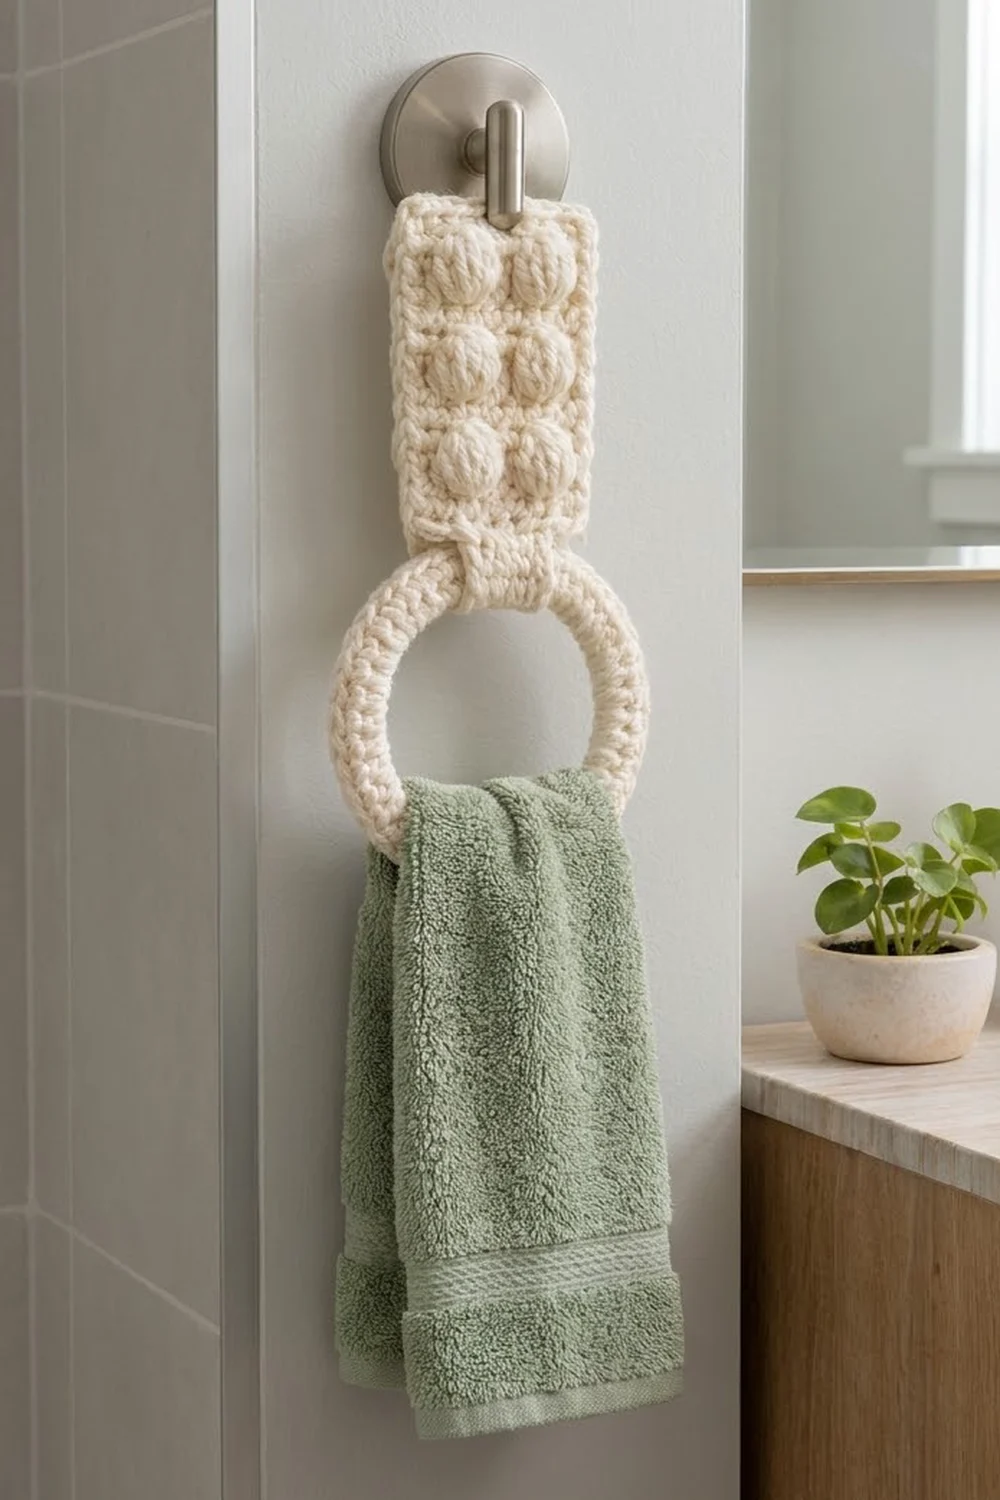
This small towel holder adds soft texture to a bathroom or kitchen. A rectangular cream tab carries three pairs of round bobbles, and a short strap at its base wraps around a crochet-covered ring. Hang the tab on a towel hook, pull a hand towel through the ring, and the towel stays put.
The whole piece uses one natural cream cotton. Because there is only one color, the bobbles and the neat single crochet border stand out. It suits farmhouse, Scandinavian, or spa-style rooms.
The pattern uses US crochet terms. The finished tab measures 3 in (7.6 cm) wide by 4.75 in (12.1 cm) tall. The covered ring is about 3.5 in (8.9 cm) across. The whole holder hangs about 8.5 in (21.6 cm) from the top of the tab to the bottom of the ring.
You will make two pieces. The first is the tab: a flat panel of double crochet rows with bobbles, one round of single crochet border, and a 6-stitch strap worked off the bottom edge. The second is a 3 in (7.6 cm) ring covered with single crochet. At the end, the strap folds over the ring and is sewn to the back of the tab.
Finished Size and Construction
- Finished size: tab 3 in x 4.75 in (7.6 cm x 12.1 cm); ring about 3.5 in (8.9 cm) outer diameter; total hanging length about 8.5 in (21.6 cm)
- Skill level: easy to intermediate (bobbles and working over a ring)
- Terminology: US
- Yarn weight: worsted (#4) cotton
- Hook: 4.5 mm (US 7)
- Number of pieces: 2 (tab with strap, covered ring)
- Layout: tab on top, ring hanging directly below it on the strap
- Tab size before border: 2.5 in x 4.25 in (6.4 cm x 10.8 cm)
- Border depth: 0.25 in (0.6 cm) on every edge
- Strap: 1.5 in x 2.5 in (3.8 cm x 6.4 cm)
Materials
Choose a smooth worsted-weight cotton or cotton blend. Cotton keeps the bobbles firm, washes well, and stretches very little under the weight of a damp towel. Avoid fuzzy or very soft acrylic, which can sag over time.
- Cream: 50 g, about 77 m (84 yd) total
- Tab and strap: about 32 g (49 m)
- Ring cover: about 13 g (20 m)
- One wooden or plastic ring, 3 in (7.6 cm) outer diameter, about 0.375 in (1.0 cm) thick
- 4.5 mm (US 7) crochet hook
- Tapestry needle
- Scissors
- Stitch markers (2)
- Ruler or tape measure
- Rustproof pins and a blocking mat
The yarn amounts include a margin of about 10 percent for a gauge check and for weaving in ends.
Abbreviations (US Terms)
- ch: chain
- sl st: slip stitch
- sc: single crochet
- dc: double crochet
- st(s): stitch(es)
- RS / WS: right side / wrong side
- bob: bobble (see below)
Bobble (bob): Work (yarn over, insert hook in the indicated st, yarn over and pull up a loop, yarn over and draw through 2 loops) 5 times in the same st. Then yarn over and draw through all 6 loops on the hook. Each bobble counts as 1 st.
Bobbles are always worked on WS rows so that they push out toward the RS. If a bobble looks flat, push it gently from the back with your finger.
Gauge and Checkpoints
Gauge: 16 sts and 8 dc rows = 4 in (10.2 cm). In single crochet, 16 sts and 16 rows = 4 in (10.2 cm). That works out to 4 sts per inch across, 2 dc rows per inch, and 4 sc rows per inch.
Make the tab first and use it as your test piece. Check these measurements as you go:
- After Row 1: the 10 sc measure 2.5 in (6.4 cm) wide.
- After Row 6: the panel is 2.75 in (7.0 cm) tall.
- After Row 9: the panel is 2.5 in x 4.25 in (6.4 cm x 10.8 cm).
- After the border: the tab is 3 in x 4.75 in (7.6 cm x 12.1 cm).
- After the strap: the strap is 1.5 in (3.8 cm) wide and 2.5 in (6.4 cm) long.
If your panel is too large, go down half a hook size. If it is too small, go up half a hook size. A difference of 0.25 in (0.6 cm) is fine for this project. A bigger difference will change how the strap fits around the ring.
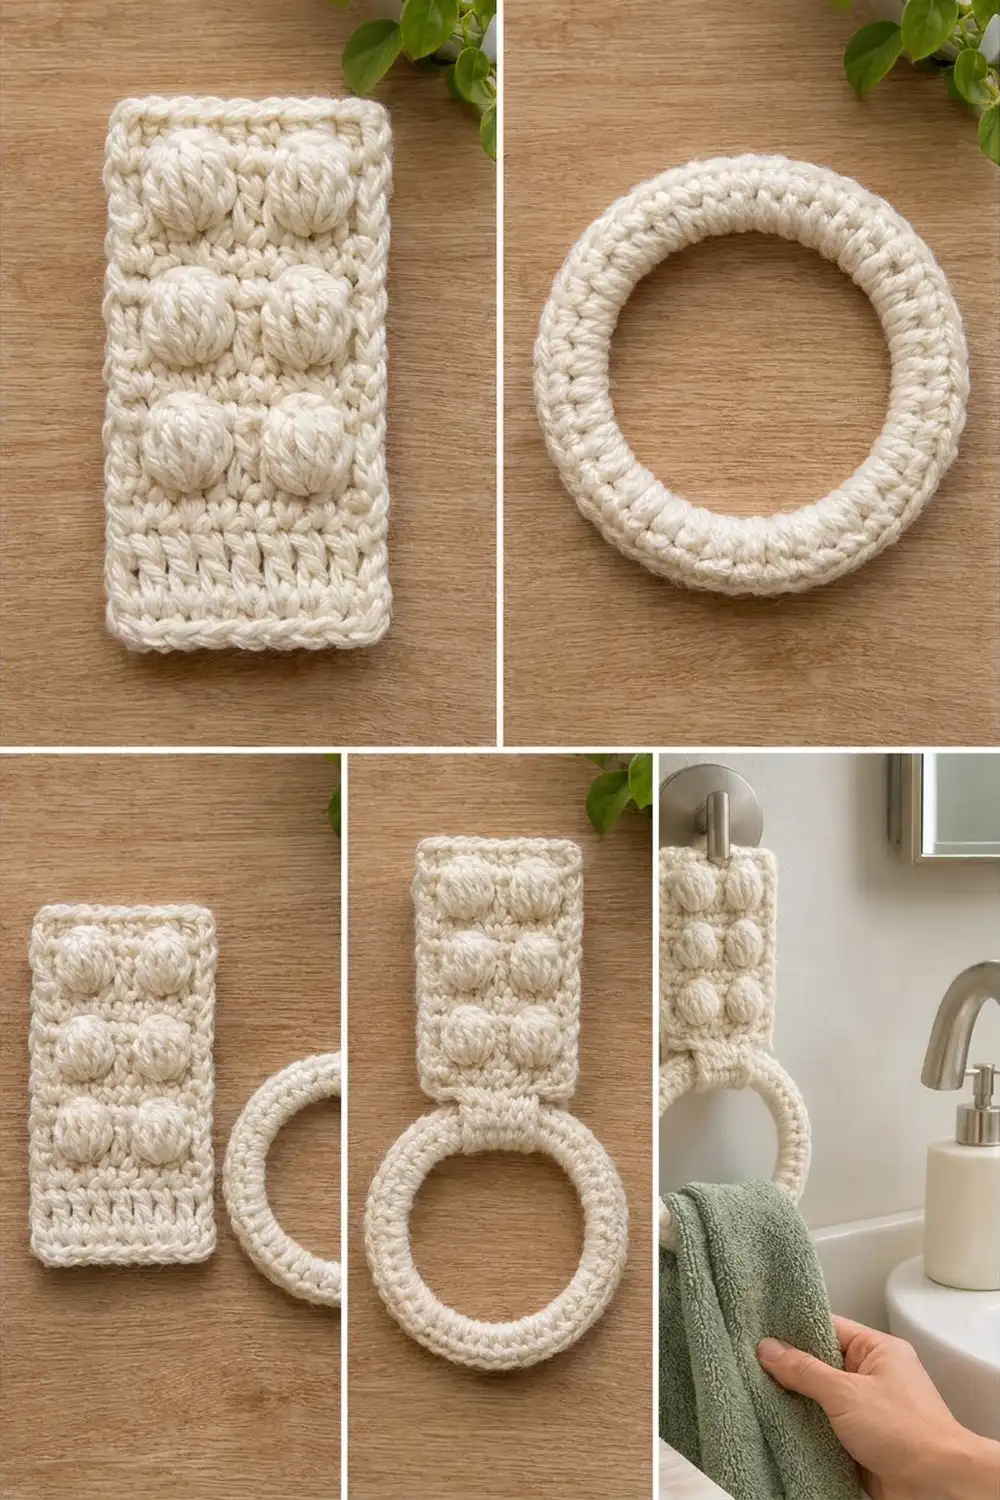
Tab
Ch 11.
Row 1 (RS): Sc in 2nd ch from hook and in each ch across. Turn. (10 sc)
Row 2 (WS): Ch 2 (does not count as a st, here and throughout), dc in first 3 sts, bob in next st, dc in next 2 sts, bob in next st, dc in last 3 sts. Turn. (8 dc + 2 bob = 10 sts)
Row 3 (RS): Ch 2, dc in each st across. Turn. (10 dc)
On top of each bobble, work 1 dc into the bobble’s closing loop, not into the space beside it. Count every row, because it is easy to gain or lose a stitch next to a bobble.
Row 4 (WS): Repeat Row 2. (10 sts)
Row 5 (RS): Repeat Row 3. (10 dc)
Row 6 (WS): Repeat Row 2. (10 sts)
Checkpoint: the panel should be 2.75 in (7.0 cm) tall. That is 0.25 in (0.6 cm) for Row 1 plus five dc rows at 0.5 in (1.3 cm) each.
Row 7 (RS): Ch 2, dc in each st across. Turn. (10 dc)
Row 8 (WS): Ch 2, dc in each st across. Turn. (10 dc)
Row 9 (RS): Ch 2, dc in each st across. Do not turn. (10 dc)
The bobbles now sit in three pairs, in sts 4 and 7 of each bobble row. Each pair has 3 sts on its outer sides and 2 sts between the bobbles, so it is centered. Rows 7 to 9 make the plain band at the bottom of the tab. The foundation edge is the top of the tab, and the Row 9 edge is the bottom.
Checkpoint: 2.5 in x 4.25 in (6.4 cm x 10.8 cm).
Border
Border gauge: 4 sc per inch along every edge, the same as the flat sc gauge. Work 1 sc in each st, 2 sc in each dc row-end, and 1 sc in the sc row-end.
Rnd 1 (RS): With the RS still facing after Row 9, ch 1 and turn the piece so you can work down the side.
- Side 1: 2 sc in each of the 8 dc row-ends (Rows 9 to 2), then 1 sc in the Row 1 row-end. (17 sc)
- Top edge (foundation): Working in the free loops of the foundation ch, 3 sc in first ch, sc in next 8 ch, 3 sc in last ch. (14 sc)
- Side 2: 1 sc in the Row 1 row-end, then 2 sc in each of the 8 dc row-ends. (17 sc)
- Bottom edge (Row 9): 3 sc in first st of Row 9, sc in next 8 sts, 3 sc in last st. (14 sc)
Join with sl st to first sc. Fasten off and weave in ends. (62 sc total)
How the corners are counted: each 3-sc corner group belongs to the top or bottom edge. The 17 sc on each side do not include any corner stitches. The total is 14 + 17 + 14 + 17 = 62, and no stitch is counted twice.
Why the math works: the top and bottom edges each have 10 sts, plus 2 extra sc in each corner group, for 14. Each side is 4.25 in (10.8 cm) long. At 4 sc per inch, that needs 17 sc: 2 for each of the 8 dc rows plus 1 for the sc row. The border lies flat, with no pulling or rippling.
Strap
You will work the strap into the 6 center sts of the bottom edge. Of the 14 sc on the bottom edge, skip the first 4 and the last 4. That leaves sc 5 to 10.
Row 1 (RS): With the RS facing, join the yarn with a sl st in the 5th sc of the bottom edge. Ch 1, sc in the same st and in the next 5 sts. Turn. (6 sc)
Rows 2 to 10: Ch 1, sc in each st across. Turn. (6 sc)
Fasten off, leaving a 12 in (30.5 cm) tail for sewing.
Checkpoint: the strap is 1.5 in (3.8 cm) wide and 2.5 in (6.4 cm) long. That is 6 sts at 4 per inch, and 10 rows at 4 rows per inch.
Ring Cover
Make a slipknot and put it on the hook.
Rnd 1: Insert the hook through the center of the ring, yarn over, and pull up a loop. Yarn over and draw through both loops to make the first sc around the ring. Work about 60 sc around the ring in total, pushing the sts together as you go so the ring does not show through. Join with sl st to first sc. (about 60 sc)
The exact count depends on your ring and your tension. Most rings need 56 to 64 sc. Use as many as it takes to cover the ring completely without the stitches bunching or rippling.
Fasten off, leaving a 6 in (15.2 cm) tail. Weave the tail through several sts on the back.
Turn the stitches around the ring so the top ridge of the sc sits on the inner edge. This leaves the outer edge smooth and rounded.
Checkpoint: the covered ring is about 3.5 in (8.9 cm) across, with an inner opening of about 1.75 in (4.4 cm).
Make All Pieces
This holder is one set of two different pieces, both in cream:
- Cream: 1 tab with strap, 1 covered ring
Layout:
+-----------+
|  o     o  |
|  o     o  |   TAB
|  o     o  |
|           |
+--[strap]--+
   (     )
  (  RING )
   (     )
Joining
Method: whipstitch, using the strap tail.
- Lay the tab RS down.
- Pass the strap through the covered ring from front to back, so the ring hangs in the fold.
- Fold the strap up onto the WS of the tab.
- Line up the 6 sts of strap Row 10 with the back of the 6 center sts of tab Row 9 (sts 3 to 8 of its 10).
- Whipstitch one stitch to one stitch: strap st 1 to Row 9 st 3, strap st 2 to Row 9 st 4, and so on, ending with strap st 6 to Row 9 st 8. Then whipstitch down each side of the strap for 2 or 3 rows so the edges do not curl.
Tension: pull each stitch snug but not tight. The sewing should not show on the RS, and the front of the tab should not pucker. Turn the piece over and check the front after every 2 stitches.
The folded strap makes a loop about 0.5 in (1.3 cm) deep. This keeps the ring close under the tab but still lets it swing.
Size checkpoint: hang the holder from one finger. It should measure about 8.5 in (21.6 cm) from the top of the tab to the bottom of the ring.
Final Blocking
- Lightly mist the tab with water. Or pin it first and steam it from above, holding the iron so it does not touch the yarn.
- Pin the tab to 3 in x 4.75 in (7.6 cm x 12.1 cm), with straight sides and square corners.
- Pin around the bobbles, not through them, so they stay round.
- Do not pin the ring. Shape it with your fingers so the stitches lie evenly.
- Let everything dry completely before you remove the pins.
Final Quality-Control Checklist
- The tab measures 3 in x 4.75 in (7.6 cm x 12.1 cm).
- There are six bobbles in three even pairs, and all of them push out to the RS.
- The border has 62 sc: 14 on the top, 14 on the bottom, and 17 on each side.
- The strap is centered, with 4 border sts free on each side.
- The ring is fully covered with no gaps.
- The seam does not show from the front.
- All ends are woven in securely.
Troubleshooting
Bobbles push out to the back: you made them on a RS row. Bobbles go only on the WS rows (Rows 2, 4, and 6).
You gain stitches next to the bobbles: you worked 2 sts into one bobble. Work just 1 st into each bobble’s closing loop.
The border ruffles along the sides: there are too many sc in the row-ends. Use exactly 2 per dc row and 1 for the sc row.
The border pulls in along the sides: your sc are tighter than your dc rows. Go up half a hook size for the border only.
The ring shows through the stitches: add more sc and push them firmly together.
The strap does not reach Row 9: your ring is thicker than 0.375 in (1.0 cm). Add 1 or 2 rows to the strap.
The tab stretches with use: the yarn may be too soft. Use a firmer cotton or go down a hook size.
Care
Hand wash, or machine wash on a gentle cycle inside a laundry bag, then reshape and lay flat to dry. Keep it out of the dryer, because heat can warp plastic rings.
Final Notes
Each measurement builds on the one before it. Ten sts at 4 per inch give a 2.5 in (6.4 cm) wide panel. One sc row and 8 dc rows give 4.25 in (10.8 cm) of height. A 0.25 in (0.6 cm) border brings the tab to 3 in x 4.75 in (7.6 cm x 12.1 cm). A 6-st strap holds a 3.5 in (8.9 cm) covered ring, and the finished holder hangs about 8.5 in (21.6 cm). Check each measurement as you go, and the finished piece will match.
Happy crocheting!