

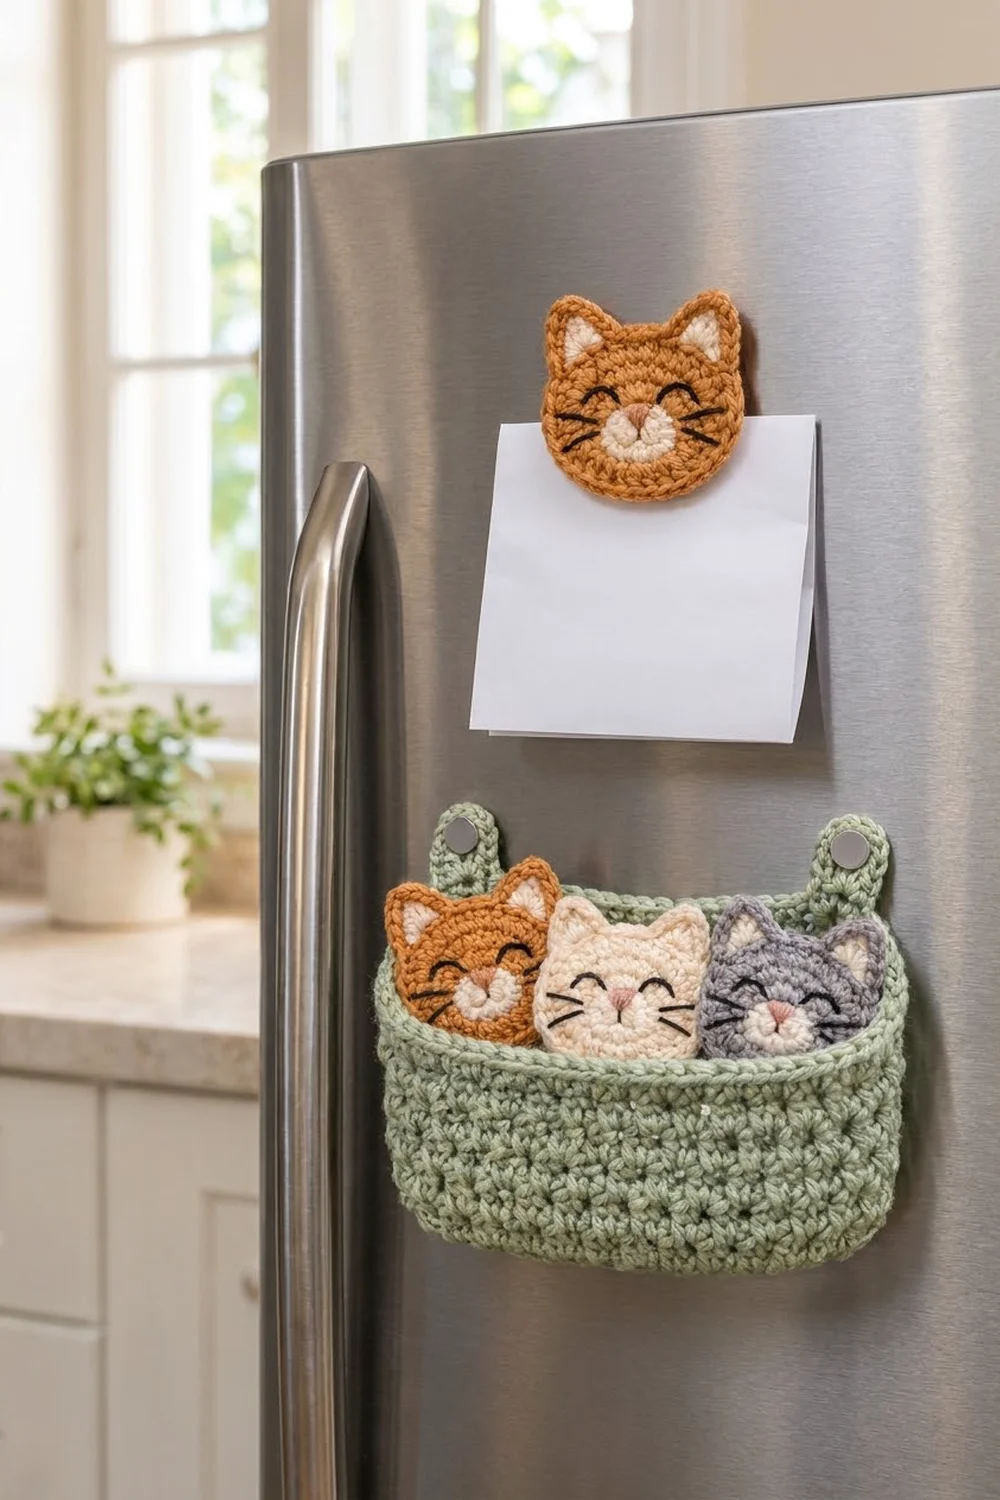
Three sleepy cats peeking out of a little green basket on the fridge: that is the whole idea behind this set. Each cat is a flat, cheerful face with pointed ears, a cream muzzle, closed smiling eyes and tiny whiskers. It has a magnet on the back, so it can hold notes on its own or nap in the basket.
The set uses four colors: ginger orange, cream and soft gray for the cats, and sage green for the basket. Black and pink embroidery floss make the faces. The style is cozy and simple, with textured walls on the basket and smooth double crochet faces on the cats.
This pattern uses US crochet terms. Each cat measures 3 in (7.6 cm) wide and 3.5 in (8.9 cm) tall. The basket measures 6 in (15.2 cm) wide, 3.25 in (8.3 cm) tall and 1.5 in (3.8 cm) deep. The tabs add 1 in (2.5 cm), for 4.25 in (10.8 cm) overall height.
Each cat head is a double crochet circle with two ears worked in rows, then a single crochet edge round that outlines everything. The basket starts with an oval base and turns up into textured walls. It finishes with a rim and gets two magnet tabs.
Finished Size and Construction
- Cat size: 3 in (7.6 cm) wide x 3.5 in (8.9 cm) tall
- Basket size: 6 in (15.2 cm) wide x 3.25 in (8.3 cm) tall x 1.5 in (3.8 cm) deep; 4.25 in (10.8 cm) tall including tabs
- Skill level: Easy to intermediate
- Terminology: US
- Yarn weight: Worsted (medium #4)
- Hook: 4.0 mm (G-6)
- Number of pieces: 4 separate pieces (3 cats, 1 basket), not joined to each other
- Layout: Cats sit loose inside the basket, side by side
- Cat size before border: 2.5 in (6.4 cm) circle
- Basket height before rim: 2.75 in (7.0 cm)
- Border depth: 0.25 in (0.6 cm) on the cats; 0.5 in (1.3 cm) rim on the basket
Materials
Choose a smooth worsted weight cotton or cotton blend. Cotton holds the cat shapes crisply and keeps the basket walls firm. Acrylic also works, but the basket will be softer and a little floppier.
- Ginger orange: 10 g, about 20 m (1 cat)
- Cream: 15 g, about 30 m (1 cat, plus muzzles and inner ears for all 3 cats)
- Soft gray: 10 g, about 20 m (1 cat)
- Sage green: 55 g, about 110 m (basket)
- Black embroidery floss (eyes, mouth, whiskers)
- Pink embroidery floss (noses)
These quantities include a margin of roughly 15 percent.
Tools:
- 4.0 mm (G-6) crochet hook
- Tapestry needle and embroidery needle
- 3 round magnets, 0.75 in (1.9 cm) diameter (cats)
- 2 round neodymium magnets, 0.5 in (1.3 cm) diameter (basket tabs)
- Scrap of cream cotton fabric, cut into three 2 x 1.75 in (5.1 x 4.4 cm) patches
- Two felt circles, 0.75 in (1.9 cm) diameter
- Strong craft glue (E6000 style)
- Sewing thread, stitch markers, scissors
Abbreviations (US Terms)
- ch chain
- sl st slip stitch
- sc single crochet
- dc double crochet
- sc2tog single crochet 2 together
- sc3tog single crochet 3 together
- BLO back loop only
- st(s) stitch(es)
- sp space
- rnd round
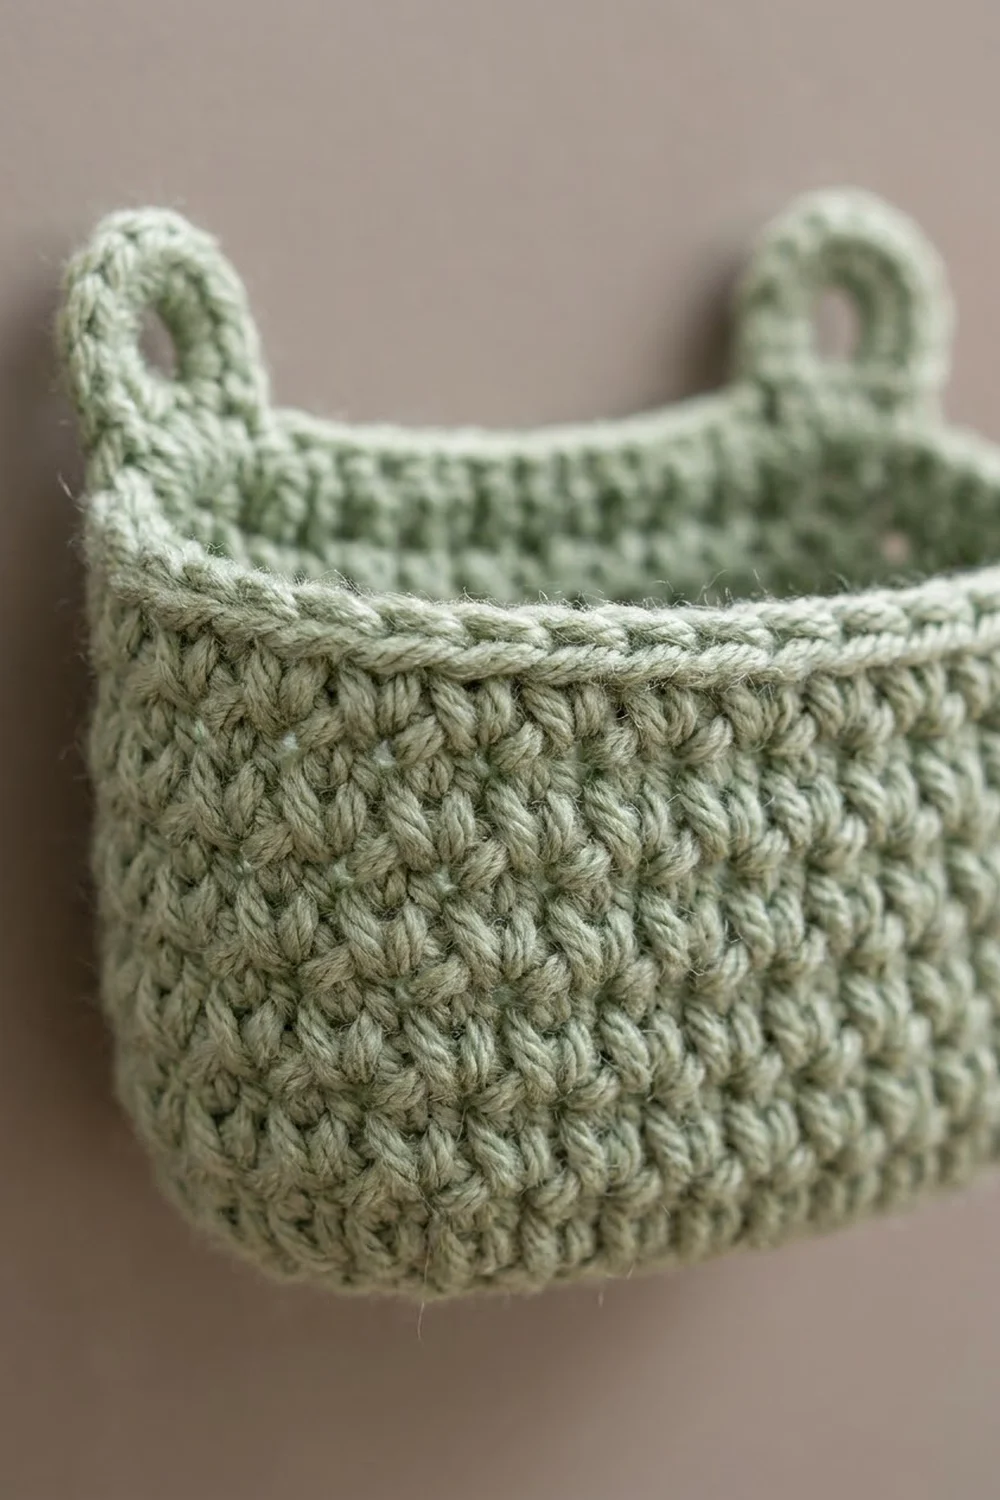
Special stitch: Pebble texture (sc/dc alternating). Alternate sc and dc across a round. On the next round, work a dc into each sc and an sc into each dc. The tall stitches push the short ones outward, creating the bumpy, slightly open texture on the basket walls.
Gauge and Checkpoints
Gauge: 16 sc and 18 rnds = 4 in (10.2 cm). In pebble texture, 16 sts and 16 rnds = 4 in (10.2 cm).
Make one cat first to test your tension.
Cat checkpoints (diameter):
- After Rnd 1: 1 in (2.5 cm)
- After Rnd 2: 1.75 in (4.4 cm)
- After Rnd 3: 2.5 in (6.4 cm)
- After border: 3 in (7.6 cm) wide
Basket checkpoints:
- Base after Rnd 3: 5.75 x 1.5 in (14.6 x 3.8 cm)
- Wall height after Rnd 9: 1.5 in (3.8 cm)
- Wall height after Rnd 14: 2.75 in (7.0 cm)
- Wall height after Rnd 16: 3.25 in (8.3 cm)
If your circle is too big, go down one hook size. If it is too small, go up one size. If the base length is right but the walls are too short, your pebble rounds are tight. Add one more pebble round instead of changing hooks partway through.
Cat Head (Make 3)
Make one in ginger, one in cream and one in gray. The face color is called MC (main color).
Rnd 1: With MC, make a magic ring. Ch 2 (does not count as a st), 12 dc in ring. Sl st to first dc. (12 dc)
Rnd 2: Ch 2, 2 dc in each st around. Sl st to first dc. (24 dc)
Rnd 3: Ch 2, dc in next st, 2 dc in next st; repeat from * around. Sl st to first dc. (36 dc)*
Fasten off. Number the Rnd 3 stitches 1 to 36, starting with the first dc after the join. Turn the circle so the join sits at bottom center. The top center now falls between sts 18 and 19.
Ears
First ear: Join MC in st 12.
- Row 1: Ch 1, sc in sts 12 through 16. (5 sc)
- Row 2: Ch 1, turn, sc2tog, sc in next st, sc2tog. (3 sts)
- Row 3: Ch 1, turn, sc3tog. (1 st)
Fasten off.
Second ear: Join MC in st 21. Work Rows 1 to 3 the same way over sts 21 through 25. Fasten off.
Sts 17 to 20 stay unworked between the ears.
Border
The cat border is a single crochet trim round that outlines the face and both ears.
Border gauge: 4 sc per 1 in (2.5 cm). One round adds 0.25 in (0.6 cm) to every edge.
Rnd 4 (trim): Join MC in st 1. Sc in sts 1 through 11 (11 sc). Work up the first ear: 3 sc along the row ends, (sc, ch 1, sc) in the sc3tog tip, 3 sc down the other side (8 sc). Sc in sts 17 through 20 (4 sc). Work the second ear the same way (8 sc). Sc in sts 26 through 36 (11 sc). Sl st to first sc. Fasten off.
Count: 26 sc worked 1 per existing head stitch + 16 sc added along the ears = 42 sc and 2 ch-1 tip spaces.
Why the math works: The 10 head stitches under the ears (sts 12 to 16 and 21 to 25) are already covered by ear Row 1, so the border skips them. That leaves exactly 26 head stitches (36 − 10). Each ear has 3 rows, so it has 3 row ends per side. Add 2 sc at the tip for 8 sc per ear. The ch-1 sharpens each ear point.
Inner Ears (Make 2 per cat)
With cream: Ch 4.
- Row 1: Sc in 2nd ch from hook and next 2 ch. (3 sc)
- Row 2: Ch 1, turn, sc2tog, sc in next st. (2 sts)
- Row 3: Ch 1, turn, sc2tog. (1 st)
Fasten off, leaving a long tail. Each triangle is about 0.75 in (1.9 cm) wide. Sew one onto each ear with the flat edge just above the head circle and the point toward the ear tip.
Muzzle (Make 1 per cat)
With cream: Ch 5.
Rnd 1: Sc in 2nd ch from hook, sc in next 2 ch, 3 sc in last ch. Working along the opposite side of the chain, sc in next 2 ch, 2 sc in the last ch (the one holding the first sc). Sl st to first sc. (10 sc)
Fasten off, leaving a long tail. The oval measures about 1.1 x 0.6 in (2.8 x 1.5 cm).
Face Details
- Sew the muzzle horizontally in the lower third of the face, centered, with its bottom edge sitting on Rnd 3.
- With pink floss, satin stitch a small downward-pointing triangle nose at the top center of the muzzle.
- With black floss, backstitch a short line down from the nose, then two tiny curves to form a “w” mouth.
- Backstitch two closed eyes as arcs that curve upward like a smile. Place them on Rnd 2, one above each side of the muzzle, about 0.75 in (1.9 cm) apart.
- Make three straight whisker stitches on each side. Start at the muzzle edge and fan them outward about 0.5 in (1.3 cm) onto the face.
Basket
Work in sage green, in joined rounds. Do not turn.
Base
Rnd 1: Ch 21. Sc in 2nd ch from hook, sc in next 18 ch, 3 sc in last ch. Working along the opposite side, sc in next 18 ch, 2 sc in last ch. Sl st to first sc. (42 sc)
Rnd 2: Ch 1, 2 sc in next st, sc in next 18 sts, 2 sc in each of next 3 sts, sc in next 18 sts, 2 sc in each of next 2 sts. Sl st to first sc. (48 sc)
Rnd 3: Ch 1, sc in next st, 2 sc in next st, sc in next 18 sts, [sc in next st, 2 sc in next st] 3 times, sc in next 18 sts, [sc in next st, 2 sc in next st] 2 times. Sl st to first sc. (54 sc)
Checkpoint: 5.75 x 1.5 in (14.6 x 3.8 cm).
Walls
Rnd 4: Ch 1, sc in BLO of each st around. Sl st to first sc. (54 sc) This turns the wall upward.
Rnd 5: Ch 1, sc in next st, dc in next st; repeat from * around. Sl st to first sc. (54 sts: 27 sc, 27 dc)*
Rnd 6: Ch 1, dc in next sc, sc in next dc; repeat from * around. Sl st to first dc. (54 sts: 27 dc, 27 sc)*
Rnds 7 to 14: Repeat Rnds 5 and 6 four more times. (54 sts each round)
Checkpoint: 2.75 in (7.0 cm) tall.
Border (Basket Rim)
Rim gauge: 18 rnds of sc = 4 in (10.2 cm), so 2 rnds add about 0.5 in (1.3 cm).
Rnds 15 and 16: Ch 1, sc in each st around. Sl st to first sc. (54 sc: 27 front, 27 back)
Fasten off.
Why the math works: The pebble pattern repeats over 2 sts, and 54 is even, so the pattern stays perfectly staggered. Rnd 1 began at the end of the chain, so the round join sits at the center of one short end. That splits the rim exactly in half: 27 sts for the back and 27 for the front.
Magnet Tabs (Make 2)
Lay the basket down with the join at the left short end. Number the back stitches 1 to 27, starting from the join. The tabs go over back sts 3 to 6 and 22 to 25, leaving 2 sts free at each end. The tab centers are 19 sts apart, which is 4.75 in (12.1 cm).
Join sage in st 3 (or 22).
- Row 1: Ch 1, sc in next 4 sts. (4 sc)
- Row 2: Ch 1, turn, sc in each st. (4 sc)
- Row 3: Ch 1, turn, sc in first st, ch 3, skip 2 sts, sc in last st. (2 sc, 1 ch-3 sp)
- Row 4: Ch 1, turn, sc in first st, 5 sc in ch-3 sp, sc in last st. (7 sc)
Fasten off. The 5 sc packed into the ch-3 space round the top of the tab into an arch around a small eyelet.
Make All Pieces
- Ginger: 1 cat head
- Cream: 1 cat head, 6 inner ears, 3 muzzles
- Gray: 1 cat head
- Sage green: 1 basket with 2 tabs
Layout inside the basket (front view):
  [tab]                        [tab]
 [Ginger cat] [Cream cat] [Gray cat]
 |========== sage basket ==========|
Assembly (Magnets and Backing)
The pieces are not joined to each other. Assembly just means adding the magnets.
Cats: Fold under 0.125 in (0.3 cm) on each edge of a fabric patch. Place a 0.75 in (1.9 cm) magnet at the center back of the cat head. Cover it with the patch. Whipstitch three sides, catching only the back loops of the dc stitches so nothing shows on the front. Push the magnet snugly into place and sew the fourth side closed.
Basket: Glue one 0.5 in (1.3 cm) magnet to the back of each tab, centered behind the eyelet so the silver shows through. Glue a felt circle over each magnet. Let the glue cure for 24 hours.
Keep your sewing tension even. Pulling hard will pucker the face.
Final Blocking
- Lightly spritz each cat with water.
- Pin it face up on a blocking mat at 3 in (7.6 cm) wide, pinning each ear tip upward.
- Let it dry completely before adding the magnet backing.
- Fill the basket with a folded towel or a small box about 5.75 x 1.5 in (14.6 x 3.8 cm).
- Spritz the walls, press the back wall flat and let it dry overnight.
- Steam the tabs flat so they lie against the fridge.
Final Quality-Control Checklist
- Each cat is 3 in (7.6 cm) wide and 3.5 in (8.9 cm) tall
- The border has 42 sc and 2 pointed ear tips
- The ears are symmetric, 4 sts apart
- The muzzle is centered and the eyes are level
- The magnet is fully enclosed and invisible from the front
- The basket rim has 54 sc and stands 3.25 in (8.3 cm) tall
- The tabs are level and 4.75 in (12.1 cm) apart
- All tails are woven in
Troubleshooting
- Cat circle ruffles: Your dc is loose. Go down a hook size.
- Cat circle cups: Your tension is tight. Check that you have 36 sts, or go up a hook size.
- Ears look uneven: Recount the Rnd 3 positions. Each ear needs exactly 5 sts.
- Pebble texture stacks instead of staggering: You worked sc into sc. Always put a dc into each sc.
- Basket leans forward: Use stronger magnets, or move the tabs closer to the ends.
- Magnet slides in the pouch: Add a few stitches to make the pocket smaller.
Care
Spot clean all pieces with a damp cloth, because the magnets are sewn or glued in place. Reshape and let dry flat.
Final Notes
The measurements build in a simple chain. Each cat grows from a 1 in (2.5 cm) ring to a 2.5 in (6.4 cm) circle, gains ears, then gets a 0.25 in (0.6 cm) border to reach 3 in (7.6 cm). The basket starts as a 5.75 x 1.5 in (14.6 x 3.8 cm) base. Its walls rise 2.75 in (7.0 cm) in pebble texture, and a 0.5 in (1.3 cm) rim brings them to 3.25 in (8.3 cm).
Happy crocheting!