

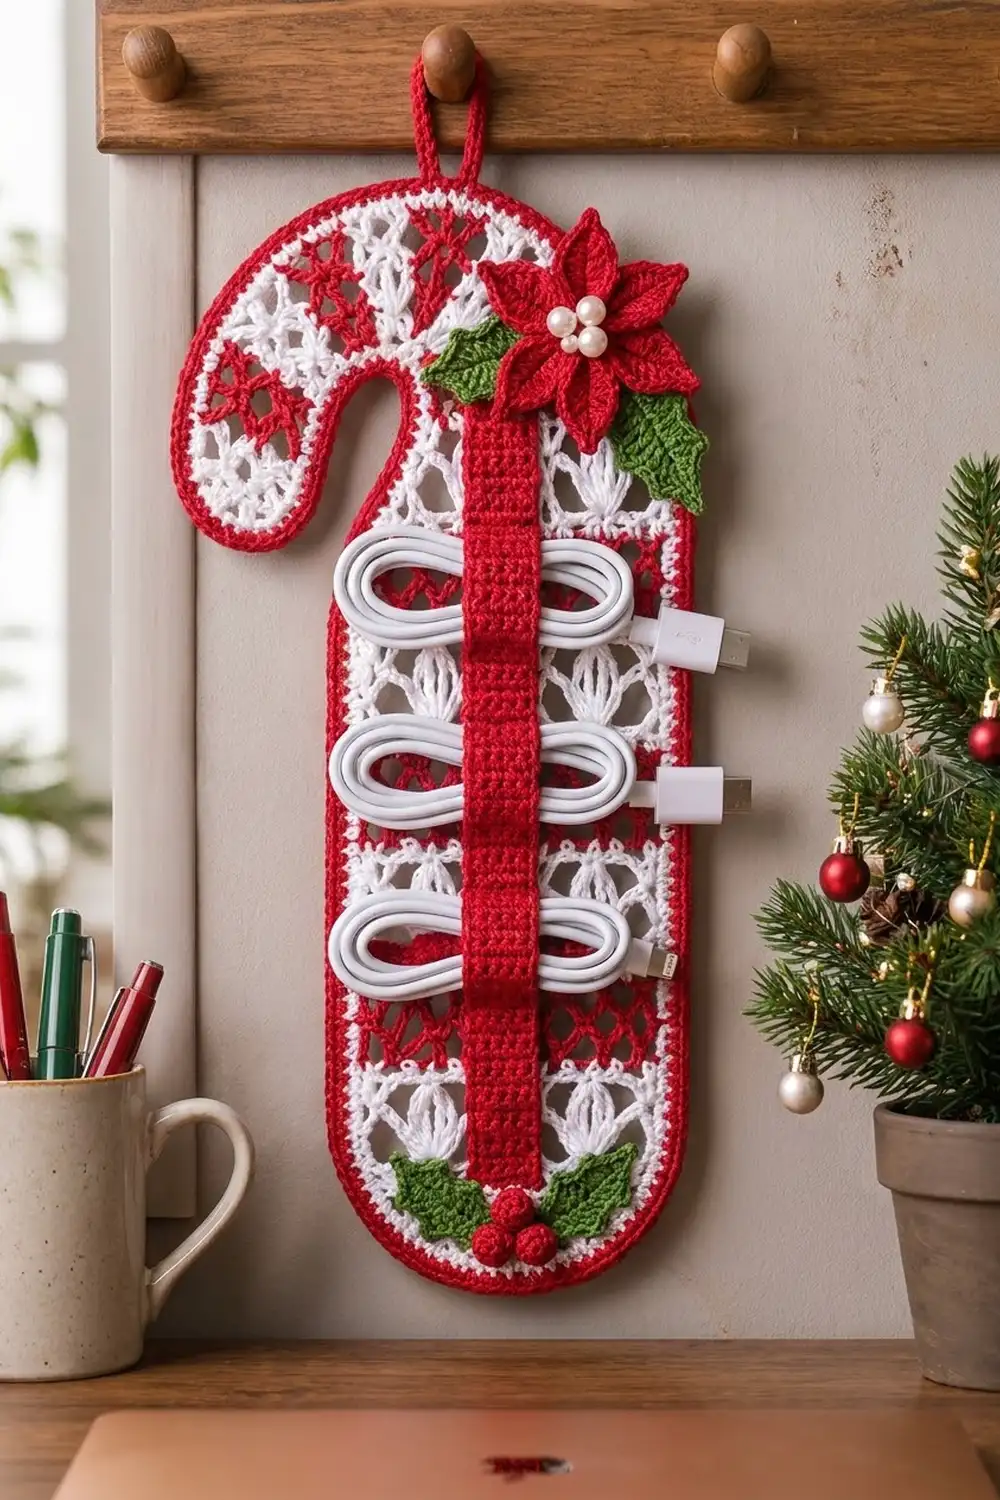
This lace candy cane hangs on the wall and keeps your charging cables tidy. White puff-stitch “lily” bands alternate with red crossed-stitch mesh on the shaft. The hook curls to the left in diagonal peppermint stripes.
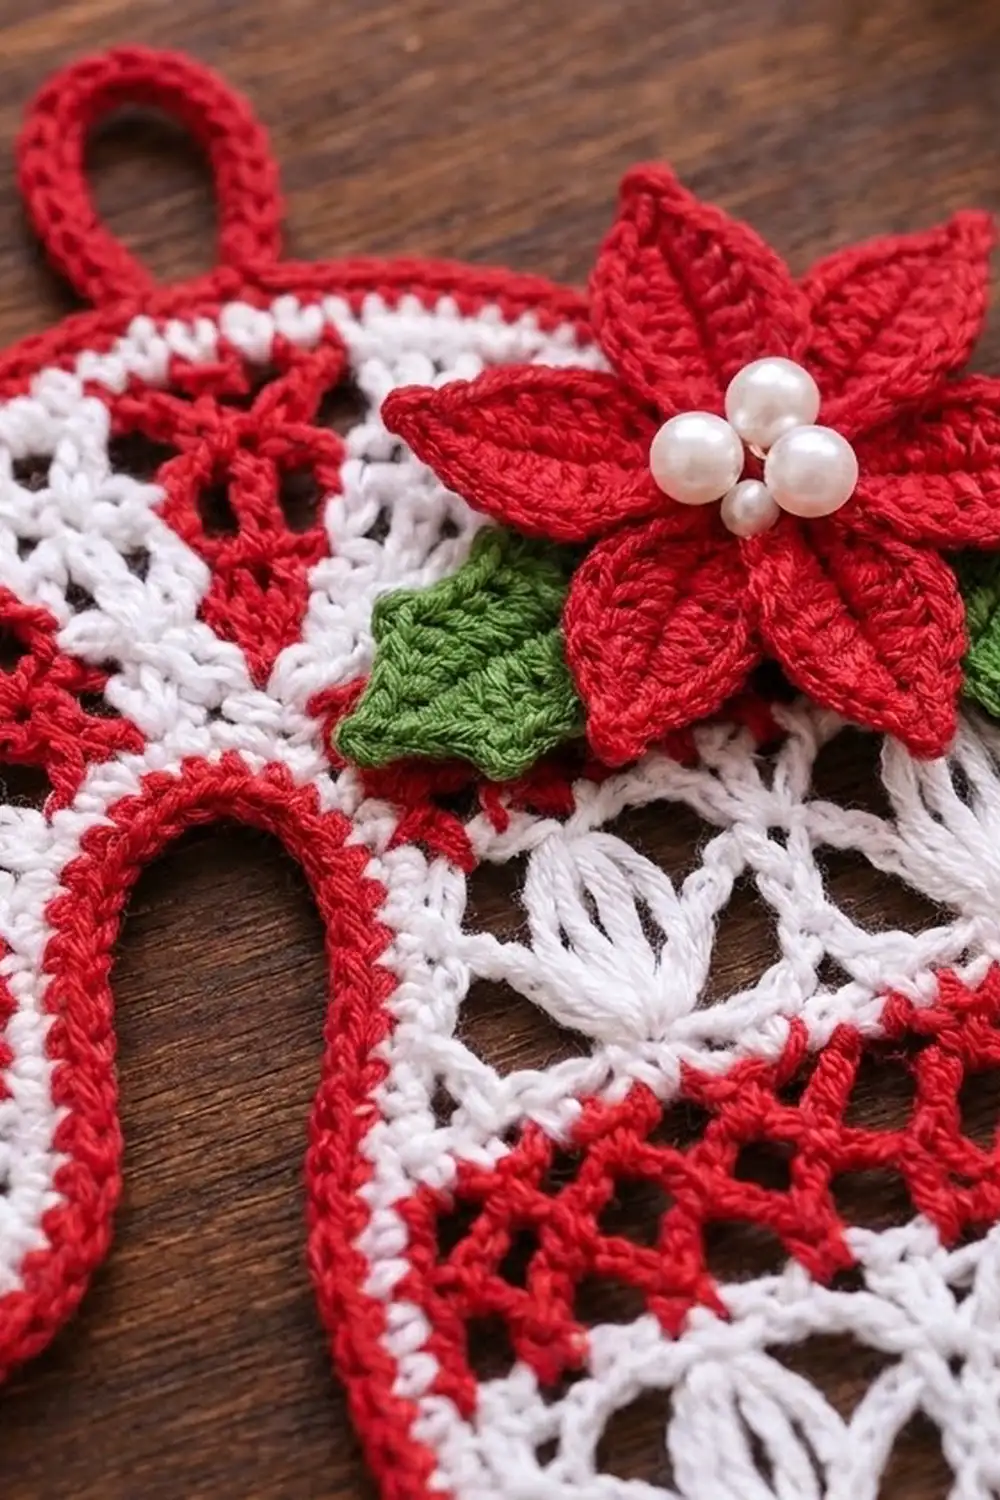
The colors are bright red, crisp white and holly green. The poinsettia has white pearl beads in its center. A red strap with four cross bands runs down the front and holds coiled cords in place.
The pattern uses US crochet terms. The finished organizer is 5.3 in (13.5 cm) wide at the shaft, 8.1 in (20.6 cm) across the hook and 14.2 in (36.1 cm) tall. The hanging loop adds about 1.25 in (3.2 cm).
You work the shaft flat in rows from the bottom up. The hook grows straight off the shaft in wedge-shaped rows that make it curl. Then you add a three-round border and sew on the appliqués and the strap.
Finished Size and Construction
- Finished size: 5.3 in (13.5 cm) x 14.2 in (36.1 cm); 8.1 in (20.6 cm) across the hook
- Skill level: Intermediate
- Terminology: US
- Yarn weight: #2 fine (sport) mercerized cotton
- Hook: 3.25 mm (US D-3)
- Number of pieces: 1 panel plus appliqués (poinsettia, 4 holly leaves, 3 berries, strap, 4 cross bands)
- Layout: a single candy cane with the hook curling left
- Size before border: shaft 4.5 in (11.4 cm) x 9.8 in (24.9 cm); hook 7.3 in (18.5 cm) wide and rising 3.6 in (9.1 cm) above the shaft; total height 13.4 in (34.0 cm)
- Border depth: 0.4 in (1.0 cm), worked in 3 rounds
Materials
Mercerized cotton gives crisp lace and blocks well. Choose a sport-weight cotton with about 155 m per 50 g.
- White (MC): 30 g, about 93 m
- Red (CC1): 40 g, about 124 m
- Green (CC2): 5 g, about 16 m
These amounts include a margin of about 15%.
Tools:
– 3.25 mm (US D-3) hook
– Tapestry needle
– 4 stitch markers
– 3 white pearl beads, 6 mm (0.25 in / 0.6 cm)
– Sewing needle and white thread
– A little fiberfill or some yarn scraps
– Blocking mat, rust-proof pins and a spray bottle
Abbreviations (US Terms)
ch = chain; sl st = slip stitch; sc = single crochet; hdc = half double crochet; dc = double crochet; tr = treble crochet; dtr = double treble crochet; sk = skip; sp = space; st(s) = stitch(es); FLO/BLO = front/back loop only; sc2tog/sc4tog = single crochet 2/4 together.
Special stitches:
– Crossed dc pair: Sk 1 st, dc in the next st, then dc in the skipped st, working in front of the first dc. It uses 2 sts and makes 2 sts. A crossed tr pair is worked the same way with tr.
– V-st: (dc, ch 1, dc) in the same st.
– Puff: (yarn over, insert hook, pull up a loop) 3 times, yarn over and pull through all 7 loops.
– Mesh pair: (st, ch 1, sk 1). It uses 2 sts and makes 2 sts.
– Picot: Ch 3, sl st in the 3rd ch from the hook.
Every ch-1 sp counts as one stitch.
Gauge and Checkpoints
- Lace gauge: 22 sts and 11 rows of dc = 4 in (10.2 cm)
- Sc gauge (strap and border): 24 sts and 28 rows = 4 in (10.2 cm)
The shaft is your test piece. Work Rows 1–9, then measure before you go on.
- After Row 1: 3.1 in (7.9 cm) wide
- After Row 3: 4.5 in (11.4 cm) wide
- After Row 9: 3.3 in (8.4 cm) tall
- After Row 16: 5.8 in (14.7 cm) tall
- After Row 27: 9.8 in (24.9 cm) tall
If your piece is too big, use a hook 0.25 mm smaller. If it is too small, use a hook 0.25 mm larger.
Shaft
Work in white unless the row says otherwise. The ch-3 at the start of a row counts as a dc.
Row 1: Ch 19. Dc in the 4th ch from the hook and in each ch across. Turn. (17 sts)
Row 2: Ch 3. Dc in the same st, 2 dc in the next st, dc in the next 13 sts, 2 dc in each of the last 2 sts. Turn. (21 sts)
Row 3: Ch 3. Dc in the same st, 2 dc in the next st, dc in the next 17 sts, 2 dc in each of the last 2 sts. Turn. (25 sts) These first three rows shape the rounded bottom.
Row 4 (Lily 1): Ch 3. Sk 1, V-st in the next st, sk 1, dc in the next st; repeat from * 6 times in total. Turn. (25 sts: 1 + 6 x 4)
Row 5 (Lily 2): Ch 3. Sk 1 dc, (puff, ch 1, puff) in the ch-1 sp, sk 1 dc, dc in the next dc; repeat from * 6 times in total. Turn. (25 sts)
Row 6 (Lily 3): Ch 3. Ch 1, sk the puff, sc in the ch-1 sp, ch 1, sk the puff, dc in the dc; repeat from * 6 times in total. Fasten off. (25 sts) The sc pinches each pair of puffs into an almond-shaped “lily.”
Rows 7–9 (red): Join red. Ch 3, then work 12 crossed dc pairs. Turn at the end of each row. (25 sts: 1 + 24) Fasten off.
Row 10: Join white. Ch 3, dc in each st across. Turn. (25 sts)
Rows 11–13: Repeat Rows 4–6.
Rows 14–16: Repeat Rows 7–9.
Row 17: Repeat Row 10.
Rows 18–20: Repeat Rows 4–6.
Rows 21–23: Repeat Rows 7–9.
Row 24: Repeat Row 10.
Rows 25–27: Repeat Rows 4–6. Row 27 ends at the left edge. (25 sts)
You now have 4 white bands and 3 red bands. The shaft measures 4.5 in (11.4 cm) x 9.8 in (24.9 cm).
Hook
Each wedge row is short at the inner (left) edge and tall at the outer (right) edge. This makes the rows fan out so the hook curls to the left. Change color every 2 rows to make 5 red and 5 white radiating stripes.
- Red rows: work the dc and tr sections as crossed pairs.
- White rows: work the dc and tr sections as mesh pairs.
Sections from the inner edge to the outer edge:
– 19-st rows: sl st 1, sc 2, hdc 4, dc 6, tr 6
– 16-st rows: sl st 1, sc 2, hdc 3, dc 4, tr 6
– 13-st rows: sl st 1, sc 2, hdc 2, dc 4, tr 4
Odd rows start at the inner edge with ch 1. Even rows start at the outer edge with ch 4, which counts as a tr, and work the sections in reverse.
Setup: Turn. Leave the first 6 sts unworked. This is the notch, 1.1 in (2.8 cm) wide. Join red in the 7th st.
Rows 1–2 (red): Work the 19-st sections. (19 sts)
Rows 3–4 (white) and Rows 5–6 (red): Work the 19-st sections. (19 sts) This part of the hook is 3.5 in (8.9 cm) wide.
Row 7 (white): Ch 1. Sc4tog over the first 4 sts, then sc 2, hdc 3, dc 4, tr 6. (16 sts: 1 + 2 + 3 + 4 + 6)
Row 8 (white), Rows 9–10 (red), Rows 11–12 (white): Work the 16-st sections. (16 sts)
Row 13 (red): Ch 1. Sc4tog over the first 4 sts, then sc 2, hdc 2, dc 4, tr 4. (13 sts: 1 + 2 + 2 + 4 + 4)
Row 14 (red), Rows 15–16 (white), Rows 17–18 (red), Rows 19–20 (white): Work the 13-st sections. (13 sts) Fasten off.
Checkpoints:
– After Row 10, the rows run straight up and down.
– After Row 20, the tip edge points down. It is 2.4 in (6.1 cm) wide and sits about 0.4 in (1.0 cm) left of the shaft, level with the top of Row 27.
– The hook is 7.3 in (18.5 cm) wide, with an inner opening of about 1.5 in (3.8 cm).
Appliqués
Poinsettia (red):
– Rnd 1: Make a magic ring, work 10 sc in the ring and join. (10 sts)
– Rnd 2 (small petals), in FLO: Ch 6. Starting in the 2nd ch from the hook, work sl st, sc, hdc, dc, hdc. Sk 1 sc, sl st in the next sc; repeat from * 5 times in total. (5 petals)
– Rnd 3 (large petals), in the BLO of the skipped sc from Rnd 1: Ch 8. Starting in the 2nd ch from the hook, work sl st, sc, hdc, dc, tr, dc, hdc. Sl st in the next skipped sc; repeat from * 5 times in total. (5 petals)
The finished flower is 3.0 in (7.6 cm) across. Sew the 3 beads to the center.
Holly leaf (green, make 4): Ch 9. Starting in the 2nd ch from the hook, work sc, hdc, dc, picot, dc, dc, picot, dc, hdc, then 3 sc in the last ch. Working along the other side of the chain, work hdc, dc, picot, dc, dc, picot, dc, hdc, sc. Sl st in the skipped tip ch, make a picot and fasten off. The leaf is 1.5 in (3.8 cm) long.
Berry (red, make 3):
– Rnd 1: Make a magic ring and work 6 sc in it. (6 sts)
– Rnd 2: Sc in each st. (6 sts)
Stuff the berry and cinch it closed. Each berry is 0.5 in (1.3 cm) across.
Strap (red): Ch 6. Sc in the 2nd ch from the hook and in each ch across. (5 sts) Work 62 more rows of sc, for 63 rows in total. The strap measures 0.8 in (2.0 cm) x 9.0 in (22.9 cm).
Cross band (red, make 4): Ch 15. Sc in the 2nd ch from the hook and in each ch across. (14 sts) Work 3 more rows of sc. Each band measures 2.3 in (5.8 cm) x 0.6 in (1.5 cm).
Border
Border gauge: 6 sc per inch (2.5 cm). Three rounds add 0.4 in (1.0 cm). A dc row-end is about 0.36 in (0.9 cm) tall, so it gets 2 sc. A tr row-end is about 0.55 in (1.4 cm) tall, so it gets 3 sc.
Rnd 1 (white): Join at the bottom right corner and work around in these sections:
- Bottom: 3 sc in the first ch, sc in the next 15 ch, 3 sc in the last ch (21 sts)
- Right side: 2 sc per row-end (54 sts)
- Hook outer edge: 3 sc per row-end (60 sts)
- Tip: 3 sc in the first st, sc 11, 3 sc in the last st (17 sts)
- Hook inner edge: 1 sc per 2 row-ends (10 sts)
- Notch: sc in the first 5 sts, 3 sc in the corner st (8 sts)
- Left side: 2 sc per row-end (54 sts)
Join and fasten off. (224 sts: 21 + 54 + 60 + 17 + 10 + 8 + 54)
Rnd 2 (red): Sc in each st around, except:
– Work 3 sc in the center st of each of the 5 corner groups (+10).
– Work sc2tog where the inner edge meets the notch (−1).
– On the outer edge, work 2 sc in every 20th st (+3).
– After the 32nd st of the outer edge, ch 14 for the hanging loop. This chain is not counted.
(236 sts: 25 + 54 + 63 + 21 + 9 + 10 + 54)
Rnd 3 (red): Work as Rnd 2, but make the outer-edge increases in every 21st st and work 24 sc into the loop. The loop stitches are not counted. (248 sts: 29 + 54 + 66 + 25 + 8 + 12 + 54) Fasten off.
Where the tip’s border touches the left side’s border, join them with 3 red whipstitches.
Why the math works:
– Convex corners gain 2 sts per round, so they stay flat.
– The concave notch loses 1 st per round, so it doesn’t ruffle.
– The outer curve grows about π x 0.14 in (0.4 cm) per round, which is about 3 sc. That matches the 3 increases.
– The straight sides stay at 54 sts, which holds the shaft at 5.3 in (13.5 cm).
Final Blocking
- Weave in all ends through stitches of the same color.
- Soak the panel in cool water and roll it in a towel to remove excess water.
- Pin it to 5.3 in (13.5 cm) at the shaft, 8.1 in (20.6 cm) across the hook and 14.2 in (36.1 cm) tall. Use a pin tip to open each lily and each crossed pair.
- Smooth the curve of the hook, pin out the holly points and let everything dry completely. Light starch is optional.
- Assembly:
- Center the strap on the shaft with its bottom end 1.5 in (3.8 cm) above the bottom border. Sew down only the top 4 rows and the bottom 4 rows.
- Sew each band across the strap at the band’s center, stitching through the strap only. Place the first band 1.5 in (3.8 cm) from the bottom of the strap and the others 2 in (5.1 cm) apart.
- Sew the poinsettia over the top of the strap, with one leaf on its left and one at its lower right.
- Sew 2 leaves in a V at the bottom center and place the 3 berries between them.
Final Quality-Control Checklist
- Every shaft row from Row 3 to Row 27 has 25 sts.
- There are 4 white lily bands and 3 red bands of 3 rows each.
- The hook has 20 rows: 19, then 16, then 13 sts.
- The border rounds have 224, 236 and 248 sts.
- The piece measures 5.3 in (13.5 cm) x 14.2 in (36.1 cm).
- The strap slides freely between its sewn ends.
- The hanging loop is secure.
Troubleshooting
- The hook doesn’t curl enough: Change the last 2 tr of each row to dtr.
- The hook cups: Change the inner sl st to sc.
- The lilies look flat: Pull up each puff loop to full dc height.
- The border ripples: Leave out one outer-edge increase per round.
- The border pulls in: Add 1 sc on each long side every 10 row-ends.
- The strap sags: Tack it down at its midpoint.
Care
Remove any cords, then hand wash in cool water and lay flat to dry.
Final Notes
The measurements build on each other. A gauge of 22 sts per 4 in (10.2 cm) gives a 25-st shaft that is 4.5 in (11.4 cm) wide. Twenty-seven rows bring the shaft to 9.8 in (24.9 cm), and the 20-row hook adds 3.6 in (9.1 cm). A 0.4 in (1.0 cm) border finishes the piece at 5.3 in (13.5 cm) x 14.2 in (36.1 cm). Check each step as you go, and your candy cane will hang straight and hold cords neatly all season.
Happy crocheting!