

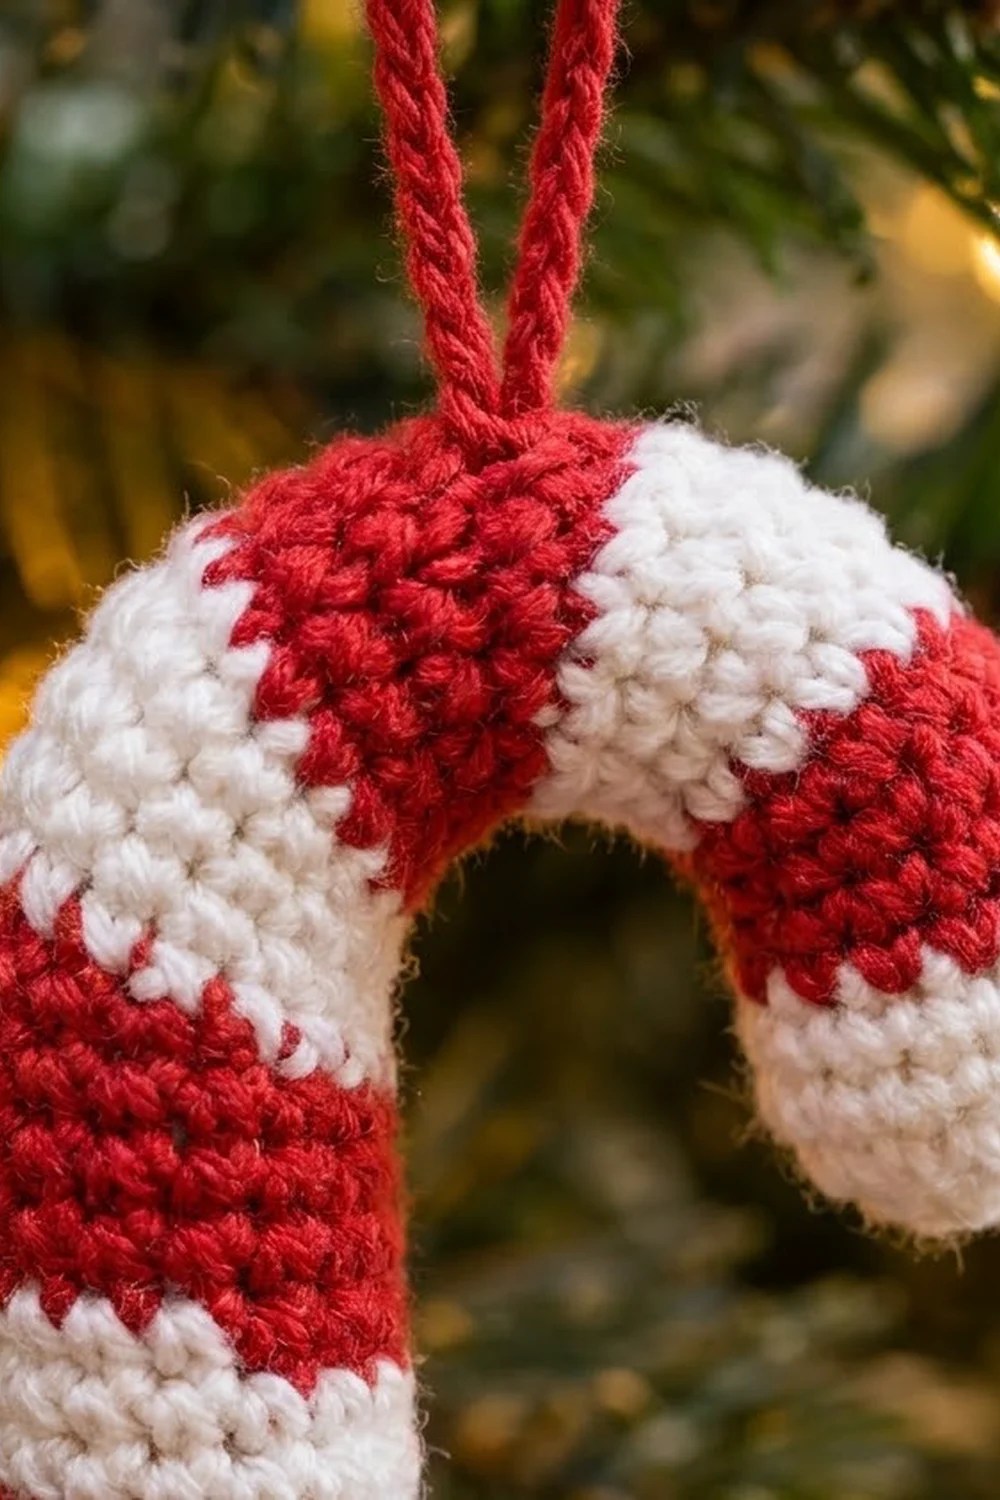
This ornament is one solid candy cane. You crochet it as a narrow tube with red and white stripes that slant around it, just like a real peppermint stick. A chenille stem inside holds the hook shape, and a red chain loop at the top of the curve lets it hang from a branch.
Only two colors are used: a bright Christmas red and a clean white. The stripes come from simple tapestry crochet in single crochet. Both ends are closed in white, so the tip of the hook and the bottom of the shaft look neat and rounded.
The pattern uses US crochet terms. The finished cane is about 6 in (15.2 cm) tall and 2 in (5.1 cm) wide across the hook. The tube is about 1/2 in (1.3 cm) thick. Before you bend it, the straight tube is about 8 in (20.3 cm) long.
Construction is quick. Start at the bottom with a magic ring and work 48 rounds in a continuous spiral of 10 stitches. Insert a chenille stem before you close the top. Then bend the hook and add the hanging loop.
Finished Size and Construction
- Finished size: about 6 in (15.2 cm) tall x 2 in (5.1 cm) wide across the hook
- Skill level: Easy to Intermediate (basic tapestry color changes)
- Terminology: US crochet terms
- Yarn weight: Sport weight (#2), cotton or cotton blend
- Hook: 2.75 mm (C-2)
- Number of pieces: 1 single tube, plus a chain loop attached at the end
- Layout: one standalone ornament; no joining
- Piece size: tube 8 in (20.3 cm) long x 1/2 in (1.3 cm) thick before bending
- Size before border: same as finished size
- Border depth: none; the piece has no border
Materials
Choose a smooth, mercerized or combed cotton in sport weight. Cotton shows each stitch clearly and keeps the stripes crisp. A fuzzy acrylic will blur the slanted stripes, so avoid it if you can.
Yarn:
– Red: 7 g, about 21 m (23 yd), for stripes and the hanging loop
– White: 7 g, about 21 m (23 yd), for stripes and both end caps
These quantities include a margin of about 15% for gauge testing and tails. One small ball of each color will make many ornaments.
Tools and notions:
– 2.75 mm (C-2) crochet hook
– 1 chenille stem (pipe cleaner), 12 in (30.5 cm) long, white or red
– A small pinch of polyester fiberfill
– Stitch marker
– Tapestry needle
– Scissors
– Small wire cutters or old scissors for the chenille stem
Abbreviations (US Terms)
- MR – magic ring
- ch – chain
- sc – single crochet
- sc2tog – single crochet 2 together (invisible decrease recommended)
- sl st – slip stitch
- st(s) – stitch(es)
- rnd(s) – round(s)
- R – red
- W – white
Special technique – tapestry color change: Work the last sc before a color change until 2 loops remain on the hook. Drop the old color, yarn over with the new color, and pull through both loops. Lay the unused color along the tops of the stitches and work over it so it travels inside the tube. Keep the carried strand relaxed, not tight.
Gauge and Checkpoints
Gauge: 6 sc x 6 rnds = 1 in (2.5 cm) in sc worked in the round.
The easiest gauge test is the ornament itself. Work Rnds 1–14, then measure before you go further.
Checkpoints:
– After Rnd 2: flat circle of 10 sts, about 1/2 in (1.3 cm) across.
– After Rnd 14: tube about 2 1/3 in (5.9 cm) long and 1/2 in (1.3 cm) thick, with one full diagonal red stripe and one full white stripe.
– After Rnd 24: tube about 4 in (10.2 cm) long.
– After Rnd 36: tube about 6 in (15.2 cm) long.
– After Rnd 48: tube about 8 in (20.3 cm) long.
If your tube is too big (wider than about 5/8 in, or 1.6 cm), go down to a 2.5 mm hook. Loose sc can also let the carried strand show through.
If your tube is too small (tight and stiff, hard to fit the chenille stem into), go up to a 3.0 mm hook.
The stitch count stays at 10 for the whole body, so any size change comes from gauge alone.
Pattern: The Candy Cane Tube
Work in a continuous spiral. Do not join rounds. Place a marker in the first st of each rnd and move it up as you go.
Bottom Cap (White)
Rnd 1: With W, MR, 5 sc in ring. Pull the ring closed. (5 sts)
Rnd 2: 2 sc in each st around. (10 sts)
Rnd 3: Sc in each st around. (10 sts)
Rnd 4: Sc in each st around. Change to R in the last st. (10 sts)
The bottom cap is now a small white cup about 1/2 in (1.3 cm) wide.
Diagonal Stripes (Rnds 5–44)
From here on, work every rnd with both colors and carry the unused color inside. The stripe pattern moves forward by 1 stitch each rnd, which turns straight stripes into a slanted spiral.
Simple rule: Work each sc in the same color as the stitch just before the one you are working into. Once the first rnd is set up, the fabric shows you which color comes next.
Written stripe cycle (10 rnds):
- Rnd 5: 5 sc R, 5 sc W. (10 sts)
- Rnd 6: 1 sc W, 5 sc R, 4 sc W. (10 sts)
- Rnd 7: 2 sc W, 5 sc R, 3 sc W. (10 sts)
- Rnd 8: 3 sc W, 5 sc R, 2 sc W. (10 sts)
- Rnd 9: 4 sc W, 5 sc R, 1 sc W. (10 sts)
- Rnd 10: 5 sc W, 5 sc R. (10 sts)
- Rnd 11: 1 sc R, 5 sc W, 4 sc R. (10 sts)
- Rnd 12: 2 sc R, 5 sc W, 3 sc R. (10 sts)
- Rnd 13: 3 sc R, 5 sc W, 2 sc R. (10 sts)
- Rnd 14: 4 sc R, 5 sc W, 1 sc R. (10 sts)
Every rnd has exactly 5 red and 5 white sts. Check this count often. It is the fastest way to catch a mistake.
Rnds 15–24: Repeat Rnds 5–14. (10 sts each rnd)
Stuff the base: Push a thin wisp of fiberfill into the bottom cap only. Do not stuff the stripe section yet.
Rnds 25–34: Repeat Rnds 5–14. (10 sts each rnd)
Rnds 35–44: Repeat Rnds 5–14. Change to W at the end of Rnd 44 and cut R, leaving a 4 in (10.2 cm) tail to weave in later. (10 sts each rnd)
You now have 4 full stripe cycles: four red and four white slanted stripes running up the tube.
Prepare the Chenille Stem
Trim the chenille stem to 7 in (17.8 cm). Fold each end back by 1/4 in (0.6 cm) and pinch it flat so no wire points can poke through the stitches. The prepared stem is about 6 1/2 in (16.5 cm) long.
Slide the stem down through the open top until it rests against the bottom cap. Use the back of your hook to push tiny wisps of fiberfill down along the sides of the stem, just enough to round out the tube. The tube should feel firm but not bulging.
Top Cap (White)
Rnd 45: With W, sc in each st around. (10 sts)
Rnd 46: Sc in each st around. (10 sts)
Rnd 47: Sc in each st around. (10 sts)
Add a final tiny wisp of fiberfill above the stem.
Rnd 48: Sc2tog 5 times. (5 sts)
Fasten off, leaving a 6 in (15.2 cm) tail. Thread it onto the tapestry needle, weave it through the front loops of the last 5 sts, and pull to close. Hide the tail inside the tube.
Shape the Hook
Measure 5 in (12.7 cm) up from the bottom of the tube, which is about the top of Rnd 30. Everything above that point becomes the hook.
Bend the top 3 in (7.6 cm) of the tube over in a smooth curve so the white top cap points downward. Aim for a hook about 2 in (5.1 cm) wide from outer edge to outer edge. Roll the tube a little in your fingers as you bend so the stripes stay smooth on the outside of the curve.
Hanging Loop
With R, ch 30, leaving a 6 in (15.2 cm) tail at each end. Fold the chain in half to make a loop about 3 in (7.6 cm) tall.
Find the highest point of the curve, around Rnd 37. Thread one tail onto the needle, pass it into the tube under 2 sts, and bring it out again. Repeat with the other tail through the neighboring sts. Tie the tails in a firm square knot and hide the ends inside the tube.
Border
This ornament has no border. A border would add bulk to a 1/2 in (1.3 cm) tube and hide the clean white end caps.
The closed caps act as the finished edges instead. That keeps the math simple: the tube holds 10 sts from Rnd 2 through Rnd 47, so there are no extra edge stitches to count or balance. Rnd 1 has 5 sts, Rnd 2 doubles that to 10, and Rnd 48 halves it back to 5, mirroring the bottom exactly. The stripe cycle keeps 5 red and 5 white sts in every rnd, so the width never drifts. The tube length is simply 48 rnds ÷ 6 rnds per in = 8 in (20.3 cm).
Final Blocking
- Check the shape. The shaft should be straight and the hook evenly curved.
- Hold a steam iron or garment steamer about 1 in (2.5 cm) above the ornament. Never press the iron onto the stitches.
- Steam the shaft for a few seconds, then roll it between your palms to even out the stitches.
- Steam the curve and gently adjust it until the hook is about 2 in (5.1 cm) wide.
- Lay the ornament flat on a towel and let it cool and dry completely, about 15 minutes.
- Do not wet block. Soaking the piece could rust the wire in the chenille stem.
Final Quality-Control Checklist
- Total height is about 6 in (15.2 cm).
- Hook width is about 2 in (5.1 cm).
- Tube thickness is about 1/2 in (1.3 cm) along the whole length.
- Every striped rnd has 5 red and 5 white sts.
- Stripes slant in one smooth direction, with no sudden vertical jumps.
- Both end caps are fully white and closed with no holes.
- No wire ends can be felt through the stitches.
- Carried strands do not show between stitches.
- The hanging loop is centered on top of the curve and knotted firmly.
- All tails are hidden inside the tube.
Troubleshooting
The stripes run straight up instead of slanting. The color pattern did not shift by 1 st per rnd. Follow the rule: use the same color as the stitch just before the one you are working into.
The other color shows through. Your stitches are too loose or the carried strand is too tight. Go down a hook size and keep the carried strand relaxed.
The tube twists or leans. This is normal for a spiral. Roll the tube between your palms during steam blocking, and keep the bend gentle.
The stem pokes through. The wire ends were not folded back. If the top is still open, pull the stem out, fold the ends, and put it back. If the piece is already closed, add a little more fiberfill around the tip.
The hook will not hold its shape. The stem is too thin or too short. Use a standard chenille stem, or twist two together.
The top cap has a hole. Weave the closing tail through the front loops only, and pull firmly before hiding the tail.
Care
Spot clean with a damp cloth and mild soap, then let the ornament air dry. Do not machine wash or soak it, because the wire stem inside could rust.

Final Notes
The measurement chain is short and easy to follow. A gauge of 6 sc x 6 rnds = 1 in (2.5 cm) gives a 10-stitch tube about 1/2 in (1.3 cm) thick. Forty-eight rnds make an 8 in (20.3 cm) tube. Bending the top 3 in (7.6 cm) leaves a 5 in (12.7 cm) shaft and a hook about 2 in (5.1 cm) wide. The finished ornament stands about 6 in (15.2 cm) tall.
Make one to check your gauge, then make a whole batch for your tree or to use as gift toppers.
Happy crocheting!