

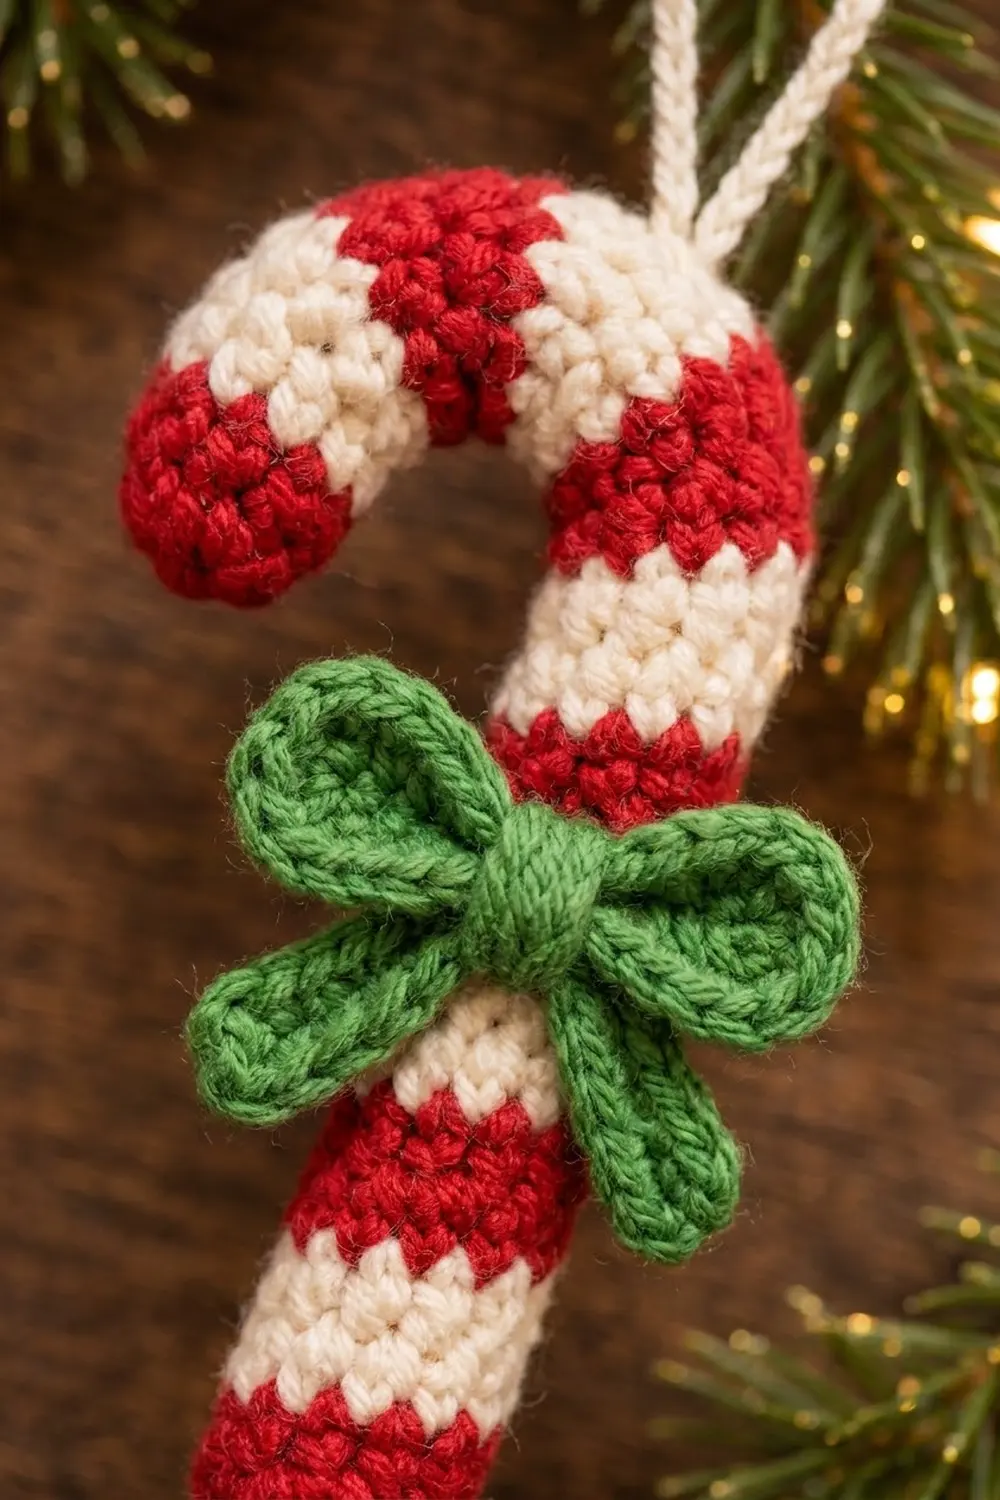
This little candy cane is a classic Christmas ornament made as a firm amigurumi tube. Red and cream stripes run from the rounded bottom tip all the way to the tip of the hook. A green bow sits just below the curve, and a cream chain loop hangs it on the tree.
There are three colors: bright Christmas red, soft cream, and holly green. The stitches are tight single crochet worked in a spiral, which gives the stripes a pebbly peppermint texture. Every stripe is exactly 3 rounds tall, so the stripes stay even along the whole cane.
The pattern uses US crochet terms. The finished ornament is about 6 in (15.2 cm) tall without the hanging loop and 2 in (5.1 cm) wide across the hook. The stuffed tube is about 0.75 in (1.9 cm) thick.
Construction is simple:
1. Crochet one straight striped tube from the bottom up.
2. Add a chenille stem inside, close the tip, and bend the top into a hook.
3. Make two small flat bow pieces and edge them with slip stitches.
4. Stack and wrap the bow pieces into a bow.
5. Sew on the bow and a chain hanging loop.
Finished Size and Construction
- Finished size: about 6 in (15.2 cm) tall x 2 in (5.1 cm) wide, plus a 2.5 in (6.4 cm) hanging loop
- Skill level: Easy
- Terminology: US crochet terms
- Yarn weight: Worsted (#4)
- Hook: 3.5 mm (E-4)
- Number of pieces: 1 ornament (one striped tube, a 2-part bow, and a chain loop)
- Layout: single ornament, with the bow centered on the shaft just below the curve
- Tube size before bending: 7.8 in (19.8 cm) long x 0.75 in (1.9 cm) thick
- Bow loop strip before border: 4 in (10.2 cm) x 0.6 in (1.5 cm)
- Bow tail strip before border: 3 in (7.6 cm) x 0.4 in (1.0 cm)
- Border depth (bow pieces only): about 0.1 in (0.3 cm) on every edge
Materials
Use a smooth worsted-weight yarn in acrylic or cotton. Smooth yarn shows the stripes clearly and holds its shape when stuffed. Avoid fuzzy or loosely spun yarn, because stuffing will show through the stitches.
- Red: 6 g / 12 m (13.1 yd)
- Cream: 6 g / 12 m (13.1 yd), including the hanging loop
- Green: 4 g / 8 m (8.7 yd), including the wrap for the bow center
These amounts include a small margin for swatching, color-change tails, and sewing.
Tools:
- 3.5 mm (E-4) crochet hook
- Polyester fiberfill (a small handful)
- 1 chenille stem (pipe cleaner), 12 in (30.5 cm) long
- Scissors and wire snips (or an old pair of scissors)
- Tapestry needle
- Stitch marker
- Ruler or tape measure
Abbreviations (US Terms)
- ch: chain
- MR: magic ring
- sc: single crochet
- sc2tog: single crochet 2 together (invisible decrease recommended: insert the hook in the front loops of the next 2 sts, yo, pull through both front loops, yo, pull through 2 loops)
- sl st: slip stitch
- st(s): stitch(es)
- yo: yarn over
- Rnd: round
- ( ): stitch count at the end of the round or row
Special technique (clean color change): Work the last sc of the old color until 2 loops remain on the hook. Drop the old color, yo with the new color, and pull it through. Carry the unused color loosely inside the tube; don’t cut it. The tube is closed and stuffed, so the carried strand stays hidden.
Gauge and Checkpoints
Gauge: 5 sc and 5 rnds = 1 in (2.5 cm) in tight spiral sc with a 3.5 mm hook.
Gauge controls the cane’s length and thickness. Test it by working Rnds 1–12 of the tube (the first 4 stripes) before you go further.
Checkpoints:
- After Rnd 2: the flat disc is about 0.75 in (1.9 cm) across.
- After Rnd 12: the tube is about 2.4 in (6.1 cm) long. Unstuffed and laid flat, it is about 1.2 in (3.0 cm) wide.
- After Rnd 24: about 4.8 in (12.2 cm) long.
- After Rnd 36: about 7.2 in (18.3 cm) long.
- Finished tube: about 7.8 in (19.8 cm) long and 0.75 in (1.9 cm) thick when stuffed.
If your piece is too big: change to a 3.25 mm or 3 mm hook. A loose tube shows stuffing and won’t hold the bend well.
If your piece is too small: change to a 3.75 mm hook, but keep the fabric firm. Don’t add rounds, because the stripe schedule depends on the 39-round count.
Main Pattern: Striped Candy Cane Tube
Work in a continuous spiral and don’t join rounds. Place a marker in the first st of each round and move it up as you go.
Stripe schedule: Every stripe is 3 rounds. Change color in the last st of Rnds 3, 6, 9, 12, 15, 18, 21, 24, 27, 30, 33, and 36.
| Rounds | Color |
|---|---|
| 1–3, 7–9, 13–15, 19–21, 25–27, 31–33, 37–39 | Red |
| 4–6, 10–12, 16–18, 22–24, 28–30, 34–36 | Cream |
That gives 7 red stripes and 6 cream stripes, so the cane starts and ends in red.
Bottom tip (red):
- Rnd 1: In a MR, work 6 sc. Pull the ring closed. (6)
- Rnd 2: Work 2 sc in each st around. (12)
- Rnd 3: Sc in each st around. Change to cream in the last st. (12)
Rnd 2 is the only increase round. It makes the small rounded dome at the bottom tip.
Shaft:
- Rnds 4–6 (cream): Sc in each st around. Change to red in the last st of Rnd 6. (12)
- Rnds 7–9 (red): Sc in each st around. Change to cream in the last st of Rnd 9. (12)
- Rnds 10–33: Keep working sc, 12 sts every round, following the stripe schedule. Change colors at the end of Rnds 12, 15, 18, 21, 24, 27, 30, and 33. (12 in every round)
Stuff the tube lightly as you go, every 2–3 stripes. Push the stuffing down with the back of your hook so the bottom tip stays round and firm.
Insert the chenille stem (after Rnd 33):
Cut the chenille stem to 7 in (17.8 cm). Fold each end back 0.25 in (0.6 cm) so no wire tips poke out. Push the stem down the center of the tube until it touches the bottom tip. Add a little stuffing around it so the stem stays centered and can’t be felt from the outside.
- Rnds 34–36 (cream): Sc in each st around. Change to red in the last st of Rnd 36. (12)
- Rnds 37–38 (red): Sc in each st around. (12)
Top up the stuffing around the stem. The top of the stem should sit just below Rnd 38.
Hook tip (red):
- Rnd 39: Sc2tog 6 times. (6)
Fasten off with a 6 in (15.2 cm) tail. Thread the tail on the tapestry needle, weave it through the front loops of the 6 remaining sts, and pull tight to close. Bury the tail inside. Rnd 39 finishes the last red stripe (Rnds 37–39).
Weave in the MR tail at the bottom by passing it through the tube and trimming it.
Bend the hook:
Turn the tube so the color-change jogs face the back. Measure 3 in (7.6 cm) down from the closed top tip and bend the tube there into a smooth, rounded U, curving the tip down to one side. Shape it with your fingers until the outside of the hook is about 2 in (5.1 cm) across. The tip should hang about 1 in (2.5 cm) below the top of the curve.
Bow
The bow is made from two flat green pieces: a loop strip and a tail strip. Both get a slip-stitch border before assembly.
Loop strip (green):
- Ch 21.
- Row 1: Sc in the 2nd ch from the hook and in each ch across. (20)
- Row 2: Ch 1, turn. Sc in each st across. (20)
- Row 3: Ch 1, turn. Sc in each st across. (20)
Don’t fasten off; go straight into the border. Before the border, the strip is 4 in (10.2 cm) x 0.6 in (1.5 cm).
Tail strip (green):
- Ch 16.
- Row 1: Sc in the 2nd ch from the hook and in each ch across. (15)
- Row 2: Ch 1, turn. Sc in each st across. (15)
Don’t fasten off; go straight into the border. Before the border, the strip is 3 in (7.6 cm) x 0.4 in (1.0 cm).
Border: Slip-Stitch Edging on the Bow Pieces
The tube has no border; its two closed, rounded ends are the finish. The border goes only on the two bow pieces. It gives them the crisp raised outline you see on the bow loops and tails.
Border gauge: Work 1 sl st per sc along the long sides and 1 sl st per row-end along the short sides. Keep the slip stitches loose, at the same height as the sc, so the edge lies flat.
Loop strip border (1 round):
- Without turning, work down the short side: 1 sl st in each row-end. (3)
- Along the foundation chain: 1 sl st in each ch. (20)
- Up the second short side: 1 sl st in each row-end. (3)
- Along Row 3: 1 sl st in each st. (20)
- Join to the first sl st. (46 sl st total: 20 + 3 + 20 + 3)
Tail strip border (1 round):
- Down the short side: 1 sl st in each row-end. (2)
- Along the foundation chain: 1 sl st in each ch. (15)
- Up the second short side: 1 sl st in each row-end. (2)
- Along Row 2: 1 sl st in each st. (15)
- Join to the first sl st. (34 sl st total: 15 + 2 + 15 + 2)
Fasten off both pieces, leaving 8 in (20.3 cm) tails for sewing.
Why the math works: Each side gets exactly one sl st per existing stitch or row-end, and no extra corner stitches are added, so nothing is counted twice. The long sides match the 20 and 15 sts in the rows, and the short sides match the 3 and 2 rows. Because the border matches the edge 1 to 1, it doesn’t ruffle or pull in. It adds only about 0.1 in (0.3 cm) on every edge. With the border, the loop strip is about 4.2 in (10.7 cm) x 0.8 in (2.0 cm), and the tail strip is about 3.2 in (8.1 cm) x 0.6 in (1.5 cm).
Assemble the bow:
- Lay the loop strip flat. Fold both short ends to the center so they overlap by about 0.2 in (0.5 cm). This makes two loops, each about 1 in (2.5 cm) long.
- Fold the tail strip in half into a V. Place it behind the center of the loops, with the fold at the top and the two ends angled down and out.
- Pinch the center of both pieces together. Wrap a 24 in (61.0 cm) length of green yarn tightly around the pinch 6–8 times to form the knot. Tie it off at the back, leaving the ends for sewing.
The finished bow is about 2 in (5.1 cm) across the loops. Each tail hangs about 1.25 in (3.2 cm) below the knot.
Attach the bow: Place the bow on the front of the shaft, centered just below where the curve starts. Using the wrap ends, sew through the knot and the tube 3–4 times. Add one small stitch behind each loop to keep the loops flat against the cane.
Hanging loop (cream): Ch 30, which is about 5 in (12.7 cm). Fasten off, leaving 6 in (15.2 cm) tails at both ends. Fold the chain in half and sew both ends to the top of the curve, so the loop stands about 2.5 in (6.4 cm) tall.
Final Blocking
- Check the shape first. The tube should be evenly stuffed and the hook smoothly rounded.
- Lightly mist the bow with water, or hold a steam iron 1 in (2.5 cm) above it without touching. Never press an iron onto acrylic.
- Pat the bow loops into rounded shapes and straighten the tails into a neat V.
- Roll the shaft gently between your palms to even out the stitches and settle the stripes.
- If the hook has lost its curve, reshape it around a marker or dowel about 1.25 in (3.2 cm) thick.
- Let the ornament dry completely, lying flat, before you hang it.
Final Quality-Control Checklist
- The tube is 7.8 in (19.8 cm) long before bending and has 39 rounds.
- There are 7 red stripes and 6 cream stripes, each 3 rounds tall.
- Both ends are red, rounded, and fully closed.
- You can’t feel the chenille stem at either tip.
- No stuffing shows between the stitches.
- The color-change jogs face the back.
- The hook is about 2 in (5.1 cm) across.
- The bow borders have 46 and 34 sl st and lie flat.
- The bow is centered just below the curve and sewn on securely.
- The hanging loop is firmly attached at the top of the curve.
Troubleshooting
Stuffing shows through: Your gauge is too loose. Go down a hook size and tighten your tension.
Stripes look staggered: This is the normal spiral jog. Turn the jogs to the back before bending.
The hook won’t hold its curve: Use a thicker stem, or twist two stems together.
The cane kinks at the bend: There’s too much stuffing in the curve. Remove a little and re-bend slowly.
Bow edges ruffle: You added extra sl st. Recount: 46 on the loop strip and 34 on the tail strip.
Bow loops flop: Tighten the center wrap and add a stitch behind each loop.
Care
Spot clean with a damp cloth and mild soap, then air dry flat. Don’t machine wash it, because the chenille stem inside can bend or rust.

Final Notes
The measurement chain is simple:
– A gauge of 5 sc and 5 rnds per 1 in (2.5 cm) gives a 12-st tube 0.75 in (1.9 cm) thick.
– 39 rounds give 7.8 in (19.8 cm) of tube.
– Bending the top 3 in (7.6 cm) gives a cane about 6 in (15.2 cm) tall and 2 in (5.1 cm) wide.
– The bow strips of 20 and 15 sts each get a 1-to-1 slip-stitch border, so they stay flat and make a bow about 2 in (5.1 cm) wide.
Make one, check your stripes, and then make a whole set for the tree.
Happy crocheting!