

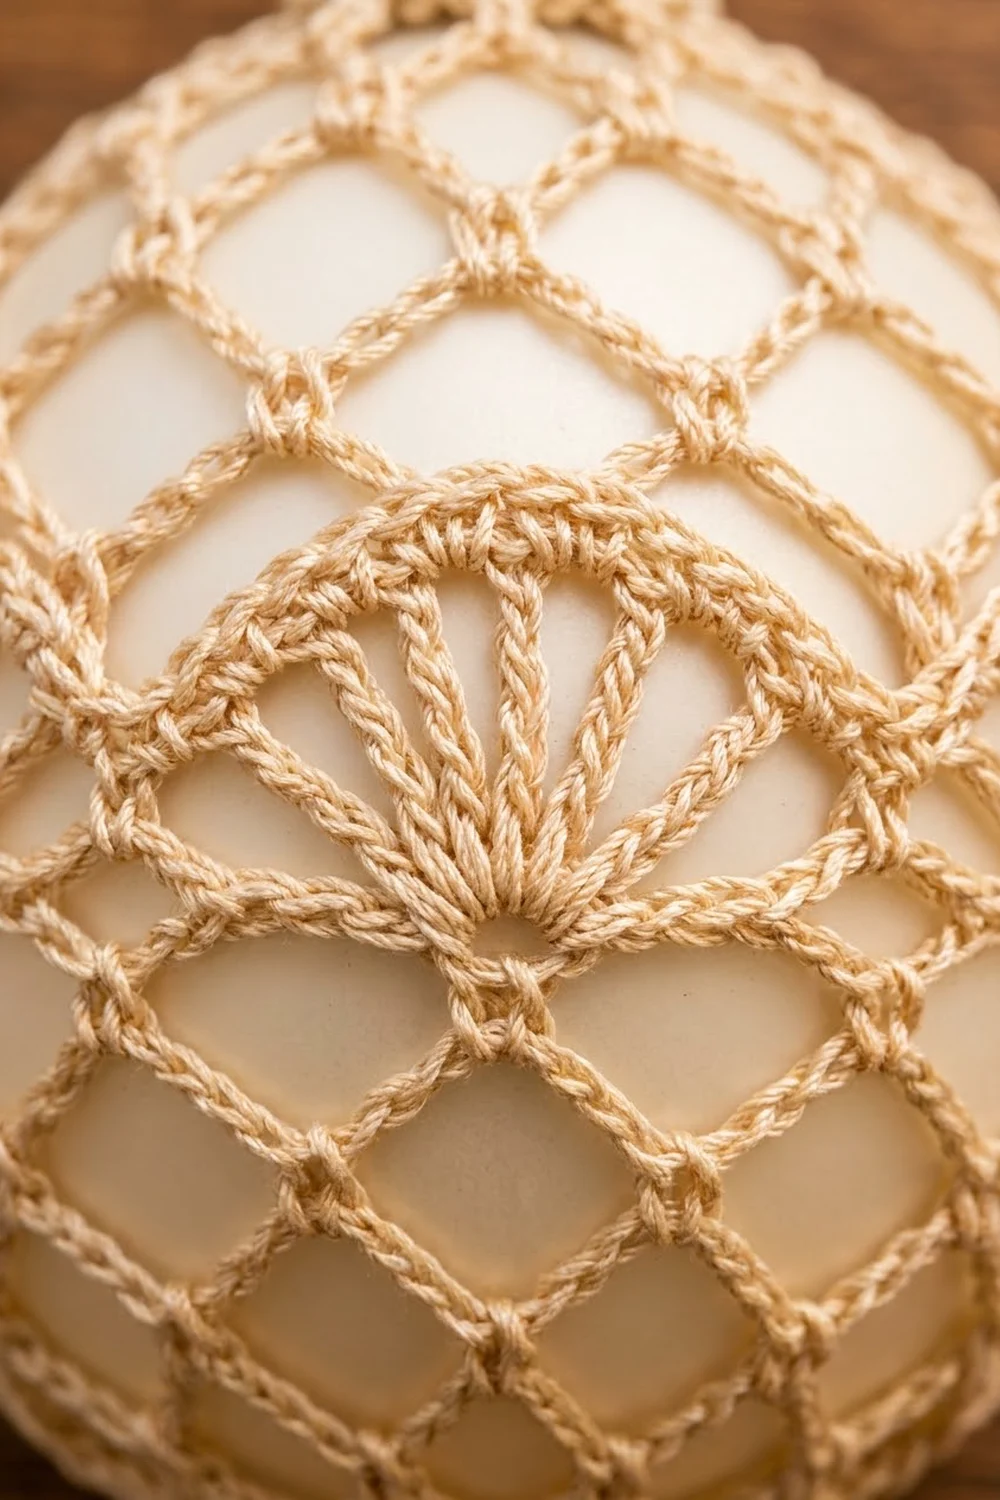
This lace cover fits over a plain glass or shatterproof ball and turns it into a vintage-style heirloom ornament. It starts with a small solid collar that sits around the ornament cap. Below that, a diamond net of chain loops opens out over the top of the ball. A row of open fans with a picot edge finishes it just below the widest point.
The sample is worked in champagne (light gold) cotton thread over a matte cream ball, with a cream twisted-cord hanger. Pale thread on a pale ball gives a soft, tone-on-tone look. It also works well as white over red, or gold over deep green.
The pattern uses US crochet terms. The finished cover is about 3 in (7.6 cm) tall and 4.5 in (11.4 cm) wide laid flat, and it fits a 3 in (7.6 cm) ball ornament.
The whole cover is one piece, worked top-down in joined rounds without turning. First you make the collar ring. Then come five mesh rounds, followed by a fan round and a picot round that form the border. A simple twisted cord finishes it.
Finished Size and Construction
- Finished size (flat): 3 in (7.6 cm) tall x 4.5 in (11.4 cm) wide
- Fits: 3 in (7.6 cm) diameter ball ornament
- Skill level: Easy to intermediate
- Terminology: US
- Yarn weight: Size 3 crochet thread (Lace / 0)
- Hook: 2.25 mm (B-1)
- Number of pieces: 1 cover, plus 1 twisted-cord hanger
- Layout: Joined rounds, worked top-down from the collar
- Collar: 3.4 in (8.6 cm) around, 0.5 in (1.3 cm) tall
- Size before border (after Rnd 8): 2.25 in (5.7 cm) tall
- Border depth: 0.75 in (1.9 cm)
Materials
Use a mercerized cotton thread in size 3. It holds its shape, shows each stitch clearly and blocks well. A metallic-blend thread looks festive too, but it is slippery, so keep your tension even.
- Champagne / light gold (Color A): 10 g, about 27 m, for the cover
- Cream (Color B): 2 g, about 5 m, for the twisted-cord hanger
- One 3 in (7.6 cm) ball ornament with a metal cap (matte is best)
- 2.25 mm (B-1) crochet hook
- Tapestry needle that fits the thread
- Scissors
- Rust-proof pins and a foam blocking surface
- Spray bottle with water, or a light fabric stiffener (optional)
The quantities include a margin of about 25% for the gauge check and weaving in ends.
Abbreviations (US Terms)
- ch: chain
- sl st: slip stitch
- sc: single crochet
- dc: double crochet
- tr: treble crochet
- st(s): stitch(es)
- sk: skip
- sp: space
- rep: repeat
- Rnd: round
Special stitch: picot. Ch 3, then sl st into the front loop and left leg of the sc you just made. This makes a small round bump on top of the edge.
Gauge and Checkpoints
Gauge: 7 dc = 1 in (2.5 cm), and 1 dc round = 0.2 in (0.5 cm), using a 2.25 mm hook.
You don’t need a separate swatch. Work the collar (Rnds 1–3) and measure it. This small, quick section checks your gauge and the fit at the same time.
Checkpoint 1, after Rnd 3: The collar is 3.4 in (8.6 cm) around and 0.5 in (1.3 cm) tall. Slip it over the ornament cap. It should sit snugly without hard stretching.
Checkpoint 2, after Rnd 8: The cover is 2.25 in (5.7 cm) from the top edge of the collar to the bottom tips of the loops. Each mesh round adds about 0.35 in (0.9 cm).
Checkpoint 3, after Rnd 10: The cover is 3 in (7.6 cm) tall and about 4.5 in (11.4 cm) wide laid flat.
If the collar is too big, it slides down past the cap. Go down to a 2 mm hook. Don’t change the starting chain, because the mesh relies on 24 stitches (see the note under Rnd 4).
If the collar is too small, it won’t fit over the cap. Go up to a 2.5 mm hook.
If the mesh is too short to reach the widest point of the ball, add one more ch-7 round before the fan round.
Pattern
Notes before you start: Work every round with the right side facing, and don’t turn. The ch-3 at the start of a dc round counts as a stitch. The ch-1 at the start of an sc round does not. Mark the first sc of each mesh round with a scrap of thread so the join is easy to find.
Collar
With Color A, ch 24 and sl st into the first ch to form a ring. Make sure the chain isn’t twisted.
Rnd 1: Ch 3 (counts as dc), dc in each of the remaining 23 ch, sl st in top of ch-3 to join. (24 dc)
Rnd 2: Ch 3 (counts as dc), dc in each st around, sl st in top of ch-3 to join. (24 dc)
Rnd 3: Ch 1, sc in each st around, sl st in first sc to join. (24 sc)
This firm three-round band grips the ornament cap, and the hanger threads through it.
Diamond Mesh
Every round from here has 12 chain loops. Each round anchors with an sc in the center of a loop from the round before, which creates the diamond net. The loops get longer over three rounds so the net widens over the curve of the ball, then stay at ch-7.
Rnd 4: Ch 1, sc in same st as join, ch 5, sk 1 st, sc in next st; rep from * 10 more times, ch 5, sk last st, sl st in first sc to join. (12 sc, 12 ch-5 loops)*
The sc land in sts 1, 3, 5 and so on through 23, so 24 sts ÷ 2 = 12 loops. The fans in Rnd 9 need an even number of loops, which is why you should change the hook size to fix the fit, not the chain count.
Rnd 5: Sl st in each of next 3 ch (center of first loop), ch 1, sc in same loop, ch 6, sc in next ch-5 loop; rep from * 10 more times, ch 6, sl st in first sc to join. (12 sc, 12 ch-6 loops)*
Rnd 6: Sl st in each of next 3 ch, ch 1, sc in same loop, ch 7, sc in next ch-6 loop; rep from * 10 more times, ch 7, sl st in first sc to join. (12 sc, 12 ch-7 loops)*
Rnd 7: Sl st in each of next 4 ch (center ch of the ch-7), ch 1, sc in same loop, ch 7, sc in next ch-7 loop; rep from * 10 more times, ch 7, sl st in first sc to join. (12 sc, 12 ch-7 loops)*
Rnd 8: Rep Rnd 7. (12 sc, 12 ch-7 loops)
Measure Checkpoint 2 now. Laid flat, the cover looks like a small bell-shaped net with a solid collar on top.
Border
The border has two rounds. The fan round makes six open scallops, and the picot round gives them a neat, bumpy edge.
Border gauge: One fan is about 1.25 in (3.2 cm) across and 0.6 in (1.5 cm) deep. The picot round adds about 0.15 in (0.4 cm), for a total border depth of 0.75 in (1.9 cm).
Rnd 9 (fan round): Sl st in each of next 4 ch, ch 1, sc in same loop, *[tr, (ch 2, tr) 5 times] in next ch-7 loop, sc in next ch-7 loop; rep from * 4 more times, [tr, (ch 2, tr) 5 times] in last ch-7 loop, sl st in first sc to join.
Per repeat: 1 sc + 1 fan (6 tr, 5 ch-2 sps).
Round total: 6 sc and 6 fans (36 tr, 30 ch-2 sps)
The fans go in alternating loops: sc in loop 1, fan in loop 2, sc in loop 3, and so on, ending with a fan in loop 12.
Rnd 10 (picot round): Ch 1 (does not count), *sc in next tr, [(sc, picot, sc) in next ch-2 sp, sc in next tr] 5 times, sl st in next sc; rep from * 5 more times. The last sl st lands in the joining sc of Rnd 9. Fasten off.
Per fan: 6 sc (1 in each tr) + 10 sc added in the ch-2 sps = 16 sc, plus 5 picots and 1 sl st.
Round total: 96 sc, 30 picots, 6 sl sts
Why the math works:
– Mesh: The collar has 24 sts, and one loop per 2 sts gives 12 loops. The mesh keeps 12 loops all the way down, so every diamond sits under the one above.
– Fans: 12 loops ÷ 2 = 6 sc-and-fan pairs. The six scallops are evenly spaced, with no partial repeat at the join.
– Picot edge: Each fan’s 6 tr and 5 ch-2 sps become 16 sc. One sc per tr and two per space keeps the edge flat, without ruffling.
Twisted-Cord Hanger
- Cut 30 in (76.2 cm) of Color B. Fold it in half and knot the ends together.
- Hook the folded end over a doorknob. Twist the strand until it kinks back on itself when you let it slacken.
- Bring the knotted end up to the doorknob and let the halves twist around each other. You now have a cord about 10 in (25.4 cm) long. Knot the loose end and trim.
- Thread the cord through two opposite stitches of Rnd 1 and through the ornament’s cap loop. Tie the ends so the hanging loop stands about 3.5 in (8.9 cm) above the collar.
Final Blocking
- Weave in all ends along the inside of the collar or into a fan, following the stitch path. Don’t trim yet.
- Mist the cover until it’s damp, or dip it in a light stiffener and squeeze out the excess.
- Slip the damp cover over the ornament and settle the collar around the cap.
- Ease each mesh round downward so the sc points line up evenly and every diamond is the same size.
- Pull each fan gently down and spread its tr evenly so the spokes form an open shell. Pinch each picot into a round bump.
- Stand the ornament cap-up in a small cup and let it dry completely on the ball, about 6 to 12 hours.
- Once dry, trim the ends close.
Drying on the ball shapes the cover to its exact curve, so it stays in place. A matte ornament grips the thread better than a glossy one.
Final Quality-Control Checklist
- The collar has 24 sts and measures 3.4 in (8.6 cm) around.
- Every mesh round has exactly 12 loops.
- The diamonds line up in straight columns from the collar to the fans.
- There are 6 fans, each with 6 tr and 5 ch-2 sps.
- Each fan has 5 picots, with a sl st dip between fans.
- Laid flat, the cover is 3 in (7.6 cm) tall and 4.5 in (11.4 cm) wide.
- On the ornament, the fans sit just below the widest point.
- The hanger is secure, through both the collar and the cap loop.
- No ends or knots show on the outside.
Troubleshooting
The mesh spirals or leans. An sc is off-center. Count the sl sts at the start of each round: 3 for ch-5 and ch-6 loops, 4 for ch-7 loops.
You have 11 or 13 loops. A stitch was skipped or doubled in Rnd 4. Rip back to Rnd 3 and skip exactly 1 st between each sc.
The fans ruffle. Your tr are loose. Use a hook half a size smaller for Rnds 9–10, or work dc instead of tr.
The fans look gappy at the base. Pull each tr’s first loop up to full height before you yarn over again.
The picots lean sideways. Work the sl st through the front loop and left leg of the sc.
The cover rides up and shows the cap. Add one more ch-7 round (repeat Rnd 7) before the fans.
The cover slides off the bottom. Remove one ch-7 round so the fans grip the curve below the widest point.
The collar is loose on the cap. Weave a strand of Color A through Rnd 3, pull it snug and tie it off inside.
Care
Dust gently. If the cover needs washing, take it off, hand wash it in cool water and reshape it over the ornament to dry. Store the ornament wrapped in tissue so the picots don’t get crushed.

Final Notes
Here is the measurement chain:
| Stage | Rounds | Size |
|---|---|---|
| Collar | 1–3 | 24 sts; 3.4 in (8.6 cm) around, 0.5 in (1.3 cm) tall |
| Mesh | 4–8 | 12 loops per round; total height 2.25 in (5.7 cm) |
| Border | 9–10 | 6 fans; adds 0.75 in (1.9 cm) |
| Finished cover | 1–10 | 3 in (7.6 cm) tall; fits a 3 in (7.6 cm) ball |
Check each stage before moving on and you’ll rarely need to rip back. Once you’ve made one, try a set in different thread colors.
Happy crocheting!